一、加载Spring配置文件
我们首先指定我们需要加载的Spring配置文件,在tomcat容器启动后,会寻找项目中的web.xml文件,加载其中的信息,
并创建一个ServletContext上下文对象,以后再web应用中可以获得其中的值。
1.1 最先加载的就是<context-param>节点
该节点加载我们的Spring配置文件,配置文件中是我们需要往Spring容器中注册的Bean对象配置。
有两种加载方式,如果在web.xml中不指定<context-param>,会默认去加载/WEB-INF/下的ApplicationContext.xml。
  <context-param>
        <param-name>contextConfigLocation</param-name>
        <param-value>
            /WEB-INF/config/application-context.xml
            /WEB-INF/config/zxw/zxw-context.xml
        </param-value>
    </context-param>
web.xml的配置中<context-param>配置作用:
1. 启动一个WEB项目的时候,容器(如:Tomcat)会去读它的配置文件web.xml.读两个节点: <listener></listener> 和 <context-param></context-param>2.紧接着,容器创建一个ServletContext(上下文),这个WEB项目所有部分都将共享这个上下文.3.容器将<context-param></context-param>转化为键值对,并交给ServletContext.4.容器创建<listener></listener>中的类实例,即创建监听.5.在监听中会有contextInitialized(ServletContextEvent args)初始化方法,在这个方法中获得ServletContext = ServletContextEvent.getServletContext();
context-param的值 = ServletContext.getInitParameter("context-param的键");6.得到这个context-param的值之后,你就可以做一些操作了.注意,这个时候你的WEB项目还没有完全启动完成.这个动作会比所有的Servlet都要早.
换句话说,这个时候,你对<context-param>中的键值做的操作,将在你的WEB项目完全启动之前被执行.7.举例.你可能想在项目启动之前就打开数据库.
那么这里就可以在<context-param>中设置数据库的连接方式,在监听类中初始化数据库的连接.
1.2 加载完配置文件后,需要配置监听器,触发监听事件。
  <listener>
        <listener-class>org.springframework.web.context.ContextLoaderListener</listener-class>
    </listener>
    <listener>
        <listener-class>org.springframework.web.util.IntrospectorCleanupListener</listener-class>
    </listener>
监听器的作用是监听ServletContext的对象是否创建,web容器一旦启动,就会创建一个ServletContext对象,所以监听器一定会触发,从而执行监听器的contextInitialized方法。方法看Spring源码如下
public class ContextLoaderListener extends ContextLoader implements ServletContextListener {
    public ContextLoaderListener() {
    }
    public ContextLoaderListener(WebApplicationContext context) {
        super(context);
    }
//执行的监听器方法
    public void contextInitialized(ServletContextEvent event) {
        this.initWebApplicationContext(event.getServletContext());
    }
    public void contextDestroyed(ServletContextEvent event) {
        this.closeWebApplicationContext(event.getServletContext());
        ContextCleanupListener.cleanupAttributes(event.getServletContext());
    }
}
web.xml
 1 <!DOCTYPE web-app PUBLIC
 2  "-//Sun Microsystems, Inc.//DTD Web Application 2.3//EN"
 3  "http://java.sun.com/dtd/web-app_2_3.dtd" >
 4
 5 <web-app xmlns:xsi="http://www.w3.org/2001/XMLSchema-instance"
 6          xmlns="http://java.sun.com/xml/ns/j2ee"
 7          xsi:schemaLocation="http://java.sun.com/xml/ns/j2ee http://java.sun.com/xml/ns/j2ee/web-app_2_4.xsd
 8          http://xmlns.jcp.org/xml/ns/javaee http://java.sun.com/xml/ns/javaee/web-app_2_5.xsd" id="WebApp_ID" version="2.4">
 9
10   <!-- 项目名称 -->
11   <display-name>spring nacos demo</display-name>
12
13   <!-- 加载spring的xml配置文件到 spring的上下文容器中,配置文件位置和名称:默认为/WEB-INF/applicationContext.xml
15       在param-value里指定相应的xml文件名,如果有多个xml文件,可以使用“,”号分隔。applicationContext-*.xml采用通配符,
18        比如这那个目录下有applicationContext-mybatis.xml,applicationContext-hessian.xml,applicationContext-logic.xml等文件,都会一同被载入-->
21   <context-param>
22     <param-name>contextConfigLocation</param-name>
23     <param-value>classpath*:/spring/spring-context-customer.xml</param-value>
24   </context-param>
25
26
27   <!-- 上下文Spring监听器 在启动web容器时,自动装配Spring的applicationContext.xml的配置信息。
28   ContextLoaderListener继承ContextLoader类,所以加载applicationContext.xml的配置文件过程中由ContextLoader类来完成
30   在配置applicationContext.xml的过程中,如果在web.xml中不写任何参数配置信息
31   默认的路径是/WEB-INF/applicationContext.xml,在WEB-INF目录下创建的xml文件的名称必须是applicationContext.xml
33   如果是要自定义文件名可以在web.xml里加入contextConfigLocation这个context参数 即context-param标签配置-->
34   <listener>
35     <listener-class>org.springframework.web.context.ContextLoaderListener</listener-class>
36   </listener>
39
40   <!-- 字符集过滤器:解决项目中出现的中文乱码问题,在Spring框架中是如何解决从页面传来的字符串的编码问题的呢?
42     下面我们来看看Spring框架给我们提供过滤器CharacterEncodingFilter,这个过滤器就是针对于每次浏览器请求进行过滤的,然后再其之上添加了父类没有的功能即处理字符编码。
44      其中encoding用来设置编码格式,forceEncoding用来设置是否理会 request.getCharacterEncoding()方法,设置为true则强制覆盖之前的编码格式。-->
46   <filter>
47     <filter-name>EncodingFilter</filter-name>
48     <filter-class>org.springframework.web.filter.CharacterEncodingFilter</filter-class>
49     <init-param>
50       <param-name>encoding</param-name>
51       <param-value>UTF-8</param-value>
52     </init-param>
53     <init-param>
54       <param-name>forceEncoding</param-name>
55       <param-value>true</param-value>
56     </init-param>
57   </filter>
58   <filter-mapping>
59     <filter-name>EncodingFilter</filter-name>
60     <url-pattern>/*</url-pattern>
61   </filter-mapping>
62
63   <!--使用Spring MVC,配置DispatcherServlet是第一步。DispatcherServlet是一个Servlet,所以可以配置多个DispatcherServlet-->
64   <!--DispatcherServlet是前置控制器,配置在web.xml文件中的。拦截匹配的请求,
65   Servlet拦截匹配规则要自已定义,把拦截下来的请求,依据某某规则分发到目标Controller(我们写的Action)来处理。-->
66   <servlet>
67     <!--在DispatcherServlet的初始化过程中,框架会在web应用的WEB-INF文件夹下寻找名为[servlet-name]-servlet.xml 的配置文件,生成文件中定义的bean。-->
69     <servlet-name>springServlet</servlet-name>
70     <servlet-class>org.springframework.web.servlet.DispatcherServlet</servlet-class>
71     <!--指明了配置文件的文件名,不使用默认配置文件名,而不使用使用dispatcher-servlet.xml配置文件。-->
72     <init-param>
73       <param-name>contextConfigLocation</param-name>
74       <param-value>classpath*:/spring/spring-mvc.xml</param-value>
75     </init-param>
76     <!--是启动顺序,让这个Servlet随Servletp容器一起启动。-->
77     <load-on-startup>1</load-on-startup>
78   </servlet>
80   <servlet-mapping>
81     <!--这个Servlet的名字是dispatcher,可以有多个DispatcherServlet,是通过名字来区分的。
82     每一个DispatcherServlet有自己的WebApplicationContext上下文对象。同时保存的ServletContext中和Request对象中.-->
83     <!--ApplicationContext是Spring的核心,Context我们通常解释为上下文环境,
84     我想用“容器”来表述它更容易理解一些,ApplicationContext则是“应用的容器”了:P,
85     Spring把Bean放在这个容器中,在需要的时候,用getBean方法取出-->
86     <servlet-name>springServlet</servlet-name>
87     <!--Servlet拦截匹配规则可以自已定义,当映射为@RequestMapping("/user/add")时,为例,拦截哪种URL合适?-->
88     <!--1、拦截*.do、*.htm, 例如:/user/add.do,这是最传统的方式,最简单也最实用。不会导致静态文件(jpg,js,css)被拦截。-->
89     <!--2、拦截/,例如:/user/add,可以实现现在很流行的REST风格。很多互联网类型的应用很喜欢这种风格的URL。
90     弊端:会导致静态文件(jpg,js,css)被拦截后不能正常显示。 -->
91 <!--会拦截URL中带“/”的请求。-->
92     <url-pattern>/</url-pattern>
93   </servlet-mapping>
94
95 </web-app>
二、DispatcherServlet 处理流程
在整个 Spring MVC 框架中,DispatcherServlet 处于核心位置,它负责协调和组织不同组件完成请求处理并返回响应工作。在看 DispatcherServlet 类之前,我们先来看一下请求处理的大致流程:
- Tomcat 启动,对 DispatcherServlet 进行实例化,然后调用它的 init() 方法进行初始化,在这个初始化过程中完成了: 对 web.xml 中初始化参数的加载;建立 WebApplicationContext (SpringMVC的IOC容器);进行组件的初始化;
- 客户端发出请求,由 Tomcat 接收到这个请求,如果匹配 DispatcherServlet 在 web.xml 中配置的映射路径,Tomcat 就将请求转交给 DispatcherServlet 处理;
- DispatcherServlet 从容器中取出所有 HandlerMapping 实例(每个实例对应一个 HandlerMapping 接口的实现类)并遍历,每个 HandlerMapping 会根据请求信息,通过自己实现类中的方式去找到处理该请求的 Handler (执行程序,如Controller中的方法),并且将这个 Handler 与一堆 HandlerInterceptor (拦截器) 封装成一个 HandlerExecutionChain 对象,一旦有一个 HandlerMapping 可以找到 Handler 则退出循环;(详情可以看 [Java]SpringMVC工作原理之二:HandlerMapping和HandlerAdpater 这篇文章)
- DispatcherServlet 取出 HandlerAdapter 组件,根据已经找到的 Handler,再从所有 HandlerAdapter 中找到可以处理该 Handler 的 HandlerAdapter 对象;
- 执行 HandlerExecutionChain 中所有拦截器的 preHandler() 方法,然后再利用 HandlerAdapter 执行 Handler ,执行完成得到 ModelAndView,再依次调用拦截器的 postHandler() 方法;
- 利用 ViewResolver 将 ModelAndView 或是 Exception(可解析成 ModelAndView)解析成 View,然后 View 会调用 render() 方法再根据 ModelAndView 中的数据渲染出页面;
- 最后再依次调用拦截器的 afterCompletion() 方法,这一次请求就结束了。
Servlet的执行过程如下:

三、DispatcherServlet 源码分析
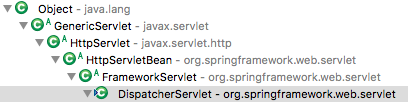
DispatcherServlet 继承自 HttpServlet,它遵循 Servlet 里的“init-service-destroy”三个阶段,首先我们先来看一下它的 init() 阶段。
1 初始化
1.1 HttpServletBean 的 init() 方法
DispatcherServlet 的 init() 方法在其父类 HttpServletBean 中实现的,它覆盖了 GenericServlet 的 init() 方法,主要作用是加载 web.xml 中 DispatcherServlet 的 <init-param> 配置,并调用子类的初始化。下面是 init() 方法的具体代码:

@Override
public final void init() throws ServletException {
    try {
        // ServletConfigPropertyValues 是静态内部类,使用 ServletConfig 获取 web.xml 中配置的参数
        PropertyValues pvs = new ServletConfigPropertyValues(getServletConfig(), this.requiredProperties);
        // 使用 BeanWrapper 来构造 DispatcherServlet
        BeanWrapper bw = PropertyAccessorFactory.forBeanPropertyAccess(this);
        ResourceLoader resourceLoader = new ServletContextResourceLoader(getServletContext());
        bw.registerCustomEditor(Resource.class, new ResourceEditor(resourceLoader, getEnvironment()));
        initBeanWrapper(bw);
        bw.setPropertyValues(pvs, true);
    } catch (BeansException ex) {}
    // 让子类实现的方法,这种在父类定义在子类实现的方式叫做模版方法模式
    initServletBean();
}
1.2 FrameworkServlet 的 initServletBean() 方法
在 HttpServletBean 的 init() 方法中调用了 initServletBean() 这个方法,它是在 FrameworkServlet 类中实现的,主要作用是建立 WebApplicationContext 容器(有时也称上下文),并加载 SpringMVC 配置文件中定义的 Bean 到改容器中,最后将该容器添加到 ServletContext 中。下面是 initServletBean() 方法的具体代码:
@Override
protected final void initServletBean() throws ServletException {
    try {
        // 初始化 WebApplicationContext (即SpringMVC的IOC容器)
        this.webApplicationContext = initWebApplicationContext();
        initFrameworkServlet();
    } catch (ServletException ex) {
    } catch (RuntimeException ex) {
    }
}
WebApplicationContext 继承于 ApplicationContext 接口,从容器中可以获取当前应用程序环境信息,它也是 SpringMVC 的 IOC 容器。下面是 initWebApplicationContext() 方法的具体代码:
protected WebApplicationContext initWebApplicationContext() {
    // 获取 ContextLoaderListener 初始化并注册在 ServletContext 中的根容器,即 Spring 的容器
    WebApplicationContext rootContext =
        WebApplicationContextUtils.getWebApplicationContext(getServletContext());
    WebApplicationContext wac = null;
    if (this.webApplicationContext != null) {
        // 因为 WebApplicationContext 不为空,说明该类在构造时已经将其注入
        wac = this.webApplicationContext;
        if (wac instanceof ConfigurableWebApplicationContext) {
            ConfigurableWebApplicationContext cwac = (ConfigurableWebApplicationContext) wac;
            if (!cwac.isActive()) {
                if (cwac.getParent() == null) {
                    // 将 Spring 的容器设为 SpringMVC 容器的父容器
                    cwac.setParent(rootContext);
                }
                configureAndRefreshWebApplicationContext(cwac);
            }
        }
    }
    if (wac == null) {
      // 如果 WebApplicationContext 为空,则进行查找,能找到说明上下文已经在别处初始化。
      wac = findWebApplicationContext();
    }
    if (wac == null) {
        // 如果 WebApplicationContext 仍为空,则以 Spring 的容器为父上下文建立一个新的。
        wac = createWebApplicationContext(rootContext);
    }
    if (!this.refreshEventReceived) {
        // 模版方法,由 DispatcherServlet 实现
        onRefresh(wac);
    }
    if (this.publishContext) {
        // 发布这个 WebApplicationContext 容器到 ServletContext 中
        String attrName = getServletContextAttributeName();
        getServletContext().setAttribute(attrName, wac);
    }
    return wac;
}
下面是查找 WebApplicationContext 的 findWebApplicationContext() 方法代码:
protected WebApplicationContext findWebApplicationContext() {
    String attrName = getContextAttribute();
    if (attrName == null) {
        return null;
    }
    // 从 ServletContext 中查找已经发布的 WebApplicationContext 容器
    WebApplicationContext wac =
    WebApplicationContextUtils.getWebApplicationContext(getServletContext(), attrName);
    if (wac == null) {
        throw new IllegalStateException("No WebApplicationContext found: initializer not registered?");
    }
    return wac;
}
1.3 DispatcherServlet 的 onRefresh() 方法
建立好 WebApplicationContext(上下文) 后,通过 onRefresh(ApplicationContext context) 方法回调,进入 DispatcherServlet 类中。onRefresh() 方法,提供 SpringMVC 的初始化,具体代码如下:
    @Override
    protected void onRefresh(ApplicationContext context) {
        initStrategies(context);
    }
    protected void initStrategies(ApplicationContext context) {
        initMultipartResolver(context);
        initLocaleResolver(context);
        initThemeResolver(context);
        initHandlerMappings(context);
        initHandlerAdapters(context);
        initHandlerExceptionResolvers(context);
        initRequestToViewNameTranslator(context);
        initViewResolvers(context);
        initFlashMapManager(context);
    }
在 initStrategies() 方法中进行了各个组件的初始化,先来看一下这些组件的初始化方法,稍后再来详细分析这些组件。
1.3.1 initHandlerMappings 方法
initHandlerMappings() 方法从 SpringMVC 的容器及 Spring 的容器中查找所有的 HandlerMapping 实例,并把它们放入到 handlerMappings 这个 list 中。这个方法并不是对 HandlerMapping 实例的创建,HandlerMapping 实例是在上面 WebApplicationContext 容器初始化,即 SpringMVC 容器初始化的时候创建的。
private void initHandlerMappings(ApplicationContext context) {
    this.handlerMappings = null;
    if (this.detectAllHandlerMappings) {
        // 从 SpringMVC 的 IOC 容器及 Spring 的 IOC 容器中查找 HandlerMapping 实例
        Map<String, HandlerMapping> matchingBeans =
            BeanFactoryUtils.beansOfTypeIncludingAncestors(context, HandlerMapping.class, true, false);
        if (!matchingBeans.isEmpty()) {
            this.handlerMappings = new ArrayList<HandlerMapping>(matchingBeans.values());
            // 按一定顺序放置 HandlerMapping 对象
            OrderComparator.sort(this.handlerMappings);
        }
    } else {
        try {
            HandlerMapping hm = context.getBean(HANDLER_MAPPING_BEAN_NAME, HandlerMapping.class);
            this.handlerMappings = Collections.singletonList(hm);
        } catch (NoSuchBeanDefinitionException ex) {
            // Ignore, we'll add a default HandlerMapping later.
        }
    }
    // 如果没有 HandlerMapping,则加载默认的
    if (this.handlerMappings == null) {
        this.handlerMappings = getDefaultStrategies(context, HandlerMapping.class);
    }
}
1.3.2 initHandlerAdapters 方法
private void initHandlerAdapters(ApplicationContext context) {
    this.handlerAdapters = null;
    if (this.detectAllHandlerAdapters) {
        // Find all HandlerAdapters in the ApplicationContext, including ancestor contexts.
        Map<String, HandlerAdapter> matchingBeans =
                    BeanFactoryUtils.beansOfTypeIncludingAncestors(context, HandlerAdapter.class, true, false);
        if (!matchingBeans.isEmpty()) {
            this.handlerAdapters = new ArrayList<HandlerAdapter>(matchingBeans.values());
            // We keep HandlerAdapters in sorted order.
            OrderComparator.sort(this.handlerAdapters);
        }
    } else {
        try {
            HandlerAdapter ha = context.getBean(HANDLER_ADAPTER_BEAN_NAME, HandlerAdapter.class);
            this.handlerAdapters = Collections.singletonList(ha);
        } catch (NoSuchBeanDefinitionException ex) {
            // Ignore, we'll add a default HandlerAdapter later.
        }
    }
    // Ensure we have at least some HandlerAdapters, by registering
    // default HandlerAdapters if no other adapters are found.
    if (this.handlerAdapters == null) {
        this.handlerAdapters = getDefaultStrategies(context, HandlerAdapter.class);
    }
}
2 处理请求
HttpServlet 提供了 doGet()、doPost() 等方法,DispatcherServlet 中这些方法是在其父类 FrameworkServlet 中实现的,代码如下:
@Override
protected final void doGet(HttpServletRequest request, HttpServletResponse response)
        throws ServletException, IOException {
    processRequest(request, response);
}
@Override
protected final void doPost(HttpServletRequest request, HttpServletResponse response)
        throws ServletException, IOException {
    processRequest(request, response);
}
这些方法又都调用了 processRequest() 方法,我们来看一下代码:
protected final void processRequest(HttpServletRequest request, HttpServletResponse response)
        throws ServletException, IOException {
    long startTime = System.currentTimeMillis();
    Throwable failureCause = null;
    // 返回与当前线程相关联的 LocaleContext
    LocaleContext previousLocaleContext = LocaleContextHolder.getLocaleContext();
    // 根据请求构建 LocaleContext,公开请求的语言环境为当前语言环境
    LocaleContext localeContext = buildLocaleContext(request);

    // 返回当前绑定到线程的 RequestAttributes
    RequestAttributes previousAttributes = RequestContextHolder.getRequestAttributes();
    // 根据请求构建ServletRequestAttributes
    ServletRequestAttributes requestAttributes = buildRequestAttributes(request, response, previousAttributes);

    // 获取当前请求的 WebAsyncManager,如果没有找到则创建
    WebAsyncManager asyncManager = WebAsyncUtils.getAsyncManager(request);
    asyncManager.registerCallableInterceptor(FrameworkServlet.class.getName(), new RequestBindingInterceptor());

    // 使 LocaleContext 和 requestAttributes 关联
    initContextHolders(request, localeContext, requestAttributes);

    try {
        // 由 DispatcherServlet 实现
        doService(request, response);
    } catch (ServletException ex) {
    } catch (IOException ex) {
    } catch (Throwable ex) {
    } finally {
        // 重置 LocaleContext 和 requestAttributes,解除关联
        resetContextHolders(request, previousLocaleContext, previousAttributes);
        if (requestAttributes != null) {
            requestAttributes.requestCompleted();
        }// 发布 ServletRequestHandlerEvent 事件
        publishRequestHandledEvent(request, startTime, failureCause);
    }
}
DispatcherServlet 的 doService() 方法主要是设置一些 request 属性,并调用 doDispatch() 方法进行请求分发处理,doDispatch() 方法的主要过程是通过 HandlerMapping 获取 Handler,再找到用于执行它的 HandlerAdapter,执行 Handler 后得到 ModelAndView ,ModelAndView 是连接“业务逻辑层”与“视图展示层”的桥梁,接下来就要通过 ModelAndView 获得 View,再通过它的 Model 对 View 进行渲染。doDispatch() 方法如下:
protected void doDispatch(HttpServletRequest request, HttpServletResponse response) throws Exception {
    HttpServletRequest processedRequest = request;
    HandlerExecutionChain mappedHandler = null;
    boolean multipartRequestParsed = false;
    // 获取当前请求的WebAsyncManager,如果没找到则创建并与请求关联
    WebAsyncManager asyncManager = WebAsyncUtils.getAsyncManager(request);
    try {
        ModelAndView mv = null;
        Exception dispatchException = null;
        try {
            // 检查是否有 Multipart,有则将请求转换为 Multipart 请求
            processedRequest = checkMultipart(request);
            multipartRequestParsed = (processedRequest != request);
            // 遍历所有的 HandlerMapping 找到与请求对应的 Handler,并将其与一堆拦截器封装到 HandlerExecution 对象中。
            mappedHandler = getHandler(processedRequest);
            if (mappedHandler == null || mappedHandler.getHandler() == null) {
                noHandlerFound(processedRequest, response);
                return;
            }
            // 遍历所有的 HandlerAdapter,找到可以处理该 Handler 的 HandlerAdapter
            HandlerAdapter ha = getHandlerAdapter(mappedHandler.getHandler());
            // 处理 last-modified 请求头
            String method = request.getMethod();
            boolean isGet = "GET".equals(method);
            if (isGet || "HEAD".equals(method)) {
                long lastModified = ha.getLastModified(request, mappedHandler.getHandler());
                if (new ServletWebRequest(request, response).checkNotModified(lastModified) && isGet) {
                    return;
                }
            }
            // 遍历拦截器,执行它们的 preHandle() 方法
            if (!mappedHandler.applyPreHandle(processedRequest, response)) {
                return;
            }
            try {
                // 执行实际的处理程序
                mv = ha.handle(processedRequest, response, mappedHandler.getHandler());
            } finally {
                if (asyncManager.isConcurrentHandlingStarted()) {
                    return;
                }
            }
            applyDefaultViewName(request, mv);
            // 遍历拦截器,执行它们的 postHandle() 方法
            mappedHandler.applyPostHandle(processedRequest, response, mv);
        } catch (Exception ex) {
            dispatchException = ex;
        }
        // 处理执行结果,是一个 ModelAndView 或 Exception,然后进行渲染
        processDispatchResult(processedRequest, response, mappedHandler, mv, dispatchException);
    } catch (Exception ex) {
    } catch (Error err) {
    } finally {
        if (asyncManager.isConcurrentHandlingStarted()) {
            // 遍历拦截器,执行它们的 afterCompletion() 方法
            mappedHandler.applyAfterConcurrentHandlingStarted(processedRequest, response);
            return;
        }
        // Clean up any resources used by a multipart request.
        if (multipartRequestParsed) {
            cleanupMultipart(processedRequest);
        }
    }
}