一、新建Spring Boot项目
注意:创建的时候勾选Mybatis依赖,pom文件如下
<dependency>
    <groupId>org.mybatis.spring.boot</groupId>
    <artifactId>mybatis-spring-boot-starter</artifactId>
     <version>2.1.1</version>
</dependency>
二、配置文件application.properties中配置数据库信息
三、创建两个表(Employee,Department)
四、创建JavaBean 用来封装表的数据

五、使用mybatis对数据库进行操作
- 配置文件方式
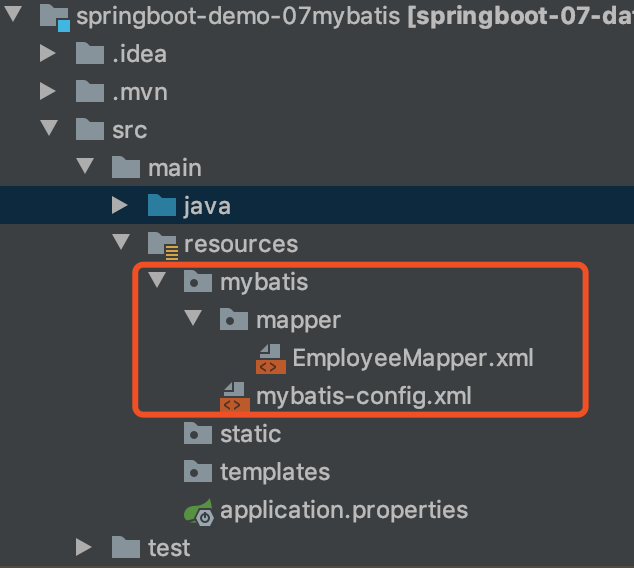
- 在resources目录下新建目录:

-
- mybatis-config.xml 内容如下
<?xml version="1.0" encoding="UTF-8" ?> <!DOCTYPE configuration PUBLIC "-//mybatis.org//DTD Config 3.0//EN" "http://mybatis.org/dtd/mybatis-3-config.dtd"> <configuration> </configuration> - EmployeeMapper.xml 内容如下
 1 <?xml version="1.0" encoding="UTF-8" ?>
 2 <!DOCTYPE mapper
 3         PUBLIC "-//mybatis.org//DTD Mapper 3.0//EN"
 4         "http://mybatis.org/dtd/mybatis-3-mapper.dtd">
 5
 6 <!--将EmployeeMapper的全类名(右键复制相对路径)复制出来,放在namespace里面-->
 7 <mapper namespace="com.demo.springboot.mapper.EmployeeMapper">
 8
 9     <!--将接口的方法配置到映射文件中
10     id="方法名"
11     resultType="返回值类型Employee的全类名"-->
12     <select id="getEmpById" resultType="com.demo.springboot.bean.Employee">
13         select * from Employee where id=#{id};
14     </select>
15 </mapper>
- 将EmployeeMapper接口的方法配置在映射文件EmployeeMapper.xml中
-
在application.properties 中添加配置
#mybatis配置
mybatis.config-location=classpath:mybatis/mybatis-config.xml
mybatis.mapper-locations=classpath:mybatis/mapper/*.xml
- 运行后测试(同下面的注解版 “***测试:新增一个Controller.DeptController”)
- mybatis-config.xml 内容如下
- 注解版方式
- 创建包:mapper
- 在包下添加一个接口:DepartmentMapper
 1 /**
 2  * 指定这是一个操作数据库的mapper
 3  */
 4 @Mapper
 5 public interface DepartmentMapper {
 6
 7     @Select("select * from Department where id=#{id}")
 8     public Department getDeptById(Integer id);
 9
10     @Delete("delete from Department where id=#{id}")
11     public int deleteDeptById(Integer id);
12
13     @Insert("insert into Department(departmentName) values=(#{departmentName})")
14     public int insertDept(Department department);
15
16     @Update("update Department set departmentName=#{departmentName} where id=#{id}")
17     public int updateDept(Department department);
18 }
- ***测试:新增一个Controller.DeptController
 1 @RestController
 2 public class DeptController {
 3
 4     @Autowired
 5     DepartmentMapper departmentMapper;
 6
 7    //查询,带入浏览器中的参数id
 8     @GetMapping("dept/{id}")
 9     public Department getDepartment(@PathVariable("id") Integer id){
10         return departmentMapper.getDeptById(id);
11     }
12
13    //插入
14     @GetMapping("dept/add")
15     public Department addDepartment(Department department){
16         departmentMapper.insertDept(department);
17         return department;
18     }
19 }
-
测试结果:
-
测试查询:在浏览器输入地址 http://localhost:8080/dept/1
- 测试插入:http://localhost:8080/dept/add?departmentName=%E6%8A%80%E6%9C%AF%E9%83%A8&empNum=13 查看数据库,新增数据成功
-