系统架构流程

服务模块可以有多个,认证和授权是做在一起的单独一个模块。
原本想写关于spring security的源码阅读的文章,但是一方面考虑时间问题,另一方面出于实用的目的,这里打算记录一下相关启动加载流程,请求认证和授权的流程。
概要如下:
1、启动流程概述
2、token获取流程分析
3、请求的认证与授权流程分析
一、启动流程概述
此处参考这里。
启动流程的关注点主要涉及配置信息的加载和过滤器链的构建。
spring security框架核心就是这个过滤器链!它是分析流程始和调试代码终要关心的重点。
首先看启动入口类org.springframework.security.config.annotation.web.configuration.WebSecurityConfiguration,方法setFilterChainProxySecurityConfigurer中有
for (SecurityConfigurer<Filter, WebSecurity> webSecurityConfigurer : webSecurityConfigurers) {
            webSecurity.apply(webSecurityConfigurer);
        }
会将org.springframework.security.config.annotation.web.configuration.WebSecurityConfigurerAdapter类型的配置(security相关)、org.springframework.security.oauth2.config.annotation.web.configuration.ResourceServerConfigurerAdapter类型配置(资源服务器相关)、org.springframework.security.oauth2.config.annotation.web.configuration.AuthorizationServerConfigurerAdapter类型配置(授权服务器相关)都装配到org.springframework.security.config.annotation.web.builders.WebSecurity对象中。
继续关注方法springSecurityFilterChain,
 1 public Filter springSecurityFilterChain() throws Exception {
 2         boolean hasConfigurers = webSecurityConfigurers != null
 3                 && !webSecurityConfigurers.isEmpty();
 4         if (!hasConfigurers) {
 5             WebSecurityConfigurerAdapter adapter = objectObjectPostProcessor
 6                     .postProcess(new WebSecurityConfigurerAdapter() {
 7                     });
 8             webSecurity.apply(adapter);
 9         }
10         return webSecurity.build();
11     }
跟进第10行,进入org.springframework.security.config.annotation.AbstractSecurityBuilder#build,
1 public final O build() throws Exception {
2         if (this.building.compareAndSet(false, true)) {
3             this.object = doBuild();
4             return this.object;
5         }
6         throw new AlreadyBuiltException("This object has already been built");
7     }
继续进入doBuild()方法,
 1 protected final O doBuild() throws Exception {
 2         synchronized (configurers) {
 3             buildState = BuildState.INITIALIZING;
 4
 5             beforeInit();
 6             init();
 7
 8             buildState = BuildState.CONFIGURING;
 9
10             beforeConfigure();
11             configure();
12
13             buildState = BuildState.BUILDING;
14
15             O result = performBuild();
16
17             buildState = BuildState.BUILT;
18
19             return result;
20         }
21     }
由于spring security的配置一般都是继承org.springframework.security.config.annotation.web.configuration.WebSecurityConfigurerAdapter,这里针对它来看。重点看上面的第6行init(),第11行configure(),第15行performBuild()。init()方法会触发org.springframework.security.config.annotation.web.configuration.WebSecurityConfigurerAdapter#init方法,
 1 public void init(final WebSecurity web) throws Exception {
 2         final HttpSecurity http = getHttp();
 3         web.addSecurityFilterChainBuilder(http).postBuildAction(new Runnable() {
 4             public void run() {
 5                 FilterSecurityInterceptor securityInterceptor = http
 6                         .getSharedObject(FilterSecurityInterceptor.class);
 7                 web.securityInterceptor(securityInterceptor);
 8             }
 9         });
10     }
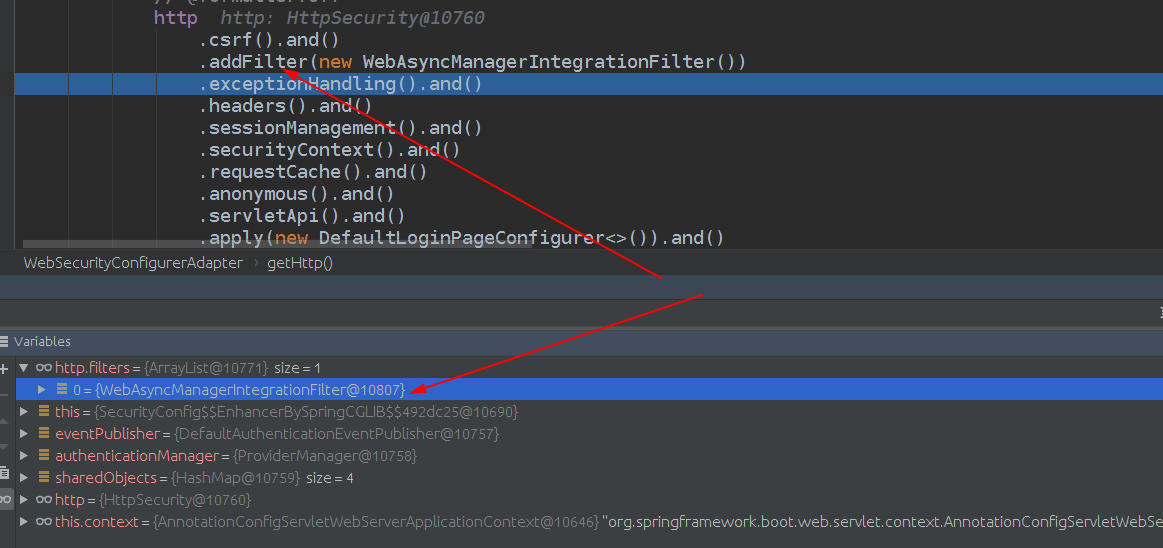
接着看getHttp()方法,其中含有的如下代码会构建默认过滤器链,
 1 http
 2                 .csrf().and()
 3                 .addFilter(new WebAsyncManagerIntegrationFilter())
 4                 .exceptionHandling().and()
 5                 .headers().and()
 6                 .sessionManagement().and()
 7                 .securityContext().and()
 8                 .requestCache().and()
 9                 .anonymous().and()
10                 .servletApi().and()
11                 .apply(new DefaultLoginPageConfigurer<>()).and()
12                 .logout();
可通过debug查看每一步对应构建出来的过滤器,如下图:
同时getHttp()方法最后有
1 configure(http)
这里会执行org.springframework.security.config.annotation.web.configuration.WebSecurityConfigurerAdapter类型的配置(security相关)、org.springframework.security.oauth2.config.annotation.web.configuration.ResourceServerConfigurerAdapter类型配置(资源服务器相关)、org.springframework.security.oauth2.config.annotation.web.configuration.AuthorizationServerConfigurerAdapter类型配置(授权服务器相关)许多configure方法。
到此大致解释了配置信息的加载流程和默认过滤器链的创建。
二、token获取流程分析
本文是使用oauth2的密码授权模式(Password Grant Type),简言之,首次认证时用户传递过来用户名密码,认证服务器会返回一个token,其后用户请求访问资源时带上这个token,即可访问其有权限的资源。详细参考:https://developer.okta.com/blog/2018/06/29/what-is-the-oauth2-password-grant 。
所以本文中所指单点登录就是获取这个token的过程。
token获取的链接是:/oauth/token ,对应代码在spring-security-oauth2 jar包的 org.springframework.security.oauth2.provider.endpoint.TokenEndpoint#postAccessToken ;
如果想了解整个流程走过的过滤器,可以在org.springframework.security.web.FilterChainProxy中断点跟踪执行到的过滤器链中的过滤器,具体可以在org.springframework.security.web.FilterChainProxy.VirtualFilterChain#doFilter方法内断点。
这里我主要想了解token的生成,所以直接在postAccessToken方法内断点,一步步走,直到如下这行代码,
OAuth2AccessToken token = getTokenGranter().grant(tokenRequest.getGrantType(), tokenRequest);
这里就是请求授予token的地方,一步步断点跟进去,最后回到方法org.springframework.security.oauth2.provider.CompositeTokenGranter#grant,
1 public OAuth2AccessToken grant(String grantType, TokenRequest tokenRequest) {
2         for (TokenGranter granter : tokenGranters) {
3             OAuth2AccessToken grant = granter.grant(grantType, tokenRequest);
4             if (grant!=null) {
5                 return grant;
6             }
7         }
8         return null;
9     }
这里的tokenRequest见下图,

从字面就看大概看出这对应oauth2的5种grant types,grant types参考https://oauth.net/2/grant-types/ ,我们密码模式对应上图中的最后一个Granter,方法org.springframework.security.oauth2.provider.CompositeTokenGranter#grant的第三行不同Granter都是根据grant type来选择适用Granter,如果不匹配直接返回null。进入最后一个Granter的grant方法如下,

protected OAuth2AccessToken getAccessToken(ClientDetails client, TokenRequest tokenRequest) {
        return tokenServices.createAccessToken(getOAuth2Authentication(client, tokenRequest));
    }
最后进入getOAuth2Authentication(client, tokenRequest),方法内有如下代码,
userAuth = authenticationManager.authenticate(userAuth);
上面authenticationManager是一个org.springframework.security.authentication.ProviderManager,封装了若干org.springframework.security.authentication.AuthenticationProvider,provider进行认证并返回非空Authentication则结束继续认证,我们项目中使用的是org.springframework.security.authentication.dao.DaoAuthenticationProvider,她会做各种check(比如配置文件中配置的Checker),用户密码校验等;
接着进入org.springframework.security.oauth2.provider.token.DefaultTokenServices#createAccessToken(org.springframework.security.oauth2.provider.OAuth2Authentication)方法,
 1 @Transactional
 2     public OAuth2AccessToken createAccessToken(OAuth2Authentication authentication) throws AuthenticationException {
 3
 4         OAuth2AccessToken existingAccessToken = tokenStore.getAccessToken(authentication);
 5         OAuth2RefreshToken refreshToken = null;
 6         if (existingAccessToken != null) {
 7             if (existingAccessToken.isExpired()) {
 8                 if (existingAccessToken.getRefreshToken() != null) {
 9                     refreshToken = existingAccessToken.getRefreshToken();
10                     // The token store could remove the refresh token when the
11                     // access token is removed, but we want to
12                     // be sure...
13                     tokenStore.removeRefreshToken(refreshToken);
14                 }
15                 tokenStore.removeAccessToken(existingAccessToken);
16             }
17             else {
18                 // Re-store the access token in case the authentication has changed
19                 tokenStore.storeAccessToken(existingAccessToken, authentication);
20                 return existingAccessToken;
21             }
22         }
23
24         // Only create a new refresh token if there wasn't an existing one
25         // associated with an expired access token.
26         // Clients might be holding existing refresh tokens, so we re-use it in
27         // the case that the old access token
28         // expired.
29         if (refreshToken == null) {
30             refreshToken = createRefreshToken(authentication);
31         }
32         // But the refresh token itself might need to be re-issued if it has
33         // expired.
34         else if (refreshToken instanceof ExpiringOAuth2RefreshToken) {
35             ExpiringOAuth2RefreshToken expiring = (ExpiringOAuth2RefreshToken) refreshToken;
36             if (System.currentTimeMillis() > expiring.getExpiration().getTime()) {
37                 refreshToken = createRefreshToken(authentication);
38             }
39         }
40
41         OAuth2AccessToken accessToken = createAccessToken(authentication, refreshToken);
42         tokenStore.storeAccessToken(accessToken, authentication);
43         // In case it was modified
44         refreshToken = accessToken.getRefreshToken();
45         if (refreshToken != null) {
46             tokenStore.storeRefreshToken(refreshToken, authentication);
47         }
48         return accessToken;
49
50     }
我们项目使用redis存储token的,如果token存在且未过期,20行直接返回,后面的代码则是关于refreshToken是否过期,过期刷新,accessToken和refreshToken创建的过程,默认都是UUID.randomUUID().toString()生成一个UUID,都有过期时间机制,最后存入
tokenStore,对于我们的项目tokenStore就是redis。

到此token获取流程分析完毕。


三、请求的认证与授权流程分析

客户请求某个子应用时,需要先到认证服务器去认证,接着到授权服务器去检测权限,那么如何办到的呢?   假设服务应用为A,我们这里认证和授权的两个服务是做在一期的,姑且称之为B;
认证与授权的流程简图如下,
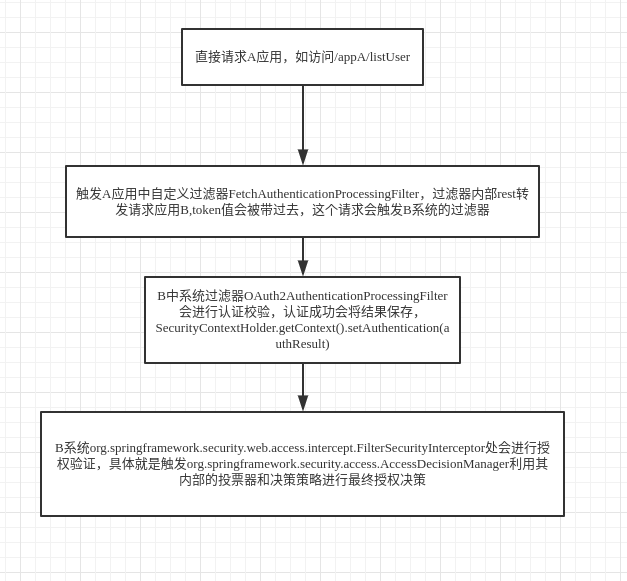
图1

图2

图3
图2和图3分别是服务模块和认证授权模块中的过滤器链;抓住过滤器链方才能够掌握整个流程。