• 完成后台管理系统功能(二)有关SSM的整合


    一.有关SpringMVC 以及 Spring  和 Mybatis

    1.SpingMVC

      1.1  首先SpringMVC是一个很流行的MVC框架。什么是MVC框架呢,就是通过把Model,View,Controller分离,把较为复杂的web应用分成逻辑清晰的几部分,是为了简化开发减少出错。还是为了组内开发人员之间的配合。总之就是一种分层工作的办法。

           1.2  SpringMVC,是Spring的一个子框架,当然拥有Spring的特性,如依赖注入。

                   通俗的讲Spring和SpringMVC之间的关系 ,假如Spring是一个工具箱,那么SpringMVC就是工具箱中的一个扳手。

           1.3  Spring工作流程描述     

    1. 用户向服务器发送请求,请求被Spring 前端控制Servelt DispatcherServlet捕获;
    2. DispatcherServlet对请求URL进行解析,得到请求资源标识符(URI)。然后根据该URI,调用HandlerMapping获得该Handler配置的所有相关的对象(包括Handler对象以及Handler对象对应的拦截器),最后以HandlerExecutionChain对象的形式返回;
    3. DispatcherServlet 根据获得的Handler,选择一个合适的HandlerAdapter。(附注:如果成功获得HandlerAdapter后,此时将开始执行拦截器的preHandler(...)方法)
    4. 提取Request中的模型数据,填充Handler入参,开始执行Handler(Controller)。 在填充Handler的入参过程中,根据你的配置,Spring将帮你做一些额外的工作:  HttpMessageConveter: 将请求消息(如Json、xml等数据)转换成一个对象,将对象转换为指定的响应信息。    数据转换:对请求消息进行数据转换。如String转换成Integer、Double等 。     数据根式化:对请求消息进行数据格式化。 如将字符串转换成格式化数字或格式化日期等 。数据验证: 验证数据的有效性(长度、格式等),验证结果存储到BindingResult或Error中。
    5. Handler执行完成后,向DispatcherServlet 返回一个ModelAndView对象;
    6. 根据返回的ModelAndView,选择一个适合的ViewResolver(必须是已经注册到Spring容器中的ViewResolver)返回给DispatcherServlet ;
    7. ViewResolver 结合Model和View,来渲染视图
    8. 将渲染结果返回给客户端。

    2.Spring

    IOC(Inversion of Control)控制反转

    本来是由应用程序管理的对象之间的依赖关系,现在交给了容器管理,这就叫控制反转,即交给了 IOC 容器,Spring 的 IOC 容器主要使用 DI 方式实现的。不需要主动查找,对象的查找、定位和创建全部由容器管理。

    Spring 中使用注解 Bean 管理:

    Spring 中,bean 都是 Spring 容器管理的,使用注解来定义和使用 bean,而不需要使用 new 来创建对象。

    Spring 中定义 bean:

    @controller

    @service

    @repository

    @component

    Spring 中得到 bean:

    @autowire

    @resource

    @Qualifer 

    3.Mybatis

    MyBatis 是支持定制化 SQL、存储过程以及高级映射的优秀的持久层框架。 MyBatis 避免了几乎所有的 JDBC 代码和手动设置参数以及获取结果集。 MyBatis 可以对配置和原生 Map 使用简单的 XML 或注解,将接口和 Java POJOs(Plain Old Java Objects,普通的 Java 对象)映射成数据库中的记录。

    在这里可以通过 mybatis的反向工程 ,去获取数据库中的pojo以及mapper方法。(在后续会说到这个)

    4.SSM整合

     我们采用 SpringMVC+Spring+Mybatis 的框架完成后台管理系统。

    1、 数据操作层:

    Mybatis 整合 Spring,通过 Spring 管理 SqlSessionFactory、mapper 代理对象。 

    整合内容

    对应工程

    Pojo

    jingxi-backend-pojo

    Mapper 映射文件

    Jingxi-backend-mapper

    Mapper 接口

    Jingxi-backend-mapper

    sqlmapConfig.xml

    Jingxi-backend-controller

    applicationContext-mybatis.xml

    Jingxi-backend-controller

    2、 业务层:所有的实现类都放到 Spring 容器中管理。由 Spring 创建数据库连接池,并有 Spring 管理实务。 

    整合内容

    对应工程

    Service 接口及实现类

    Jingxi-backend-service

    applicationContext-service.xml

    Jingxi-backend-controller

    3、 表现层:

    Springmvc 整合 Spring 框架,由 Springmvc 管理 controller。 

    整合内容

    对应工程

    applicationContext-mvc.xml

    Jingxi-backend-controller

    Controller

    Jingxi-backend-controller

    web.xml

    Jingxi-backend-controller

    构建核心文件

    在 jingxi-backend-controller 项目中创建下面文件夹: 
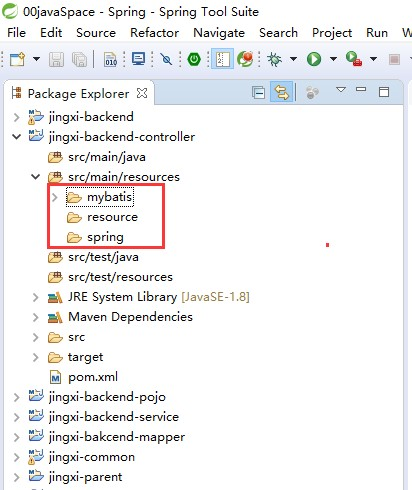
    Step1 配置 Mybatis:创建 SqlMapConfig.xml 配置文件 (用于配置mybatis的全局配置文件)

     Step2 配置 Spring 整合 Mybatis: 创建 applicationContext-mybatis.xml 和 db.properties 文件。

    在applicationContext-maybatic.xml文件中  我们配置了数据库连接池,sqlSessionFactory(mybatis的连接工厂),以及Mybatis映射文件的包扫描器

    首先要配置数据库连接池  我们就需要加载目录下面的db.properties 文件,加载数据库的信息。

    db.properties

    jdbc.driver=com.mysql.jdbc.Driver

    jdbc.url=jdbc:mysql://localhost:3306/jingxi?characterEncoding=utf-8

    jdbc.username=root

    jdbc.password=apj123apj

     applicationContext-mybatis.xml

    <!--数据库连接池-->
    <!--加载配置文件-->
    <context:property-placeholder location="classpath:resource/*.properties"/>
    <!--数据库连接池-->
    <bean id="dataSource" class="com.alibaba.druid.pool.DruidDataSource" destroy-method="close">
    <property name="url" value="${jdbc.url}"/>
    <property name="username" value="${jdbc.username}"/>
    <property name="password" value="${jdbc.password}"/>
    <property name="driverClassName" value="${jdbc.driver}"/>
    <property name="maxActive" value="10"/>
    <property name="minIdle" value="5"/>
    </bean>

    <!--让spring管理sqlsessionfactory使用mybatis和spring整合包中的-->
    <bean id="sqlSessionFactory" class="org.mybatis.spring.SqlSessionFactoryBean">

    <!--数据库连接池-->
    <property name="dataSource" ref="dataSource"/>

    <!--加载mybatis的全局配置文件-->
    <property name="configLocation" value="classpath:mybatis/SqlMapConfig.xml"/>
    </bean>

    <bean class="org.mybatis.spring.mapper.MapperScannerConfigurer">
    <property name="basePackage" value="com.jingxi.mapper"/>
    </bean>
    </beans>

    step3:配置spring的事物管理 applicationContext-service.xml 

    在application-service.xml文件中,我们配置了

    ①包的扫描器,扫描所有带有@Service注解的类

    <context:component-scan base-package="com.jingxi.service"/>
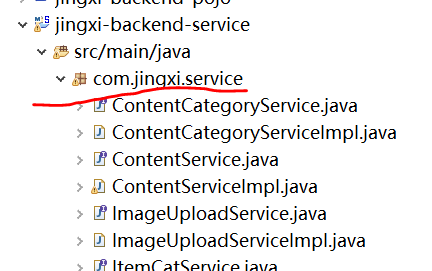
    ②配置事物,其中事务的传播行为需要说明一下,当接口名以save、insert、add、create、delete、upate开头时spring会自动帮我们开启事务(前提是我们配置了事务传播行为),而find、select、get开头的接口是查询,不涉及更改数据库,因此不需要事务,spring不会为查询接口自动开启事务。下面再说说切面,也就是事务的作用范围,execution(* com.taotao.service.*.*(..))的意思是,com.taotao.service下的任意类的任意方法的任意参数及任意返回值都是事务的切入点。

    <beans xmlns="http://www.springframework.org/schema/beans"
    xmlns:context="http://www.springframework.org/schema/context"
    xmlns:p="http://www.springframework.org/schema/p"
    xmlns:aop="http://www.springframework.org/schema/aop"
    xmlns:tx="http://www.springframework.org/schema/tx"
    xmlns:xsi="http://www.w3.org/2001/XMLSchema-instance"
    xsi:schemaLocation="http://www.springframework.org/schema/beans
    http://www.springframework.org/schema/beans/spring-beans-4.0.xsd
    http://www.springframework.org/schema/context
    http://www.springframework.org/schema/context/spring-context-4.0.xsd
    http://www.springframework.org/schema/aop
    http://www.springframework.org/schema/aop/spring-aop-4.0.xsd
    http://www.springframework.org/schema/tx
    http://www.springframework.org/schema/tx/spring-tx-4.0.xsd
    http://www.springframework.org/schema/util
    http://www.springframework.org/schema/util/spring-util-4.0.xsd">
    <context:component-scan base-package="com.jingxi.service"/>
    <!--事务管理器-->
    <bean id="transactionManager" class="org.springframework.jdbc.datasource.DataSourceTransactionManager">
    <!--数据源-->
    <property name="dataSource" ref="dataSource"/></bean>
    <!--通知-->
    <tx:advice id="txAdvice" transaction-manager="transactionManager">
    <tx:attributes>
    <!--传播行为-->
    <tx:method name="save*" propagation="REQUIRED"/>
    <tx:method name="insert*" propagation="REQUIRED"/>
    <tx:method name="add*" propagation="REQUIRED"/>
    <tx:method name="create*" propagation="REQUIRED"/>
    <tx:method name="delete*" propagation="REQUIRED"/>
    <tx:method name="update*" propagation="REQUIRED"/>
    <tx:method name="find*" propagation="SUPPORTS" read-only="true"/>
    <tx:method name="select*" propagation="SUPPORTS" read-only="true"/>
    <tx:method name="get*" propagation="SUPPORTS" read-only="true"/>
    </tx:attributes>
    </tx:advice>
    <!--切面-->
    <aop:config>
    <aop:advisor advice-ref="txAdvice" pointcut="execution(* com.jingxi.service.*.*(..))"/>
    </aop:config>
    </beans>

    Step4: 配置表现层 SpringMVC applicationContext-mvc.xml 

    在applicatContext-mvc.xml文件中配置 

    ①配置包扫描器,扫描带有@Controller注解的类

    ②配置视图解析器

    ③配置资源文件的加载

    <?xml version="1.0" encoding="UTF-8"?>

    <beans xmlns="http://www.springframework.org/schema/beans"       xmlns:xsi="http://www.w3.org/2001/XMLSchema-instance" xmlns:p="http://www.springframework.org/schema/p"  xmlns:context="http://www.springframework.org/schema/context"       xmlns:mvc="http://www.springframework.org/schema/mvc"  xsi:schemaLocation="http://www.springframework.org/schema/beans http://www.springframework.org/schema/beans/spring-beans.xsd         http://www.springframework.org/schema/mvc http://www.springframework.org/schema/mvc/spring-mvc-4.0.xsd         http://www.springframework.org/schema/context http://www.springframework.org/schema/context/spring-context.xsd">

          <context:component-scan base-package="com.jingxi.controller" />

           <mvc:annotation-driven />

          <bean

             class="org.springframework.web.servlet.view.InternalResourceViewResolver">

                <property name="prefix" value="/WEB-INF/jsp/" />

                <property name="suffix" value=".jsp" />

          </bean>

    <mvc:resources location="/WEB-INF/js/" mapping="/js/**"/>

    <mvc:resources location="/WEB-INF/css/" mapping="/css/**"/>

    </beans>

    Step5:配置 web.xml 

    web.xml文件主要配置了

    ①加载spring容器

    ②springmvc的前端控制器

    其中前端控制器配置中<load-on-startup>1</load-on-startup>这句话的意思是tomcat启动之后便加载DispatcherServlet,如果不配置的话,需要等请求访问的时候才会加载DispatcherServlet

    ③解决post乱码

    <?xml version="1.0" encoding="UTF-8"?>
    <web-app xmlns:xsi="http://www.w3.org/2001/XMLSchema-instance"
    xmlns="http://java.sun.com/xml/ns/javaee"
    xmlns:web="http://java.sun.com/xml/ns/javaee/web-app_2_5.xsd"
    xsi:schemaLocation="http://java.sun.com/xml/ns/javaee
    http://java.sun.com/xml/ns/javaee/web-app_2_5.xsd" id="taotao" version="2.5">
    <display-name>jingxi-backend</display-name>
    <welcome-file-list>
    <welcome-file>index.html</welcome-file>
    <welcome-file>index.htm</welcome-file>
    <welcome-file>index.jsp</welcome-file>
    <welcome-file>default.html</welcome-file>
    <welcome-file>default.htm</welcome-file>
    <welcome-file>default.jsp</welcome-file>
    </welcome-file-list>

    <!--加载spring容器-->
    <context-param>
    <param-name>contextConfigLocation</param-name>
    <param-value>classpath:spring/applicationContext*.xml</param-value>
    </context-param>
    <listener>
    <listener-class>org.springframework.web.context.ContextLoaderListener</listener-class>
    </listener>
    <!--springmvc的前端控制器-->
    <servlet>
    <servlet-name>jingxi-backend</servlet-name>
    <servlet-class>org.springframework.web.servlet.DispatcherServlet</servlet-class>
    <!--contextConfigLocation不是必须的,如果不配置contextConfigLocation,springmvc的配置文件默认在:WEB-INF/servlet的name+"-servlet.xml" -->
    <init-param>
    <param-name>contextConfigLocation</param-name>
    <param-value>classpath:spring/applicationContext-mvc.xml</param-value>
    </init-param>
    <load-on-startup>1</load-on-startup>
    </servlet>
    <servlet-mapping>
    <servlet-name>jingxi-backend</servlet-name>
    <url-pattern>/</url-pattern>
    </servlet-mapping>
    <!--解决post乱码-->
    <filter>
    <filter-name>CharacterEncodingFilter</filter-name>
    <filter-class>org.springframework.web.filter.CharacterEncodingFilter</filter-class>
    <init-param>
    <param-name>encoding</param-name>
    <param-value>utf-8</param-value>
    </init-param>
    </filter>
    <filter-mapping>
    <filter-name>CharacterEncodingFilter</filter-name>
    <url-pattern>/*</url-pattern>
    </filter-mapping>
    </web-app>

    Step6 添加静态资源文件 

    静态的资源文件可以去http://download.csdn.net/detail/u012453843/9794517这个地址进行下载
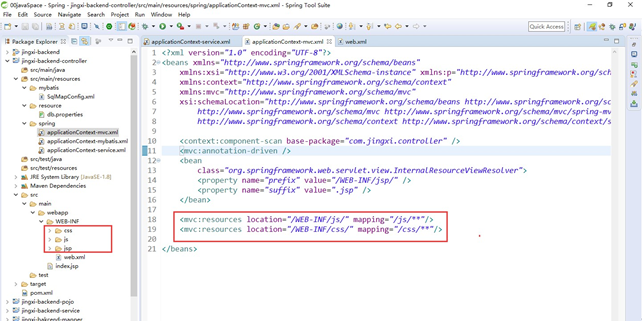
    Step7 构建数据库 

    step8  到此 配置ssm基本完成了 不过我们会发现我们还没有写对应数据库的model  以及 各种mapper(dao)方法

               这些我们可以通过mybatis的反向工程来自动生成。

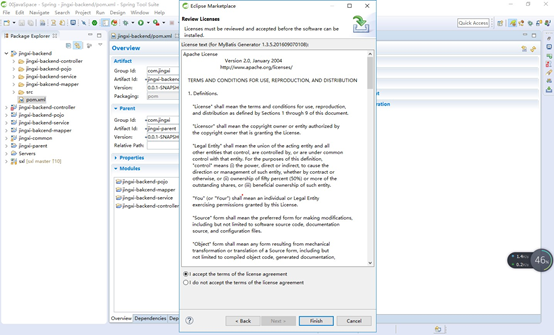
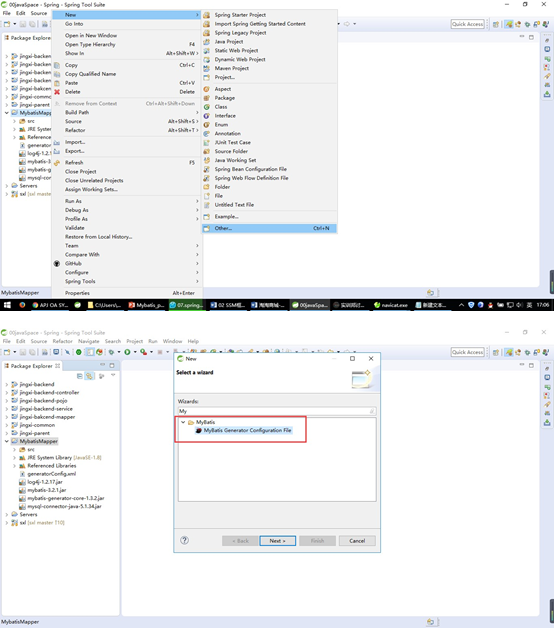
    1.安装插件
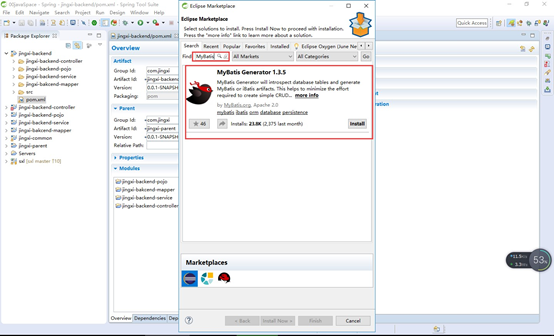
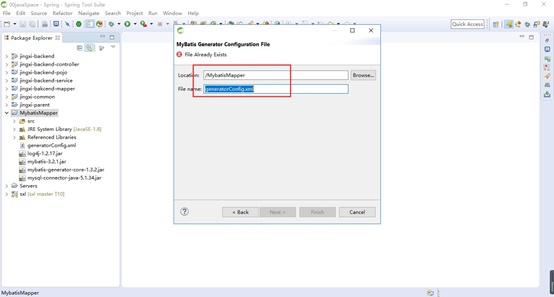
    2.安装完插件之后重新启动 STS. 接下来创建一个新项目’MybatisMapper’: 
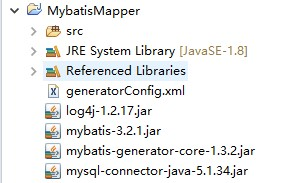
     

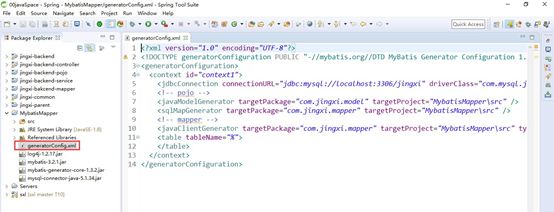
    3.接下来修改 generatorConfig.xml 如下: 
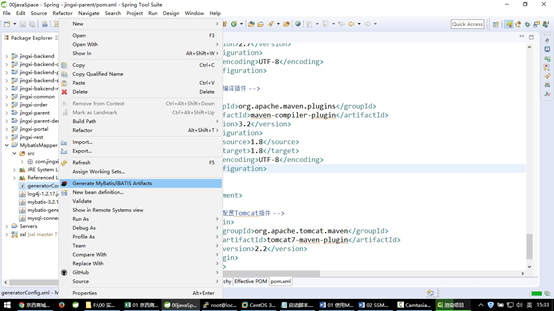
    4.然后运行生成代码: 
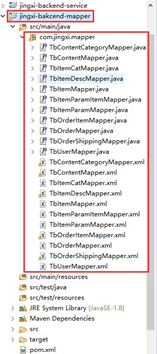
    5.生成如下代码:

    6.将生成的代码复制到对应 module 
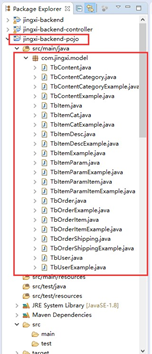
    7.修改 jingxi-backend-mapper 的 pom 文件,添加如下内容以保证发布的时

    候.xml 文件可以被发布到项目中: 

    <!-- 如果不添加此节点mybatis的mapper.xml文件都会被漏掉。 -->

       <build>

                    <resources>

                <resource>

                    <directory>src/main/java</directory>

                    <includes>

                        <include>**/*.properties</include>

                        <include>**/*.xml</include>

                    </includes>

                    <filtering>false</filtering>

                </resource>

            </resources>

            </build>

     至此,ssm框架的整合结束~

  • 相关阅读:
    Mybatis3详解(一)----Mybatis的介绍
    【k8s】svc-sessionAffinityConfig
    【k8s】svc-sessionAffinity
    【k8s】svc-selector
    【k8s】svc-publishNotReadyAddresses
    【k8s】svc-ports
    【k8s】svc-externalIPs
    【k8s】svc-clusterIPs
    【k8s】svc-clusterIP
    【k8s】Service
  • 原文地址:https://www.cnblogs.com/mumudechengzhang/p/7678386.html
Copyright © 2020-2023  润新知