基本概念
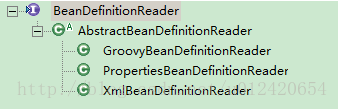
BeanDefinitionReader ,该接口的作用就是加载 Bean。
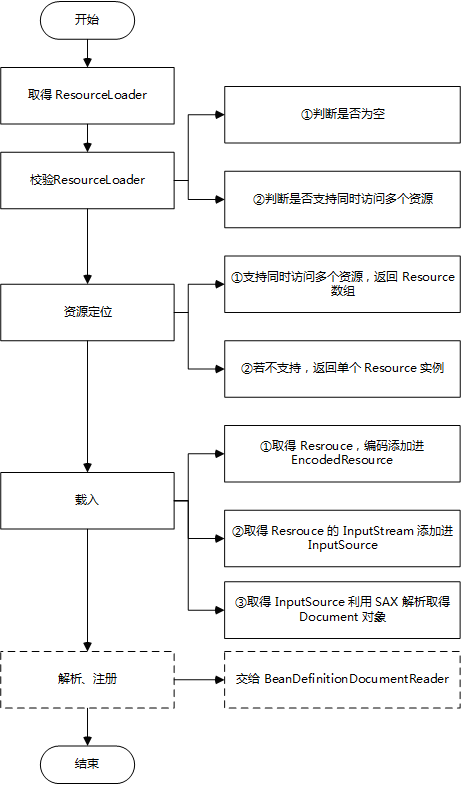
在 Spring 中,Bean 一般来说都在配置文件中定义。而在配置的路径由在 web.xml 中定义。所以加载 Bean 的步骤大致就是:
-
加载资源,通过配置文件的路径(Location)加载配置文件(Resource)
-
解析资源,通过解析配置文件的内容得到 Bean。
下面来看它的接口定义:
public interface BeanDefinitionReader {

    BeanDefinitionRegistry getRegistry();

    ResourceLoader getResourceLoader();

    ClassLoader getBeanClassLoader();

    BeanNameGenerator getBeanNameGenerator();

    // 通过 Resource 加载 Bean

    int loadBeanDefinitions(Resource resource)
        throws BeanDefinitionStoreException;

    int loadBeanDefinitions(Resource... resources)
        throws BeanDefinitionStoreException;

    // 通过 location 加载资源

    int loadBeanDefinitions(String location)
        throws BeanDefinitionStoreException;

    int loadBeanDefinitions(String... locations)
        throws BeanDefinitionStoreException;
}
具体的继承关系如下:
流程分析
首先来看 Spring Ioc 容器从启动开始到调用 BeanDefinitionReader 加载 Bean 的过程如下:
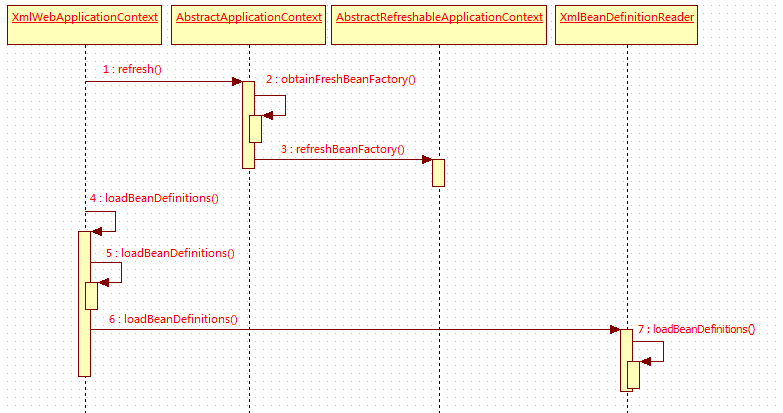
注意:由于这里采用 XML 文件作为 Spring 的配置文件,所以默认调用 XmlBeanDefinitionReader 来处理。
1.通过 BeanFactory 加载 Bean
在 Spring 容器(ApplicationContext)内部存在一个内部容器(BeanFactory)负责 Bean 的创建与管理。
在创建完 BeanFactory ,下一步就是要去加载 Bean。它由 loadBeanDefinitions 方法负责。
protected void loadBeanDefinitions(DefaultListableBeanFactory beanFactory)
    throws BeansException, IOException {

    // 1.创建 BeanDefinitionReader
    XmlBeanDefinitionReader beanDefinitionReader =
        new XmlBeanDefinitionReader(beanFactory);

    // 2.设置 BeanDefinitionReader 的相关属性

    // 2.1.设置 Environment,即环境,与容器的环境一致
    beanDefinitionReader.setEnvironment(getEnvironment());

    // 2.2.设置 ResourceLoader,即资源加载器,因为容器实现了该接口,具体加载资源的功能
    beanDefinitionReader.setResourceLoader(this);

    // 2.3.设置 EntityResolver,即实体解析器,这里用于解析资源加载器加载的资源内容
    beanDefinitionReader.setEntityResolver(new ResourceEntityResolver(this));

    // 3.初始化 BeanDefinitionReader ,空方法
    initBeanDefinitionReader(beanDefinitionReader);

    // 4.通过 BeanDefinitionReader 加载 Bean
    loadBeanDefinitions(beanDefinitionReader);
}


// 构造函数
public XmlBeanDefinitionReader(BeanDefinitionRegistry registry) {
    // 内部 BeanFactory 被当作 Bean 注册器
    super(registry);
}
观察代码,该方法的主要目的是创建了 BeanDefinitionReader ,并由它去加载 Bean。具体过程如下:
- 创建 BeanDefinitionReader
- 设置 BeanDefinitionReader 的相关属性
- 初始化 BeanDefinitionReader
- 通过 BeanDefinitionReader 加载 Bean
2.通过 BeanDefinitionReader 加载 Bean
在创建完 BeanDefinitionReader 后,则就需要通过它来 加载 Bean,过程如下:
// 通过 BeanDefinitionReader 加载 Bean
protected void loadBeanDefinitions(XmlBeanDefinitionReader reader)
    throws IOException {
    // 取得 Spring 容器的所有配置文件
    String[] configLocations = getConfigLocations();
    if (configLocations != null) {
        for (String configLocation : configLocations) {
            // 调用 BeanDefinitionReader 加载 Bean
            reader.loadBeanDefinitions(configLocation);
        }
    }
}
3.通过 Location 加载 Bean
加载的 Bean 的责任被交给了 BeanDefinitionReader ,下面来看看该类的 loadBeanDefinitions 方法。
public int loadBeanDefinitions(String location)
    throws BeanDefinitionStoreException {
    return loadBeanDefinitions(location, null);
}

public int loadBeanDefinitions(String location, Set<Resource> actualResources)
    throws BeanDefinitionStoreException {

    // 1.取得资源加载器,即容器本身
    ResourceLoader resourceLoader = getResourceLoader();
    if (resourceLoader == null) {
        // 抛出异常...
    }

    // 判断资源加载器类型
    if (resourceLoader instanceof ResourcePatternResolver) {
        // 说明该 ResourceLoader 可以基于路径加载多个资源

        try {
            // 2.加载资源
            Resource[] resources =
                ((ResourcePatternResolver) resourceLoader).getResources(location);

            // 3.通过 Resource 加载 Bean
            int loadCount = loadBeanDefinitions(resources);

            if (actualResources != null) {
                for (Resource resource : resources) {
                    actualResources.add(resource);
                }
            }

            // 省略代码...

            return loadCount;

        }catch (IOException ex) {
            // 抛出异常...
        }
    }else {
        // 表示 ResourceLoader 只能加载一个资源
        Resource resource = resourceLoader.getResource(location);
        int loadCount = loadBeanDefinitions(resource);
        if (actualResources != null) {
            actualResources.add(resource);
        }

        // 省略代码...

        return loadCount;
    }
}
观察代码,该方法的工作流程可分为四个步骤:
-
取得资源加载器
-
加载资源,通过 location 利用 ResourceLoader 加载
-
通过 Resource 加载 Bean
4.通过 Resource 加载 Bean
在得到资源(Resource)后,该方法对它进行了封装,使其变成一个 EncodedResource 对象。
public int loadBeanDefinitions(Resource resource)
    throws BeanDefinitionStoreException {

    // EncodedResource 表示编码类型的资源
    return loadBeanDefinitions(new EncodedResource(resource));
}

// 构造函数
public EncodedResource(Resource resource, String encoding) {
    // 封装资源,并带上编码类型
    this(resource, encoding, null);
}
5.通过 EncodedResource 加载 Bean
public int loadBeanDefinitions(EncodedResource encodedResource)
    throws BeanDefinitionStoreException {

    // 省略代码...

    // 1.取得[已加载的资源]的集合,用于存在已加载的资源。空,则创建。
    Set<EncodedResource> currentResources = this.resourcesCurrentlyBeingLoaded.get();
    if (currentResources == null) {
        currentResources = new HashSet<EncodedResource>(4);
        this.resourcesCurrentlyBeingLoaded.set(currentResources);
    }

    // 2.将当前资源加入集合
    if (!currentResources.add(encodedResource)) {
        // 抛出异常...
    }

    try {
        // 3.将资源转换成流
        InputStream inputStream = encodedResource.getResource().getInputStream();

        try {
            //5.通过流创建 InputSource ,并设置编码
            InputSource inputSource = new InputSource(inputStream);
            if (encodedResource.getEncoding() != null) {
                inputSource.setEncoding(encodedResource.getEncoding());
            }

            //6.通过 InputSource 加载 Bean
            return doLoadBeanDefinitions(inputSource, encodedResource.getResource());

        }finally {
            inputStream.close();
        }
    }catch (IOException ex) {
        // 抛出异常...
    }finally {

        // 移除已完成解析的资源
        currentResources.remove(encodedResource);

        // 集合为空,则一并删除
        if (currentResources.isEmpty()) {
            this.resourcesCurrentlyBeingLoaded.remove();
        }
    }
}- 取得已加载的资源集合
- 将当前资源添加到集合
- 将资源转换成流
- 通过流创建 InputSource ,并设置编码
- 通过 InputSource 加载 Bean
6.通过 InputSource 加载 Bean
之所以把 Resource 转换成 InputSource ,就是为了 SAX 解析作准备。
protected int doLoadBeanDefinitions(InputSource inputSource, Resource resource)
    throws BeanDefinitionStoreException {
    try {

        // 1.解析 XML 文件
        Document doc = doLoadDocument(inputSource, resource);

        // 2.注册 Bean
        return registerBeanDefinitions(doc, resource);

    }catch (BeanDefinitionStoreException ex) {
        // 抛出异常...
    }catch (SAXParseException ex) {
        // 抛出异常...
    }catch (SAXException ex) {
        // 抛出异常...
    }catch (ParserConfigurationException ex) {
        // 抛出异常...
    }catch (IOException ex) {
        // 抛出异常...
    }catch (Throwable ex) {
        // 抛出异常...
    }
}

// 解析 XML 文件,并返回 Document 对象。
protected Document doLoadDocument(InputSource inputSource, Resource resource)
    throws Exception {
    return this.documentLoader.loadDocument(
        inputSource,
        getEntityResolver(),
        this.errorHandler,
        getValidationModeForResource(resource),
        isNamespaceAware());
}
3.Bean 注册
上一步中 XmlBeanDefinitionReader 已经取得了 XML 的 Document 对象,完成了资源的解析过程。
下一步就是 Bean 的注册过程。
public int registerBeanDefinitions(Document doc, Resource resource) throws BeanDefinitionStoreException {

    // 利用 documentReader 对配置文件的内容进行解析
    BeanDefinitionDocumentReader documentReader = createBeanDefinitionDocumentReader();

    // 取得已经注册 BeanDefinition
    int countBefore = getRegistry().getBeanDefinitionCount();

    // 关键 -> 注册 BeanDefinition (包含解析过程)
    documentReader.registerBeanDefinitions(doc, createReaderContext(resource));

    return getRegistry().getBeanDefinitionCount() - countBefore;
}
总结
分析完 BeanDefinitionReader 具体工作流程,最后通过一个图简单阐述: