一、创建项目
1.创建WPF项目,设置初始化窗口大小(初级难度):高x宽为430x350。
2.添加文件夹Images,并添加相关图片。

3.xaml中引入图片资源。
<Window.Resources>
    <BitmapImage x:Key="ImgSpace" UriSource="/Images/space.bmp"/>
    <BitmapImage x:Key="ImgMine" UriSource="/Images/mine.png"/>
    <BitmapImage x:Key="ImgNum1_8" UriSource="/Images/num1_8.png"/>
    <BitmapImage x:Key="ImgForeground" UriSource="/Images/foreImg.png"/>
    <BitmapImage x:Key="ImgMineOrTimer" UriSource="/Images/mineAndTimer.png"/>
    <BitmapImage x:Key="ImgBomb" UriSource="/Images/bomb.png"/>
</Window.Resources>
4.添加窗口元素
(1)菜单
<DockPanel>
        <Menu DockPanel.Dock="Top">
            <MenuItem Header="游戏(_G)">
                <MenuItem x:Name="MenuGameStart" Header="开始游戏(_S)" Click="MenuGameStart_Click"/>
                <Separator/>
                <MenuItem x:Name="MenuGameExit" Header="退出游戏(_x)" Click="MenuGameExit_Click"/>
            </MenuItem>
            <MenuItem Header="级别(_L)">
                <MenuItem Header="初级(_L)" x:Name="MenuLowLevel" IsChecked="True" Click="MenuLowLevel_Click"/>
                <MenuItem Header="中级(_M)" x:Name="MenuMiddleLevel" IsChecked="False" Click="MenuMiddleLevel_Click"/>
                <MenuItem Header="高级(_H)" x:Name="MenuHighLevel" IsChecked="False" Click="MenuHighLevel_Click"/>
            </MenuItem>
            <MenuItem Header="选项(_O)">
                <MenuItem  x:Name="MenuOptionsMusic" Header="音乐音效(_S)" IsCheckable="True" IsChecked="True"
                          Click="MenuOptionsMusic_Click"/>
                <Separator/>
                <MenuItem x:Name="MenuShowAllMine" Header="显示地雷(_O)" Click="MenuShowAllMine_Click"/>
                <MenuItem x:Name="MenuRestoreMap" Header="继续游戏(_F)" Click="MenuRestoreMap_Click"/>
                <Separator />
                <MenuItem x:Name="MenuResetData" Header="重置记录(_R)" Click="MenuResetData_Click" />
            </MenuItem>
            <MenuItem Header="帮助(_H)">
                <MenuItem x:Name="MenuHelpAbout" Header="关于(_A)..." Click="MenuHelpAbout_Click"/>
            </MenuItem>
        </Menu>


</DockPanel>
(2)在菜单之后,</DockPanel>之前添加其他界面元素
<Grid Margin="3" DockPanel.Dock="Top">
            <Grid.RowDefinitions>
                <RowDefinition Height="40"/>
                <RowDefinition Height="*"/>
            </Grid.RowDefinitions>
            <StackPanel Grid.Row="0" Background="SkyBlue" VerticalAlignment="Center">
                <Grid Margin="2 2 2 2">
                    <Grid.ColumnDefinitions>
                        <ColumnDefinition Width="*"/>
                        <ColumnDefinition Width="*"/>
                    </Grid.ColumnDefinitions>
                    <StackPanel Grid.Column="0" HorizontalAlignment="Right" Margin="0 0 60 0" Orientation="Horizontal">
                        <Image x:Name="ImgClock" Width="35" Height="35" />
                        <Border Height="30" Width="60" CornerRadius="6" BorderThickness="1" VerticalAlignment="Center" Background="#333333">
                            <TextBlock x:Name="textBlockTime" Text="" VerticalAlignment="Center" HorizontalAlignment="Center"
                                   FontSize="14" Foreground="AliceBlue"/>
                        </Border>
                    </StackPanel>

                    <StackPanel Grid.Column="1" HorizontalAlignment="Left" Orientation="Horizontal"  Margin="40 0 0 0">
                        <Image x:Name="ImgMineNum" Width="35" Height="35" />

                        <Border Height="30" Width="60" CornerRadius="6" BorderThickness="1" VerticalAlignment="Center" Background="#333333">
                            <TextBlock x:Name="textBlockMineNum" Text="" VerticalAlignment="Center" HorizontalAlignment="Center"
                               FontSize="14" Foreground="AliceBlue"/>
                        </Border>
                    </StackPanel>
                </Grid>
            </StackPanel>
            <StackPanel Grid.Row="1" HorizontalAlignment="Left" VerticalAlignment="Top">
                <Canvas x:Name="BackCanvas" Width="315" Height="315" Background="LightCyan" Margin="10" />
            </StackPanel>
            <StackPanel Grid.Row="1" HorizontalAlignment="Left" VerticalAlignment="Top">
                <Canvas x:Name="ForeCanvas" Width="315" Height="315"  Margin="10"
                        MouseLeftButtonDown="ForeCanvas_MouseLeftButtonDown"
                        MouseRightButtonDown="ForeCanvas_MouseRightButtonDown"/>
            </StackPanel>
        </Grid>
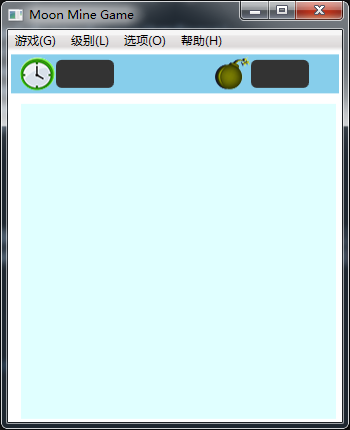
其中两个Image用于显示时钟和地雷数图例,其后两个TextBlock分别用于显示读秒数和剩余地雷数。
两个重叠的Canvas,分别显示底层图块和前景图块。底层图块游戏开始后是固定的,其中会显示随机分布的地雷及其周边地雷数值,而前景图块可以通过鼠标点击进行移除或标记为问号或小红旗。
二、载入图片资源
1、添加一个静态图片帮助类ImageHelper,方便以后的图片切片操作。
public static class ImageHelper
{
    /// <summary>
    /// BitmapSource图片源剪切操作函数
    /// </summary>
    /// <param name="bmpSource">等待剪切的源</param>
    /// <param name="cut">剪切矩形</param>
    /// <returns>已剪切的图片源</returns>
    public static BitmapSource CutImage(BitmapSource bmpSource, Int32Rect cut)
    {
        return new CroppedBitmap(bmpSource, cut);
    }

    /// <summary>
    /// 将BitmapImage转换为BitmapSource
    /// </summary>
    /// <param name="bitmapImage">待转换的BitmapImage</param>
    /// <returns>BitmapSource</returns>
    public static BitmapSource BitmapImageToBitmapSource(BitmapImage bitmapImage)
    {
        ImageSource imageSource = bitmapImage;
        Bitmap bitmap = ImageSourceToBitmap(imageSource);
        BitmapSource bitmapSource = BitmapToBitmapImage(bitmap);
     bitmap.Dispose();

        return bitmapSource;
    }

    /// <summary>
    /// 将ImageSource转为Bitmap
    /// </summary>
    /// <param name="imageSource"></param>
    /// <returns></returns>
    public static System.Drawing.Bitmap ImageSourceToBitmap(ImageSource imageSource)
    {
        BitmapSource m = (BitmapSource)imageSource;
        Bitmap bmp = new Bitmap(m.PixelWidth, m.PixelHeight, System.Drawing.Imaging.PixelFormat.Format32bppPArgb);
        System.Drawing.Imaging.BitmapData data = bmp.LockBits(new Rectangle(System.Drawing.Point.Empty, bmp.Size),
            System.Drawing.Imaging.ImageLockMode.WriteOnly, System.Drawing.Imaging.PixelFormat.Format32bppPArgb);

        m.CopyPixels(Int32Rect.Empty, data.Scan0, data.Height * data.Stride, data.Stride);
        bmp.UnlockBits(data);
        return bmp;
    }

    /// <summary>
    /// 将Bitmap转为BitmapImage
    /// </summary>
    /// <param name="bitmap"></param>
    /// <returns></returns>
    public static BitmapImage BitmapToBitmapImage(Bitmap bitmap)
    {
        using (MemoryStream stream = new MemoryStream())
        {
            bitmap.Save(stream, System.Drawing.Imaging.ImageFormat.Png);
            stream.Position = 0;
            BitmapImage result = new BitmapImage();
            result.BeginInit();
            result.CacheOption = BitmapCacheOption.OnLoad;
            result.StreamSource = stream;
            result.EndInit();
            result.Freeze();
            return result;
        }
    }
}
2、添加几个字段变量
主程序MainWindow.xaml.cs中添加:
private BitmapSource _bmpSpace, _bmpMine, _bmpNum1_8, _bmpForeground, _bmpMineOrTimer, _bmpBomb;
private System.Drawing.Size _cellSize = new System.Drawing.Size(35, 35);
3、获取图片资源
private void GetImageResource()
{
    BitmapImage bmpSpace = (BitmapImage)TryFindResource("ImgSpace");
    BitmapImage bmpMine = (BitmapImage)TryFindResource("ImgMine");
    BitmapImage bmpNum1_8 = (BitmapImage)TryFindResource("ImgNum1_8");
    BitmapImage bmpForeground = (BitmapImage)TryFindResource("ImgForeground");
    BitmapImage bmpMineOrTimer = (BitmapImage)TryFindResource("ImgMineOrTimer");
    BitmapImage bmpBomb = (BitmapImage)TryFindResource("ImgBomb");

    _bmpSpace = ImageHelper.BitmapImageToBitmapSource(bmpSpace);
    _bmpMine = ImageHelper.BitmapImageToBitmapSource(bmpMine);
    _bmpNum1_8 = ImageHelper.BitmapImageToBitmapSource(bmpNum1_8);
    _bmpForeground = ImageHelper.BitmapImageToBitmapSource(bmpForeground);
    _bmpMineOrTimer = ImageHelper.BitmapImageToBitmapSource(bmpMineOrTimer);
    _bmpBomb = ImageHelper.BitmapImageToBitmapSource(bmpBomb);
}
4、将界面中用到的时钟和地图数这两张图片设置到位。
private void SetTimerAndMineImage()
{
    ImgClock.Source = ImageHelper.CutImage(_bmpMineOrTimer, new Int32Rect(0, 0, _cellSize.Width, _cellSize.Height));
    ImgMineNum.Source = ImageHelper.CutImage(_bmpMineOrTimer, new Int32Rect(1 * _cellSize.Width, 0, _cellSize.Width, _cellSize.Height));
}
5、将上述两个方法添加到构造方法中。
运行程序,如图1。
三、设置状态枚举
添加一个MyEnum.cs类文件,让主cs文件看起来简练一点。内容如下:
// 游戏级别
public enum Level
{
    SIMPLE,
    NORMAL,
    HARD
};

// 前景状态
public enum ForeState
{
    NONE,           // 无
    NORMAL,         // 正常覆盖
    FLAG,           // 红旗
    QUESTION        // 问号
};

// 底层状态
public enum BackState
{
    MINE = -1,      // 地雷
    BLANK = 0,      // 空
};

// 游戏状态
public enum GameState
{
    NONE,           // 未开始
    STOP,           // 已停止
    START,          // 已开始
    PAUSE           // 已暂停
};
四、添加GameLevel类,定义游戏级别相关参数
public class GameLevel
{
    public int _mineNum { get; set; }      // 地雷数
    public int _rowGrid { get; set; }      // 横格子数
    public int _colGrid { get; set; }      // 纵格子数

    public GameLevel(int currLevel, int mineNum, int rowGrid, int colGrid)
    {
        _mineNum = mineNum;
        _rowGrid = rowGrid;
        _colGrid = colGrid;
    }
}
五、定义主游戏数据变量
private int[,] _backData = null;            // 底部背景数据(雷-1,0为空白,数值(1-8)周围雷数)
private int[,] _foreData = null;            // 前景数据(1:正常盖住;2:红旗;3:问号)
private Image[,] _backImage = null;         // 底图图片数组
private Image[,] _foreImage = null;         // 上方图片数组

private GameState _gameState = GameState.NONE;

private Random rnd = new Random();          // 随机数

private GameLevel _gameLevel;
private Level _level = Level.Simple;
另外还用到几个计时器,看后面的注释
// 计时
private System.Diagnostics.Stopwatch _stopWatchGame = new System.Diagnostics.Stopwatch(); // 游戏过程读秒
private DispatcherTimer _timerSetTimeText = new DispatcherTimer();      // 更新读秒文本框
private DispatcherTimer _timerWinAnim = new DispatcherTimer();     // 用于胜利时动画
private DispatcherTimer _timerBomb = new DispatcherTimer();            // 用于踩雷动画
将计时器初始化放在构造方法中
// 计时器
_timerSetTimeText.Interval = new TimeSpan(0, 0, 1);
_timerSetTimeText.Tick += _timerSetTimeText_Tick;

// 动画计时器
_timerWinAnim.Interval = new TimeSpan(0, 0, 0, 0, 300);
_timerWinAnim.Tick += _timerWinAnim_Tick;

// 用户踩雷后的动画
_timerBomb.Interval = new TimeSpan(0, 0, 0, 0, 200);
_timerBomb.Tick += _timerBomb_Tick;
六、初始化游戏状态
private void InitialGameState()
{
    _timerSetTimeText.Stop();
    _timerWinAnim.Stop();

    _stopWatchGame.Reset();
    _stopWatchGame.Stop();
    _gameState = GameState.NONE;

    MenuGamePauseOrContinue.Header = "暂停(_P)";

}

private void _timerSetTimeText_Tick(object sender, EventArgs e)
{
    textBlockTime.Text = ((int)_stopWatchGame.Elapsed.TotalSeconds).ToString();
}

private void _timerWinAnim_Tick(object sender, EventArgs e)
{
}

private void _timerBomb_Tick(object sender, EventArgs e)
{
}
后面动画计时事件方法以后再加入,这里先空着。
七、初始化游戏主数据
private void InitGameData(Level level)
{
    switch (level)
    {
        case  Level.SIMPLE:
            _gameLevel = new GameLevel(9, 9, 10);
            break;

        case Level.NORMAL:
            _gameLevel = new GameLevel(16, 16, 40);
            break;

        case Level.HARD:
            _gameLevel = new GameLevel(30, 16, 99);
            break;
    }

    // 设置窗口大小
    this.Width = _cellSize.Width * _gameLevel._rowGrid + 40;
    this.Height = _cellSize.Height * _gameLevel._colGrid + 20 + 100;

    // 获取屏幕大小
    double screenWidth = SystemParameters.WorkArea.Width;
    double screenHeight = SystemParameters.WorkArea.Height;

    // 使窗口居中
    this.Left = (screenWidth - this.Width) / 2;
    this.Top = (screenHeight - this.Height) / 2;

    // 设置绘图控件大小
    BackCanvas.Width = _gameLevel._colGrid * _cellSize.Width;
    BackCanvas.Height = _gameLevel._rowGrid * _cellSize.Height;
    ForeCanvas.Width = BackCanvas.Width;
    ForeCanvas.Height = BackCanvas.Height;

    // 初始化前景和背景数据
    _backData = new int[_gameLevel._colGrid, _gameLevel._rowGrid];
    _foreData = new int[_gameLevel._colGrid, _gameLevel._rowGrid];

    for (int y = 0; y<_gameLevel._colGrid; y++)
    {
        for (int x=0; x<_gameLevel._rowGrid; x++)
        {
            _backData[y, x] = (int)BackState.BLANK;
            _foreData[y, x] = (int)ForeState.NORMAL;
        }
    }

    // 初始化前景和背景图片数组
    _backImage = new Image[_gameLevel._colGrid, _gameLevel._rowGrid];
    _foreImage = new Image[_gameLevel._colGrid, _gameLevel._rowGrid];

    // 清理绘制区
    BackCanvas.Children.Clear();
    ForeCanvas.Children.Clear();
}