Dialog 窗口添加机制
代码示例
首先举两个例子:
例子1 在Activity中
  @OnClick(R.id.but)
    void onClick() {
        Log.d("LiaBin", "activity window token:" + this.getWindow().getAttributes().token);

        Dialog dialog = new ProgressDialog(this);
        dialog.show();
        Log.d("LiaBin", "dialog window token:" + dialog.getWindow().getAttributes().token);
    }
输出结果:
11-21 03:24:38.038 2040-2040/lbb.demo.first D/LiaBin: activity window token:android.os.BinderProxy@18421fac
11-21 03:24:38.054 2040-2040/lbb.demo.first D/LiaBin: dialog window token:null
例子2
 @OnClick(R.id.but)
    void onClick() {
        Dialog dialog = new ProgressDialog(getApplicationContext());
        dialog.show();
    }
例子3
public class WindowService extends Service {
    @Override
    public IBinder onBind(Intent intent) {
        return null;
    }

    @Override
    public void onCreate() {
        super.onCreate();
        //重点关注构造函数的参数
        Dialog dialog = new ProgressDialog(this);
        dialog.setTitle("TestDialogContext");
        dialog.show();
    }
}
输出结果都是:
E/AndroidRuntime: android.view.WindowManager$BadTokenException: Unable to add window – token null is not for an application
E/AndroidRuntime: at android.view.ViewRootImpl.setView(ViewRootImpl.java:566)
E/AndroidRuntime: at android.view.WindowManagerGlobal.addView(WindowManagerGlobal.java:282)
E/AndroidRuntime: at android.view.WindowManagerImpl.addView(WindowManagerImpl.java:85)
E/AndroidRuntime: at android.app.Dialog.show(Dialog.java:298)
为什么会出现以上两种输出结果,看以下分析。
Dialog源码分析
Dialog是一系列XXXDialog的基类,我们可以new任意Dialog或者通过Activity提供的onCreateDialog(……)、onPrepareDialog(……)和showDialog(……)等方法来管理我们的Dialog,但是究其实质都是来源于Dialog基类,所以我们对于各种XXXDialog来说只用分析Dialog的窗口加载就可以了。
public class Dialog implements DialogInterface, Window.Callback,
        KeyEvent.Callback, OnCreateContextMenuListener, Window.OnWindowDismissedCallback {
    ......
    public Dialog(Context context) {
        this(context, 0, true);
    }
    //构造函数最终都调运了这个默认的构造函数
    Dialog(Context context, int theme, boolean createContextThemeWrapper) {
        //默认构造函数的createContextThemeWrapper为true
        if (createContextThemeWrapper) {
            //默认构造函数的theme为0
            if (theme == 0) {
                TypedValue outValue = new TypedValue();
                context.getTheme().resolveAttribute(com.android.internal.R.attr.dialogTheme,
                        outValue, true);
                theme = outValue.resourceId;
            }
            mContext = new ContextThemeWrapper(context, theme);
        } else {
            mContext = context;
        }
        //mContext已经从外部传入的context对象获得值(一般是个Activity)!!!非常重要,先记住!!!

        //获取WindowManager对象
        mWindowManager = (WindowManager)context.getSystemService(Context.WINDOW_SERVICE);
        //为Dialog创建新的Window
        Window w = PolicyManager.makeNewWindow(mContext);
        mWindow = w;
        //Dialog能够接受到按键事件的原因
        w.setCallback(this);
        w.setOnWindowDismissedCallback(this);
        //关联WindowManager与新Window,特别注意第二个参数token为null,也就是说Dialog没有自己的token
        //一个Window属于Dialog的话,那么该Window的mAppToken对象是null
        w.setWindowManager(mWindowManager, null, null);
        w.setGravity(Gravity.CENTER);
        mListenersHandler = new ListenersHandler(this);
    }
    ......
}
Dialog构造函数首先把外部传入的参数context对象赋值给了当前类的成员(我们的Dialog一般都是在Activity中启动的,所以这个context一般是个Activity),然后调用context.getSystemService(Context.WINDOW_SERVICE)获取WindowManager,这个WindowManager是哪来的呢?先按照上面说的context一般是个Activity来看待,可以发现这句实质就是Activity的getSystemService方法,我们看下源码,如下:
http://androidxref.com/6.0.1_r10/xref/frameworks/base/core/java/android/app/Activity.java
 @Override
    public Object getSystemService(@ServiceName @NonNull String name) {
        if (getBaseContext() == null) {
            throw new IllegalStateException(
                    "System services not available to Activities before onCreate()");
        }
        //我们Dialog中获得的WindowManager对象就是这个分支
        if (WINDOW_SERVICE.equals(name)) {
            //Activity的WindowManager
            return mWindowManager;
        } else if (SEARCH_SERVICE.equals(name)) {
            ensureSearchManager();
            return mSearchManager;
        }
        return super.getSystemService(name);
    }
看见没有,Dialog中的WindowManager成员实质和Activity里面是一样的,也就是共用了一个WindowManager。
回到Dialog的构造函数继续分析,在得到了WindowManager之后,程序又新建了一个Window对象(类型是PhoneWindow类型,和Activity的Window新建过程类似);接着通过w.setCallback(this)设置Dialog为当前window的回调接口,这样Dialog就能够接收事件处理了;接着把从Activity拿到的WindowManager对象关联到新创建的Window中。
总结如下:
1.dialog使用有自己的window,不同于activity的window
2.dialog的mWindowManager变量其实就是activity对象的mWindowManager变量,此时注意因为window通过setWindowManager方法也会复制自己的mWindowManager,但这个mWindowManager是通过createLocalWindowManager返回的。不同于dialog的mWindowManager变量。不要混淆
//Window

    public void setWindowManager(WindowManager wm, IBinder appToken, String appName,
            boolean hardwareAccelerated) {
        mAppToken = appToken;
        mAppName = appName;
        mHardwareAccelerated = hardwareAccelerated
                || SystemProperties.getBoolean(PROPERTY_HARDWARE_UI, false);
        if (wm == null) {
            wm = (WindowManager)mContext.getSystemService(Context.WINDOW_SERVICE);
        }

        //在此处创建mWindowManager
        mWindowManager = ((WindowManagerImpl)wm).createLocalWindowManager(this);
    }

//在WindowManagerImpl类中
    public WindowManagerImpl createLocalWindowManager(Window parentWindow) {
        return new WindowManagerImpl(mContext, parentWindow);
    }
Activity的getSystemService根本没有创建WindowManager。类似于PhoneWindow和Window的关系,WindowManager是一个接口,具体的实现是WindowManagerImpl。
Application 的getSystemService()源码其实是在ContextImpl中:有兴趣的可以看看APP启动时Context的创建:
 @Override
    public Object getSystemService(String name) {
        return SystemServiceRegistry.getSystemService(this, name);
    }
SystemServiceRegistry类用静态字段及方法中封装了一些服务的代理,其中就包括WindowManagerService
public static Object getSystemService(ContextImpl ctx, String name) {
        ServiceFetcher<?> fetcher = SYSTEM_SERVICE_FETCHERS.get(name);
        return fetcher != null ? fetcher.getService(ctx) : null;
    }

    static {
             ...
             registerService(Context.WINDOW_SERVICE, WindowManager.class,
                new CachedServiceFetcher<WindowManager>() {
            @Override
            public WindowManager createService(ContextImpl ctx) {
                return new WindowManagerImpl(ctx.getDisplay());
            }});
            ...
    }
http://androidxref.com/6.0.1_r10/xref/frameworks/base/core/java/android/view/WindowManagerImpl.java
public WindowManagerImpl(Display display) {
    this(display, null);
}

private WindowManagerImpl(Display display, Window parentWindow) {
    mDisplay = display;
    mParentWindow = parentWindow;
}
因此context.getApplicationContext().getSystemService()最终可以简化为new WindowManagerImpl(ctx.getDisplay())。
3.activity覆盖了context的getSystemService方法,如果WINDOW_SERVICE,那么返回的是当前activity的mWindowManager对象
至此Dialog的创建过程Window处理已经完毕,很简单,所以接下来我们继续看看Dialog的show与cancel方法,如下:
  public void show() {
        ......
        if (!mCreated) {
            //回调Dialog的onCreate方法
            dispatchOnCreate(null);
        }
        //回调Dialog的onStart方法
        onStart();
        //类似于Activity,获取当前新Window的DecorView对象,所以有一种自定义Dialog布局的方式就是重写Dialog的onCreate方法,使用setContentView传入布局,就像前面文章分析Activity类似
        mDecor = mWindow.getDecorView();
        ......
        //获取新Window的WindowManager.LayoutParams参数,和上面分析的Activity一样type为TYPE_APPLICATION
        WindowManager.LayoutParams l = mWindow.getAttributes();
        ......
        try {
            //把一个View添加到Activity共用的windowManager里面去
            mWindowManager.addView(mDecor, l);
            ......
        } finally {
        }
    }
可以看见Dialog的新Window与Activity的Window的type同样都为TYPE_APPLICATION,上面介绍WindowManager.LayoutParams时TYPE_APPLICATION的注释明确说过,普通应用程序窗口TYPE_APPLICATION的token必须设置为Activity的token来指定窗口属于谁。所以可以看见,既然Dialog和Activity共享同一个WindowManager(也就是上面分析的WindowManagerImpl),而WindowManagerImpl里面有个Window类型的mParentWindow变量,这个变量在Activity的attach中创建WindowManagerImpl时传入的为当前Activity的Window,而当前Activity的Window里面的mAppToken值又为当前Activity的token,所以Activity与Dialog共享了同一个mAppToken值,只是Dialog和Activity的Window对象不同。
然后这句话是重点,有木有跟Activity窗口添加的时候很像,没错
mWindowManager.addView(mDecor, l);
Dialog机制大概就这些了,现在来分析一下,上面两个代码示例
第一个问题:
Dialog dialog = new ProgressDialog(this);//为什么这样是正常的?
所以此时dialog的mWindowManager变量其实就是activity对象的mWindowManager变量。
还记得吗?在WindowManager.addView实际上执行的是WindowManagerImpl的addView
http://androidxref.com/6.0.1_r10/xref/frameworks/base/core/java/android/view/WindowManagerImpl.java
public final class WindowManagerImpl implements WindowManager {
    //继承自Object的单例类
    private final WindowManagerGlobal mGlobal = WindowManagerGlobal.getInstance();
    private final Window mParentWindow;

public WindowManagerImpl(Display display) {
    this(display, null);
}

private WindowManagerImpl(Display display, Window parentWindow) {
    mDisplay = display;
    mParentWindow = parentWindow;
}
public void addView(@NonNull View view, @NonNull ViewGroup.LayoutParams params) {
        applyDefaultToken(params);
        //mParentWindow是上面分析的在Activity中获取WindowManagerImpl实例化时传入的当前Window
        //view是Activity中最顶层的mDecor
        mGlobal.addView(view, params, mDisplay, mParentWindow);
    }
    ......
}
所以此时mParentWindow其实就是Activity的PhoneWindow对象,虽然dialog有自己的PhoneWindow,但是这两者完全是两码事,不要混淆
所以在WindowManagerGlobal.addView方法中调用
public void addView(View view, ViewGroup.LayoutParams params,
  Display display, Window parentWindow) {
         //...

        final WindowManager.LayoutParams wparams = (WindowManager.LayoutParams) params;
        if (parentWindow != null) {
        //依据当前Activity的Window调节sub Window的LayoutParams
            parentWindow.adjustLayoutParamsForSubWindow(wparams);
        } else {
            // If there's no parent, then hardware acceleration for this view is
            // set from the application's hardware acceleration setting.
            final Context context = view.getContext();
            if (context != null
                    && (context.getApplicationInfo().flags
                            & ApplicationInfo.FLAG_HARDWARE_ACCELERATED) != 0) {
                wparams.flags |= WindowManager.LayoutParams.FLAG_HARDWARE_ACCELERATED;
            }
        }

        ViewRootImpl root;
        View panelParentView = null;

        synchronized (mLock) {
           //...
            root = new ViewRootImpl(view.getContext(), display);

            view.setLayoutParams(wparams);

            mViews.add(view);
            mRoots.add(root);
            mParams.add(wparams);
        }

        // do this last because it fires off messages to start doing things
        try {
            root.setView(view, wparams, panelParentView);
        } catch (RuntimeException e) {
           //...
        }
    }
http://androidxref.com/6.0.1_r10/xref/frameworks/base/core/java/android/view/Window.java
adjustLayoutParamsForSubWindow方法中
    void adjustLayoutParamsForSubWindow(WindowManager.LayoutParams wp) {
        CharSequence curTitle = wp.getTitle();
        if (wp.type >= WindowManager.LayoutParams.FIRST_SUB_WINDOW &&
                wp.type <= WindowManager.LayoutParams.LAST_SUB_WINDOW) {
           //...

        } else if (wp.type >= WindowManager.LayoutParams.FIRST_SYSTEM_WINDOW &&
          //...
        } else {
            if (wp.token == null) {
                wp.token = mContainer == null ? mAppToken : mContainer.mAppToken;
            }
            if ((curTitle == null || curTitle.length() == 0)
                    && mAppName != null) {
                wp.setTitle(mAppName);
            }
        }
        if (wp.packageName == null) {
            wp.packageName = mContext.getPackageName();
        }
        if (mHardwareAccelerated) {
            wp.flags |= WindowManager.LayoutParams.FLAG_HARDWARE_ACCELERATED;
        }
    }
调整wp的时候,所以最后wp.token拿到的就是Activity的mToken,就不为null,所以在最后WindowManagerService的addWindow方法中就不会让ViewRootImpl中抛异常了,所以一切OK
第二个问题:
Log.d(“LiaBin”, “dialog window token:” + dialog.getWindow().getAttributes().token); 打印的为什么是null,而不是activity的token
现在就很好理解了,首先dialog.getWindow(),那么获取的就是dialog的PhoneWindow,而Dialog的window的mWindowAttributes的token值初始化就为null
虽然调用了adjustLayoutParamsForSubWindow方法,但是并没有调整Dialog的window的mWindowAttributes的token值,因为以下代码行就把两者关系断了,调整的是另外一个对象
final WindowManager.LayoutParams wparams = (WindowManager.LayoutParams)params;
第三个问题:
Dialog dialog = new ProgressDialog(getApplicationContext());为什么会抛异常BadTokenException: Unable to add window – token null is not for an application
因为mContext赋值为了getApplicationContext(),那么
//获取WindowManager对象
mWindowManager = (WindowManager)context.getSystemService(Context.WINDOW_SERVICE);
那么此时的mWindowManager就是全局唯一的mWindowManager了,而不是activity的mWindowManager。可以看上一篇的分析。调用的其实是ContextImpl的getSystemService方法
所以在WindowManagerGlobal.addView方法中parentWindow就为null了,所以就不会去调用adjustLayoutParamsForSubWindow方法了,所以最后params的token就为null了
在最后WindowManagerService的addWindow方法,把param的token取出来一看是null,就return WindowManagerGlobal.ADD_NOT_APP_TOKEN;返回给ViewRootImpl的setView方法
再来看ViewRootImpl的setView方法,片段
case WindowManagerGlobal.ADD_NOT_APP_TOKEN:throw new WindowManager.BadTokenException(“Unable to add window – token ” + attrs.token + ” is not for an application”);
所以最后抛BadTokenException异常啦
第四个问题:
在服务中调用Dialog dialog = new ProgressDialog(this);为什么要会抛异常
因为service中并没有跟activity做同样的处理,调用的其实是ContextImpl的getSystemService方法,所以此时的mWindowManager就是全局唯一的mWindowManager了,
另外一种情况:
在Activity中使用Dialog的时候,为什么有时候会报错“Unable to add window – token is not valid; is your activity running?”?这种情况一般发生在什么时候?一般发生在Activity进入后台,Dialog没有主动Dismiss掉,然后从后台再次进入App的时候。
Dialog窗口加载总结
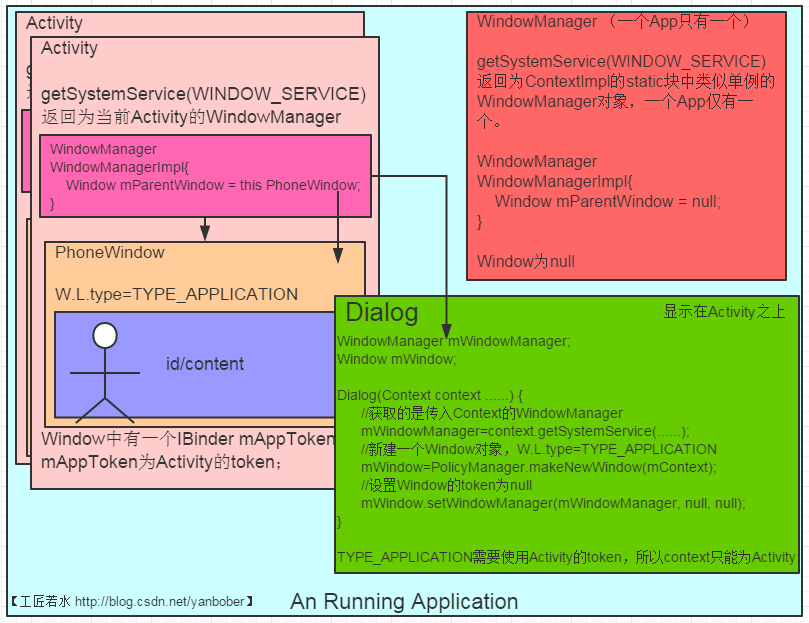
从图中可以看出,Activity和Dialog共用了一个Token对象,Dialog必须依赖于Activity而显示(通过别的context搞完之后token都为null,最终会在ViewRootImpl的setView方法中加载时因为token为null抛出异常),所以Dialog的Context传入参数一般是一个存在的Activity,如果Dialog弹出来之前Activity已经被销毁了,则这个Dialog在弹出的时候就会抛出异常,因为token不可用了。在Dialog的构造函数中我们关联了新Window的callback事件监听处理,所以当Dialog显示时Activity无法消费当前的事件。
PopWindow 窗口添加机制
http://androidxref.com/6.0.1_r10/xref/frameworks/base/core/java/android/widget/PopupWindow.java
public class PopupWindow {
   private int mWindowLayoutType = WindowManager.LayoutParams.TYPE_APPLICATION_PANEL;
    ......
    //我们只分析最常用的一种构造函数
    public PopupWindow(View contentView, int width, int height, boolean focusable) {
        if (contentView != null) {
            //获取mContext,contentView实质是View,View的mContext都是构造函数传入的,View又层级传递,所以最终这个mContext实质是Activity!!!很重要
            mContext = contentView.getContext();
            //获取Activity的getSystemService的WindowManager
            mWindowManager = (WindowManager) mContext.getSystemService(Context.WINDOW_SERVICE);
        }
        //进行一些Window类的成员变量初始化赋值操作
        setContentView(contentView);
        setWidth(width);
        setHeight(height);
        setFocusable(focusable);
    }
    ......
}
其中注意,view创建的时候都会把一个context参数传递进去,context就是当前的activity了,所以其实contentView.getContext();返回的是该Activity,所以mWindowManager共享当前Activity的mWindowManager变量。同时因为popupwindow构造函数的参数是view,并不是context,所以并不用担心getApplicationContext造成的问题
public void showAsDropDown(View anchor, int xoff, int yoff, int gravity) {
        ......
        //anchor是Activity中PopWindow准备依附的View,这个View的token实质也是Activity的Window中的token,也即Activity的token
        //第一步   初始化WindowManager.LayoutParams
        WindowManager.LayoutParams p = createPopupLayout(anchor.getWindowToken());
        //第二步
        preparePopup(p);
        ......
        //第三步
        invokePopup(p);
    }
createPopupLayout
  private WindowManager.LayoutParams createPopupLayout(IBinder token) {
        //实例化一个默认的WindowManager.LayoutParams,其中type=TYPE_APPLICATION
        WindowManager.LayoutParams p = new WindowManager.LayoutParams();
        //设置Gravity
        p.gravity = Gravity.START | Gravity.TOP;
        //设置宽高
        p.width = mLastWidth = mWidth;
        p.height = mLastHeight = mHeight;
        //依据背景设置format
        if (mBackground != null) {
            p.format = mBackground.getOpacity();
        } else {
            p.format = PixelFormat.TRANSLUCENT;
        }
        //设置flags
        p.flags = computeFlags(p.flags);
        //修改type=WindowManager.LayoutParams.TYPE_APPLICATION_PANEL,mWindowLayoutType有初始值,type类型为子窗口
        p.type = mWindowLayoutType;
        //设置token为Activity的token
        p.token = token;
        ......
        return p;
    }
private void preparePopup(WindowManager.LayoutParams p) {
        ......
        //有无设置PopWindow的background区别
        if (mBackground != null) {
            ......
            //如果有背景则创建一个PopupViewContainer对象的ViewGroup
            PopupViewContainer popupViewContainer = new PopupViewContainer(mContext);
            PopupViewContainer.LayoutParams listParams = new PopupViewContainer.LayoutParams(
                    ViewGroup.LayoutParams.MATCH_PARENT, height
            );
            //把背景设置给PopupViewContainer的ViewGroup
            popupViewContainer.setBackground(mBackground);
            //把我们构造函数传入的View添加到这个ViewGroup
            popupViewContainer.addView(mContentView, listParams);
            //返回这个ViewGroup
            mPopupView = popupViewContainer;
        } else {
            //如果没有通过PopWindow的setBackgroundDrawable设置背景则直接赋值当前传入的View为PopWindow的View
            mPopupView = mContentView;
        }
        ......
    }
可以看见preparePopup方法的作用就是判断设置View,如果有背景则会在传入的contentView外面包一层PopupViewContainer(实质是一个重写了事件处理的FrameLayout)之后作为mPopupView,如果没有背景则直接用contentView作为mPopupView。我们再来看下这里的PopupViewContainer类,如下源码:
   private class PopupViewContainer extends FrameLayout {
        ......
        @Override
        protected int[] onCreateDrawableState(int extraSpace) {
            ......
        }

        @Override
        public boolean dispatchKeyEvent(KeyEvent event) {
            ......
        }

        @Override
        public boolean dispatchTouchEvent(MotionEvent ev) {
            if (mTouchInterceptor != null && mTouchInterceptor.onTouch(this, ev)) {
                return true;
            }
            return super.dispatchTouchEvent(ev);
        }

        @Override
        public boolean onTouchEvent(MotionEvent event) {
            ......
            if(xxx) {
                dismiss();
            }
            ......
        }

        @Override
        public void sendAccessibilityEvent(int eventType) {
            ......
        }
    }
可以看见,这个PopupViewContainer是一个PopWindow的内部私有类,它继承了FrameLayout,在其中重写了Key和Touch事件的分发处理逻辑。同时查阅PopupView可以发现,PopupView类自身没有重写Key和Touch事件的处理,所以如果没有将传入的View对象放入封装的ViewGroup中,则点击Back键或者PopWindow以外的区域PopWindow是不会消失的(其实PopWindow中没有向Activity及Dialog一样new新的Window,所以不会有新的callback设置,也就没法处理事件消费了)。
   private void invokePopup(WindowManager.LayoutParams p) {
        if (mContext != null) {
            p.packageName = mContext.getPackageName();
        }
        mPopupView.setFitsSystemWindows(mLayoutInsetDecor);
        setLayoutDirectionFromAnchor();
        mWindowManager.addView(mPopupView, p);
    }
这里使用了Activity的WindowManager将我们的PopWindow进行了显示。
到此可以发现,PopWindow的实质无非也是使用WindowManager的addView、updateViewLayout、removeView进行一些操作展示。与Dialog不同的地方是没有新new Window而已(也就没法设置callback,无法消费事件,也就是前面说的PopupWindow弹出后可以继续与依赖的Activity进行交互的原因)。
到此PopWindw的窗口加载显示机制就分析完毕了,接下来进行总结与应用开发技巧提示。
可以看见preparePopup方法的作用就是判断设置View,如果有背景则会在传入的contentView外面包一层PopupViewContainer(实质是一个重写了事件处理的FrameLayout)之后作为mPopupView,如果没有背景则直接用contentView作为mPopupView
PopupViewContainer是一个PopWindow的内部私有类,它继承了FrameLayout,在其中重写了Key和Touch事件的分发处理逻辑。同时查阅PopupView可以发现,PopupView类自身没有重写Key和Touch事件的处理,所以如果没有将传入的View对象放入封装的ViewGroup中,则点击Back键或者PopWindow以外的区域PopWindow是不会消失的(其实PopWindow中没有向Activity及Dialog一样new新的Window,所以不会有新的callback设置,也就没法处理事件消费了)。
1.与Dialog不同的地方是没有新new Window而已(也就没法设置callback,无法消费事件,也就是前面说的PopupWindow弹出后可以继续与依赖的Activity进行交互的原因)。
2.如果设置了PopupWindow的background,则点击Back键或者点击PopupWindow以外的区域时PopupWindow就会dismiss;如果不设置PopupWindow的background,则点击Back键或者点击PopupWindow以外的区域PopupWindow不会消失。
另一方面,如果需要全屏的popupwindow,那么可以使用一下代码
view.showAtLocation(mActivity.getWindow().getDecorView(), Gravity.CENTER, 0, 0);
getWindow().getDecorView()就是获取顶层的DecorView
Toast 窗口添加机制
我们常用的Toast窗口其实和前面分析的Activity、Dialog、PopWindow都是不同的,因为它和输入法、墙纸类似,都是系统窗口。
 public static Toast makeText(Context context, CharSequence text, @Duration int duration) {
        //new一个Toast对象
        Toast result = new Toast(context);
        //获取前面有篇文章分析的LayoutInflater
        LayoutInflater inflate = (LayoutInflater)
                context.getSystemService(Context.LAYOUT_INFLATER_SERVICE);
        //加载解析Toast的布局,实质transient_notification.xml是一个LinearLayout中套了一个@android:id/message的TextView而已
        View v = inflate.inflate(com.android.internal.R.layout.transient_notification, null);
        //取出布局中的TextView
        TextView tv = (TextView)v.findViewById(com.android.internal.R.id.message);
        //把我们的文字设置到TextView上
        tv.setText(text);
        //设置一些属性
        result.mNextView = v;
        result.mDuration = duration;
        //返回新建的Toast
        return result;
    }
    public void show() {
        ......
        INotificationManager service = getService();
        String pkg = mContext.getOpPackageName();
        TN tn = mTN;
        tn.mNextView = mNextView;

        try {
            //把TN对象和一些参数传递到远程NotificationManagerService中去
            service.enqueueToast(pkg, tn, mDuration);
        } catch (RemoteException e) {
            // Empty
        }
    }
这里使用了IBinder机制,其实是通过远程NotificationManagerService服务来管理toast的
  private static class TN extends ITransientNotification.Stub {
        private final WindowManager.LayoutParams mParams = new WindowManager.LayoutParams();
        params.type = WindowManager.LayoutParams.TYPE_TOAST;
        ......
        //仅仅是实例化了一个Handler,非常重要!!!!!!!!
        final Handler mHandler = new Handler();
        ......
        final Runnable mShow = new Runnable() {
            @Override
            public void run() {
                handleShow();
            }
        };

        final Runnable mHide = new Runnable() {
            @Override
            public void run() {
                handleHide();
                // Don't do this in handleHide() because it is also invoked by handleShow()
                mNextView = null;
            }
        };
        ......
        //实现了AIDL的show与hide方法
        @Override
        public void show() {
            if (localLOGV) Log.v(TAG, "SHOW: " + this);
            mHandler.post(mShow);
        }

        @Override
        public void hide() {
            if (localLOGV) Log.v(TAG, "HIDE: " + this);
            mHandler.post(mHide);
        }
        ......
    }
此时说明toast的type是TYPE_TOAST,这里直接new了一个handler,所以如果在子线程中直接显示一个taost,就会报异常,除非在子线程中调用Looper的prepare和looper方法,才可以在线程中显示toast。接下来重点分析handleShow方法
   public void handleShow() {
            if (localLOGV) Log.v(TAG, "HANDLE SHOW: " + this + " mView=" + mView
                    + " mNextView=" + mNextView);
            if (mView != mNextView) {
                // remove the old view if necessary
                //如果有必要就通过WindowManager的remove删掉旧的
                handleHide();
                mView = mNextView;
                Context context = mView.getContext().getApplicationContext();
                String packageName = mView.getContext().getOpPackageName();
                if (context == null) {
                    context = mView.getContext();
                }
                //通过得到的context(一般是ContextImpl的context)获取WindowManager对象(上一篇文章分析的单例的WindowManager)
                mWM = (WindowManager)context.getSystemService(Context.WINDOW_SERVICE);
                ......
                //在把Toast的View添加之前发现Toast的View已经被添加过(有partent)则删掉
                if (mView.getParent() != null) {
                    ......
                    mWM.removeView(mView);
                }
                ......
                //把Toast的View添加到窗口,其中mParams.type在构造函数中赋值为TYPE_TOAST!!!!!!特别重要
                mWM.addView(mView, mParams);
                ......
            }
        }
mWM此时是全局单例的WindowManager,调用的是ContextImpl的getSystemService方法获取
最后总结一下:
通过分析TN类的handler可以发现,如果想在非UI线程使用Toast需要自行声明Looper,否则运行会抛出Looper相关的异常;UI线程不需要,因为系统已经帮忙声明。
1.在使用Toast时context参数尽量使用getApplicationContext(),可以有效的防止静态引用导致的内存泄漏。 因为首先toast构造函数中拿到了toast,所以如果在当前activity中弹出一个toast,然后finish掉该toast,toast并不依赖activity,是系统级的窗口,当然也不会随着activity的finish就消失,只是随着设置时间的到来而消失,所以如果此时设置toast显示的时间足够长,那么因为toast持有该activity的引用,那么该activty就一直不能被回收,一直到toast消失,造成内存泄漏,所以最好使用getApplicationContext()
2.有时候我们会发现Toast弹出过多就会延迟显示,因为上面源码分析可以看见Toast.makeText是一个静态工厂方法,每次调用这个方法都会产生一个新的Toast对象,当我们在这个新new的对象上调用show方法就会使这个对象加入到NotificationManagerService管理的mToastQueue消息显示队列里排队等候显示;所以如果我们不每次都产生一个新的Toast对象(使用单例来处理)就不需要排队,也就能及时更新了。
3.Toast的显示交由远程的NotificationManagerService管理是因为Toast是每个应用程序都会弹出的,而且位置和UI风格都差不多,所以如果我们不统一管理就会出现覆盖叠加现象,同时导致不好控制,所以Google把Toast设计成为了系统级的窗口类型,由NotificationManagerService统一队列管理。