Gitlab 安装
安装环境准备:
操作系统:centos6/7
内存:实验环境至少 2G,生产建议 4G 以上
磁盘:至少 50G,根据生产实际仓库大小进行配置
安全:关闭防火墙、selinux
安装依赖:
yum install curl policycoreutils openssh-server openssh-clients policycoreutils-python –y
获取安装包
可以到清华镜像站下载安装包
https://mirrors.tuna.tsinghua.edu.cn/
[root@ci-node1 git_test]# cd /usr/local/src/

// 安装gitlab
[root@ci-node1 src]# rpm -ivh gitlab-ce-10.2.2-ce.0.el7.x86_64.rpm
warning: gitlab-ce-10.2.2-ce.0.el7.x86_64.rpm: Header V4 RSA/SHA1 Signature, key ID f27eab47: NOKEY
Preparing...                          ################################# [100%]
Updating / installing...
   1:gitlab-ce-10.2.2-ce.0.el7        ################################# [100%]
It looks like GitLab has not been configured yet; skipping the upgrade script.

       *.                  *.
      ***                 ***
     *****               *****
    .******             *******
    ********            ********
   ,,,,,,,,,***********,,,,,,,,,
  ,,,,,,,,,,,*********,,,,,,,,,,,
  .,,,,,,,,,,,*******,,,,,,,,,,,,
      ,,,,,,,,,*****,,,,,,,,,.
         ,,,,,,,****,,,,,,
            .,,,***,,,,
                ,*,.


     _______ __  __          __
    / ____(_) /_/ /   ____ _/ /_
   / / __/ / __/ /   / __ \`/ __
  / /_/ / / /_/ /___/ /_/ / /_/ /
  \____/_/\__/_____/\__,_/_.___/


Thank you for installing GitLab!
GitLab was unable to detect a valid hostname for your instance.
Please configure a URL for your GitLab instance by setting `external_url`
configuration in /etc/gitlab/gitlab.rb file.
Then, you can start your GitLab instance by running the following command:
  sudo gitlab-ctl reconfigure

For a comprehensive list of configuration options please see the Omnibus GitLab readme
https://gitlab.com/gitlab-org/omnibus-gitlab/blob/master/README.md
gitlab安装完成
配置 GitLab
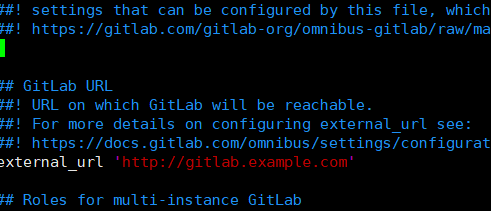
GitLab 的默认配置文件为于:/etc/gitlab/gitlab.rb,
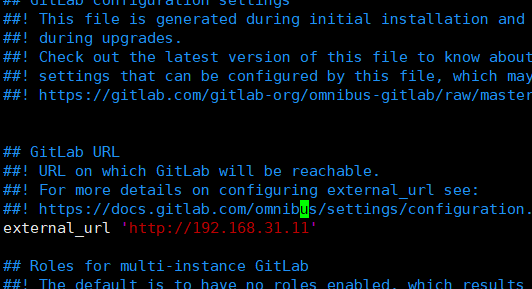
修改下图所示的 external_url为本机 IP 地址或者一个可以访问到本机的域名。


修改配置文件:/etc/gitlab/gitlab.rb
修改external_url 的地址为:http://192.168.31.11
修改完主配置文件后,使用gitlab-ctl reconfigure重新配置gitlab
只要修改了/etc/gitlab/gitlab.rb 配置文件 要重新执行 gitlab-ctl reconfigure 重新配置gitlab服务
我们可以使用 gitlab-ctl status 命令来查看各服务的状态
[root@ci-node1 src]# gitlab-ctl status
run: gitaly: (pid 33277) 28s; run: log: (pid 33021) 89s
run: gitlab-monitor: (pid 33301) 27s; run: log: (pid 33119) 72s
run: gitlab-workhorse: (pid 33266) 29s; run: log: (pid 32976) 104s
run: logrotate: (pid 33004) 96s; run: log: (pid 33003) 96s
run: nginx: (pid 32988) 102s; run: log: (pid 32987) 102s
run: node-exporter: (pid 33070) 78s; run: log: (pid 33069) 78s
run: postgres-exporter: (pid 33322) 26s; run: log: (pid 33169) 54s
run: postgresql: (pid 32754) 147s; run: log: (pid 32753) 147s
run: prometheus: (pid 33309) 26s; run: log: (pid 33151) 60s
run: redis: (pid 32694) 153s; run: log: (pid 32693) 153s
run: redis-exporter: (pid 33137) 66s; run: log: (pid 33136) 66s
run: sidekiq: (pid 32959) 110s; run: log: (pid 32958) 110s
run: unicorn: (pid 32920) 116s; run: log: (pid 32919) 116s
启动 GitLab
重新配置执行成功后,我们就可以启动 Gitlab
重启服务
[root@ci-node1 src]# gitlab-ctl restart
ok: run: gitaly: (pid 33501) 0s
ok: run: gitlab-monitor: (pid 33513) 1s
ok: run: gitlab-workhorse: (pid 33523) 0s
ok: run: logrotate: (pid 33532) 0s
ok: run: nginx: (pid 33538) 0s
ok: run: node-exporter: (pid 33543) 0s
ok: run: postgres-exporter: (pid 33548) 1s
ok: run: postgresql: (pid 33592) 0s
ok: run: prometheus: (pid 33601) 1s
ok: run: redis: (pid 33608) 0s
ok: run: redis-exporter: (pid 33614) 1s
ok: run: sidekiq: (pid 33621) 1s
ok: run: unicorn: (pid 33630) 0s
重新配置gitlba后,在浏览器地址里输入:http://192.168.31.11,出现如图所示页面:首次登录要求我们重新设置 root 用户的密码:

重新输入用户密码后,输入的密码至少8位以上,密码12345678,即可使用 root 用户及刚入设置的密码登录 GitLab

登录后的页面如下,至此我们完成了 GitLab 的安装。
