AppWidget是创建的桌面窗口小控件,在这个小控件上允许我们进行一些操作(这个视自己的需要而定)。作为菜鸟,我在这里将介绍一下AppWeight的简单使用。
1.在介绍AppWidget之前,我们先来了解一下PendingIntent和RemoteViews;
PendingIntent:A description of an Intent and target action to perform with it. Instances of this class are created with getActivity, getActivities, getBroadcast, and getService; the returned object can be handed to other applications so that they can perform the action you described on your behalf at a later time.
翻译:通过PendingIntent来描述一个Intent和target action,这个类的实例和getActivity,getActivites,getBroadCast,getService一起创建:返回的对象能够传给其他程序,以便它们能在后来执行你想让他们执行的动作。
结合Mars老师的讲解可以这样来理解:PendingIntent能够包含一个Intent对象,能够将这个Intent传递给其他的应用,当满足一定条件时,就会执行这个Intent中包含的动作。getActivity和getActivities是为了启动活动,getBroadcast是为了发送广播,getService是为了开启一个服务。(这个在下面有讲解)
RemoteViews:A class that describes a view hierarchy that can be displayed in another process. The hierarchy is inflated from a layout resource file, and this class provides some basic operations for modifying the content of the inflated hierarchy.
翻译:remoteviews:一个类描述了一个视图的层次结构,可以显示在另一个进程。该层次结构从布局资源文件中增长,该类提供一些基本操作来修改虚化层次结构的内容。
简言之就是RemoteView代表的是显示在桌面上的appwidget这整个布局,包括设置的按钮,图片什么的。。。
2.了解了上面的概念,就可以更好的理解AppWeight了。
实现AppWeige的步骤:
文件的结构:
1).在res下新建一个文件夹,里面新建一个类型为appwidget_provider的xml文件。这个是代表显示在桌面上的整个布局(只是布局的框架,不包含细节,至于显示的内容需要引用另一个布局文件),示例中我的xml文件名为example_appwidget_provider.xml:
<?xml version="1.0" encoding="utf-8"?>
<appwidget-provider xmlns:android="http://schemas.android.com/apk/res/android"

    android:minWidth = "280dp"
    android:minHeight = "100dp"
    android:updatePeriodMillis = "864000000"
    android:initialLayout="@layout/example_appwidget">

</appwidget-provider>
<!-- 上面设置了布局的宽、高、更新时间周期(毫秒)、包含的布局 -->
2).在layout中新建一个xml文件来作为在appwidget中的布局显示,就是上面的@layout/example_appwidget中的example_appwidget。
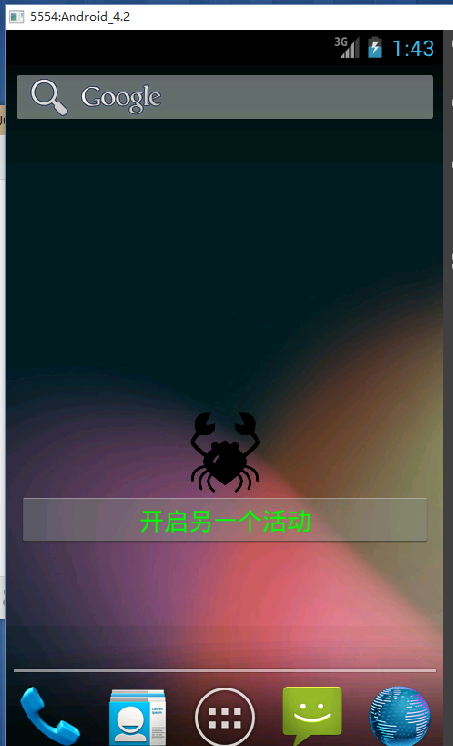
<?xml version="1.0" encoding="utf-8"?>
<LinearLayout xmlns:android="http://schemas.android.com/apk/res/android"
    android:layout_width="match_parent"
    android:layout_height="match_parent"
    android:orientation="vertical" >

    <!-- 这里是显示在桌面的appWidget的布局 -->
    <ImageView
        android:id="@+id/imageId"
        android:layout_width="fill_parent"
        android:layout_height="60dp"
        android:src="@drawable/cancer"/>
    <Button
        android:id="@+id/changeButton"
        android:layout_width="match_parent"
        android:layout_height="40dp"
        android:textColor="#00ff00"
        android:text="开启另一个活动"/>
</LinearLayout>
3).新建一个Activity,这个Activity继承AppWidgetProvider,复写其中的方法。在这里注释的代码实现了点击AppWidget中的按钮就启动另一个Activity,未注释的代码实现了ImagView中的Image的替换:值得注意的是,AppWiget所进行的活动并不与当前Main_Activity所在的线程在同一个线程中,因此这里并不能像在主线程中那样操作布局内容,AppWiget的操作方法可以看下面代码。
package com.example.appwight; import android.app.PendingIntent; import android.appwidget.AppWidgetManager; import android.appwidget.AppWidgetProvider; import android.content.ComponentName; import android.content.Context; import android.content.Intent; import android.widget.RemoteViews; public class ExampleAppWidgetProvider extends AppWidgetProvider{ //广播名称,需要在AppWidget Manifest.xml文件中声明 private static final String UPDATE_INTENT = "com.example.appwidget"; @Override public void onReceive(Context context, Intent intent) { //接受广播的时候调用
//接受广播Action String action = intent.getAction();
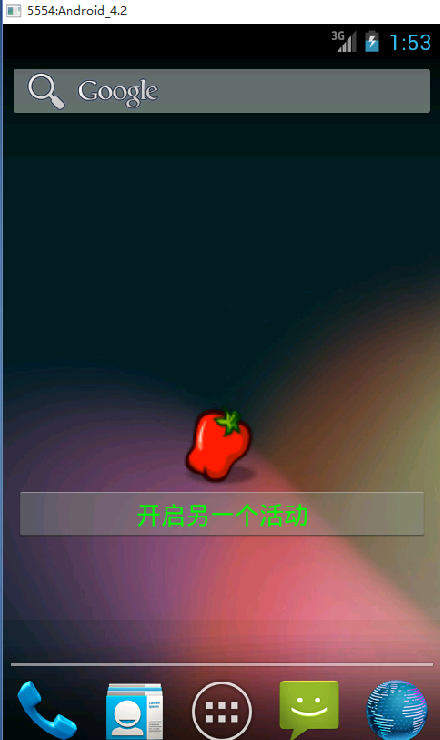
//当接受到指定的广播时,就执行下main代码 if (UPDATE_INTENT.equals(action)) { System.out.println("action=======>"+UPDATE_INTENT); RemoteViews remoteViews = new RemoteViews(context.getPackageName(), R.layout.example_appwidget);
//第一个参数:ImagView的Id,第二个参数:用来替换的图片 remoteViews.setImageViewResource(R.id.imageId, R.drawable.chilli); AppWidgetManager appWidgetManager = AppWidgetManager.getInstance(context); //ComponentName也代表AppWidget控件,与RemoteViews不同的是。前者只是代表着“整个”控件,后者包含Button,ImageView,,,等内容 ComponentName componentName = new ComponentName(context, ExampleAppWidgetProvider.class); appWidgetManager.updateAppWidget(componentName, remoteViews); }else { //调用父类的onReceive方法 super.onReceive(context, intent); } } @Override public void onUpdate(Context context, AppWidgetManager appWidgetManager, int[] appWidgetIds) { super.onUpdate(context, appWidgetManager, appWidgetIds); System.out.println("onUpdate"); for (int i = 0; i < appWidgetIds.length; i++) { //Intent intent = new Intent(context, SecondActivity.class); Intent intent = new Intent(); intent.setAction(UPDATE_INTENT); /* * pendingIntent可以包含一个intent * 第一个参数是当前上下文,第二个参数是包含的intent * getAcitivity表明这个PendingIntent的目的是为了启动一个activity,此外还有getService(),和getBroadcast() *PendingIntent pendingIntent = PendingIntent.getActivity(context, 0, intent, 0); */ PendingIntent pendingIntent = PendingIntent.getBroadcast(context, 0, intent, 0); //remoteView代表的是AppWidget的整个布局,第一个参数是包名,第二个参数是AppWidget的布局 RemoteViews remoteViews = new RemoteViews(context.getPackageName(), R.layout.example_appwidget); //为remoteVIew中的按钮设置点击事件,第一个为按钮的id,第二个参数为要启动的PendingIntent。 remoteViews.setOnClickPendingIntent(R.id.changeButton, pendingIntent); //更新AppWidget,第一个参数为表明是当前哪个AppWidget(因为可以在桌面上创建多个AppWidget) //第二个参数为要更新的RemoteViews的对象 appWidgetManager.updateAppWidget(appWidgetIds[i], remoteViews); } } @Override public void onDeleted(Context context, int[] appWidgetIds) { //删除AppWidget的时候调用 super.onDeleted(context, appWidgetIds); System.out.println("onDeleted"); } @Override public void onEnabled(Context context) { //当AppWidget被创建的时候调用 super.onEnabled(context); System.out.println("onEnabled"); } @Override public void onDisabled(Context context) { //当最后一个AppWidget被删除的时候调用 super.onDisabled(context); System.out.println("onDisable"); } }
4).在AndroidManifest.xml文件中的<application 中声明。
<receiver
            android:name="com.example.appwight.ExampleAppWidgetProvider">
        //过滤广播
            <intent-filter >
                <action android:name="android.appwidget.action.APPWIDGET_UPDATE"/>
                <action android:name="com.example.appwidget"/>
            </intent-filter>
        //元数据,将布局与类绑定
            <meta-data android:name="android.appwidget.provider"
                android:resource="@xml/example_appwidget_provider"/>
        </receiver>
效果图: