相信有很多小伙伴都知道,dubbo是一个分布式、高性能、透明化的RPC服务框架,提供服务自动注册、自动发现等高效服务治理方案,dubbo的中文文档也是非常全的,中文文档可以参考这里dubbo.io。由于官网的介绍比较简洁,我这里打算通过Maven多模块工程再给小伙伴们演示一下用法。
环境:IntelliJ IDEA2017.1
关于如何在IntelliJ IDEA中创建Maven多模块项目,小伙伴们可以参考之前的博客 IntelliJ IDEA中创建Web聚合项目(Maven多模块项目) ,这里我就不再赘述。
这里我还是以dubbo官方文档中的例子作为基准,我们来详细的看看运行过程。
创建一个Maven工程
IntelliJ中创建Maven工程的方式我这里就不再多说了,这里只说一点,工程创建成功之后,将src目录删除,因为我们不需要在这个工程下面写代码,我们将以这个工程为父工程,然后给它创建多个模块。
向创建好的工程中添加模块
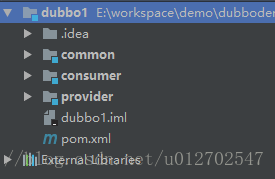
当我们第一步成功创建了要给Maven工程之后,第二步我们就向这个Maven工程中添加三个模块,分别是common,provider和consumer三个模块,添加完成之后效果如下:
provider将作为我们的服务提供者,consumer将作为服务消费者,这两个好理解,除了这两个之外我们还需要要给common模块,common模块主要是提供公共接口,供服务提供者和服务消费者使用。
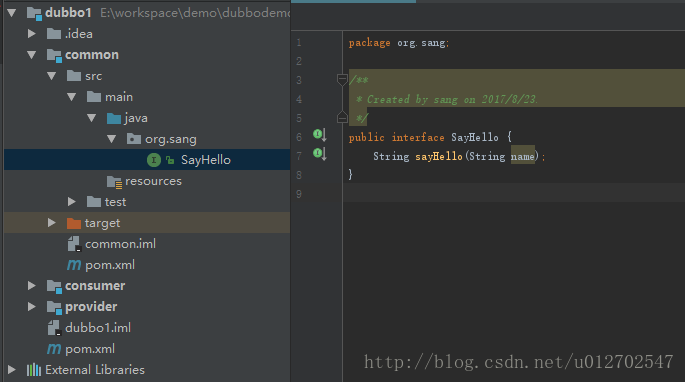
向common模块中添加接口
在common模块中,添加一个SayHello接口,如下:
provider模块依赖common并提供服务
1.首先打开provider的pom.xml文件,在其中添加依赖,要添加的依赖有如下四个小类:
1.添加对common模块的依赖
2.添加对spring的依赖
3.添加对dubbo的依赖
4.添加对zookeeper的依赖
如下:
<dependencies>
        <dependency>
            <groupId>org.sang</groupId>
            <artifactId>common</artifactId>
            <version>1.0-SNAPSHOT</version>
        </dependency>
        <dependency>
            <groupId>org.springframework</groupId>
            <artifactId>spring-web</artifactId>
            <version>4.3.10.RELEASE</version>
        </dependency>
        <dependency>
            <groupId>com.alibaba</groupId>
            <artifactId>dubbo</artifactId>
            <version>2.5.3</version>
            <exclusions>
                <exclusion>
                    <groupId>org.springframework</groupId>
                    <artifactId>spring</artifactId>
                </exclusion>
                <exclusion>
                    <artifactId>netty</artifactId>
                    <groupId>org.jboss.netty</groupId>
                </exclusion>
            </exclusions>
        </dependency>
        <dependency>
            <groupId>org.apache.zookeeper</groupId>
            <artifactId>zookeeper</artifactId>
            <version>3.4.10</version>
        </dependency>
        <dependency>
            <groupId>com.101tec</groupId>
            <artifactId>zkclient</artifactId>
            <version>0.10</version>
        </dependency>
</dependencies>- 1
- 2
- 3
- 4
- 5
- 6
- 7
- 8
- 9
- 10
- 11
- 12
- 13
- 14
- 15
- 16
- 17
- 18
- 19
- 20
- 21
- 22
- 23
- 24
- 25
- 26
- 27
- 28
- 29
- 30
- 31
- 32
- 33
- 34
- 35
- 36
- 37
然后在provider中实现common模块的接口,如下:
public class SayHelloImpl implements SayHello {
    public String sayHello(String name) {
        return "Hello "+name;
    }
}- 1
- 2
- 3
- 4
- 5
然后我们需要在provider的spring配置文件中暴露服务,如下:
<?xml version="1.0" encoding="UTF-8"?>
<beans xmlns="http://www.springframework.org/schema/beans"
       xmlns:xsi="http://www.w3.org/2001/XMLSchema-instance" xmlns:dubbo="http://code.alibabatech.com/schema/dubbo"
       xsi:schemaLocation="http://www.springframework.org/schema/beans http://www.springframework.org/schema/beans/spring-beans.xsd http://code.alibabatech.com/schema/dubbo http://code.alibabatech.com/schema/dubbo/dubbo.xsd">
<dubbo:application name="hello-world-app"></dubbo:application>
    <!--<dubbo:registry address="multicast://224.5.6.7:2181"/>-->
    <dubbo:registry address="zookeeper://192.168.248.128:2181"/>
    <dubbo:protocol name="dubbo" port="20880"/>
    <dubbo:service interface="org.sang.SayHello" ref="sayHelloImpl"/>
    <bean id="sayHelloImpl" class="org.sang.SayHelloImpl"/>
</beans>- 1
- 2
- 3
- 4
- 5
- 6
- 7
- 8
- 9
- 10
- 11
这里我采用了dubbo推荐的注册中心zookeeper,关于Linux上zookeeper的安装小伙伴们可以参考Linux上安装Zookeeper以及一些注意事项。
注册地址就是你安装zookeeper的服务器地址,然后将服务的接口暴露出来即可。
最后我们采用一个main方法将provider跑起来,如下:
public class Main {
    public static void main(String[] args) throws IOException {
        ClassPathXmlApplicationContext ctx = new ClassPathXmlApplicationContext("applicationContext.xml");
        ctx.start();
        System.in.read();
    }
}- 1
- 2
- 3
- 4
- 5
- 6
- 7
OK,如此之后我们的provider模块就算开发完成了。
在consumer模块中消费服务
首先在consumer模块中添加相关依赖,要依赖的东西和provider的依赖一样,这里我就不再重复贴出代码。
然后我们在consumer的spring配置文件中订阅服务,订阅方式如下:
<?xml version="1.0" encoding="UTF-8"?>
<beans xmlns="http://www.springframework.org/schema/beans"
       xmlns:xsi="http://www.w3.org/2001/XMLSchema-instance" xmlns:dubbo="http://code.alibabatech.com/schema/dubbo"
       xsi:schemaLocation="http://www.springframework.org/schema/beans http://www.springframework.org/schema/beans/spring-beans.xsd http://code.alibabatech.com/schema/dubbo http://code.alibabatech.com/schema/dubbo/dubbo.xsd">
    <dubbo:application name="consumer-of-helloworld-app"/>
    <!--<dubbo:registry address="multicast://224.5.6.7:2181" check="false"/>-->
    <dubbo:registry address="zookeeper://192.168.248.128:2181" check="false"/>
    <dubbo:reference id="sayHello" interface="org.sang.SayHello" check="false"/>
</beans>- 1
- 2
- 3
- 4
- 5
- 6
- 7
- 8
- 9
首先订阅地址依然是zookeeper的地址,然后注册一个SayHello的bean,这个bean可以直接在我们的工程中使用。
一样,我们还是通过一个main方法来启动服务消费端:
public class Main {
    public static void main(String[] args) {
        ClassPathXmlApplicationContext ctx = new ClassPathXmlApplicationContext("applicationContext.xml");
        SayHello sayHello = (SayHello) ctx.getBean("sayHello");
        String s = sayHello.sayHello("张三");
        System.out.println(s);
    }
}- 1
- 2
- 3
- 4
- 5
- 6
- 7
- 8
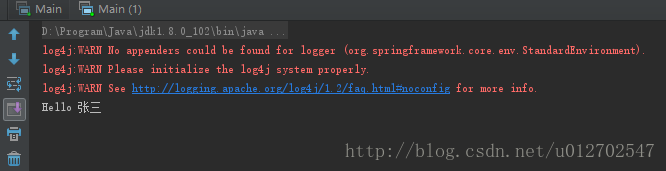
运行结果如下:
转自:https://blog.csdn.net/u012702547/article/details/77601538