简介
Nacos支持三种部署模式:
-
单机模式 - 用于测试和单机试用。
-
集群模式 - 用于生产环境,确保高可用。
-
多集群模式 - 用于多数据中心场景。
这里我们主要讲解 集群模式部署。至于测试使用的单机模式不是参考单机模式下运行Nacos。
环境准备
架构说明
为了保证 Nacos 的高可用,使用 HAProxy 负载均衡 至 3 节点集群的 nacos;nacos 数据库使用双主架构的MySQL,MySQL 通过 HAProxy 代理访问,nacos 使用 HAProxy 代理后的地址访问数据库。

版本
系统:CentOS 7
Nacos:v1.2.1
MySQL:v5.7
HAProxy:v2.0.4
服务器配置信息
| 主机名 | IP | 配置 |
|---|---|---|
| nacos01 | 192.168.17.37 | 4C8G100G |
| nacos02 | 192.168.17.38 | 4C8G100G |
| nacos03 | 192.168.17.39 | 4C8G100G |
MySQL 主主
MySQL部署于192.168.17.37、和192.168.17.38上,互为主从,通过内网HAProxy代理(192.168.14.2)。
注意:我这里实验环境所以,两台 MySQL 和 nacos 机器部署在一起,生产环境MySQL请单独部署。
1. 预备环境准备
请确保是在环境中安装使用:
- 64 bit OS Linux/Unix/Mac,推荐使用Linux系统。
- 64 bit JDK 1.8+;下载,配置。
- Maven 3.2.x+;下载,配置。
- 3个或3个以上Nacos节点才能构成集群。
2. JDK 1.8+ 环境配置
# cd /usr/
# tar -xf jdk-8u241-linux-x64.tar.gz
# mv jdk1.8.0_241 java
备注:至于为什么要将解压后的jdk-8u241-linux-x64.tar.gz文件jdk1.8.0_241重命名为 java,且放置于/usr目录下,请参考nacos目录的bin/startup.sh脚本,有惊喜发现哦!
配置环境变量 /etc/profile
export JAVA_HOME=/usr/java
export PATH=$JAVA_HOME/bin:$PATH
使能环境变量
# source /etc/profile
验证
# java -version
java version "1.8.0_241"
Java(TM) SE Runtime Environment (build 1.8.0_241-b07)
Java HotSpot(TM) 64-Bit Server VM (build 25.241-b07, mixed mode)
3. Maven 3.2.x+ 环境配置
# cd /usr/local
# tar -xf apache-maven-3.6.3-bin.tar.gz
配置环境变量 /etc/profile
export MAVEN_HOME=/usr/local/apache-maven-3.6.3
export PATH=$MAVEN_HOME/bin:$PATH
使能环境变量
# source /etc/profile
验证
# mvn -version
Apache Maven 3.6.3 (cecedd343002696d0abb50b32b541b8a6ba2883f)
Maven home: /usr/local/apache-maven-3.6.3
Java version: 1.8.0_241, vendor: Oracle Corporation, runtime: /usr/local/jdk1.8.0_241/jre
Default locale: en_US, platform encoding: UTF-8
OS name: "linux", version: "3.10.0-1062.18.1.el7.x86_64", arch: "amd64", family: "unix"
4. MySQL 57 yum 仓库安装
安装MySQL57
# wget -i -c http://dev.mysql.com/get/mysql57-community-release-el7-10.noarch.rpm
# yum -y install mysql57-community-release-el7-10.noarch.rpm
# yum -y install mysql-community-server
# systemctl start  mysqld.service
# grep "password" /var/log/mysqld.log
# mysql -uroot -p
mysql> set global validate_password_policy=0;
mysql> set global validate_password_length=1;
mysql> ALTER USER 'root'@'localhost' IDENTIFIED BY 'new password';
注意:如果后面的项目中使用root用户帐号密码连接数据库,需要开放访问权限
例如:
mysql> GRANT ALL PRIVILEGES ON *.* TO 'root'@'%' IDENTIFIED BY 'new password';
mysql> flush privileges;
删除mysql源
# yum -y remove mysql57-community-release-el7-10.noarch
5. MySQL 57 主主配置
数据库采用双主配置,即互为主从。
主库:192.168.17.37、从库:192.168.17.38
及
主库:192.168.17.38、从库:192.168.17.37
备注:以下以主库(192.168.17.37)-> 从库(192.168.17.38) 为例配置;
依此类推可配置主库(192.168.17.38)-> 从库(192.168.17.37),请自行配置。
5.1 主库
停止数据库,修改配置文件 /etc/my.cnf
# systemctl stop mysqld
[mysqld]
datadir=/www/mysql
socket=/www/mysql/mysql.sock

# Disabling symbolic-links is recommended to prevent assorted security risks
symbolic-links=0

log-error=/var/log/mysql/mysqld.log
pid-file=/var/run/mysqld/mysqld.pid

bind-address=0.0.0.0

server_id=37
log-bin=mysql-bin
log_bin_index=/var/log/mysql/mysql-bin.log.index
relay_log=/var/log/mysql/mysql-relay-bin
relay_log_index=/var/log/mysql/mysql-relay-bin.index

binlog_format=row
binlog-ignore-db=mysql
binlog-ignore-db=information_schema
binlog-ignore-db=performance_schema
binlog_cache_size=1m
expire_logs_days=7
log-bin=mysql-bin
max_binlog_size=1024M


auto_increment_offset=1
auto_increment_increment=2

replicate-ignore-db=information_schema
replicate-ignore-db=performance_schema
replicate-ignore-db=test

innodb_buffer_pool_size=4G
max_connections=3000

explicit_defaults_for_timestamp=true

[client]
socket=/www/mysql/mysql.sock
备注:从库配置过程中注意auto_increment_offset设置为2、两台数据库server_id的值不能一样。
# systemctl start mysqld
登入数据库,添加主从复制用户及授权
# mysql -u root -p
mysql> CREATE USER 'repl'@'192.168.17.%' IDENTIFIED BY 'repl';
mysql> GRANT REPLICATION SLAVE ON *.* TO 'repl'@'192.168.17.%';
查看主库状态
mysql> SHOW MASTER STATUS;
+------------------+----------+--------------+---------------------------------------------+-------------------+
| File             | Position | Binlog_Do_DB | Binlog_Ignore_DB                            | Executed_Gtid_Set |
+------------------+----------+--------------+---------------------------------------------+-------------------+
| mysql-bin.000005 |     1082 |              | mysql,information_schema,performance_schema |                   |
+------------------+----------+--------------+---------------------------------------------+-------------------+
1 row in set (0.00 sec)
5.2 从库
停止数据库,修改配置文件 /etc/my.cnf
# systemctl stop mysqld
[mysqld]
datadir=/www/mysql
socket=/www/mysql/mysql.sock

# Disabling symbolic-links is recommended to prevent assorted security risks
symbolic-links=0

log-error=/var/log/mysql/mysqld.log
pid-file=/var/run/mysqld/mysqld.pid

bind-address=0.0.0.0

server_id=38
log-bin=mysql-bin
log_bin_index=/var/log/mysql/mysql-bin.log.index
relay_log=/var/log/mysql/mysql-relay-bin
relay_log_index=/var/log/mysql/mysql-relay-bin.index

binlog_format=row
binlog-ignore-db=mysql
binlog-ignore-db=information_schema
binlog-ignore-db=performance_schema
binlog_cache_size=1m
expire_logs_days=7
log-bin=mysql-bin
max_binlog_size=1024M

auto_increment_offset=2
auto_increment_increment=2

replicate-ignore-db=information_schema
replicate-ignore-db=performance_schema
replicate-ignore-db=test

innodb_buffer_pool_size=4G
max_connections=3000

explicit_defaults_for_timestamp=true

[client]
socket=/www/mysql/mysql.sock
# systemctl start mysqld
从库连接主库(Slave_IO_Running和 Slave_SQL_Running的值均为yes即为主从连接成功)
mysql> CHANGE MASTER TO MASTER_HOST='192.168.17.37', MASTER_USER='repl',MASTER_PASSWORD='repl',MASTER_LOG_FILE='mysql-bin.000005',MASTER_LOG_POS=1082;
启动从库
mysql> start slave;
查看从库是否链接成功
mysql> SHOW SLAVE STATUSG;
*************************** 1. row ***************************
               Slave_IO_State: Waiting for master to send event
                  Master_Host: 192.168.17.37
                  Master_User: repl
                  Master_Port: 3306
                Connect_Retry: 60
              Master_Log_File: mysql-bin.000043
          Read_Master_Log_Pos: 1186
               Relay_Log_File: mysql-relay-bin.000012
                Relay_Log_Pos: 1399
        Relay_Master_Log_File: mysql-bin.000043
             Slave_IO_Running: Yes
            Slave_SQL_Running: Yes
              Replicate_Do_DB:
          Replicate_Ignore_DB: information_schema,performance_schema,test
           Replicate_Do_Table:
       Replicate_Ignore_Table:
      Replicate_Wild_Do_Table:
  Replicate_Wild_Ignore_Table:
                   Last_Errno: 0
                   Last_Error:
                 Skip_Counter: 0
          Exec_Master_Log_Pos: 1186
              Relay_Log_Space: 1772
              Until_Condition: None
               Until_Log_File:
                Until_Log_Pos: 0
           Master_SSL_Allowed: No
           Master_SSL_CA_File:
           Master_SSL_CA_Path:
              Master_SSL_Cert:
            Master_SSL_Cipher:
               Master_SSL_Key:
        Seconds_Behind_Master: 0
Master_SSL_Verify_Server_Cert: No
                Last_IO_Errno: 0
                Last_IO_Error:
               Last_SQL_Errno: 0
               Last_SQL_Error:
  Replicate_Ignore_Server_Ids:
             Master_Server_Id: 37
                  Master_UUID: 5aa209a9-7d6d-11ea-9094-fa163e582a04
             Master_Info_File: /www/mysql/master.info
                    SQL_Delay: 0
          SQL_Remaining_Delay: NULL
      Slave_SQL_Running_State: Slave has read all relay log; waiting for more updates
           Master_Retry_Count: 86400
                  Master_Bind:
      Last_IO_Error_Timestamp:
     Last_SQL_Error_Timestamp:
               Master_SSL_Crl:
           Master_SSL_Crlpath:
           Retrieved_Gtid_Set:
            Executed_Gtid_Set:
                Auto_Position: 0
         Replicate_Rewrite_DB:
                 Channel_Name:
           Master_TLS_Version:
1 row in set (0.00 sec)
注意:双主配置完毕后,请先自行测试是否配置成功。MySQL数据库可采用Prometheus监控主从状态,这里不再赘述。
6 配置代理转发
为了保证 MySQL 、Nacos的高可用,使用内网HAProxy(192.168.14.2)做负载均衡。
6.1 MySQL 代理
为了保证MySQL的高可用,后端两台MySQL机器已做主主,HAProxy 采用主备模式,HAProxy 每 2 秒检测一次服务是否可用,如果连续检测 2 次成功,则表示服务可用,如果连续 3 次检测失败,则表示服务不可用,自动切换至从库。
frontend mysql_23306
  bind *:23306
  mode tcp
  timeout client 3600000
  default_backend mysql_23306_servers

backend mysql_23306_servers
  mode tcp
  timeout server 3600000
  server mysql01 192.168.17.37:3306 check inter 2000 rise 2 fall 3
  server mysql02 192.168.17.38:3306 check inter 2000 rise 2 fall 3 backup
注意:此处配置MySQL代理要在Nacos服务起来之前配置,Nacos 配置中使用的是代理后的数据库地址。
6.2 Nacos 负载均衡
Nacos 为 3 节点,为了保证 3 节点的高可用及负载均衡,采用 3 台 nacos 轮询模式。
acl is_nacos hdr_beg(host) -i nacos.com

use_backend www_nacos if is_nacos

backend www_nacos
  mode http
  server web01 192.168.17.37:8848 check inter 2000 rise 2 fall 3
  server web02 192.168.17.38:8848 check inter 2000 rise 2 fall 3
  server web03 192.168.17.39:8848 check inter 2000 rise 2 fall 3
7. 获取 Nacos 安装包并安装部署
Nacos包下载地址:https://github.com/alibaba/nacos/releases
7.1 获取 Nacos 安装包
可以通过两种方式来获取 Nacos:
- 从 Github 上下载源码方式
unzip nacos-source.zip
cd nacos/
mvn -Prelease-nacos clean install -U
cd nacos/distribution/target/nacos-server-1.2.1/nacos/bin
- 下载编译后压缩包方式
  unzip nacos-server-1.2.1.tar.gz 或者 tar -xvf nacos-server-1.2.1.tar.gz
  cd nacos/bin
我们使用第二种方式安装,把下载好的nacos-server-1.2.1.tar.gz放置于/usr/local目录下,并解压缩。
7.3 配置集群配置文件
在nacos的解压目录nacos/的conf目录下,有配置文件cluster.conf,请每行配置成ip:port。(请配置3个或3个以上节点)
# cp conf/cluster.conf.example conf/cluster.conf
将各个节点的IP配置于conf/cluster.conf配置文件中
192.168.17.37:8848
192.168.17.38:8848
192.168.17.39:8848
7.4 配置 MySQL 数据库
注意:生产使用建议至少主备模式,或者采用高可用数据库。
7.4.1 初始化 MySQL 数据库
mysql> CREATE DATABASE `nacos_config`;
mysql> USE `nacos_config`;
mysql> source nacos-mysql.sql;
7.4.2 application.properties 配置
#*************** Config Module Related Configurations ***************#
# 配置数据库连接地址
### If user MySQL as datasource:
spring.datasource.platform=mysql

### Count of DB:
db.num=1

### Connect URL of DB:
db.url.0=jdbc:mysql://192.168.14.2:3306/nacos_config?characterEncoding=utf8&connectTimeout=1000&socketTimeout=3000&autoReconnect=true
db.user=root
db.password=test


#*************** CMDB Module Related Configurations ***************#
### The interval to dump external CMDB in seconds:
nacos.cmdb.dumpTaskInterval=3600

### The interval of polling data change event in seconds:
nacos.cmdb.eventTaskInterval=10

### The interval of loading labels in seconds:
nacos.cmdb.labelTaskInterval=300

### If turn on data loading task:
nacos.cmdb.loadDataAtStart=false

# 激活权限认证
nacos.core.auth.enabled=true

#*************** Metrics Related Configurations ***************#
### Metrics for prometheus
# 激活Prometheus监控采集Exporter
management.endpoints.web.exposure.include=*

### Metrics for elastic search
#management.metrics.export.elastic.enabled=true
#management.metrics.export.elastic.host=http://localhost:9200
注意:三节点conf/cluster.conf和conf/application.properties配置一样即可
7.4.3 启动服务
# sh nacos/bin/startup.sh
查看端口是否启动
# netstat -tnlp
Active Internet connections (only servers)
Proto Recv-Q Send-Q Local Address           Foreign Address         State       PID/Program name
tcp        0      0 0.0.0.0:22              0.0.0.0:*               LISTEN      958/sshd
tcp        0      0 127.0.0.1:25            0.0.0.0:*               LISTEN      1192/master
tcp6       0      0 :::22                   :::*                    LISTEN      958/sshd
tcp6       0      0 ::1:25                  :::*                    LISTEN      1192/master
tcp6       0      0 :::3306                 :::*                    LISTEN      12155/mysqld
tcp6       0      0 :::8848                 :::*                    LISTEN      12550/java
如果8848端口以启动,则可通过Web界面访问8848端口,配置域名解析,解析至LB上,即可通过域名访问例如:http://nacos.com
8 Nacos 服务起停配置
Nacos 的起停服务均在/usr/local/nacos/bin/目录下,
/usr/local/nacos/bin/
├── logs
│   └── access_log.2020-04-15.log
├── shutdown.cmd
├── shutdown.sh								// 服务停止脚本
├── startup.cmd
├── startup.sh								// 服务启动脚本
└── work
    └── Tomcat
        └── localhost
            └── nacos

5 directories, 5 files
Nacos服务器动:sh /usr/local/nacos/bin/startup.sh
Nacos服务停止:sh /usr/local/nacos/bin/shutdown.sh
脚本启方式存在问题,如果服务器关机重启后,需要手动启动服务。因此,我们采用 systemd 守护进程的方式启动 Nacos 服务,配置如下:
[Unit]
Description=nacos-server
After=syslog.target network.target remote-fs.target nss-lookup.target

[Service]
Type=forking
ExecStart=/usr/local/nacos/bin/startup.sh
ExecStop=/usr/local/nacos/bin/shutdown.sh
Restart=always PrivateTmp=true

[Install]
WantedBy=multi-user.target
# 启动服务
systemctl start nacos.service
# 查看服务状态
systemctl status nacos.service
# 开启自启动
systemctl enable nacos.service
9 Prometheus 监控 Nacos 集群
9.1 配置 Prometheus
在 nacos 的配置文件application.properties中,有一项激活Prometheus的选项management.endpoints.web.exposure.include=*,开启后通过ip:8848/nacos/actuator/prometheus可以获取到Exporter监控采集信息。在Prometheus中添加采集配置。
- scrape_interval:采集间隔时间60s
- scrape_timeout:采集超时时间60s
- metrics_path:prometheus 采集路径
  - job_name: "Configure_Center_Nacos"
    scrape_interval: 60s
    scrape_timeout: 60s
    metrics_path: /nacos/actuator/prometheus
    scheme: http
    static_configs:
      - targets:['192.168.17.37:8848','192.168.17.38:8848','192.168.17.39:8848']
若采集成功,则如下图所示

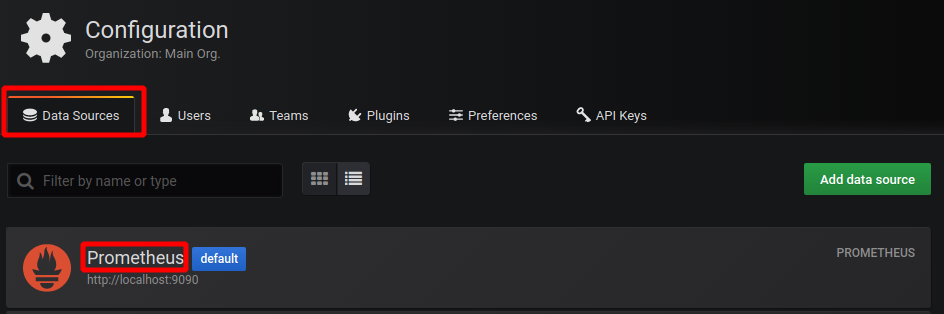
9.2 配置 Grafana 中添加 Dashboard
Dashboard地址: https://github.com/nacos-group/nacos-template/blob/master/nacos-grafana.json
可参考官网配置:Nacos 监控手册
注意:在Grafana 中导入nacos-grafana.json配置时,默认使用的 datasource: proemtheus,如果Grafana 配置的 Data source中Prometheus名称存在与 nacos-grafana.json 中的datasource大小写不一致,请将 nacos-grafana.json 中的datasource全部替换。