1.web.xml文件中配置
<!--将shiro的配置文件交给Spring监听器初始化-->
    <context-param>
        <param-name>contextConfigLocation</param-name>
        <param-value>classpath:spring.xml,classpath:spring-shiro-web.xml</param-value>
    </context-param>
<!-- shiro配置 开始 --><!-- shiro filter的名字是shiroFilter,那么在shiro的配置文件中要有一个名字为shiroFilter的bean-->
    <filter>
        <filter-name>shiroFilter</filter-name>
        <filter-class>org.springframework.web.filter.DelegatingFilterProxy</filter-class>
        <async-supported>true</async-supported>
        <init-param>
            <param-name>targetFilterLifecycle</param-name>
            <param-value>true</param-value>
        </init-param>
    </filter>
    <filter-mapping>
        <filter-name>shiroFilter</filter-name>
        <url-pattern>/*</url-pattern>
    </filter-mapping>
    <!-- shiro配置 结束 -->
由于项目通过Spring管理,因此所有的配置原则上都是交给Spring。DelegatingFilterProxy的功能是通知Spring将所有的Filter交给ShiroFilter管理。
2.在classpath路径下配置spring-shiro-web.xml文件
<beans xmlns="http://www.springframework.org/schema/beans"
    xmlns:xsi="http://www.w3.org/2001/XMLSchema-instance" xmlns:p="http://www.springframework.org/schema/p"
    xmlns:context="http://www.springframework.org/schema/context"
    xmlns:mvc="http://www.springframework.org/schema/mvc"
    xsi:schemaLocation="http://www.springframework.org/schema/beans
                        http://www.springframework.org/schema/beans/spring-beans-3.1.xsd
                        http://www.springframework.org/schema/context
                        http://www.springframework.org/schema/context/spring-context-3.1.xsd
                        http://www.springframework.org/schema/mvc
                        http://www.springframework.org/schema/mvc/spring-mvc-4.0.xsd">

    <!-- 缓存管理器 使用Ehcache实现 -->
    <bean id="cacheManager" class="org.apache.shiro.cache.ehcache.EhCacheManager">
        <property name="cacheManagerConfigFile" value="classpath:ehcache.xml" />
    </bean>

    <!-- 凭证匹配器 -->
    <bean id="credentialsMatcher" class="utils.RetryLimitHashedCredentialsMatcher">
        <constructor-arg ref="cacheManager" />
        <property name="hashAlgorithmName" value="md5" />
        <property name="hashIterations" value="2" />
        <property name="storedCredentialsHexEncoded" value="true" />
    </bean>

    <!-- Realm实现 -->
    <bean id="userRealm" class="utils.UserRealm">
        <property name="credentialsMatcher" ref="credentialsMatcher" />
    </bean>

    <!-- 安全管理器 -->
    <bean id="securityManager" class="org.apache.shiro.web.mgt.DefaultWebSecurityManager">
        <property name="realm" ref="userRealm" />
    </bean>

    <!-- Shiro的Web过滤器 -->
    <bean id="shiroFilter" class="org.apache.shiro.spring.web.ShiroFilterFactoryBean">
        <property name="securityManager" ref="securityManager" />
        <property name="loginUrl" value="/" />
        <property name="unauthorizedUrl" value="/" />
        <property name="filterChainDefinitions">
            <value>
                /authc/admin = roles[admin]
                /authc/** = authc
                /** = anon
            </value>
        </property>
    </bean>

    <bean id="lifecycleBeanPostProcessor" class="org.apache.shiro.spring.LifecycleBeanPostProcessor" />
</beans>
需要注意filterChainDefinitions过滤器中对于路径的配置是有顺序的,当找到匹配的条目之后容器不会再继续寻找。因此带有通配符的路径要放在后面。
3.Shiro内置过滤器说明 (Shiro Filter的执行顺序:自上而下,从左到右” 即可。)
通常可分为三组:
1)身份验证相关的 -------authc,anon,authcBasic,logout,user
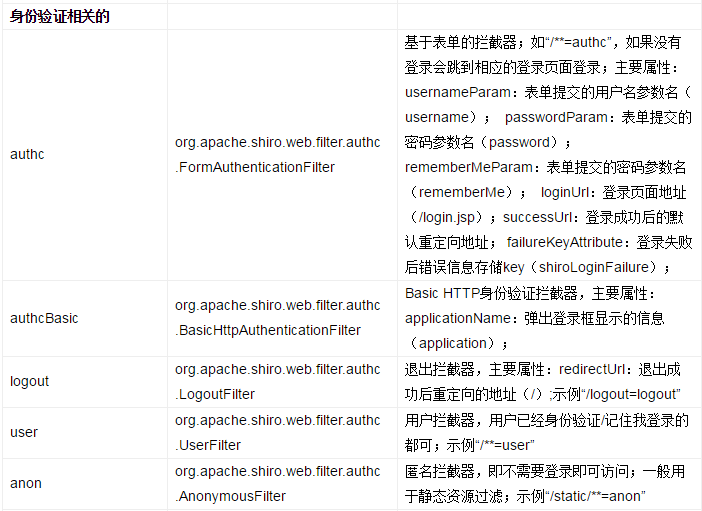
注意user和authc不同:当应用开启了rememberMe时,用户下次访问时可以是一个user,但绝不会是authc,因为authc是需要重新认证的
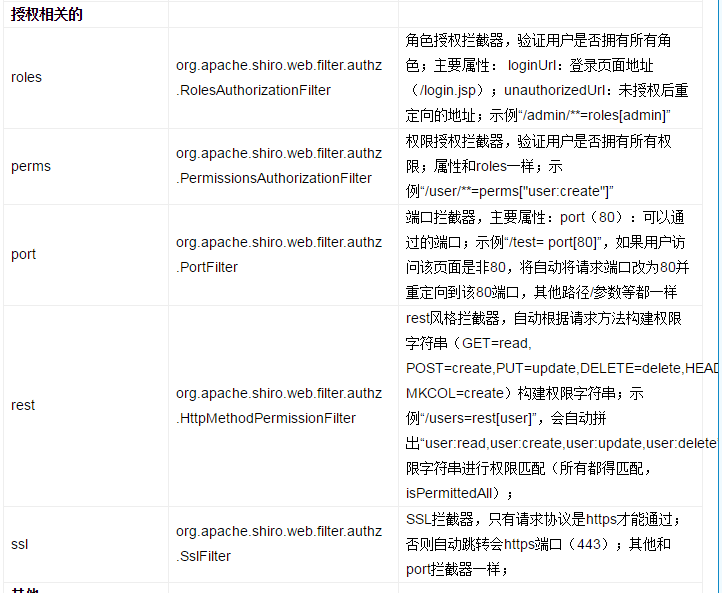
2)授权相关的 ---- perms,port,rest,roles,ssl
3)其他 ---noSessionCreation
