首先配置Nginx
[root@nginx~]#systemctl stop firewalld
[root@nginx~]#iptables -F
[root@nginx~]#setenforce 0
[root@nginx~]# yum -y install pcre-devel zlib-devel openssl-devel
[root@nginx~]#useradd -M -s /sbin/nologin nginx
[root@nginx~]# tar xf nginx-1.14.2.tar.gz -C /usr/src/
4)配置编译:
[root@nginx~]# cd /usr/src/nginx-1.16.1/
[root@nginxnginx-1.14.2]# ./configure --prefix=/usr/local/nginx --user=nginx --group=nginx --with-http_stub_status_module --with-http_ssl_module --with-http_flv_module --with-http_gzip_static_module&&make && make install
[root@nginxnginx-1.14.2]# ln -s /usr/local/nginx/sbin/nginx /usr/local/bin/
[root@nginxnginx-1.14.2]#ll /usr/local/bin/nginx
lrwxrwxrwx 1 root root 27 12-29 07:24 /usr/local/bin/nginx -> /usr/local/nginx/sbin/nginx
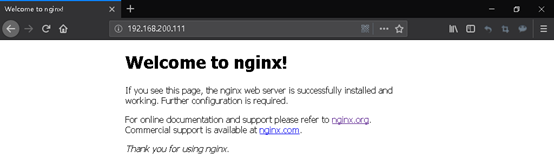
[root@nginxconf]#nginx -t
nginx: the configuration file /usr/local/nginx/conf/nginx.conf syntax is ok
nginx: configuration file /usr/local/nginx/conf/nginx.conf test is successful
[root@nginxconf]# netstat -anpt |grep :80
[root@nginxconf]#nginx
[root@nginxconf]# netstat -anpt |grep :80
tcp 0 0 0.0.0.0:80 0.0.0.0:* LISTEN 6810/nginx: master
方便重启可以用脚本
[root@nginx~]# vim /etc/init.d/nginx
#!/bin/bash
# chkconfig: 2345 99 20
# description: Nginx Server Control Script
PROG="/usr/local/nginx/sbin/nginx"
PIDF="/usr/local/nginx/logs/nginx.pid"
case "$1" in
start)
$PROG
;;
stop)
kill -s QUIT $(cat $PIDF)
;;
restart)
$0 stop
$0 start
;;
reload)
kill -s HUP $(cat $PIDF)
;;
*)
echo "Usage: $0 {start|stop|restart|reload}"
exit 1
esac
exit 0
[root@nginx~]#chmod +x /etc/init.d/nginx
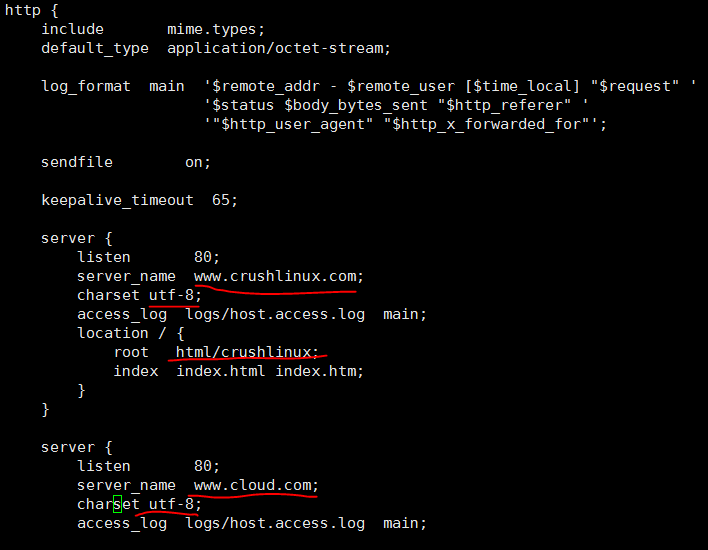
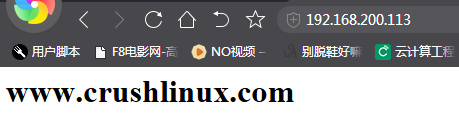
1.基于域名的虚拟主机
[root@nginx~]#mkdir /usr/local/nginx/html/crushlinux
[root@nginx~]#mkdir /usr/local/nginx/html/cloud


[root@localhost html]# vim /usr/local/nginx/conf/nginx.conf
killall -1 nginx
nginx -t
nginx #重启服务
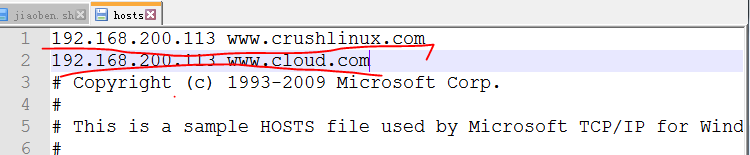
修改物理机hosts文件


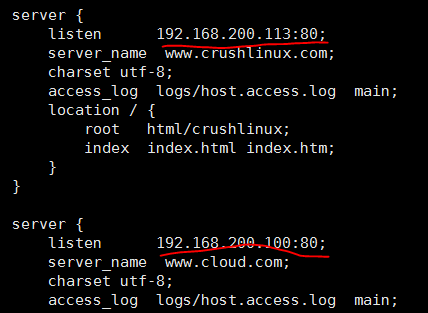
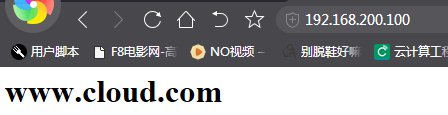
2.基于IP地址的虚拟主机
##添加子网卡
[root@localhost ~]# ifconfig eno16777728:1 192.168.200.100
killall -3 nginx
nginx
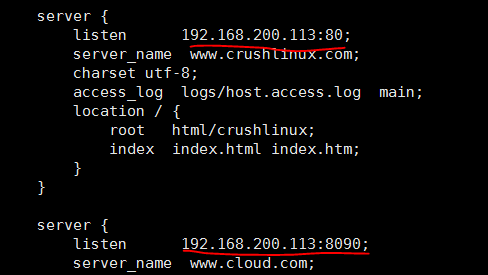
3.基于端口的虚拟主机
killall -3 nginx
nginx