简介
D语言发展了十多年,一直不愠不火。现在 go 和 rust 都火起来了, D还是那个样子,现有的第三方开发库少,很多第三方库年久失修,IDE插件也不是很好用,容易崩溃,总之存在了很多不完善的地方。不过D语言自身也有很多吸引人的特性,对于我本人来说,作为一个和c/c++一样类型的语言,却能写出脚本语言的轻松,而且性能强劲,是很有吸引力的。时隔多年,我又忍不住下载了一下D语言最新安装包,准备尝试一下,先后尝试了 vs+visual-d 和 vscode+code-d 两种方案,感觉 vscode 这个方案要更加好用点。由于资料少,这里记录一下,方便后来人。
正文
安装插件
首先我们需要安装一下D语言的插件,如下:
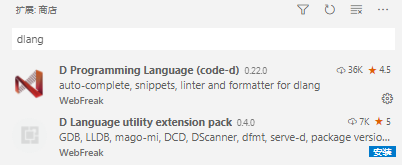
我们一般选择第一个安装即可
创建D语言工程
我们新建一个文件夹,然后使用cmd进入该文件夹,使用dub指令来初始化一个D语言的工程目录,这里可以查看一下dub的帮助
$ dub init -h
USAGE: dub init [<directory> [<dependency>...]] [<options...>]

Initializes an empty package of the specified type in the given directory. By
default, the current working directory is used.


Command specific options
========================

  -t  --type=VALUE      Set the type of project to generate. Available types:

                        minimal - simple "hello world" project (default)
                        vibe.d - minimal HTTP server based on vibe.d
                        deimos - skeleton for C header bindings
  -f  --format=VALUE    Sets the format to use for the package description
                        file. Possible values:
                          json (default), sdl
  -n  --non-interactive Don't enter interactive mode.
我们可以看到其支持的工程类型,这里我们选择默认,也就是 minimal
dub init
然后该文件夹下面就会生成工程目录
配置vscode编译选项
配置编译选项是很简单的事情,因为D语言的vscode插件已经存在了几种默认的编译配置,我们按下 ctrl+shift+p 调出运行框,输入build,然后选择 任务:配置默认生成任务,可以看到:
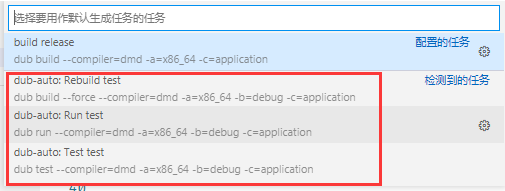
然后我们选择自己需要的选项,点击右边那个配置齿轮,会转到 tasks.json 配置文件,最终我配置好的如下:
{
	"version": "2.0.0",
	"tasks": [
		{
			"type": "dub",
			"run": false,
			"compiler": "dmd",
			"archType": "x86_64",
			"buildType": "debug",
			"configuration": "application",
			"_generated": true,
			"problemMatcher": [
				"$dmd"
			],
			"group": "build",
			"label": "build debug",
			"detail": "dub build --compiler=dmd -a=x86_64 -b=debug -c=application"
		},
		{
			"type": "dub",
			"run": false,
			"compiler": "dmd",
			"archType": "x86_64",
			"buildType": "release",
			"configuration": "application",
			"_generated": true,
			"problemMatcher": [
				"$dmd"
			],
			"group": "build",
			"label": "build release",
			"detail": "dub build --compiler=dmd -a=x86_64 -c=application"
		}
	]
}
注意:
如果使用x86的话一定要在dub后指定 x86_mscoff 这个编译选项,而不是 x86 ,不然是没法使用vscode的c++插件进行调试的,因为它无法识别其调试信息
配置vscode调试选项
我们创建一个调试配置 lanuch.json ,内容如下:
{
    // 使用 IntelliSense 了解相关属性。
    // 悬停以查看现有属性的描述。
    // 欲了解更多信息,请访问: https://go.microsoft.com/fwlink/?linkid=830387
    "version": "0.2.0",
    "configurations": [
        {
            "name": "启动",
            "type": "cppvsdbg",
            "request": "launch",
            "program": "${workspaceFolder}/test.exe",
            "args": [],
            "stopAtEntry": false,
            "cwd": "${workspaceFolder}",
            "environment": [],
            "console": "externalTerminal"
        }
    ]
}
配置vscode调试断点选项
为了能够支持对D语言源码文件下断点的操作,我们需要修改 settings.json 配置文件,做如下设置:
{
    "debug.allowBreakpointsEverywhere": true
}
然后一切就ok了!