相机标定问题已经是比较成熟的问题,OpenCV中提供了比较全面的标定、矫正等函数接口。但是如果我想通过一张矫正好的图像,想获得原始的畸变图,却没有比较好的方法,这里讨论了点的畸变和反畸变问题。
1.问题提出:给定一些已经经过矫正的二维点集,如何获得矫正前带畸变的二维点集?
2.理论基础:理论基础无它,就是相机的小孔成像模型和畸变参数模型,
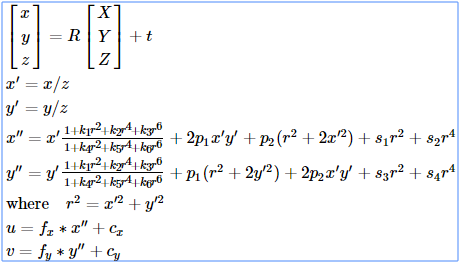
这里需要注意,k1,k2等为径向畸变参数,p1,p2为切向畸变参数,s1,s2为薄棱镜畸变参数(常忽略),x'为理想的无畸变的图像像素坐标或者点(Points)坐标,x''是带透镜畸变参数的图像像素或点坐标,上述公式详尽表达了它们之间的关系。通俗点讲,x',y'是指通过针孔模型求出来的理想点的位置,x'',y''是其真实位置,所以要通过后面的畸变模型进行近似,获得x'',y''的值,但是在实际应用时,x'',y''通常是已知的,即我们通过相机获得了带畸变的图像,但是我们需要反算回去得到x',y',OpenCV提供了这样的过程函数接口,可以直接使用。
而这里想做的是通过矫正图得到畸变图点,即通过x‘,y’得到x'',y'',所以只要通过上述公式进行求解就行了。
3.求解过程:
直接给出相关程序:
void myDistortPoints(const std::vector<cv::Point2d> & src, std::vector<cv::Point2d> & dst,
    const cv::Mat & cameraMatrix, const cv::Mat & distortionCoeff)
{

    dst.clear();
    double fx = cameraMatrix.at<double>(0, 0);
    double fy = cameraMatrix.at<double>(1, 1);
    double ux = cameraMatrix.at<double>(0, 2);
    double uy = cameraMatrix.at<double>(1, 2);

    double k1 = distortionCoeff.at<double>(0, 0);
    double k2 = distortionCoeff.at<double>(0, 1);
    double p1 = distortionCoeff.at<double>(0, 2);
    double p2 = distortionCoeff.at<double>(0, 3);
    double k3 = distortionCoeff.at<double>(0, 4);
    double k4;//
    double k5;//
    double k6;//

    for (unsigned int i = 0; i < src.size(); i++)
    {
        const cv::Point2d & p = src[i];

     //获取的点通常是图像的像素点,所以需要先通过小孔相机模型转换到归一化坐标系下;
        double xCorrected = (p.x - ux) / fx;
        double yCorrected = (p.y - uy) / fy;

        double xDistortion, yDistortion;

      //我们已知的是经过畸变矫正或理想点的坐标;
        double r2 = xCorrected*xCorrected + yCorrected*yCorrected;

        double deltaRa = 1. + k1 * r2 + k2 * r2 * r2 + k3 * r2 * r2 * r2;
        double deltaRb = 1 / (1. + k4 * r2 + k5 * r2 * r2 + k6 * r2 * r2 * r2);
        double deltaTx = 2. * p1 * xCorrected * yCorrected + p2 * (r2 + 2. * xCorrected * xCorrected);
        double deltaTy = p1 * (r2 + 2. * yCorrected * yCorrected) + 2. * p2 * xCorrected * yCorrected;

     //下面为畸变模型;
        xDistortion = xCorrected * deltaRa * deltaRb + deltaTx;
        yDistortion = yCorrected * deltaRa * deltaRb + deltaTy;

     //最后再次通过相机模型将归一化的坐标转换到像素坐标系下;
        xDistortion = xDistortion * fx + ux;
        yDistortion = yDistortion * fy + uy;

        dst.push_back(cv::Point2d(xDistortion, yDistortion));
    }

}
4.存在的问题:经过上面的过程,我们就获得了在畸变原图中点的坐标,但是有一点值得注意的是,我们将获得的畸变图中的点经过OpenCV提供的UndistortPoints()函数进行矫正的时候,不能得到原始的点,即这里存在误差。这种误差是由于自己写的畸变模型和OpenCV提供的畸变函数模型不同导致的,有兴趣的可以查看OpenCV源码,你会发现后面关于 r 的平方和 r 的四次方,六次方在OpenCV中都是平方项,所以计算结果存在误差,这里有两个解决办法,第一是修改上述代码,统一改成平方项;第二就是自己实现UndistortPoints函数:
void myUndistortPoints(const std::vector<cv::Point2d> & src, std::vector<cv::Point2d> & dst,
    const cv::Mat & cameraMatrix, const cv::Mat & distortionCoeff)
{

    dst.clear();
    double fx = cameraMatrix.at<double>(0, 0);
    double fy = cameraMatrix.at<double>(1, 1);
    double ux = cameraMatrix.at<double>(0, 2);
    double uy = cameraMatrix.at<double>(1, 2);

    double k1 = distortionCoeff.at<double>(0, 0);
    double k2 = distortionCoeff.at<double>(0, 1);
    double p1 = distortionCoeff.at<double>(0, 2);
    double p2 = distortionCoeff.at<double>(0, 3);
    double k3 = distortionCoeff.at<double>(0, 4);
    double k4;
    double k5;
    double k6;

    for (unsigned int i = 0; i < src.size(); i++)
    {
        const cv::Point2d & p = src[i];

     //首先进行坐标转换;
        double xDistortion = (p.x - ux) / fx;
        double yDistortion = (p.y - uy) / fy;

        double xCorrected, yCorrected;

        double x0 = xDistortion;
        double y0 = yDistortion;

     //这里使用迭代的方式进行求解,因为根据2中的公式直接求解是困难的,所以通过设定初值进行迭代,这也是OpenCV的求解策略;
        for (int j = 0; j < 10; j++)
        {
            double r2 = xDistortion*xDistortion + yDistortion*yDistortion;

            double distRadialA = 1 / (1. + k1 * r2 + k2 * r2 * r2 + k3 * r2 * r2 * r2);
            double distRadialB = 1. + k4 * r2 + k5 * r2 * r2 + k6 * r2 * r2 * r2;

            double deltaX = 2. * p1 * xDistortion * yDistortion + p2 * (r2 + 2. * xDistortion * xDistortion);
            double deltaY = p1 * (r2 + 2. * yDistortion * yDistortion) + 2. * p2 * xDistortion * yDistortion;

            xCorrected = (x0 - deltaX)* distRadialA * distRadialB;
            yCorrected = (y0 - deltaY)* distRadialA * distRadialB;

            xDistortion = xCorrected;
            yDistortion = yCorrected;
        }

     //进行坐标变换;
        xCorrected = xCorrected * fx + ux;
        yCorrected = yCorrected * fy + uy;

        dst.push_back(cv::Point2d(xCorrected, yCorrected));
    }

}
上面的迭代求解过程是值得学习的地方,因为所求的x本身就被包含在r中,所以直接求解变得几乎不可能,而上面的迭代方法提供了一种解决方法,当迭代次数足够多时,求解接近精确值。
5.结果展示:下面给出通过设定好相机的畸变参数和内参矩阵,给定一幅带有点线的原图,通过3生成畸变图,然后再通过4反算原图的过程:


注:上面的线是在一个全黑的Mat矩阵中画点生成的。