React-Native Image加载图片方式解析
1.加载当前工程文件夹下图片
<Image style={styles.image} source={require('./TT2.jpg')} />
2.加载当前应用沙盒文件内图片
分析:
假定图片存储在document文件夹下(document/TT1.jpg)
理论上这个加载方式和第一种默认似乎一样(都是路径),
实际上require里面的参数只能是工程文件夹内部的图片,并且参数不能是变量。
(require(this.state.localPath) 这种是错误的)
正确方式:
用 uri,这里就需要在js文件中获取当前应用的沙盒路径(document路径),
于是我就天真的开始寻找js如何获取app的沙盒路径,然并卵。。。。。。
恍然大悟:React-Native并非万能,也无法完全取代原生,这就是我的一个学习误区,
实际上开发过程中需要两者相辅相成
实现逻辑如下:
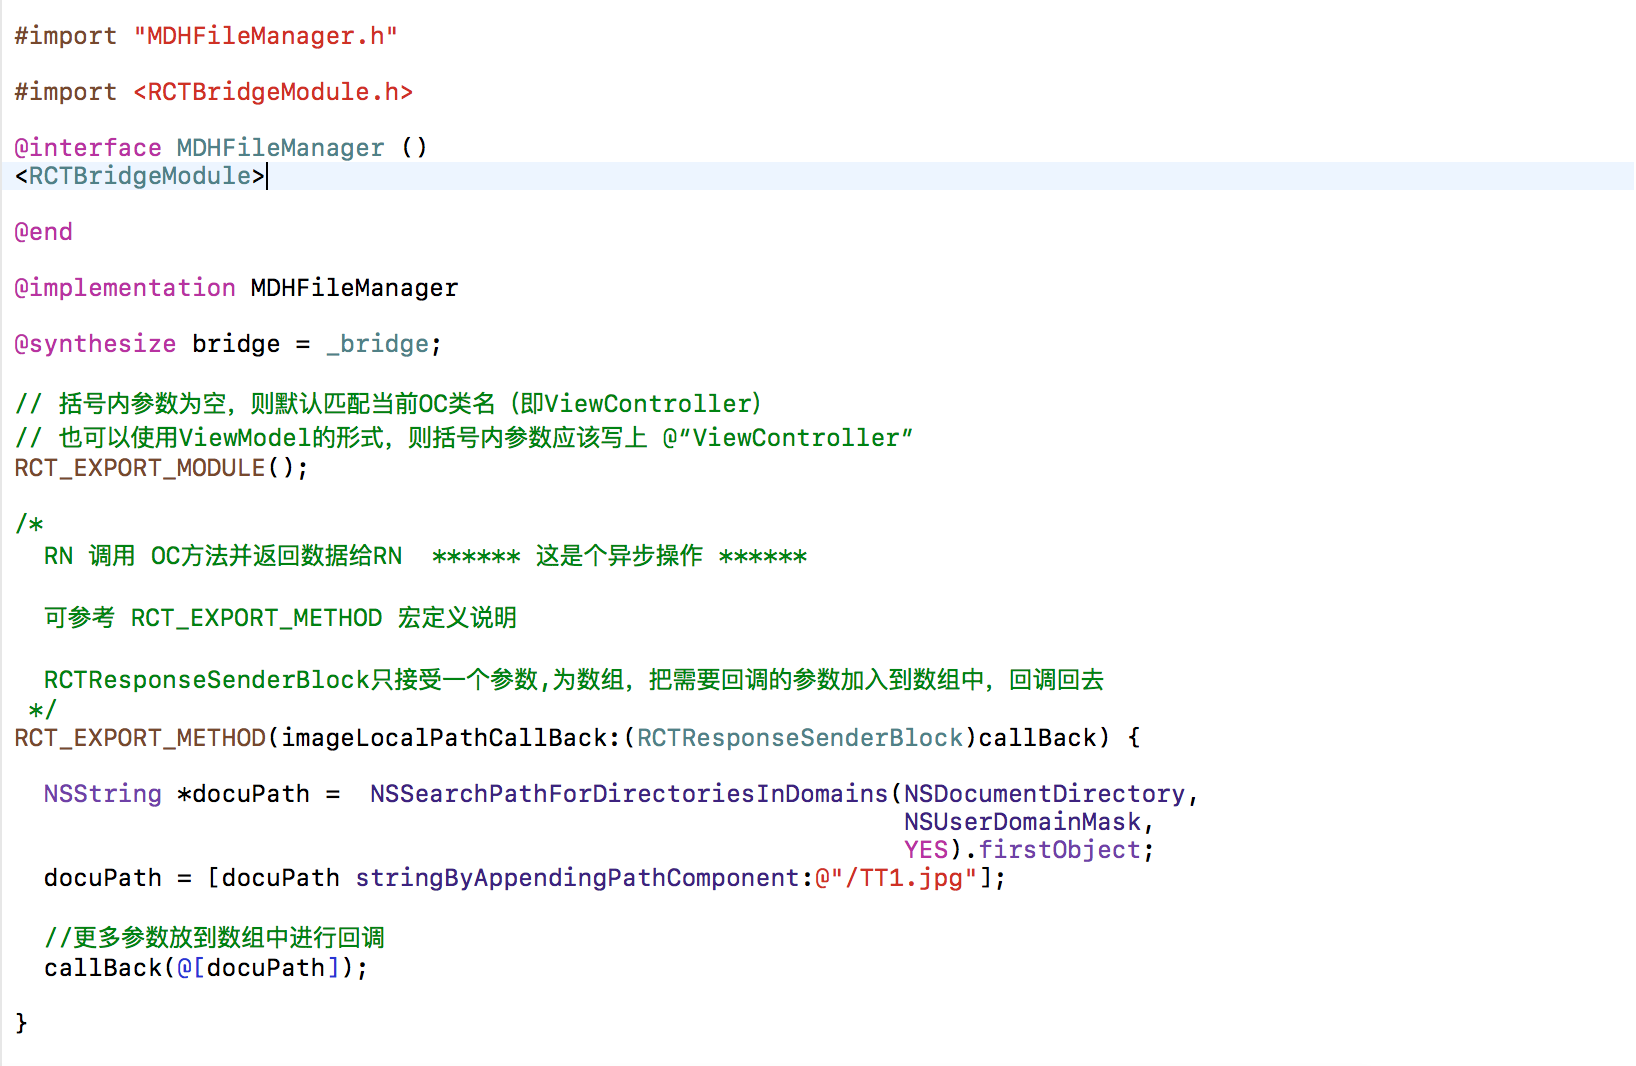
1.创建OC类,MDHFileManager并与js文件实现数据传递
2.MDHFileManager: 负责获取图片沙盒路径,并callback给js文件
3.js:收到OC类的回调后,更新state中参数(state参数改变,对应Image组件就会刷新)
this.state.ok 来处理placeholderImage
<Image style = {{ 300, height: 200, backgroundColor:'white'}}
source = {this.state.ok ? {uri: this.state.localImagePath} : require('./TT4.jpg')}
resizeMode = {'contain'}/>
3.加载网络图片(不过多赘述)
<Image style = {{ 300, height: 300, backgroundColor:'white'}}
source = {{uri: 'http://facebook.github.io/react/img/logo_og.png'}}
resizeMode = {'contain'}

/**
* Sample React Native App
* https://github.com/facebook/react-native
* @flow
*/
import React, { Component } from 'react';
import {
AppRegistry,
StyleSheet,
Text,
Image,
View,
NativeModules
} from 'react-native';
var FileManager = NativeModules.MDHFileManager
export default class SS extends Component {
constructor(props) {
console.log(' 1111111**********++++++++++ constructor');
super(props);
this.state = {
'localImagePath' : '',
'ok':false
}
}
componentWillMount() {
/**
* 此函数调用时机是在组件创建,并初始化了状态之后,在第一次绘制render()之前
* 可以在这里做一些业务初始化操作,也可以设置组件状态,整个生命周期中只被调用一次
*/
console.log('222222++++++++++ componentWillMount');
FileManager.imageLocalPathCallBack((path)=>{
console.log(' **********++++++++++ path' + path);
this.setState({
'localImagePath':path,
'ok':true
})
})
}
componentDidMount() {
console.log('44444++++++++++ componentDidMount');
/**
* 在组件第一次绘制后,会调用,通知组件以及加载完成。
*/
}
render() {
console.log('33333**********++++++++++ render' );
return (
<View style={styles.container}>
<View style = {{ 300, height: 300, backgroundColor:'white'}}>
<Image style = {{ 300, height: 200, backgroundColor:'white'}}
source = {this.state.ok ? {uri: this.state.localImagePath} : require('./TT4.jpg')}
resizeMode = {'contain'}/>
<Text style={styles.welcome}>加载document目录下图片</Text>
</View>
<View style = {{ 300, height: 300, backgroundColor:'white'}}>
<Image style = {{ 300, height: 200}}
source = {require('./TT2.jpg')}
resizeMode = {'contain'}
/>
<Text style={styles.welcome}>加载工程文件夹下的图片</Text>
</View>
<View style = {{ 300, height: 300, backgroundColor:'white'}}>
<Image style = {{ 300, height: 300, backgroundColor:'white'}}
source = {{uri: 'http://facebook.github.io/react/img/logo_og.png'}}
resizeMode = {'contain'}
/>
<Text style={styles.welcome}>加载网络图片</Text>
</View>
</View>
);
}
}
const styles = StyleSheet.create({
container: {
flex: 1,
justifyContent: 'center',
alignItems: 'center',
backgroundColor: '#F5FCFF',
},
welcome: {
fontSize: 20,
textAlign: 'center',
margin: 10,
color:'red'
},
instructions: {
textAlign: 'center',
color: '#333333',
marginBottom: 5,
},
});
AppRegistry.registerComponent('SS', () => SS);