一、爬虫基本知识
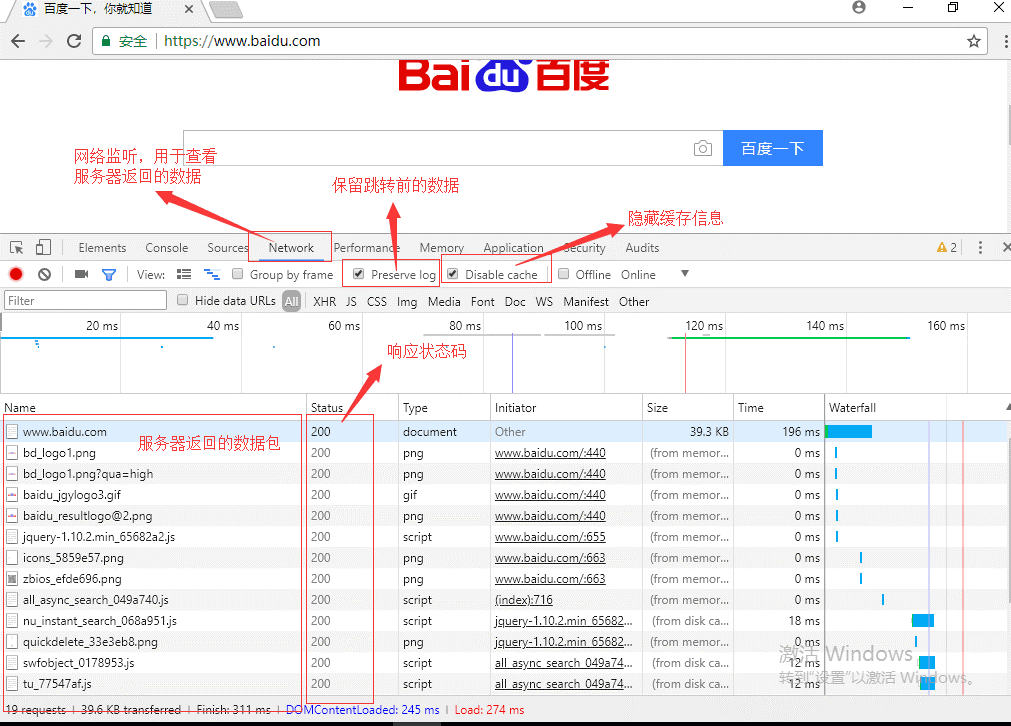
 1 爬虫原理:
 2         什么是爬虫?
 3             爬虫指的是爬取数据。
 4
 5         什么是互联网?
 6             由一堆网络设备把一台一台的计算机互联到一起。
 7
 8         互联网建立的目的?
 9             数据的传递与数据的共享。
10
11         上网的全过程:
12             - 普通用户
13                 打开浏览器 --> 往目标站点发送请求 --> 接收响应数据 --> 渲染到页面上。
14
15             - 爬虫程序
16                 模拟浏览器 --> 往目标站点发送请求 --> 接收响应数据 --> 提取有用的数据 --> 保存到本地/数据库。
17
18         浏览器发送的是什么请求?
19             http协议的请求:
20                 - 请求url
21                 - 请求方式:
22                     GET、POST
23
24                 - 请求头:
25                     cookies
26                     user-agent
27                     host
28
29         爬虫的全过程:
30             1、发送请求 (请求库)
31                 - requests模块
32                 - selenium模块
33
34             2、获取响应数据(服务器返回)
35
36             3、解析并提取数据(解析库)
37                 - re正则
38                 - bs4(BeautifulSoup4)
39                 - Xpath
40
41             4、保存数据(存储库)
42                 - MongoDB
43
44             1、3、4需要手动写。
45
46             - 爬虫框架
47                 Scrapy(基于面向对象)
48 53
54         使用Chrome浏览器工具
55             打开开发者模式 ----> network ---> preserve log、disable cache
二、requests库的安装
1、在DOS中输入“pip3 install requests”进行安装
2、在pycharm中进行安装

三、基于HTTP协议的requests的请求机制
1、http协议:(以请求百度为例)
(1)请求url:
https://www.baidu.com/
(2)请求方式:
GET
(3)请求头:
Cookie: 可能需要关注。
User-Agent: 用来证明你是浏览器
注意: 去浏览器的request headers中查找
Mozilla/5.0 (Windows NT 10.0; WOW64) AppleWebKit/537.36 (KHTML, like Gecko) Chrome/65.0.3325.146 Safari/537.36
Host: www.baidu.com
2、浏览器的使用
3、requests几种使用方式
1 >>> import requests
2 >>> r = requests.get('https://api.github.com/events')
3 >>> r = requests.post('http://httpbin.org/post', data = {'key':'value'})
4 >>> r = requests.put('http://httpbin.org/put', data = {'key':'value'})
5 >>> r = requests.delete('http://httpbin.org/delete')
6 >>> r = requests.head('http://httpbin.org/get')
7 >>> r = requests.options('http://httpbin.org/get')
4、爬取百度主页
 1 import requests
 2
 3 response = requests.get(url='https://www.baidu.com/')
 4 response.encoding = 'utf-8'
 5 print(response)  # <Response [200]>
 6 # 返回响应状态码
 7 print(response.status_code)  # 200
 8 # 返回响应文本
 9 # print(response.text)
10 print(type(response.text))  # <class 'str'>
11 #将爬取的内容写入xxx.html文件
12 with open('baidu.html', 'w', encoding='utf-8') as f:
13     f.write(response.text)
四、GET请求讲解
1、请求头headers使用(以访问“知乎发现”为例)
(1)、直接爬取,则会出错:
1 访问”知乎发现“
2 import requests
3 response = requests.get(url='https://www.zhihu.com/explore')
4 print(response.status_code)  # 400
5 print(response.text)  # 返回错误页面
(2)添加请求头之后即可正常爬取
 1 # 携带请求头参数访问知乎:
 2 import requests
 3
 4 #请求头字典
 5 headers = {
 6     'user-agent': 'Mozilla/5.0 (Windows NT 10.0; WOW64) AppleWebKit/537.36 (KHTML, like Gecko) Chrome/65.0.3325.146 Safari/537.36'
 7 }
 8 #在get请求内,添加user-agent
 9 response = requests.get(url='https://www.zhihu.com/explore', headers=headers)
10 print(response.status_code)  # 200
11 # print(response.text)
12 with open('zhihu.html', 'w', encoding='utf-8') as f:
13     f.write(response.text)
2、params请求参数
(1)在访问某些网站时,url会特别长,而且有一长串看不懂的字符串,这时可以用params进行参数替换
 1 import requests
 2 from urllib.parse import urlencode
 3 #以百度搜索“蔡徐坤”为例
 4 # url = 'https://www.baidu.com/s?wd=%E8%94%A1%E5%BE%90%E5%9D%A4'
 5 '''
 6 方法1:
 7 url = 'https://www.baidu.com/s?' + urlencode({"wd": "蔡徐坤"})
 8 headers = {
 9     'user-agent': 'Mozilla/5.0 (Windows NT 10.0; WOW64) AppleWebKit/537.36 (KHTML, like Gecko) Chrome/65.0.3325.146 Safari/537.36'
10 }
11 response = requests.get(url,headers)
12 '''
13 #方法2:
14 url = 'https://www.baidu.com/s?'
15 headers = {
16     'user-agent': 'Mozilla/5.0 (Windows NT 10.0; WOW64) AppleWebKit/537.36 (KHTML, like Gecko) Chrome/65.0.3325.146 Safari/537.36'
17 }
18 # 在get方法中添加params参数
19 response = requests.get(url, headers=headers, params={"wd": "蔡徐坤"})
20 print(url) # https://www.baidu.com/s?wd=%E8%94%A1%E5%BE%90%E5%9D%A4
21 # print(response.text)
22 with open('xukun.html', 'w', encoding='utf-8') as f:
23     f.write(response.text)
3、cookies参数使用
(1)携带登录cookies破解github登录验证
 1 携带cookies
 2 携带登录cookies破解github登录验证
 3
 4 请求url:
 5     https://github.com/settings/emails
 6
 7 请求方式:
 8     GET
 9
10 请求头:
11     User-Agen
12
13     Cookie: has_recent_activity=1; _ga=GA1.2.1416117396.1560496852; _gat=1; tz=Asia%2FShanghai; _octo=GH1.1.1728573677.1560496856; _device_id=1cb66c9a9599576a3b46df2455810999; user_session=1V8n9QfKpbgB-DhS4A7l3Tb3jryARZZ02NDdut3J2hy-8scm; __Host-user_session_same_site=1V8n9QfKpbgB-DhS4A7l3Tb3jryARZZ02NDdut3J2hy-8scm; logged_in=yes; dotcom_user=TankJam; _gh_sess=ZS83eUYyVkpCWUZab21lN29aRHJTUzgvWjRjc2NCL1ZaMHRsdGdJeVFQM20zRDdPblJ1cnZPRFJjclZKNkcrNXVKbTRmZ3pzZzRxRFExcUozQWV4ZG9kOUQzZzMwMzA2RGx5V2dSaTMwaEZ2ZDlHQ0NzTTBtdGtlT2tVajg0c0hYRk5IOU5FelYxanY4T1UvVS9uV0YzWmF0a083MVVYVGlOSy9Edkt0aXhQTmpYRnVqdFAwSFZHVHZQL0ZyQyt0ZjROajZBclY4WmlGQnNBNTJpeEttb3RjVG1mM0JESFhJRXF5M2IwSlpHb1Mzekc5M0d3OFVIdGpJaHg3azk2aStEcUhPaGpEd2RyMDN3K2pETmZQQ1FtNGNzYnVNckR4aWtibkxBRC8vaGM9LS1zTXlDSmFnQkFkWjFjanJxNlhCdnRRPT0%3D--04f6f3172b5d01244670fc8980c2591d83864f60
14
方法一:在请求头中拼接cookies
 1 import requests
 2
 3 # 请求url
 4 url = 'https://github.com/settings/emails'
 5
 6 # 请求头
 7 headers = {
 8     'user-agent': 'Mozilla/5.0 (Windows NT 10.0; WOW64) AppleWebKit/537.36 (KHTML, like Gecko) Chrome/65.0.3325.146 Safari/537.36',
 9     # 在请求头中拼接cookies
10     # 'Cookie': 'has_recent_activity=1; _ga=GA1.2.1416117396.1560496852; _gat=1; tz=Asia%2FShanghai; _octo=GH1.1.1728573677.1560496856; _device_id=1cb66c9a9599576a3b46df2455810999; user_session=1V8n9QfKpbgB-DhS4A7l3Tb3jryARZZ02NDdut3J2hy-8scm; __Host-user_session_same_site=1V8n9QfKpbgB-DhS4A7l3Tb3jryARZZ02NDdut3J2hy-8scm; logged_in=yes; dotcom_user=TankJam; _gh_sess=ZS83eUYyVkpCWUZab21lN29aRHJTUzgvWjRjc2NCL1ZaMHRsdGdJeVFQM20zRDdPblJ1cnZPRFJjclZKNkcrNXVKbTRmZ3pzZzRxRFExcUozQWV4ZG9kOUQzZzMwMzA2RGx5V2dSaTMwaEZ2ZDlHQ0NzTTBtdGtlT2tVajg0c0hYRk5IOU5FelYxanY4T1UvVS9uV0YzWmF0a083MVVYVGlOSy9Edkt0aXhQTmpYRnVqdFAwSFZHVHZQL0ZyQyt0ZjROajZBclY4WmlGQnNBNTJpeEttb3RjVG1mM0JESFhJRXF5M2IwSlpHb1Mzekc5M0d3OFVIdGpJaHg3azk2aStEcUhPaGpEd2RyMDN3K2pETmZQQ1FtNGNzYnVNckR4aWtibkxBRC8vaGM9LS1zTXlDSmFnQkFkWjFjanJxNlhCdnRRPT0%3D--04f6f3172b5d01244670fc8980c2591d83864f60'
11 }
12 github_res = requests.get(url, headers=headers)
方法二:将cookies做为get的一个参数
 1 import requests
 2 headers = {
 3     'user-agent': 'Mozilla/5.0 (Windows NT 10.0; WOW64) AppleWebKit/537.36 (KHTML, like Gecko) Chrome/65.0.3325.146 Safari/537.36'}
 4 cookies = {
 5     'Cookie': 'has_recent_activity=1; _ga=GA1.2.1416117396.1560496852; _gat=1; tz=Asia%2FShanghai; _octo=GH1.1.1728573677.1560496856; _device_id=1cb66c9a9599576a3b46df2455810999; user_session=1V8n9QfKpbgB-DhS4A7l3Tb3jryARZZ02NDdut3J2hy-8scm; __Host-user_session_same_site=1V8n9QfKpbgB-DhS4A7l3Tb3jryARZZ02NDdut3J2hy-8scm; logged_in=yes; dotcom_user=TankJam; _gh_sess=ZS83eUYyVkpCWUZab21lN29aRHJTUzgvWjRjc2NCL1ZaMHRsdGdJeVFQM20zRDdPblJ1cnZPRFJjclZKNkcrNXVKbTRmZ3pzZzRxRFExcUozQWV4ZG9kOUQzZzMwMzA2RGx5V2dSaTMwaEZ2ZDlHQ0NzTTBtdGtlT2tVajg0c0hYRk5IOU5FelYxanY4T1UvVS9uV0YzWmF0a083MVVYVGlOSy9Edkt0aXhQTmpYRnVqdFAwSFZHVHZQL0ZyQyt0ZjROajZBclY4WmlGQnNBNTJpeEttb3RjVG1mM0JESFhJRXF5M2IwSlpHb1Mzekc5M0d3OFVIdGpJaHg3azk2aStEcUhPaGpEd2RyMDN3K2pETmZQQ1FtNGNzYnVNckR4aWtibkxBRC8vaGM9LS1zTXlDSmFnQkFkWjFjanJxNlhCdnRRPT0%3D--04f6f3172b5d01244670fc8980c2591d83864f60'
 6 }
 7
 8 github_res = requests.get(url, headers=headers, cookies=cookies)
 9
10 print('15622792660' in github_res.text)
五、POST请求讲解
1、GET和POST介绍
(1)GET请求: (HTTP默认的请求方法就是GET)
* 没有请求体
* 数据必须在1K之内!
* GET请求数据会暴露在浏览器的地址栏中
(2)GET请求常用的操作:
1. 在浏览器的地址栏中直接给出URL,那么就一定是GET请求
2. 点击页面上的超链接也一定是GET请求
3. 提交表单时,表单默认使用GET请求,但可以设置为POST
(3)POST请求
(1). 数据不会出现在地址栏中
(2). 数据的大小没有上限
(3). 有请求体
(4). 请求体中如果存在中文,会使用URL编码!
!!!requests.post()用法与requests.get()完全一致,特殊的是requests.post()有一个data参数,用来存放请求体数据!
2、POST请求自动登录github
对于登录来说,应该在登录输入框内输错用户名或密码然后抓包分析通信流程,假如输对了浏览器就直接跳转了,还分析什么鬼?就算累死你也找不到数据包
 1 '''
 2
 3 POST请求自动登录github。
 4     github反爬:
 5         1.session登录请求需要携带login页面返回的cookies
 6         2.email页面需要携带session页面后的cookies
 7 '''
 8
 9 import requests
10 import re
11 # 一 访问login获取authenticity_token
12 login_url = 'https://github.com/login'
13 headers = {
14     'User-Agent': 'Mozilla/5.0 (Windows NT 10.0; WOW64) AppleWebKit/537.36 (KHTML, like Gecko) Chrome/70.0.3538.77 Safari/537.36',
15     'Referer': 'https://github.com/'
16 }
17 login_res = requests.get(login_url, headers=headers)
18 # print(login_res.text)
19 authenticity_token = re.findall('name="authenticity_token" value="(.*?)"', login_res.text, re.S)[0]
20 # print(authenticity_token)
21 login_cookies = login_res.cookies.get_dict()
22
23
24 # 二 携带token在请求体内往session发送POST请求
25 session_url = 'https://github.com/session'
26
27 session_headers = {
28     'Referer': 'https://github.com/login',
29     'User-Agent': 'Mozilla/5.0 (Windows NT 10.0; WOW64) AppleWebKit/537.36 (KHTML, like Gecko) Chrome/70.0.3538.77 Safari/537.36',
30 }
31
32 form_data = {
33     "commit": "Sign in",
34     "utf8": "✓",
35     "authenticity_token": authenticity_token,
36     "login": "username",
37     "password": "githubpassword",
38     'webauthn-support': "supported"
39 }
40
41 # 三 开始测试是否登录
42 session_res = requests.post(
43     session_url,
44     data=form_data,
45     cookies=login_cookies,
46     headers=session_headers,
47     # allow_redirects=False
48 )
49
50 session_cookies = session_res.cookies.get_dict()
51
52 url3 = 'https://github.com/settings/emails'
53 email_res = requests.get(url3, cookies=session_cookies)
54
55 print('账号' in email_res.text)
56
57 自动登录github(手动处理cookies信息)
六、response响应
1、response属性

import requests

headers = {
    'User-Agent': 'Mozilla/5.0 (Linux; Android 6.0; Nexus 5 Build/MRA58N) AppleWebKit/537.36 (KHTML, like Gecko) Chrome/46.0.2490.76 Mobile Safari/537.36',
}

response = requests.get('https://www.github.com', headers=headers)

# response响应
print(response.status_code)  # 获取响应状态码
print(response.url)  # 获取url地址
print(response.text)  # 获取文本
print(response.content)  # 获取二进制流
print(response.headers)  # 获取页面请求头信息
print(response.history)  # 上一次跳转的地址
print(response.cookies)  # # 获取cookies信息
print(response.cookies.get_dict())  # 获取cookies信息转换成字典
print(response.cookies.items())  # 获取cookies信息转换成字典
print(response.encoding)  # 字符编码
print(response.elapsed)  # 访问时间
七、requests高级用法
1、超时设置
# 超时设置
# 两种超时:float or tuple
# timeout=0.1  # 代表接收数据的超时时间
# timeout=(0.1,0.2)  # 0.1代表链接超时  0.2代表接收数据的超时时间

import requests

response = requests.get('https://www.baidu.com',
                        timeout=0.0001)
2、使用代理
# 官网链接: http://docs.python-requests.org/en/master/user/advanced/#proxies

# 代理设置:先发送请求给代理,然后由代理帮忙发送(封ip是常见的事情)
import requests
proxies={
    # 带用户名密码的代理,@符号前是用户名与密码
    'http':'http://tank:123@localhost:9527',
    'http':'http://localhost:9527',
    'https':'https://localhost:9527',
}
response=requests.get('https://www.12306.cn',
                     proxies=proxies)
print(response.status_code)


# 支持socks代理,安装:pip install requests[socks]
import requests
proxies = {
    'http': 'socks5://user:pass@host:port',
    'https': 'socks5://user:pass@host:port'
}
respone=requests.get('https://www.12306.cn',
                     proxies=proxies)

print(respone.status_code)