对于正式运行的环境,一般需要设置网络安全控制区DMZ,通过代理,把仅需要的端口向客户端暴露,其他内部端口应该是在防火墙包含之内的。
下文将针对ArcGIS 的Portal软件,讲述在DMZ中如何架构的问题。
架构1,使用ArcGIS提供的WebAdaptor组件。
该组件分为.Net和Java版,支持运作在微软的IIS以及常见的Java Application Server。
对于使用Web Server进行身份认证的场景下,必须使用Web Adaptor。
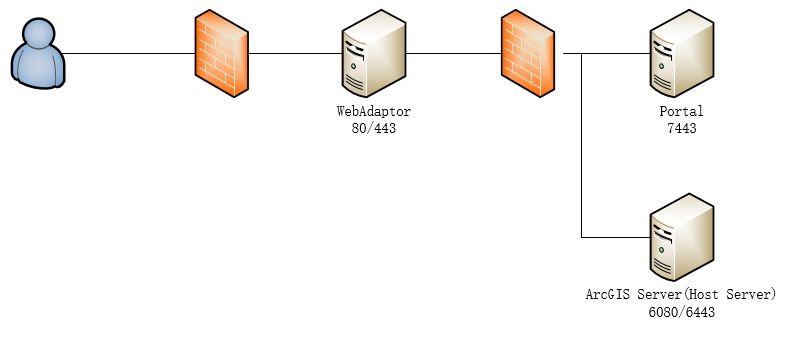
上图的部署架构中,WebAdaptor需要分别针对Portal和GIS Server部署两个Web应用。
在进行Portal和GIS Server进行联合的时候,需要把GIS Server的WebAdaptor代理地址填写到Services URL一栏,把GIS Server的内部6443地址填写到Administrator URL一栏。
另外需要分别设置Portal和GIS Server的WebContextURL属性,填写其对应的WebAdaptor代理地址。
架构2,使用第三方反向代理服务器。
有众多第三方反向代理服务器可以选择,只要支持HTTP和HTTPS协议的服务器都可以。
下面以常见的Apache为例进行说明。

Apache提供若干模块支持反向代理和HTTPS。
通过配置Apache的httpd.conf文件,加载这些模块:headers_module,proxy_module,proxy_http,ssl_module。
<VirtualHost _default_:80>
ServerName 192.168.1.72:80
ProxyTimeout 6000
ProxyPreserveHost On
RequestHeader add Accept-Encoding gzip
ProxyPass /portal http://portal.esrigz.com:7080/arcgis
ProxyPassReverse /portal http://portal.esrigz.com:7080/arcgis
ProxyPass /server http://portal.esrigz.com:6080/arcgis
ProxyPassReverse /server http://portal.esrigz.com:6080/arcgis
</virtualHost>
以下是HTTPS的配置
<VirtualHost _default_:443>
SSLEngine on
SSLProxyEngine on
SSLProxyCheckPeerCN off
SSLProxyVerify optional_no_ca
ProxyTimeout 6000
ProxyPreserveHost On
RequestHeader add Accept-Encoding gzip
ProxyPass /portal https://portal.esrigz.com/7443/arcgis
ProxyPassReverse /portal https://portal.esrigz.com:7443/arcgis
ProxyPass /server https://portal.esrigz.com:6443/arcgis
ProxyPassReverse /server https://portal.esrigz.com/server
ServerName 192.168.1.72:443
SSLCertificateFile "${SRVROOT}/conf/ssl/adproxy.crt"
SSLCertificateKeyFile "${SRVROOT}/conf/ssl/common.key"
</virtualhost>
除了Apache可以作为代理服务器外,目前nginx服务作为代理服务器也是十分流行的,对于nginx服务器的配置如下:
#user nobody;
worker_processes 1;
error_log logs/error.log;
#error_log logs/error.log notice;
#error_log logs/error.log info;
pid logs/nginx.pid;
events {
worker_connections 1024;
}
http {
include mime.types;
default_type application/octet-stream;
#log_format main '$remote_addr - $remote_user [$time_local] "$request" '
# '$status $body_bytes_sent "$http_referer" '
# '"$http_user_agent" "$http_x_forwarded_for"';
#access_log logs/access.log main;
sendfile on;
#tcp_nopush on;
#keepalive_timeout 0;
keepalive_timeout 65;
gzip on;
server {
listen 192.168.1.72:80;
server_name 192.168.1.72;
#charset koi8-r;
#access_log logs/host.access.log main;
location /portal {
proxy_set_header Accept-Encoding "gzip";
proxy_set_header X-Forwarded-Host $host:$server_port;
proxy_set_header X-Forwarded-Server $host;
proxy_set_header X-Forwarded-For $proxy_add_x_forwarded_for;
proxy_pass http://portal.esrigz.com/portal;
#proxy_redirect default;
#index index.html index.htm;
}
#error_page 404 /404.html;
# redirect server error pages to the static page /50x.html
#
error_page 500 502 503 504 /50x.html;
location = /50x.html {
root html;
}
}
# HTTPS server
server {
listen 443 ssl;
server_name 192.168.1.72;
ssl_certificate adproxy.crt;
ssl_certificate_key common.key;
#ssl_session_cache shared:SSL:1m;
#ssl_session_timeout 5m;
ssl_protocols TLSv1 TLSv1.1 TLSv1.2;
ssl_ciphers HIGH:!aNULL:!MD5;
ssl_prefer_server_ciphers on;
location /portal {
#proxy_set_header Host $host;
#proxy_set_header X-Real-IP $remote_addr;
proxy_set_header Accept-Encoding "gzip";
proxy_set_header X-Forwarded-Host $host:$server_port;
proxy_set_header X-Forwarded-Server $host;
proxy_set_header X-Forwarded-For $proxy_add_x_forwarded_for;
proxy_pass https://portal.esrigz.com/portal;
#proxy_redirect default;
}
}
}
架构3,第三方代理服务器和WebAdaptor混合使用。

该架构能提供Web Server的身份认证功能,同时可以提供了双重代理的安全标准。