-
安装
链接:https://pan.baidu.com/s/1w-wpzkiR45KLqwXOYU8pNw
提取码:u4sc
官网下载 https://www.elastic.co/downloads/past-releases/elasticsearch-5-2-2 安装包
解压 Elasticsearch安装包
tar -zxvf elasticsearch-5.6.2.tar.gz
elasticsearch 安装目录下创建二个目录

-
配置 elasticsearch.yml
# ======================== Elasticsearch Configuration =========================
#
# NOTE: Elasticsearch comes with reasonable defaults for most settings.
#       Before you set out to tweak and tune the configuration, make sure you
#       understand what are you trying to accomplish and the consequences.
#
# The primary way of configuring a node is via this file. This template lists
# the most important settings you may want to configure for a production cluster.
#
# Please consult the documentation for further information on configuration options:
# https://www.elastic.co/guide/en/elasticsearch/reference/index.html
#
# ---------------------------------- Cluster -----------------------------------
#
# Use a descriptive name for your cluster:
#
cluster.name: kevin-application
#
# ------------------------------------ Node ------------------------------------
#
# Use a descriptive name for the node:
#
node.name: node-1
#
# Add custom attributes to the node:
#
#node.attr.rack: r1
#
# ----------------------------------- Paths ------------------------------------
#
# Path to directory where to store the data (separate multiple locations by comma):
#
path.data: /home/kevin/modules/elasticsearch-5.6.2/data
#
# Path to log files:
#
path.logs: /home/kevin/modules/elasticsearch-5.6.2/logs
#
# ----------------------------------- Memory -----------------------------------
#
bootstrap.memory_lock: false
bootstrap.system_call_filter: false
#
# Make sure that the heap size is set to about half the memory available
# on the system and that the owner of the process is allowed to use this
# limit.
#
# Elasticsearch performs poorly when the system is swapping the memory.
#
# ---------------------------------- Network -----------------------------------
#
# Set the bind address to a specific IP (IPv4 or IPv6):
#
network.host: 192.168.1.20
#
# Set a custom port for HTTP:
#
http.port: 9200
#
# For more information, consult the network module documentation.
#
# --------------------------------- Discovery ----------------------------------
#
# Pass an initial list of hosts to perform discovery when new node is started:
# The default list of hosts is ["127.0.0.1", "[::1]"]
#
discovery.zen.ping.unicast.hosts: ["linux01"]
#
# Prevent the "split brain" by configuring the majority of nodes (total number of master-eligible nodes / 2 + 1):
#
#discovery.zen.minimum_master_nodes: 3
#
# For more information, consult the zen discovery module documentation.
#
# ---------------------------------- Gateway -----------------------------------
#
# Block initial recovery after a full cluster restart until N nodes are started:
#
#gateway.recover_after_nodes: 3
#
# For more information, consult the gateway module documentation.
#
# ---------------------------------- Various -----------------------------------
#
# Require explicit names when deleting indices:
#
#action.destructive_requires_name: true
http.cors.enabled: true
http.cors.allow-origin: "*"
案例

# ======================== Elasticsearch Configuration =========================
#
# NOTE: Elasticsearch comes with reasonable defaults for most settings.
#       Before you set out to tweak and tune the configuration, make sure you
#       understand what are you trying to accomplish and the consequences.
#
# The primary way of configuring a node is via this file. This template lists
# the most important settings you may want to configure for a production cluster.
#
# Please consult the documentation for further information on configuration options:
# https://www.elastic.co/guide/en/elasticsearch/reference/index.html
#
# ---------------------------------- Cluster -----------------------------------
#
# Use a descriptive name for your cluster:
#
cluster.name: es
#
# ------------------------------------ Node ------------------------------------
#
# Use a descriptive name for the node:
#
node.name: node-123
#
# Add custom attributes to the node:
#
#node.attr.rack: r1
#
# ----------------------------------- Paths ------------------------------------
#
# Path to directory where to store the data (separate multiple locations by comma):
#
#path.data: /path/to/data
#
# Path to log files:
#
#path.logs: /path/to/logs
#
# ----------------------------------- Memory -----------------------------------
#
# Lock the memory on startup:
#
#bootstrap.memory_lock: true
#
# Make sure that the heap size is set to about half the memory available
# on the system and that the owner of the process is allowed to use this
# limit.
#
# Elasticsearch performs poorly when the system is swapping the memory.
#
# ---------------------------------- Network -----------------------------------
#
# Set the bind address to a specific IP (IPv4 or IPv6):
#
network.host: 192.168.31.122
#
# Set a custom port for HTTP:
#
#http.port: 9200
#
# For more information, consult the network module documentation.
#
# --------------------------------- Discovery ----------------------------------
#
# Pass an initial list of hosts to perform discovery when new node is started:
# The default list of hosts is ["127.0.0.1", "[::1]"]
#i
discovery.zen.ping.unicast.hosts: ["192.168.31.122","192.168.31.122","192.168.31.123","192.168.31.124","192.168.31.125"]
#
# Prevent the "split brain" by configuring the majority of nodes (total number of master-eligible nodes / 2 + 1):
#
#discovery.zen.minimum_master_nodes: 3
#
# For more information, consult the zen discovery module documentation.
#
# ---------------------------------- Gateway -----------------------------------
#
# Block initial recovery after a full cluster restart until N nodes are started:
#
#gateway.recover_after_nodes: 3
#
# For more information, consult the gateway module documentation.
#
# ---------------------------------- Various -----------------------------------
#
# Require explicit names when deleting indices:
#
#action.destructive_requires_name: true
indices.query.bool.max_clause_count: 1000000
bootstrap.system_call_filter: false
#allow origin
http.cors.enabled: true
http.cors.allow-origin: "*"


indices.fielddata.cache.size: 40%

discovery.zen.fd.ping_timeout: 120s
discovery.zen.fd.ping_retries: 3
discovery.zen.fd.ping_interval: 30s

transport.tcp.compress: true
-
配置linux系统环境
- 切换到root用户,编辑limits.conf 添加类似如下内容
[root@hadoop102 elasticsearch-5.2.2]# vi /etc/security/limits.conf
添加如下内容:
* soft nofile 65536
* hard nofile 131072
* soft nproc 2048
* hard nproc 4096
- 切换到root用户,进入limits.d目录下修改配置文件。
[root@hadoop102 elasticsearch-5.2.2]# vi /etc/security/limits.d/90-nproc.conf
修改如下内容:
* soft nproc 1024
#修改为
* soft nproc 2048
- 切换到root用户修改配置sysctl.conf
[root@hadoop102 elasticsearch-5.2.2]# vi /etc/sysctl.conf
添加下面配置:
vm.max_map_count=655360
并执行命令:
[root@hadoop102 elasticsearch-5.2.2]# sysctl -p

切换成普通用户启动elasticsearch
bin/elasticsearch
-
elasticsearch添加用户和用户组并授权
groupadd es
useradd es -g es -p es
chown -R es:es /data0/es/elasticsearch-6.8.0
su es
-
启动服务
#切换es用户,启动elasticsearch不能使用root用户
su es
cd /opt/elasticsearch-7.3.0/bin
#后台运行
./elasticsearch -d
ps -ef|grep elastic
网页查看 linux01:9200 如果显示下面这个表示 成功
-
安装中文分词器
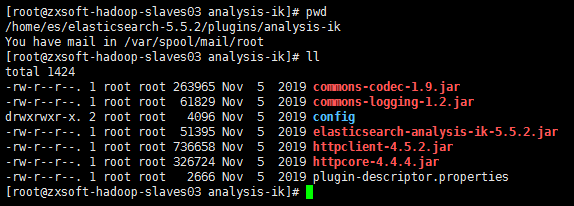
在 elasticsearch-5.5.2/plugins 创建 analysis-ik 目录

将这些 jar 移动到 analysis-ik 目录
IK分词器对中文具有良好支持的分词器,包括ik_max_word和ik_smart,
ik_max_word会将文本做最细粒度的拆分;
ik_smart 会做最粗粒度的拆分;

-
默认分词测试

POST /_analyze
{"text":"原世间美好与您环环相扣"}


返回结果


{
  "tokens" : [
    {
      "token" : "原",
      "start_offset" : 0,
      "end_offset" : 1,
      "type" : "<IDEOGRAPHIC>",
      "position" : 0
    },
    {
      "token" : "世",
      "start_offset" : 1,
      "end_offset" : 2,
      "type" : "<IDEOGRAPHIC>",
      "position" : 1
    },
    {
      "token" : "间",
      "start_offset" : 2,
      "end_offset" : 3,
      "type" : "<IDEOGRAPHIC>",
      "position" : 2
    },
    {
      "token" : "美",
      "start_offset" : 3,
      "end_offset" : 4,
      "type" : "<IDEOGRAPHIC>",
      "position" : 3
    },
    {
      "token" : "好",
      "start_offset" : 4,
      "end_offset" : 5,
      "type" : "<IDEOGRAPHIC>",
      "position" : 4
    },
    {
      "token" : "与",
      "start_offset" : 5,
      "end_offset" : 6,
      "type" : "<IDEOGRAPHIC>",
      "position" : 5
    },
    {
      "token" : "您",
      "start_offset" : 6,
      "end_offset" : 7,
      "type" : "<IDEOGRAPHIC>",
      "position" : 6
    },
    {
      "token" : "环",
      "start_offset" : 7,
      "end_offset" : 8,
      "type" : "<IDEOGRAPHIC>",
      "position" : 7
    },
    {
      "token" : "环",
      "start_offset" : 8,
      "end_offset" : 9,
      "type" : "<IDEOGRAPHIC>",
      "position" : 8
    },
    {
      "token" : "相",
      "start_offset" : 9,
      "end_offset" : 10,
      "type" : "<IDEOGRAPHIC>",
      "position" : 9
    },
    {
      "token" : "扣",
      "start_offset" : 10,
      "end_offset" : 11,
      "type" : "<IDEOGRAPHIC>",
      "position" : 10
    }
  ]
}
-
IK分词器测试(ik_smart和ik_max_word)


POST /_analyze
{"text":"原世间美好与您环环相扣","analyzer":"ik_max_word"}

返回结果

{
  "tokens" : [
    {
      "token" : "原",
      "start_offset" : 0,
      "end_offset" : 1,
      "type" : "CN_CHAR",
      "position" : 0
    },
    {
      "token" : "世间",
      "start_offset" : 1,
      "end_offset" : 3,
      "type" : "CN_WORD",
      "position" : 1
    },
    {
      "token" : "美好",
      "start_offset" : 3,
      "end_offset" : 5,
      "type" : "CN_WORD",
      "position" : 2
    },
    {
      "token" : "与",
      "start_offset" : 5,
      "end_offset" : 6,
      "type" : "CN_CHAR",
      "position" : 3
    },
    {
      "token" : "您",
      "start_offset" : 6,
      "end_offset" : 7,
      "type" : "CN_CHAR",
      "position" : 4
    },
    {
      "token" : "环环相扣",
      "start_offset" : 7,
      "end_offset" : 11,
      "type" : "CN_WORD",
      "position" : 5
    },
    {
      "token" : "环环",
      "start_offset" : 7,
      "end_offset" : 9,
      "type" : "CN_WORD",
      "position" : 6
    },
    {
      "token" : "相",
      "start_offset" : 9,
      "end_offset" : 10,
      "type" : "CN_CHAR",
      "position" : 7
    },
    {
      "token" : "扣",
      "start_offset" : 10,
      "end_offset" : 11,
      "type" : "CN_CHAR",
      "position" : 8
    }
  ]
}

POST /_analyze
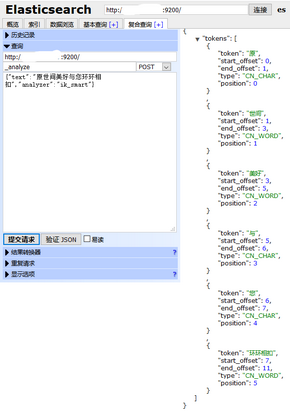
{"text":"原世间美好与您环环相扣","analyzer":"ik_smart"}

返回结果

{
  "tokens" : [
    {
      "token" : "原",
      "start_offset" : 0,
      "end_offset" : 1,
      "type" : "CN_CHAR",
      "position" : 0
    },
    {
      "token" : "世间",
      "start_offset" : 1,
      "end_offset" : 3,
      "type" : "CN_WORD",
      "position" : 1
    },
    {
      "token" : "美好",
      "start_offset" : 3,
      "end_offset" : 5,
      "type" : "CN_WORD",
      "position" : 2
    },
    {
      "token" : "与",
      "start_offset" : 5,
      "end_offset" : 6,
      "type" : "CN_CHAR",
      "position" : 3
    },
    {
      "token" : "您",
      "start_offset" : 6,
      "end_offset" : 7,
      "type" : "CN_CHAR",
      "position" : 4
    },
    {
      "token" : "环环相扣",
      "start_offset" : 7,
      "end_offset" : 11,
      "type" : "CN_WORD",
      "position" : 5
    }
  ]
}
