我是微软Dynamics 365 & Power Platform方面的工程师/顾问罗勇,也是2015年7月到2018年6月连续三年Dynamics CRM/Business Solutions方面的微软最有价值专家(Microsoft MVP),欢迎关注我的微信公众号 MSFTDynamics365erLuoYong ,回复432或者20210112可方便获取本文,同时可以在第一间得到我发布的最新博文信息,follow me!
Power Apps component framework的简要介绍参考官方文档:Power Apps component framework overview ,我不一一翻译,简述如下:
1. 它简称PCF,我这后文为了简便用PCF代替Power Apps component framework,不是Power Apps Component,这是两个不同的东西,后者只能用于Canvas Apps,不能用于Model-Driven Apps,处于Public Preview阶段,而且也推荐用 Component library 代替Power App Component,稍有基础的非开发者用户也能使用,前者两者都能用,需要专业的能写代码的开发者的来开发。
2.PCF开发出来的组件可以用于表单(form)上,视图(view)中,或者仪表盘(dashboard)上,可以用来做更酷的效果,比如用地图或者日历替换View来显示数据,用滚动条在表单上显示/更改字段的值。
3.PCF对于Model-Driven App来说是已经GA了,对于Canvas App来说目前还处于Pulic Preview阶段(预计2021年3月左右GA),而且默认情况下Canvas App并没有启用PCF,需要手动启用,Model-Driven Apps版本PCF支持的API等,对于Canvas App版本的PCF来讲不全部支持,Public Preview阶段的产品一般不适宜用于生产环境。
4.PCF用于Model-Driven Apps时候仅仅支持UCI,不支持经典界面,实际上当前已经没有经典界面了。当然,PCF不支持本地部署版本的Dynamics 365 Customer Engagement.
5.PCF在表单上显示/更改字段字段值,以前我们用HTML Web Resource基本也能做,那PCF有啥优势?优势是在当前上下文中与其他组件一起加载,速度更快,能调用丰富的API,也包括能使用相机,地理位置,麦克风等,更灵活,可重复使用性更高,所有文件打包成一个等等。
说了那么多我这里做个简单的例子,搞个中国特色的例子,将数字转换为中文大写,我这里的JavaScript代码参考 用JavaScript将数字转换为大写金额 。
工欲善其事必先利其器,要做PCF开发首先需要安装Microsoft Power Apps CLI (command-line interface),当然你的环境(Enivornment)必须要有Microsoft Dataverse才能安装和部署PCF. Microsoft Power Apps CLI的安装请参考官方文档,因为比较简单我就不翻译了,步骤如下:
Install Power Apps CLI
To get Power Apps CLI, do the following:
-
Install Npm (comes with Node.js) or Node.js (comes with npm). We recommend LTS (Long Term Support) version 10.15.3 or higher.
-
Install .NET Framework 4.6.2 Developer Pack.
-
If you don’t already have Visual Studio 2017 or later, follow one of these options:
- Option 1: Install Visual Studio 2017 or later.
- Option 2: Install .NET Core 3.1 SDK and then install Visual Studio Code.
-
Install Power Apps CLI.
-
To take advantage of all the latest capabilities, update the Power Apps CLI tooling to the latest version using this command:
pac install latest
请参考官方文档 Create your first component 结合本文一起看。
首先我想好项目名字,我取名为ConvertNumberToUpperCase,命名空间我就用LuoYongNamespace,模板分成field和dataset,我们这里适用于field。
首先是建立好文件目录,可以用命令,也可以手工建立。我这里用命令,用管理员身份打开CMD,执行如下命令(我这里与官方文档不同的是我一般建立一个src的子文件来放源代码):
cd /d D:Codes
mkdir ConvertNumberToUpperCase
cd ConvertNumberToUpperCase
mkdir src
cd src
pac pcf init --namespace LuoYongNamespace --name ConvertNumberToUpperCase --template field
npm install
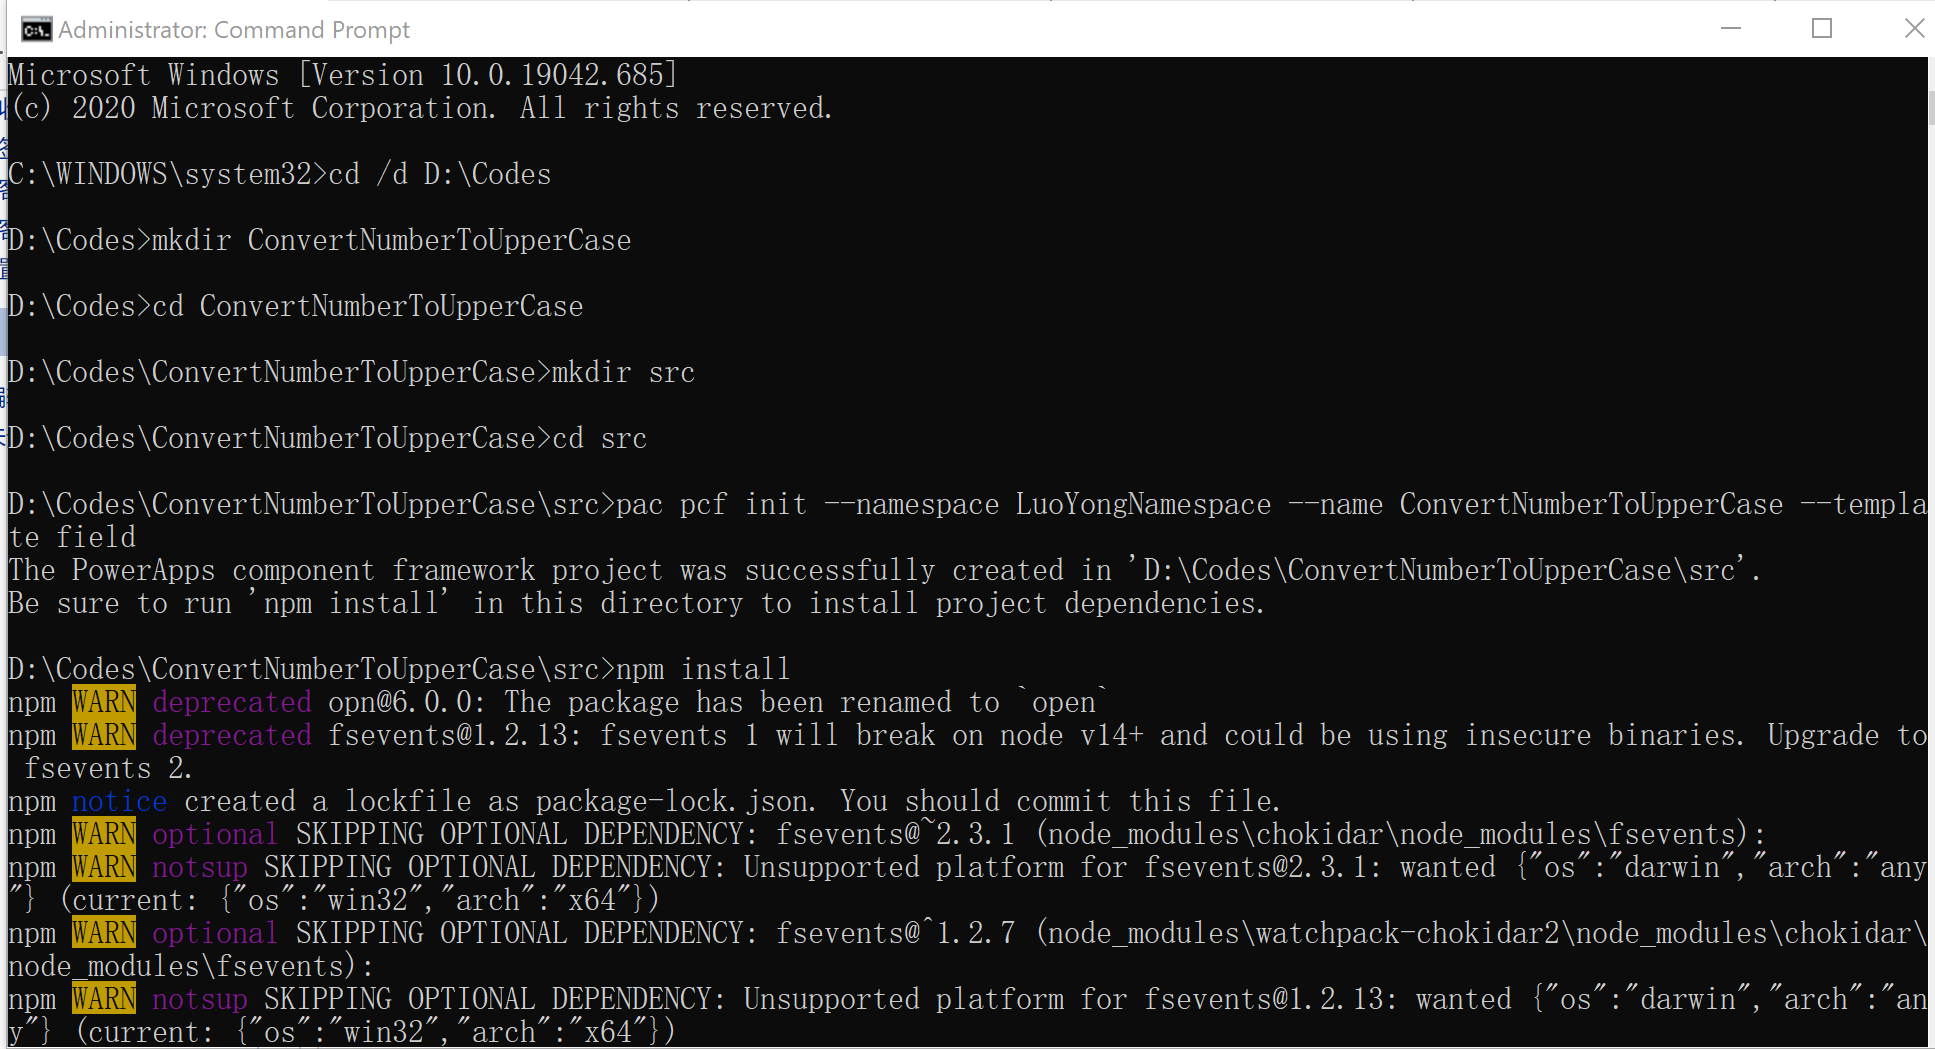
执行完毕后就可以用IDE打开了,如果有报错要纠正,否则到时候编译会报错。这里使用 code . 命令使用Visual Studio Code来打开它。最重要的两个文件就是项目名称文件夹下面的 ControlManifest.Input.xml 和index.ts。

ControlManifest.Input.xml 中control元素的version属性很重要,采用这种格式命名版本,部署后更改代码再次部署测试需要更改这个version属性的值。
然后重要的就是参数,也就是 property 这个元素,我这里使用一个property即可,使用的代码如下:
<property name="numberValue" display-name-key="numberValue_Display_Key" description-key="numberValue_Desc_Key" of-type-group="numbers" usage="bound" required="true" />
这个文件的整个代码是:
<?xml version="1.0" encoding="utf-8" ?>
<manifest>
  <control namespace="LuoYongNamespace" constructor="ConvertNumberToUpperCase" version="0.0.1" display-name-key="ConvertNumberToUpperCase" description-key="ConvertNumberToUpperCase description" control-type="standard">
    <external-service-usage enabled="true">
    </external-service-usage>
      <type-group name="numbers">
        <type>Whole.None</type>
        <type>Currency</type>
        <type>FP</type>
        <type>Decimal</type>
      </type-group>
      <property name="numberValue" display-name-key="numberValue_Display_Key" description-key="numberValue_Desc_Key" of-type-group="numbers" usage="bound" required="true" />
    <resources>
      <code path="index.ts" order="1"/>
    </resources>
  </control>
</manifest>
我这里是简单例子,不用额外引用css文件或者resx文件来支持多语言。
然后就是修改index.ts文件了,这里要使用TypeScript来写代码,当然可以使用React框架来简化撰写的代码,我这里就用TypeScript来写,简单易懂,声明下我对TypeScript并不是很熟悉。
我这里使用的代码如下,各个事件的含义我就不解释了,参考官方文档。
bound类型的参数值改变要通知外面的话,记得调用 notifyOutputChanged 。
getOutputs 方法返回的就是bound类型参数的输出值。
import {IInputs, IOutputs} from "./generated/ManifestTypes";

export class ConvertNumberToUpperCase implements ComponentFramework.StandardControl<IInputs, IOutputs> {

      // Value of the field is stored and used inside the component
      private _value: number;
      // Power Apps component framework delegate which will be assigned to this object which would be called whenever any update happens.
      private _notifyOutputChanged: () => void;
      // label element created as part of this component
      private labelElement: HTMLLabelElement;
      // input element that is used to create the range slider
      private inputElement: HTMLInputElement;
      // reference to the component container HTMLDivElement
      // This element contains all elements of our code component example
      private _container: HTMLDivElement;
      // reference to Power Apps component framework Context object
      private _context: ComponentFramework.Context<IInputs>;
      // Event Handler 'refreshData' reference
      private _refreshData: EventListenerOrEventListenerObject;

    constructor()
    {

    }

    /**
     * Used to initialize the control instance. Controls can kick off remote server calls and other initialization actions here.
     * Data-set values are not initialized here, use updateView.
     * @param context The entire property bag available to control via Context Object; It contains values as set up by the customizer mapped to property names defined in the manifest, as well as utility functions.
     * @param notifyOutputChanged A callback method to alert the framework that the control has new outputs ready to be retrieved asynchronously.
     * @param state A piece of data that persists in one session for a single user. Can be set at any point in a controls life cycle by calling 'setControlState' in the Mode interface.
     * @param container If a control is marked control-type='standard', it will receive an empty div element within which it can render its content.
     */
    public init(context: ComponentFramework.Context<IInputs>, notifyOutputChanged: () => void, state: ComponentFramework.Dictionary, container:HTMLDivElement)
    {
            this._context = context;
    this._container = document.createElement("div");
    this._notifyOutputChanged = notifyOutputChanged;
    this._refreshData = this.refreshData.bind(this);

    this.inputElement = document.createElement("input");
    this.inputElement.addEventListener("change", this._refreshData);
    //setting the max and min values for the component.
    this.inputElement.setAttribute("type", "number");
    this.inputElement.setAttribute("id", "txtNumber");
    // creating a HTML label element that shows the value that is set on the linear range component
    this.labelElement = document.createElement("label");
    this.labelElement.setAttribute("id", "lblNumber");
    // retrieving the latest value from the component and setting it to the HTML elements.
    this._value = context.parameters.numberValue.raw
      ? context.parameters.numberValue.raw
      : 0;
    this.inputElement.value =
      context.parameters.numberValue.raw
        ? context.parameters.numberValue.raw.toString()
        : "0";

    this.labelElement.innerHTML = this.numberToUpperCase(this._value);
    // appending the HTML elements to the component's HTML container element.
    this._container.appendChild(this.inputElement);
    this._container.appendChild(document.createElement("br"));
    this._container.appendChild(this.labelElement);
    container.appendChild(this._container);
    }

    public refreshData(evt: Event): void {
        this._value = Number(this.inputElement.value);
        this.labelElement.innerHTML = this.numberToUpperCase(this._value);
        this._notifyOutputChanged();
      }

      public numberToUpperCase(inNumber:number):string{
        let fraction = ['角', '分'];
        let digit = [
            '零', '壹', '贰', '叁', '肆',
            '伍', '陆', '柒', '捌', '玖'
        ];
        let unit = [
            ['元', '万', '亿'],
            ['', '拾', '佰', '仟']
        ];
        let head = inNumber < 0 ? '欠' : '';
        inNumber = Math.abs(inNumber);
        let s:string = '';
        for (let i = 0; i < fraction.length; i++) {
            s += (digit[Math.floor(inNumber * 10 * Math.pow(10, i)) % 10] + fraction[i]).replace(/零./, '');
        }
        s = s || '整';
        inNumber = Math.floor(inNumber);
        for (let i = 0; i < unit[0].length && inNumber > 0; i++) {
            let p = '';
            for (let j = 0; j < unit[1].length && inNumber > 0; j++) {
                p = digit[inNumber % 10] + unit[1][j] + p;
                inNumber = Math.floor(inNumber / 10);
            }
            s = p.replace(/(零.)*零$/, '').replace(/^$/, '零') + unit[0][i] + s;
        }
        return head + s.replace(/(零.)*零元/, '元')
            .replace(/(零.)+/g, '零')
            .replace(/^整$/, '零元整');
      }


    /**
     * Called when any value in the property bag has changed. This includes field values, data-sets, global values such as container height and width, offline status, control metadata values such as label, visible, etc.
     * @param context The entire property bag available to control via Context Object; It contains values as set up by the customizer mapped to names defined in the manifest, as well as utility functions
     */
    public updateView(context: ComponentFramework.Context<IInputs>): void
    {
            this._value = context.parameters.numberValue.raw
            ? context.parameters.numberValue.raw
            : 0;
          this._context = context;
          this.inputElement.value =
          context.parameters.numberValue.raw
            ? context.parameters.numberValue.raw.toString()
            : "0";

          this.labelElement.innerHTML = this.numberToUpperCase(this._value);
    }

    /**
     * It is called by the framework prior to a control receiving new data.
     * @returns an object based on nomenclature defined in manifest, expecting object[s] for property marked as “bound” or “output”
     */
    public getOutputs(): IOutputs
    {
        return {
            numberValue: this._value
          };
    }

    /**
     * Called when the control is to be removed from the DOM tree. Controls should use this call for cleanup.
     * i.e. cancelling any pending remote calls, removing listeners, etc.
     */
    public destroy(): void
    {
        this.inputElement.removeEventListener("change", this._refreshData);
    }
}
然后编译看下是否有错误,在Visual Studio Code中点击命令栏的Terminal > Open Terminal 执行如下命令:
npm run build
确保编译成功,我这里截图如下:

然后我们来调试下,使用如下命令,不过我一般是用的是 npm start watch ,这样对代码的更改会自动刷新调试界面。
npm start
调试起来的界面如下,可以输入不同的参数值进行测试,测试没有问题就准备部署。

很多人调试的时候忘了暂停用什么方法,我一般常用 Ctrl + C 来停止调试(还有一种方法我忘了),按键后会出现询问是否终止batch job的提示,输入y回车即可。

然后我使用如下命令来打包准备部署:
cd ..
mkdir Solution
cd Solution
pac solution init --publisher-name LuoYong --publisher-prefix ly
pac solution add-reference --path D:CodesConvertNumberToUpperCasesrc
msbuild /t:restore
msbuild
后面的build不需要加上 /t:restore了。
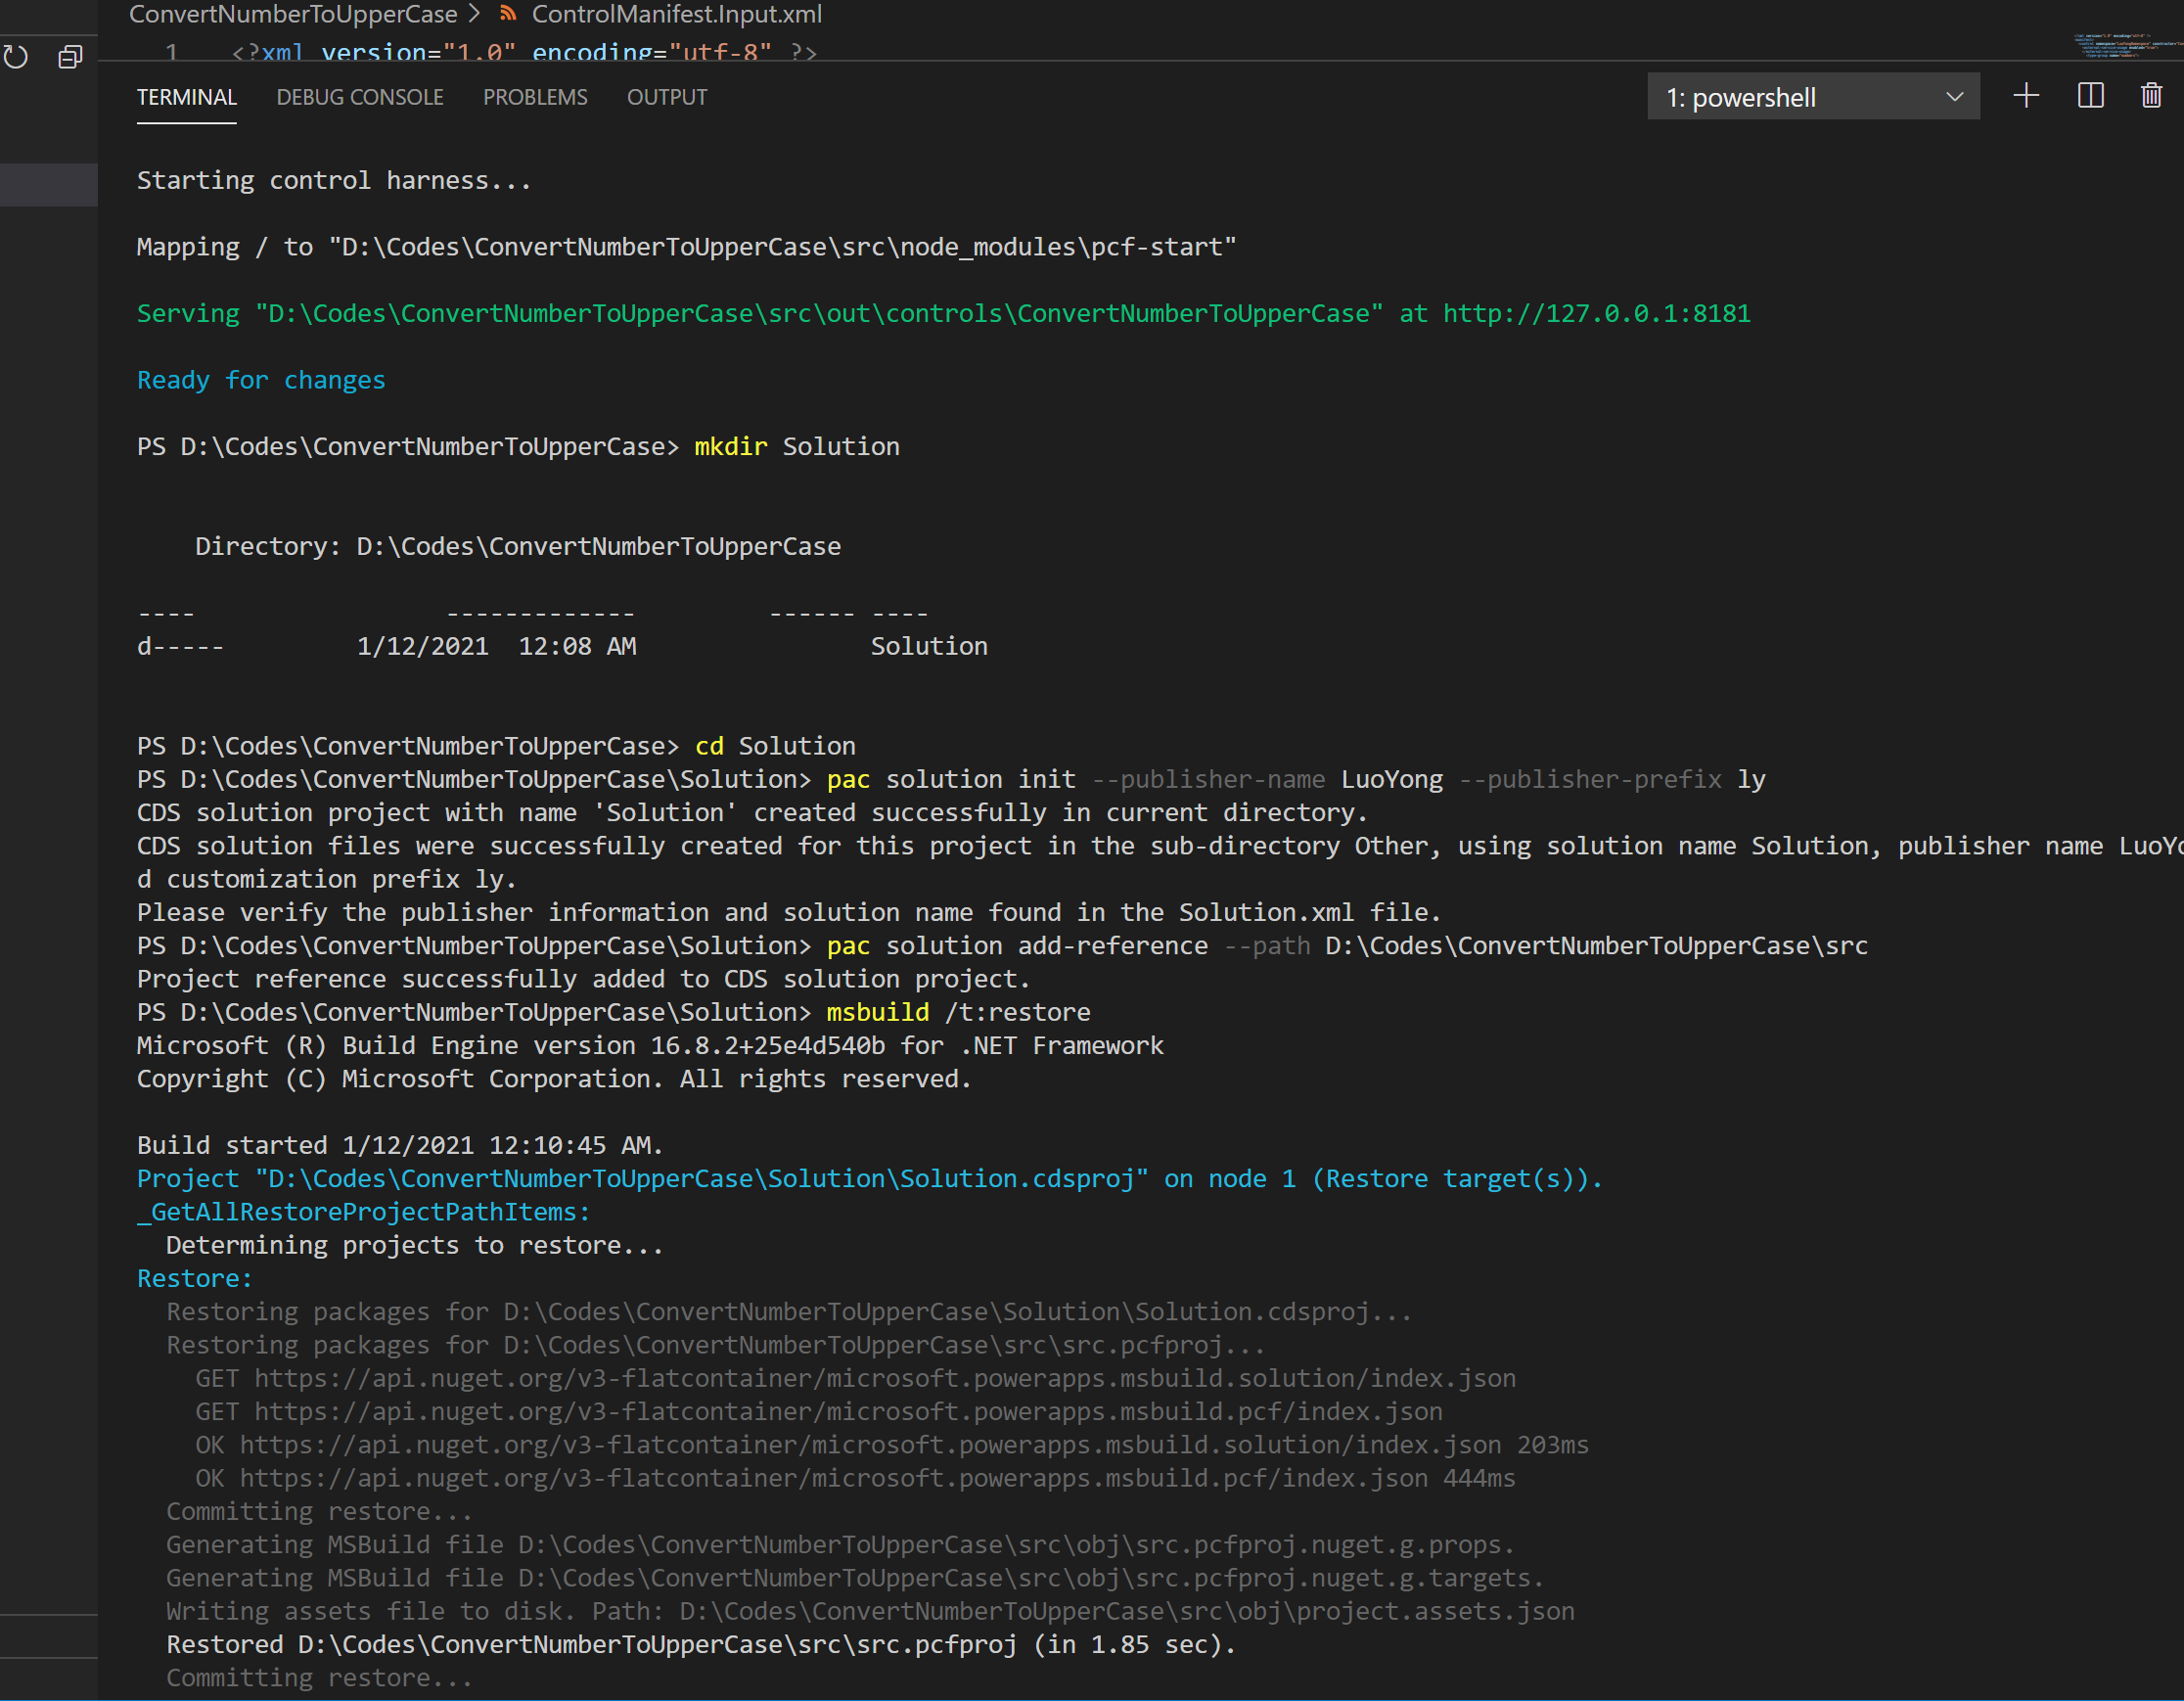
然后在Solution文件夹下面的 bin > Debug就可以看到产生的解决方案文件了,将此解决方案导入到Microsoft Dataverse并发布(因为是非托管解决方案,所以导入后是需要发布的)。

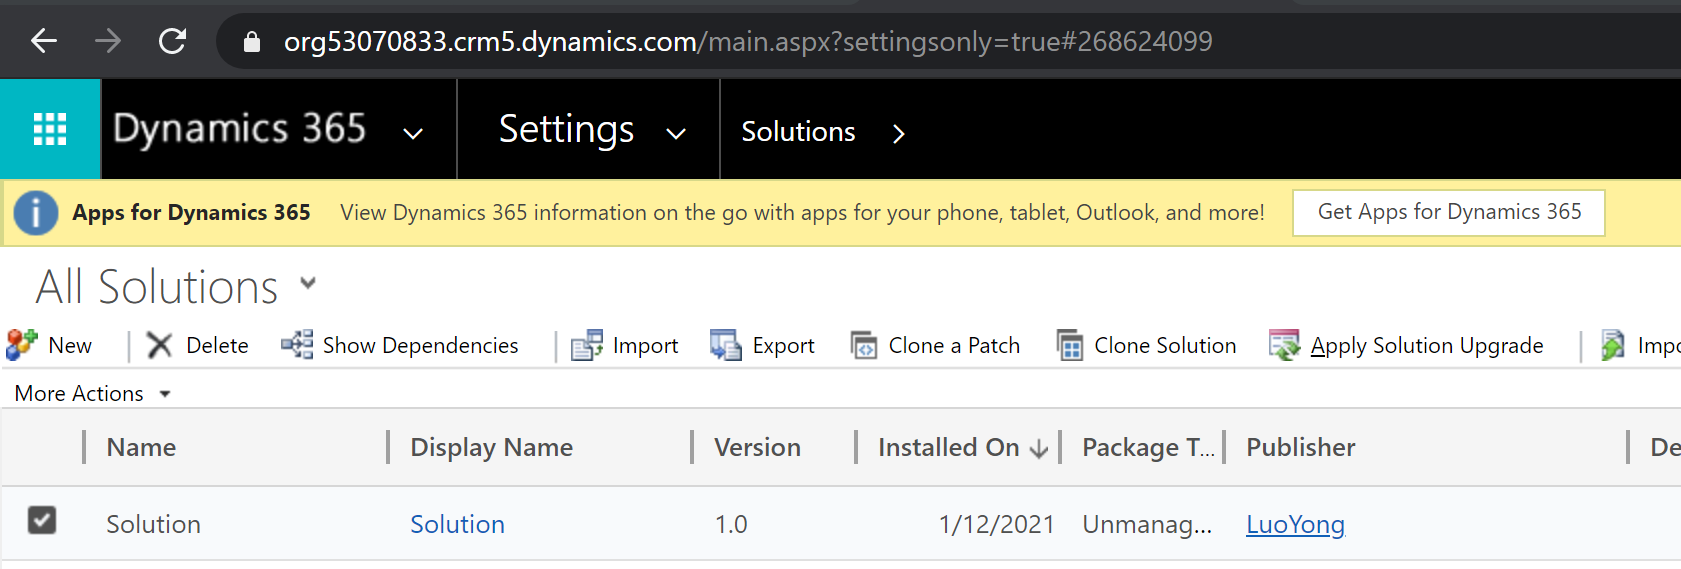
我这里导入后如下:
然后我在Model-Driven apps中来使用这个PCF组件,这个可以参考官方文档:Add code components to a field or entity in model-driven apps 。
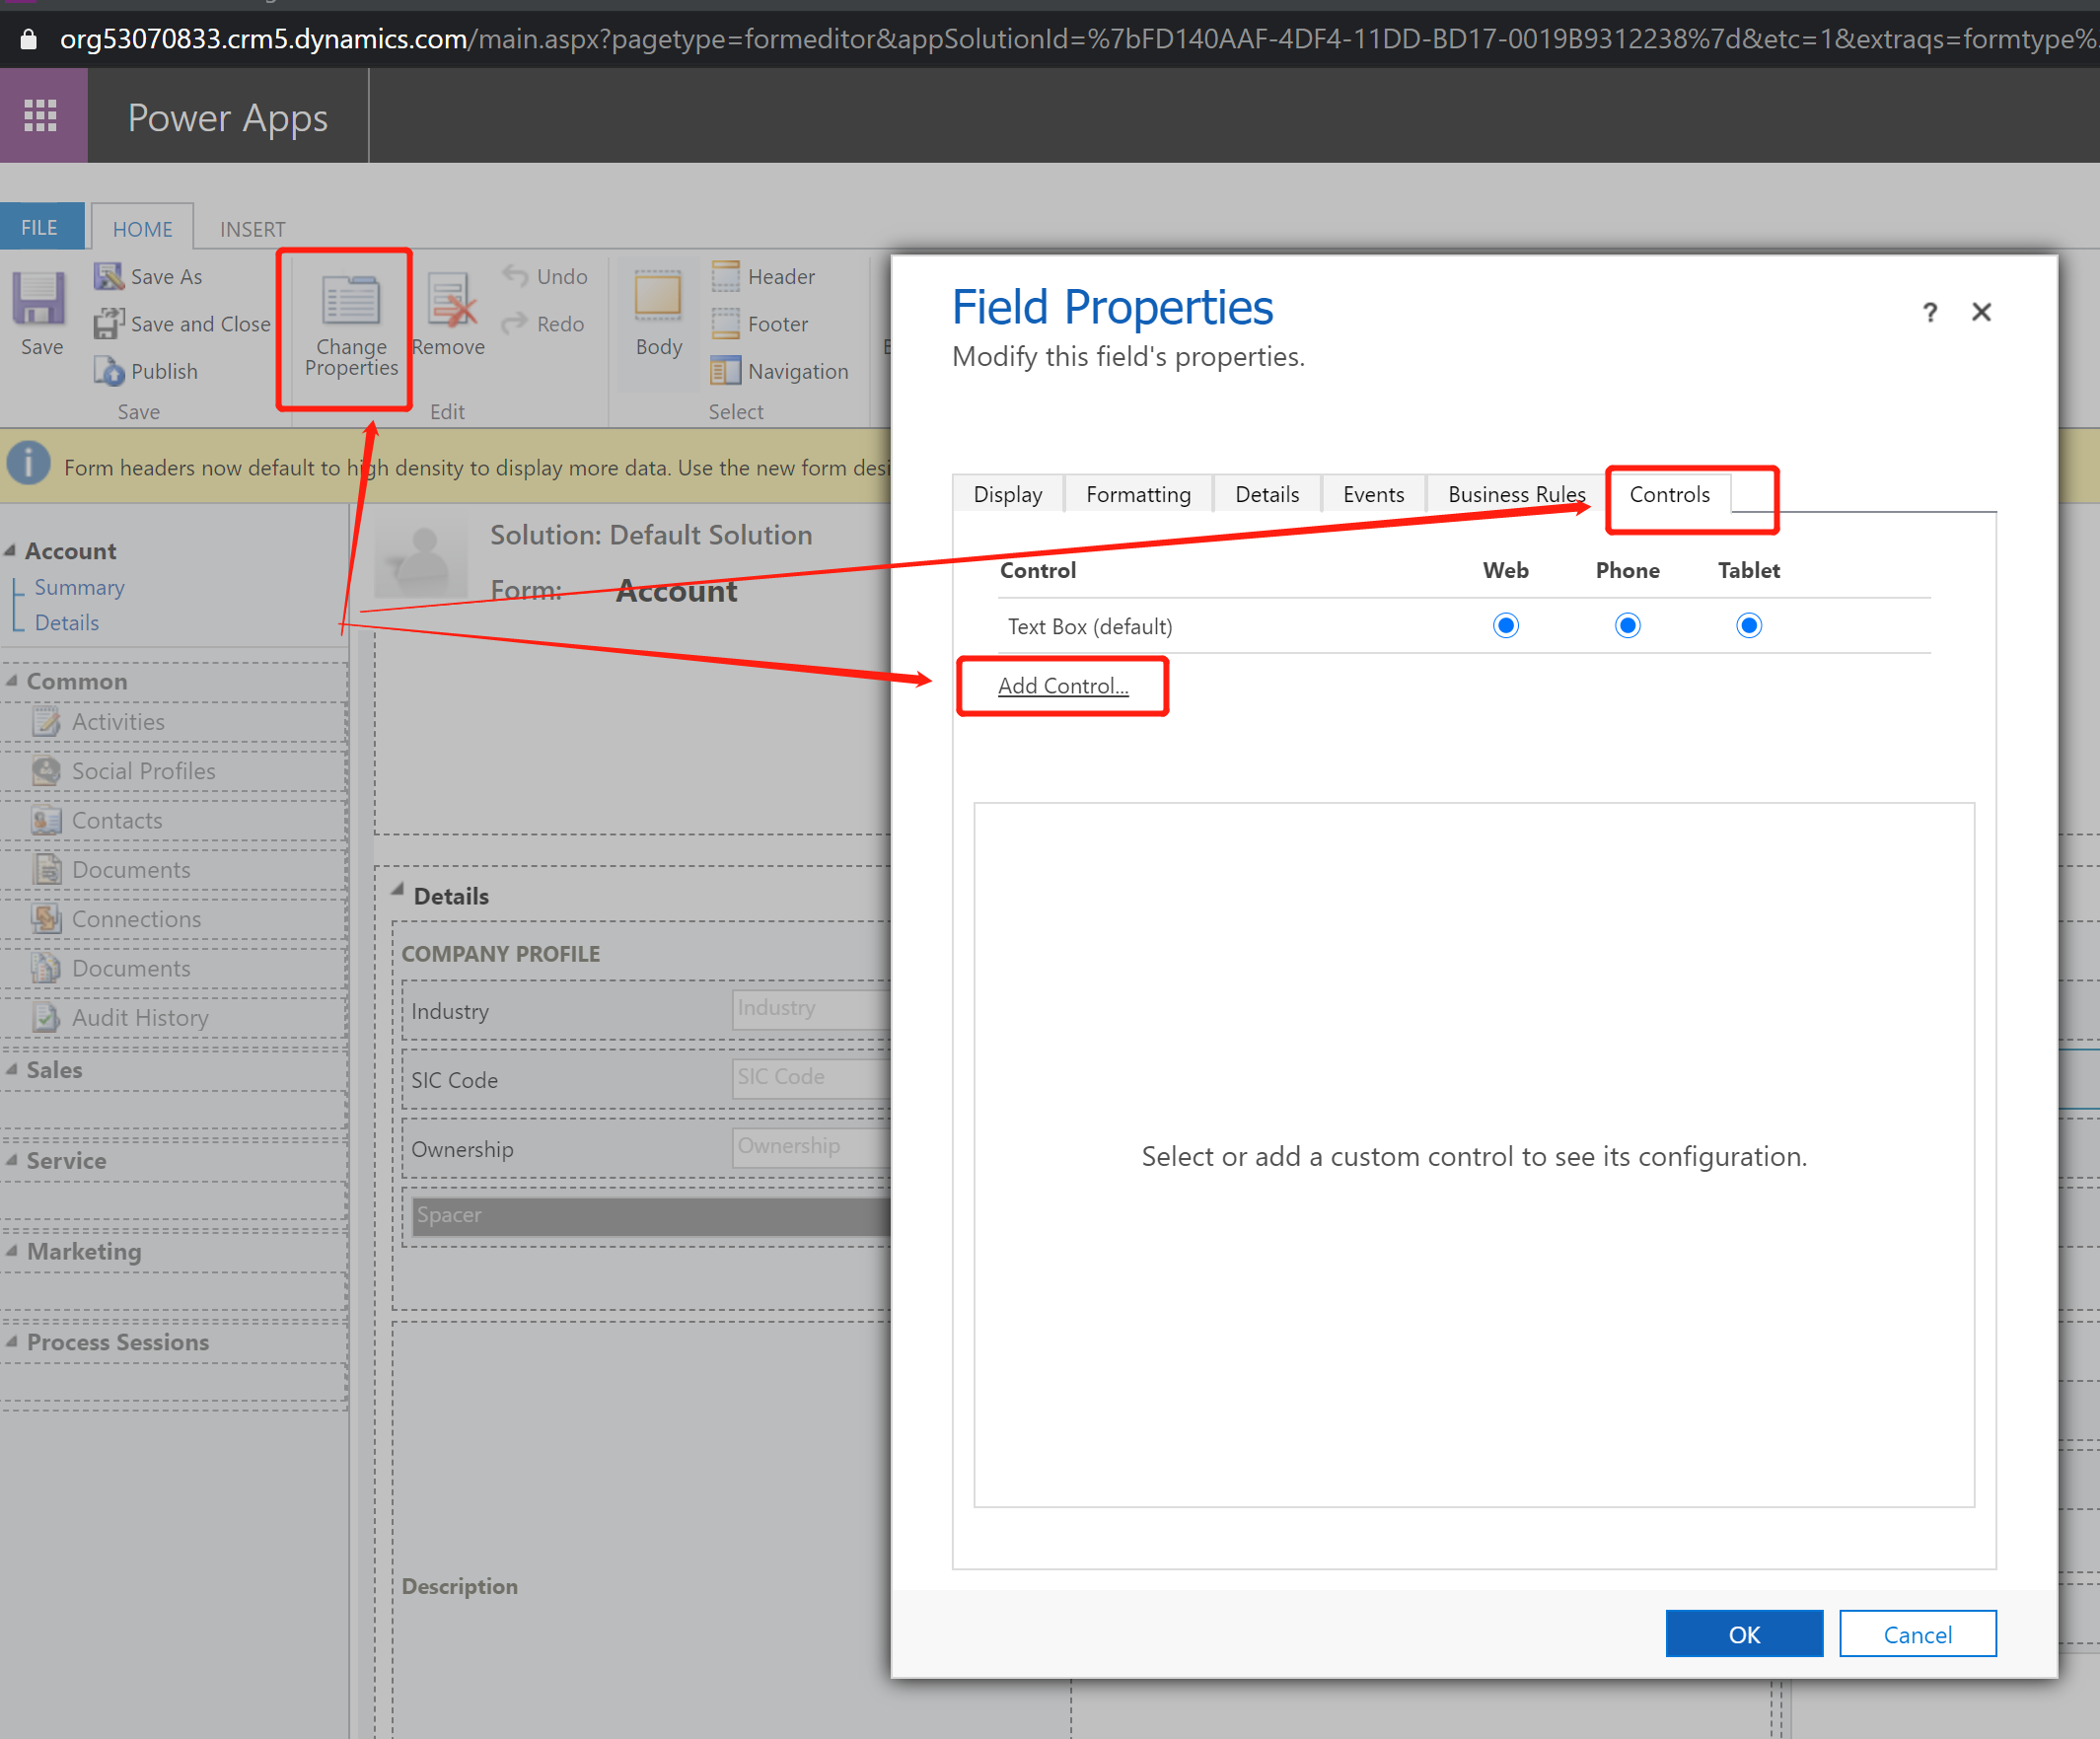
我在Account实体的表单中使用这个组件,打开Account实体的Main表单,选择要显示的字段,点击 Change Properties ,在弹出的Field Properties窗口中选择Controls这个tab,点击 Add Control.. 。
选择我们创建的PCF组件,点击Add按钮。
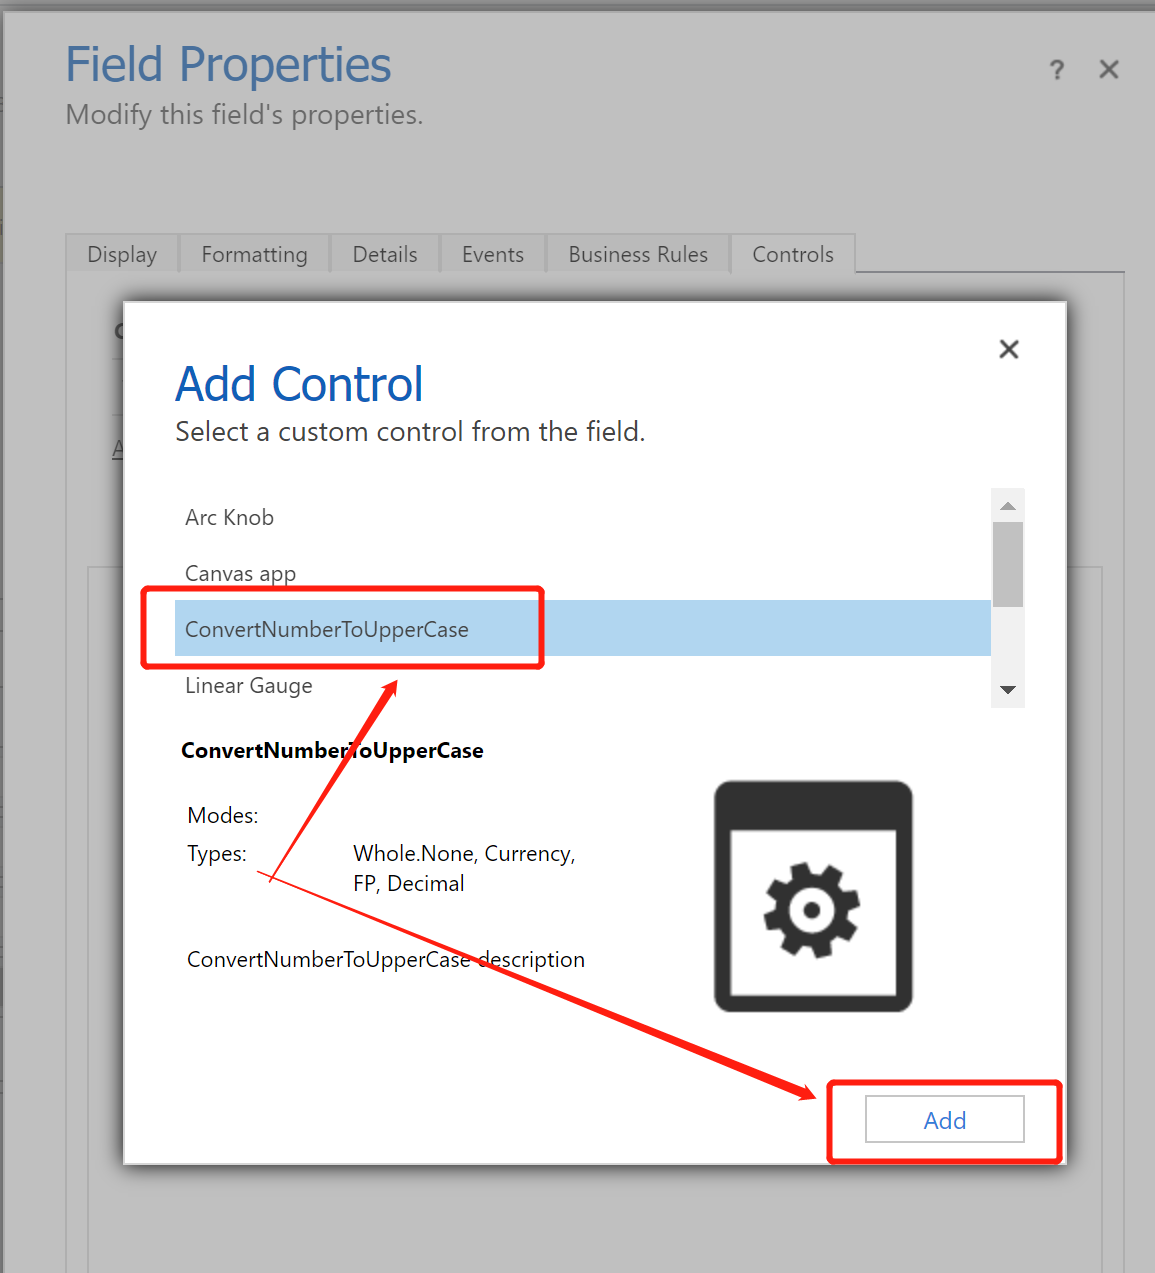
注意至少要选择Web使用这个PCF控件,等会儿看效果才能看到,可以看到我们的绑定参数已经自动设定为要显示的字段了,点击OK,然后保存并发布表单,我们去看下效果。

可以看大这个字段的值我是可以改的,改动后表单需要保存才能将记录保存好。

在Canvas app中使用PCF请参考官方文档:Code components for canvas apps 。
首先需要为环境启用Power Apps component framework 这个feature。登录 https://admin.powerplatform.microsoft.com/ ,
选择要启用的 Enivornment,选择 Settings 。
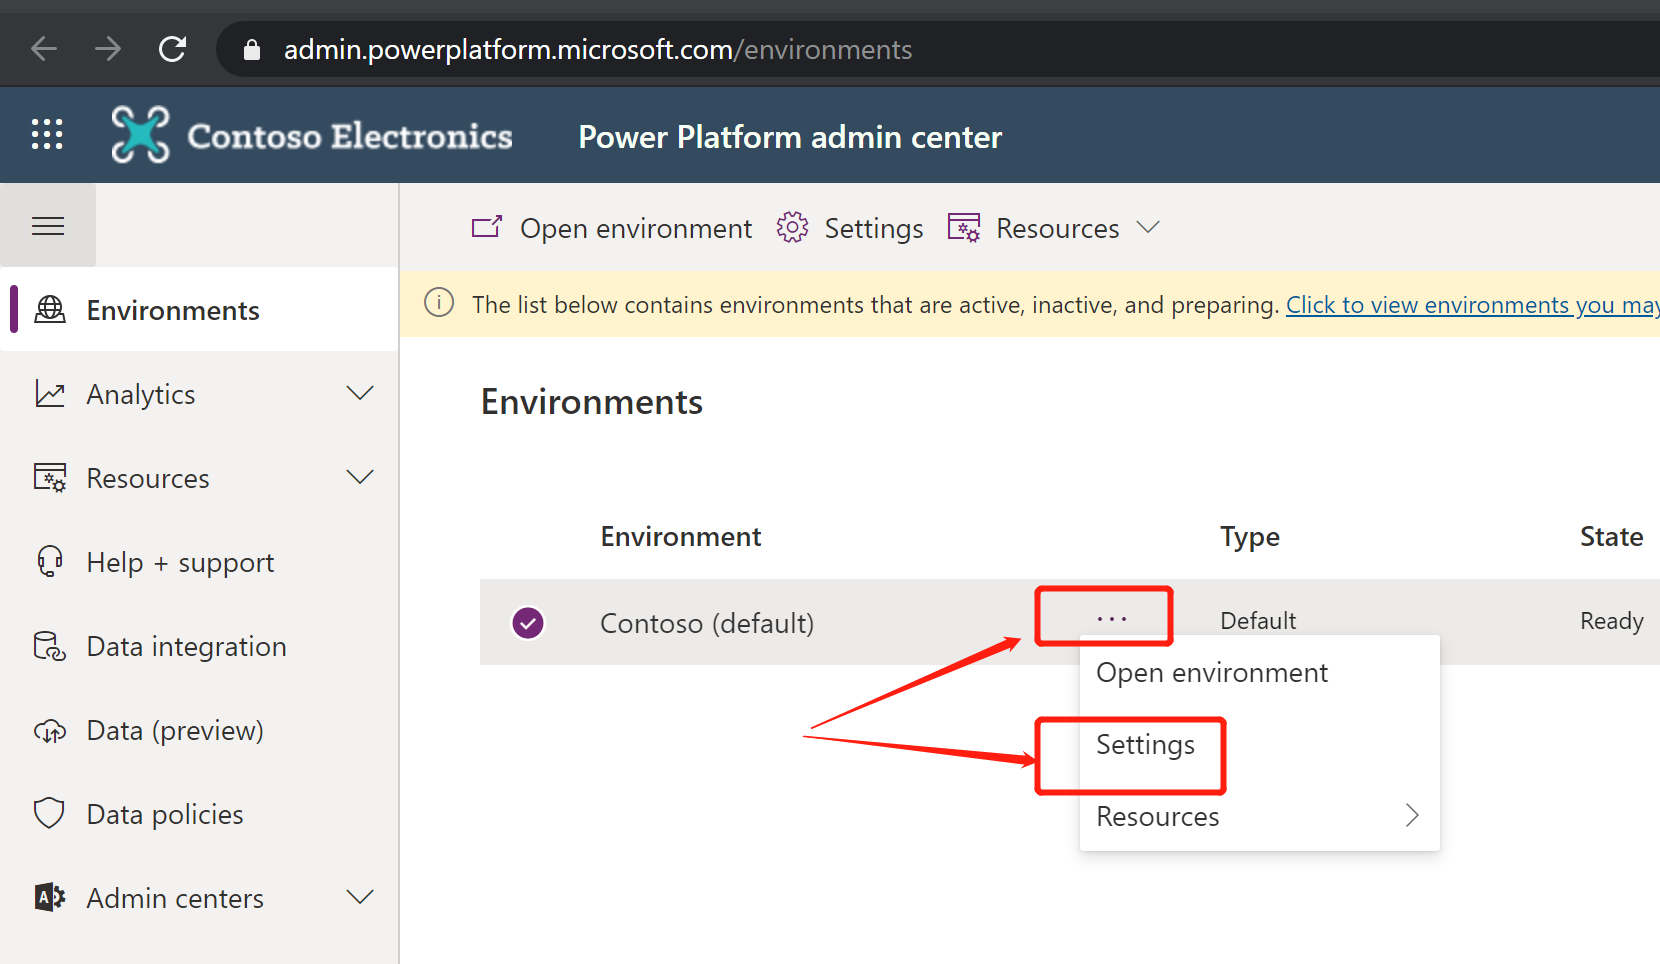
点击 Product 下面的 Features 。
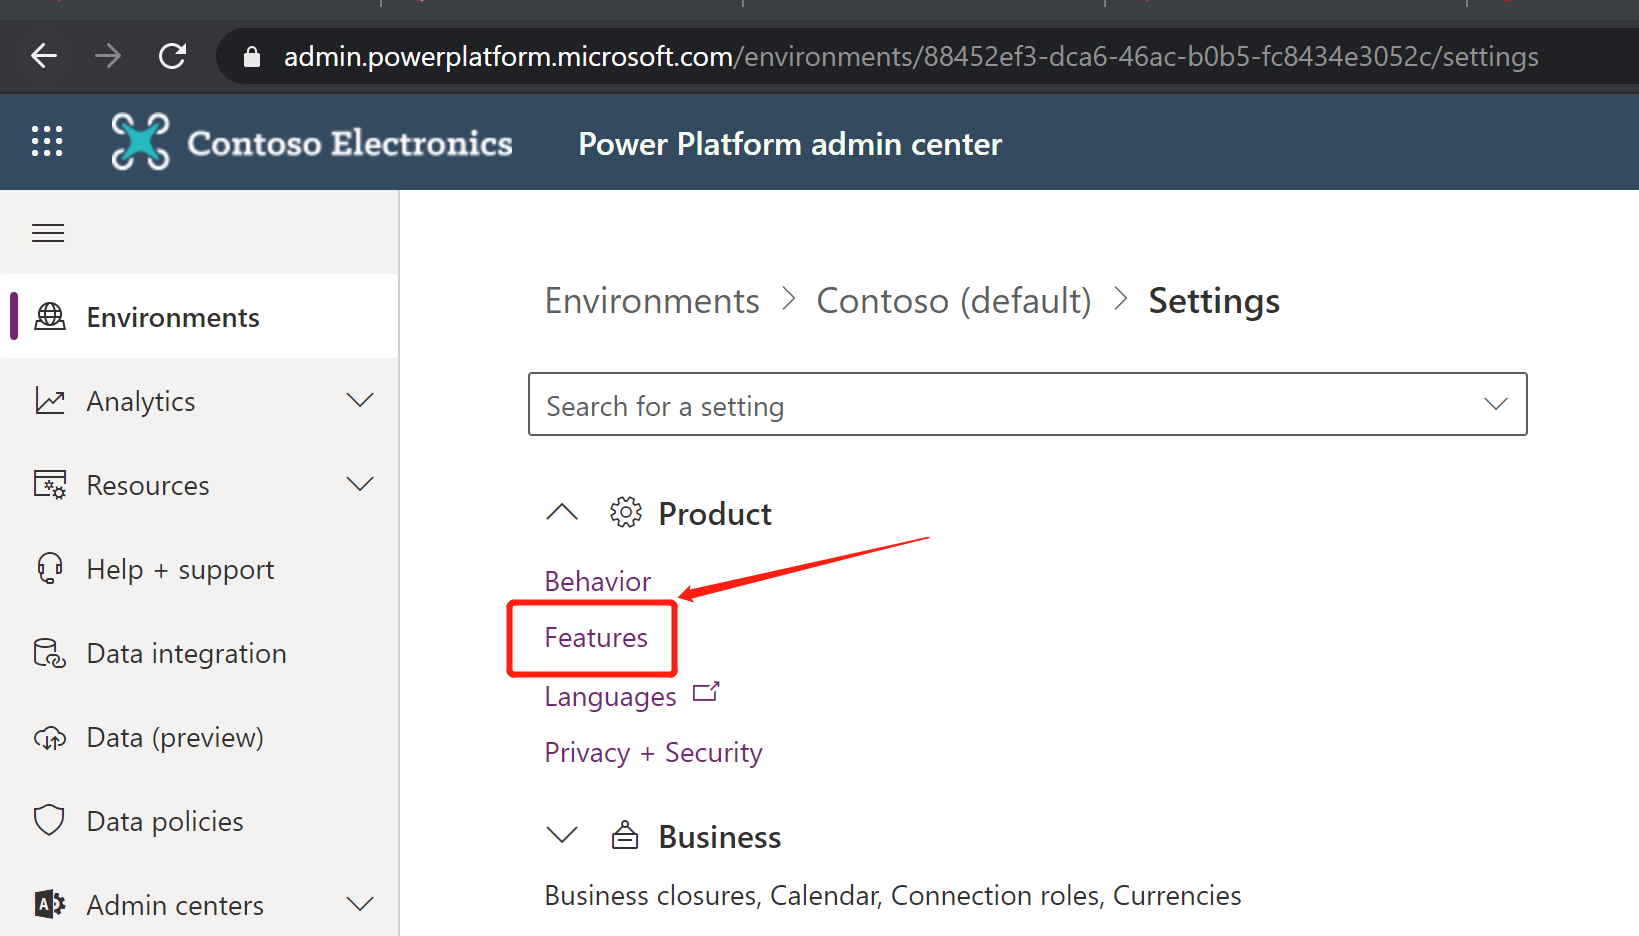
启用 Allow publishing of canvas apps with code components 这个feature后点击 Save 按钮。
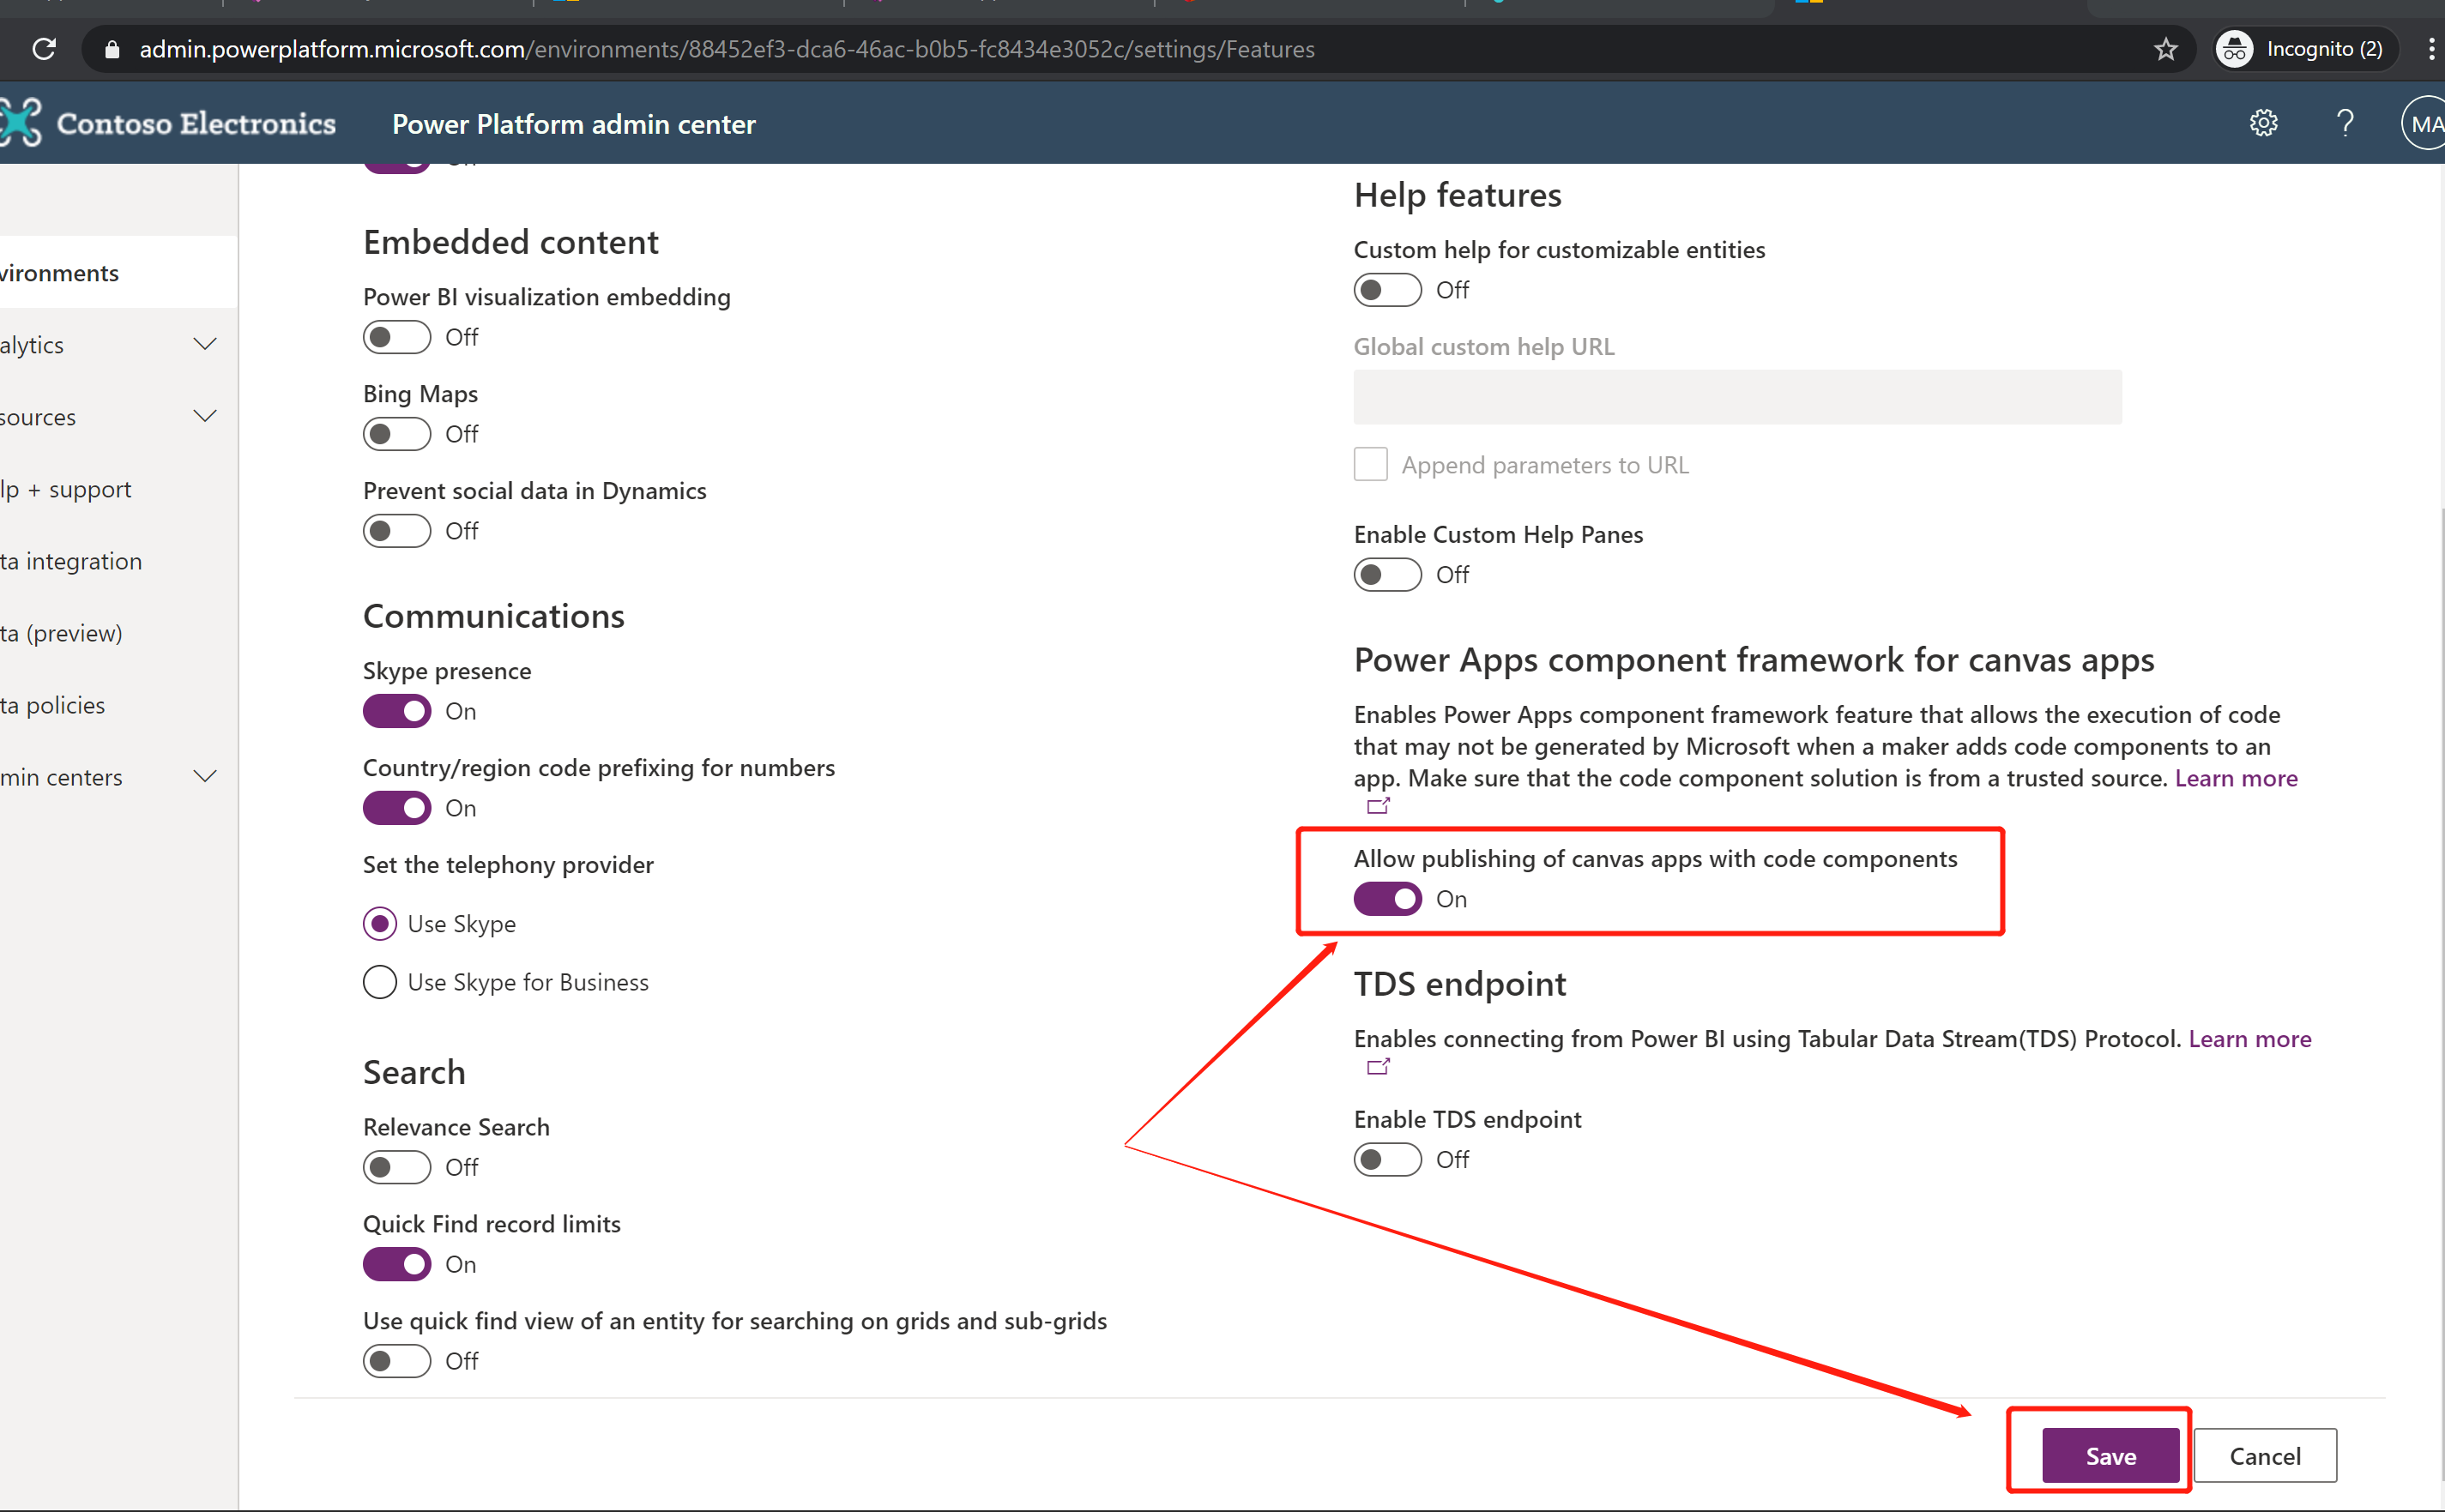
然后我新建一个Canvas App来使用它。官方文档说要在这个app的Advanced Settings 启用Components,但是目前新建的的Canvas App默认都是启用的了,我认为这步骤可以不做了。
然后就是在Canvas App中点击 Insert > Custom > Import component 。
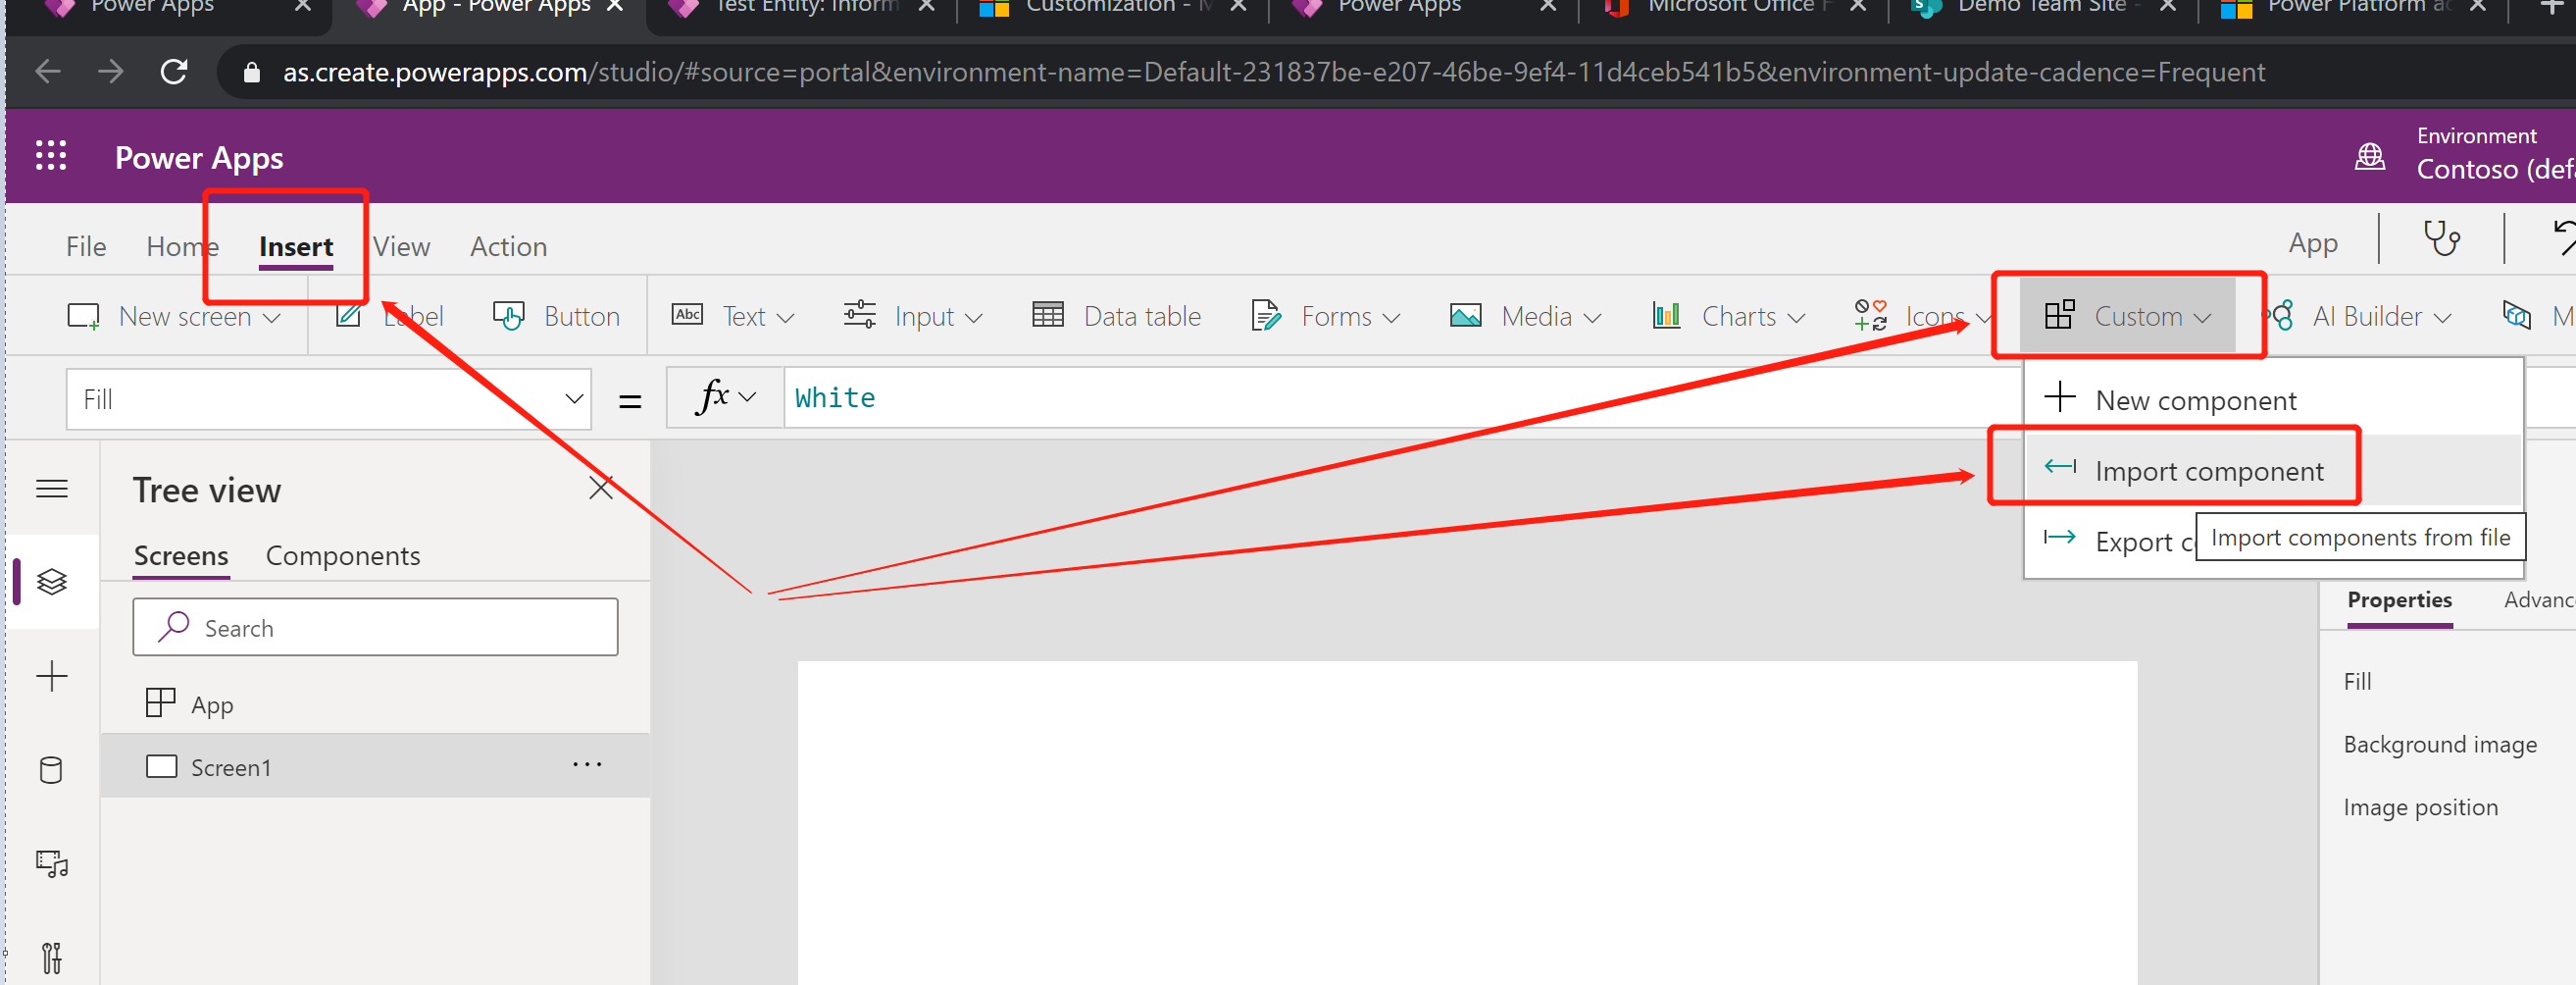
切换到Code,待刷新后选择我们要使用的PCF组件,点击Import按钮。

然后切换到 Insert 面板,展开 Code components节点,点击要插入的PCF组件,这样就会加入到Canvas App中的当前screen上。

选中刚才添加到Screen上的PCF 组件,右边的Advanced面板可以设置绑定参数的值,当然可以用表达式,还可以为OnChange事件指定执行的代码(bound类型参数的值变化会触发),我这里设置如下。
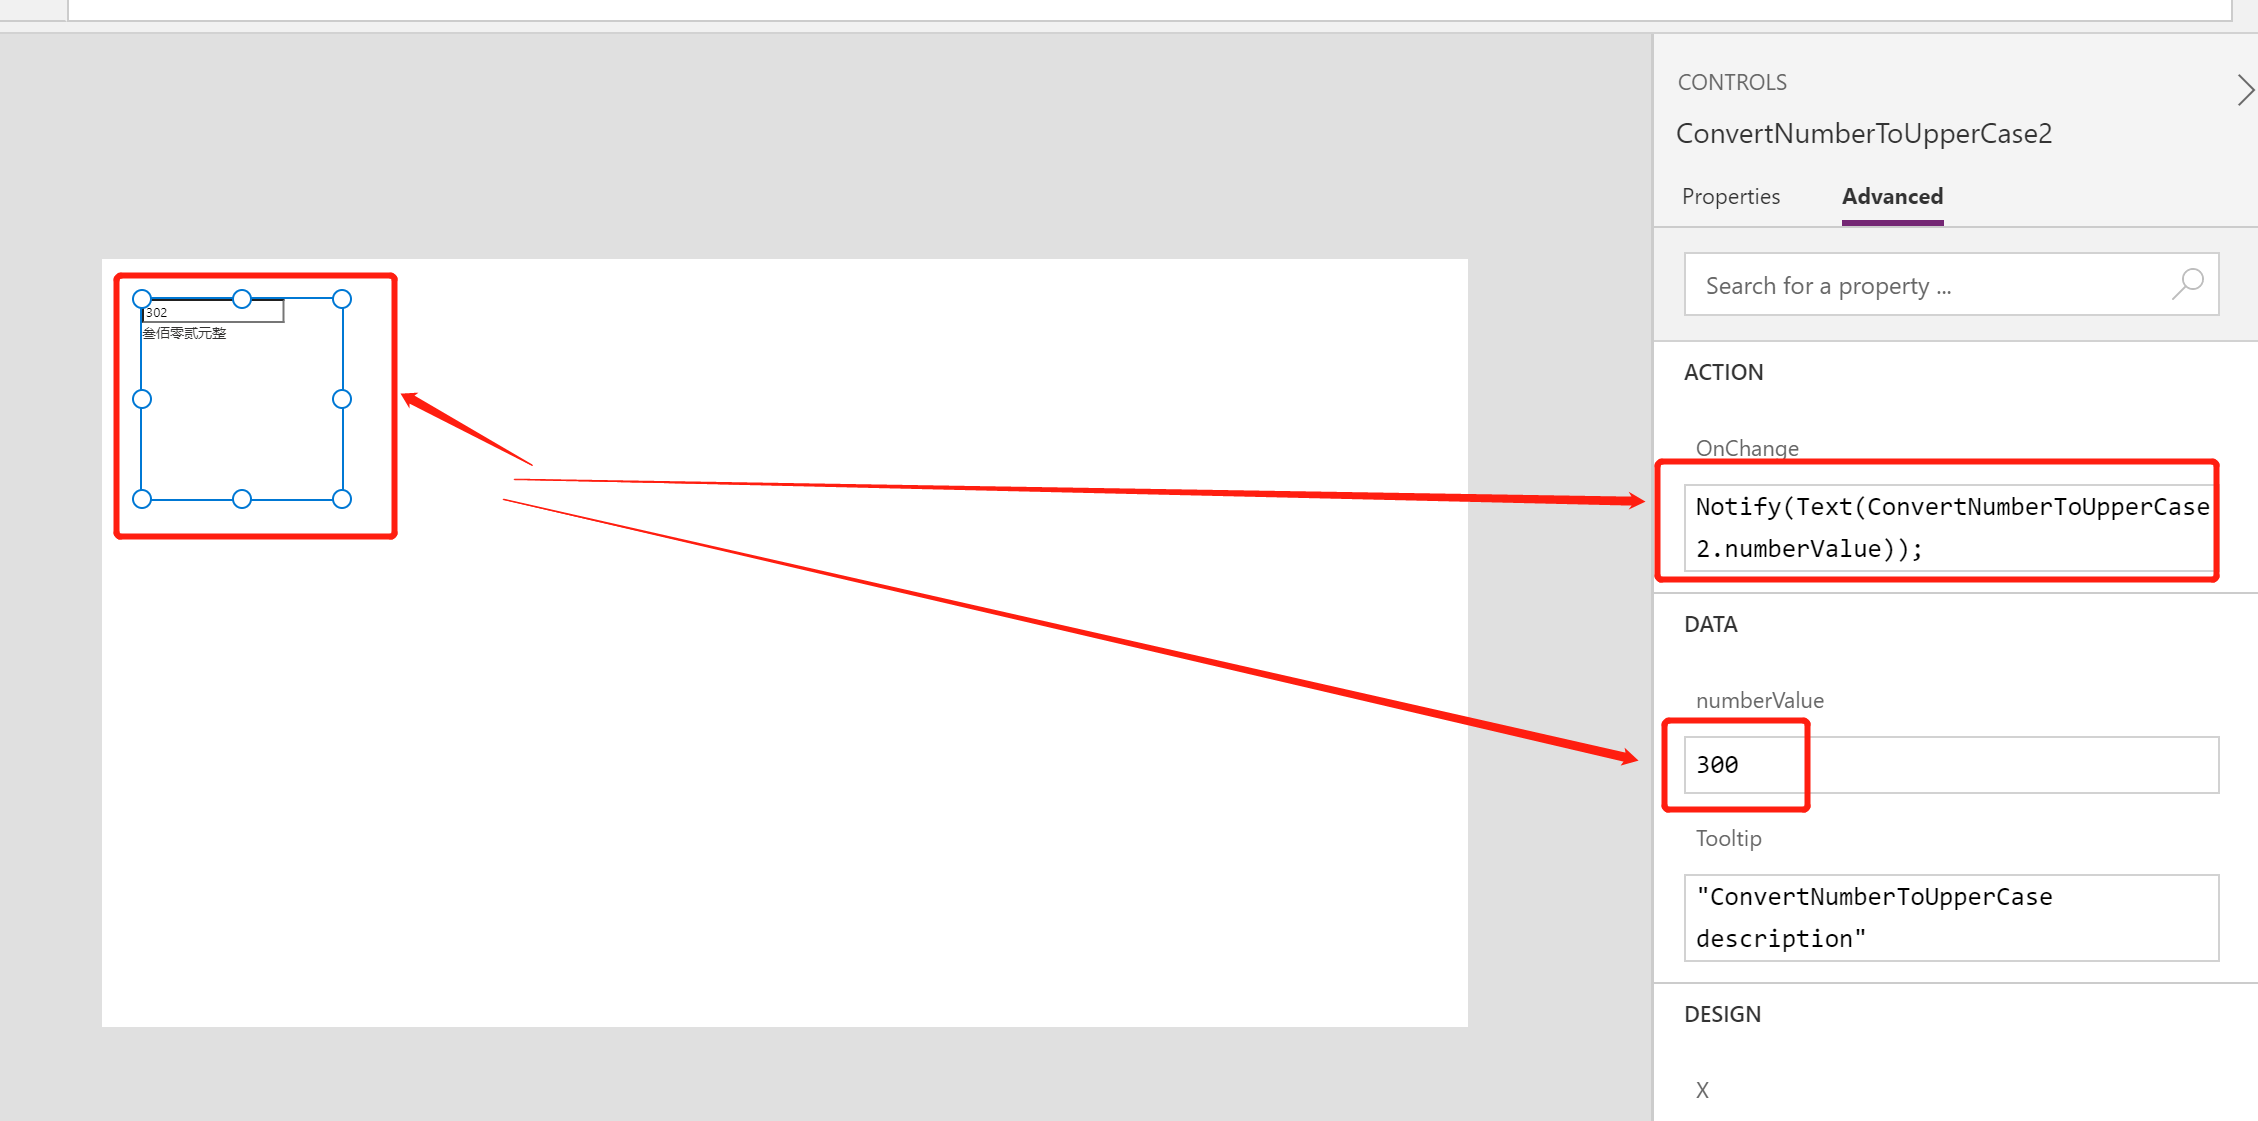
可以按F5来预览Canvas App,我这预览效果如下,虽然不是很严谨的程序,但是基本达到了教学的目的。

常见问题:
1. 我的PCF控件在最开始总是显示错误,特别是参数值为默认值val的时候,这个时候请检查index.ts中Init方法,如果参数值不是想要的格式或者内容不合要求,代码是否有兼容处理这个问题。如果这时候会导致程序异常,就会看到PCF控件在设置好参数之前会显示为错误。
2.PCF控件我改了代码后如何更新呢?需要更改 ControlManifest.Input.xml 文件中 control 的Version属性,
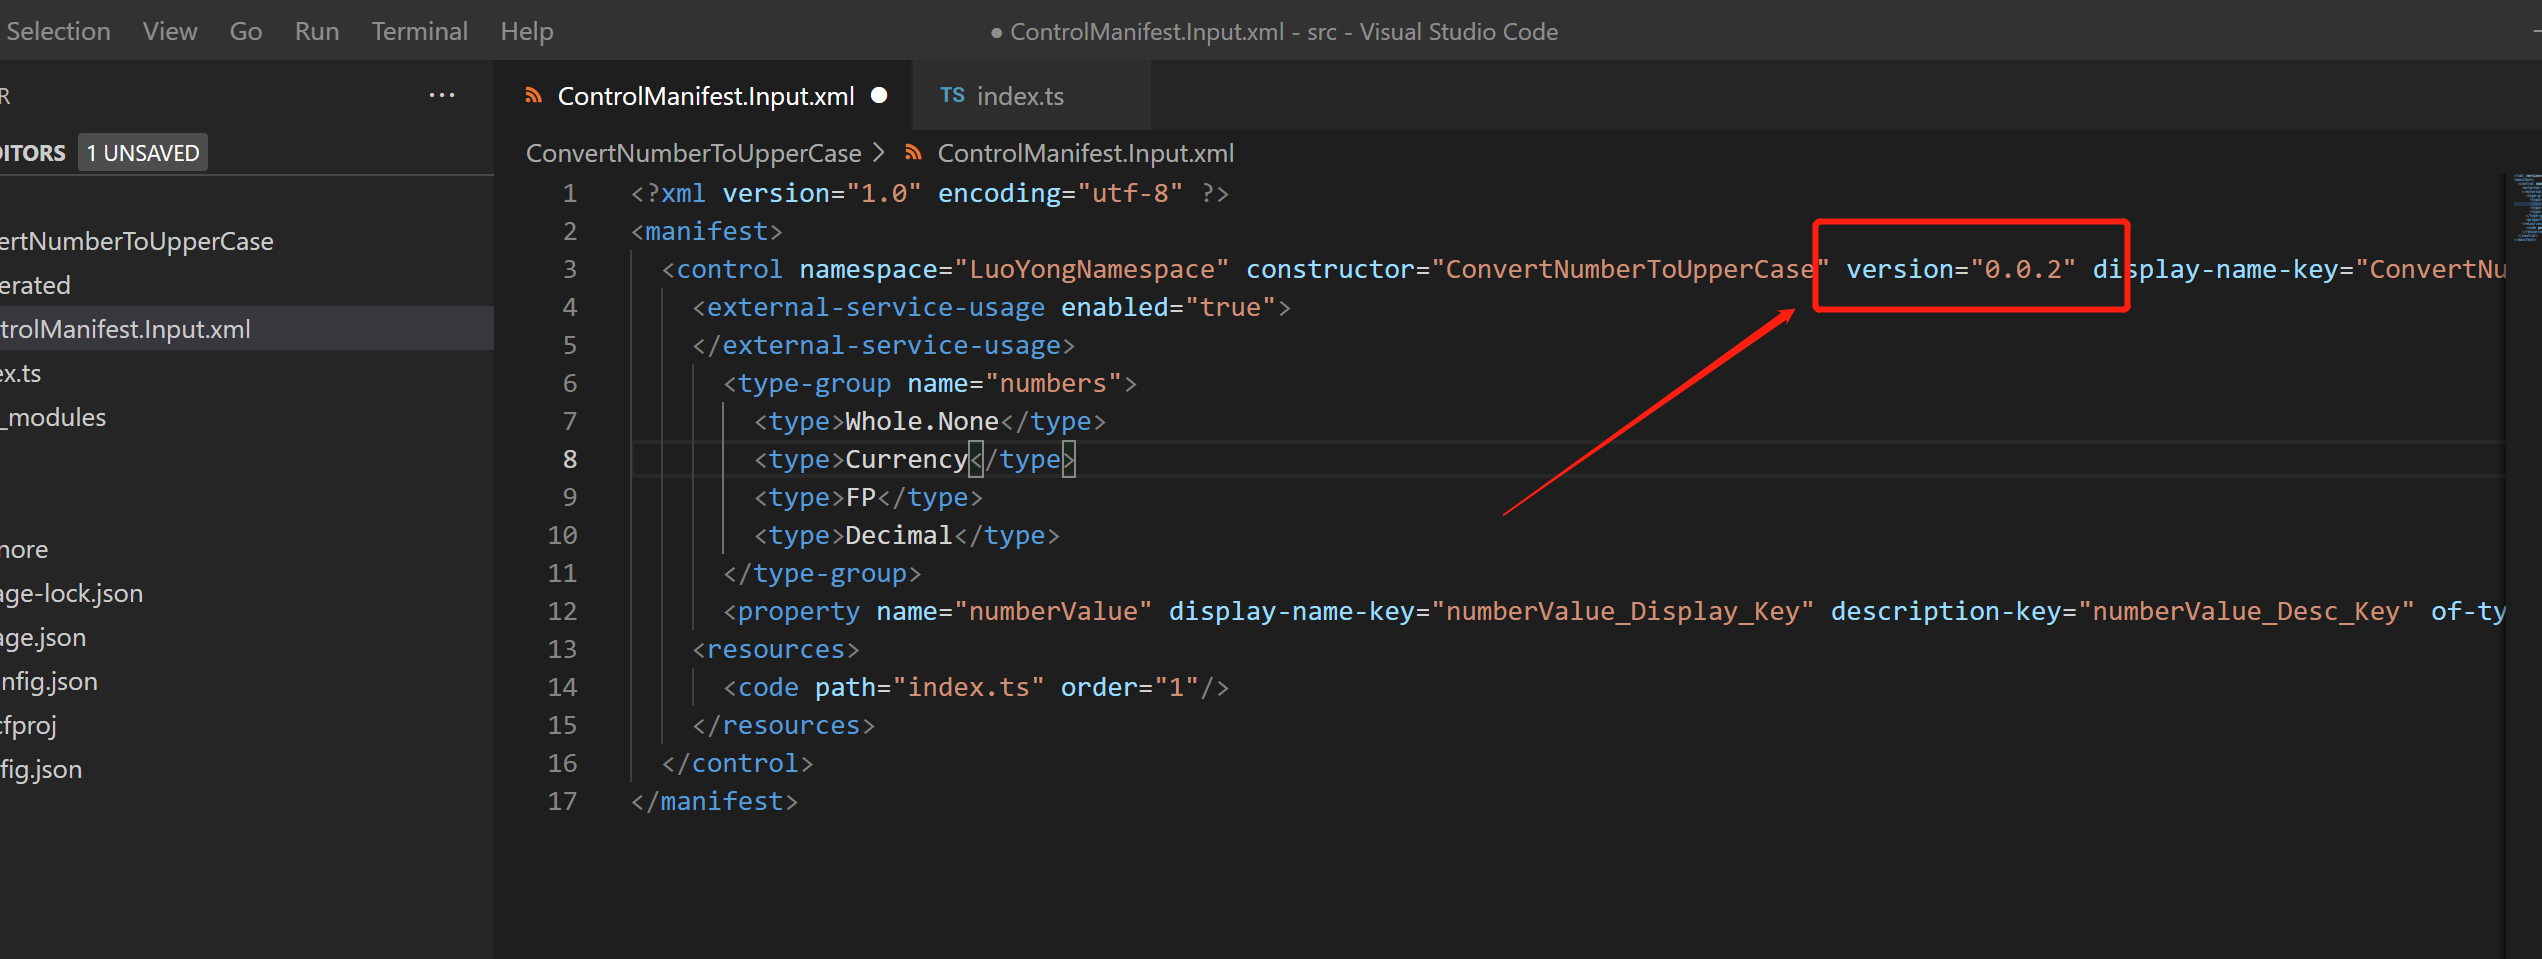
保存后打开Terminal,再切换到Solution文件夹,执行 msbuild 命令,然后将解决方案导入Microsoft Dataverse 并发布。

下次打开时候会有安全警告,点击 Open app按钮。
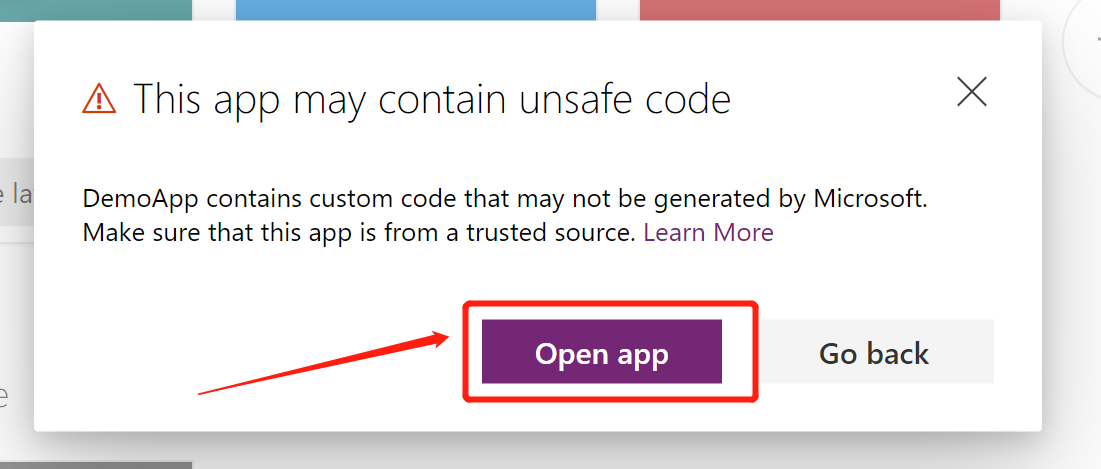
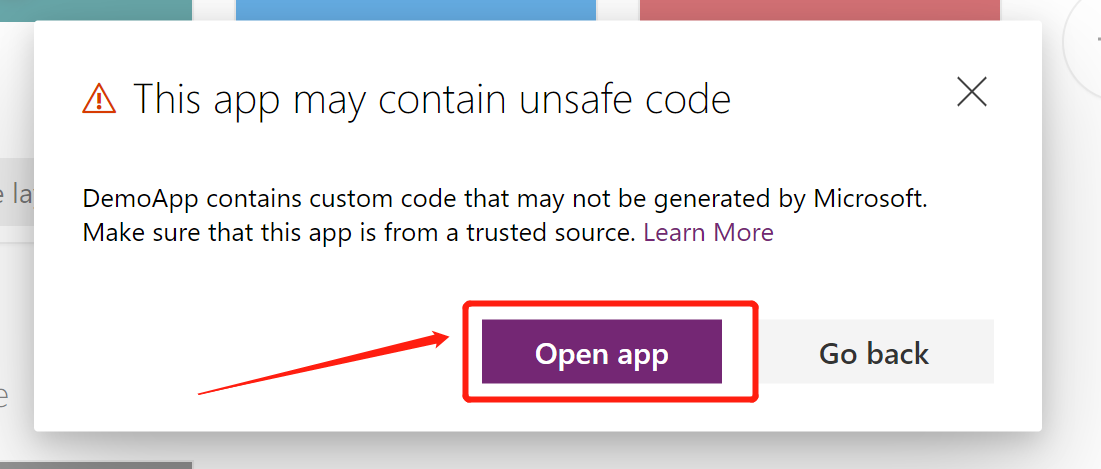
点击 Update 按钮,再次预览canvas app的时候就会发现更改在了。

3. indext.ts中Init方法有时候获取不到参数的值,我认为是传递的参数也是额外获取的,比如通过在app的OnStart事件或者Screen的OnVisible事件中代码获取的Dataverse中数据或者其他数据源比如Sharepoint等数据,或许是异步的原因,在PCF组件的Init方法执行的时候还获取不到这些值,所以updateView中的代码要注意,这个代码是可以获取到绑定参数的值,这个代码要做适当处理,获取后进行必要的处理。
4. TypeScript写的代码不够简洁,可以用其他JavaScript框架吗? 用React是可以的,可以参考官方博客:Use of React and Office UI Fabric React in the PowerApps component framework is now available .
5.每次打包solution后还要手工导入解决方案,有命令行方式吗?有的,请参考官方文档 Package a code component ,主要是使用类似命令如下,我其实一般使用这种,这种就一个命令搞定了,效率高点,也容易自动化。
pac auth create --url https://luoyongdemo.crm5.dynamics.com
pac pcf push --publisher-prefix ly
6. 可有示例参考?How to use the sample components? 和 PCF Gallery 。
7.我的输出参数很复杂怎么办?我的建议是用单行文本作为输出参数,内容为json字符串,这样Model-Driven App和Canvas App用起来都毫无压力
8.我改了参数的名称改了代码后很多错误怎么办?build一下就可以啊,执行 npm run build 命令后就没问题了,如果还有错误就要纠正了。