简介
装饰模式可以在不改变一个对象本身功能的基础上给对象增加额外的新行为。例如一张照片,我们可以不改变照片本身,给它增加一个相框, 使得它具有防潮的功能;给他增加一个灯管,使它有可以发光的功能...用户可以根据需要给它增加其它的功能。
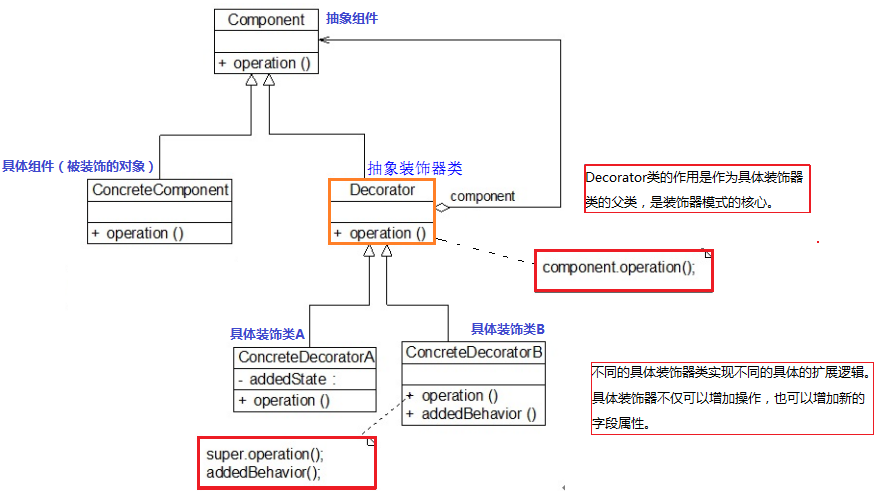
在装饰器模式中,被装饰的对象叫做Component。
一个Conponent被装饰后形成的新类对象和原Conponent属于相同的类别,只是功能有所增强。例如相片被加上相框后,依然属于相片。
使用装饰器模式前的基础代码
如下,ConcreteComponent是我们程序中使用的组件类。它实现了Component接口。现在想增加ConcreteConponent的功能,怎么做呢?

interface Component
{
      void operation();
}

class ConcreteConponent implements Component
{

      @Override
      public void  operation()
      {
            System . out. println( "我是一个具体组件(ConcreteComponent)对象,我的能力是可以输出当前这句话" );
      }
}
使用装饰器模式
能把装被装饰对象 具体Component 包装为 功能更强的类叫做 :装饰器类。
装饰器类有2种:
1、抽象装饰器类
2、具体装饰器类
抽象装饰器类是装饰器模式核心,也是所有具体装饰器的父类。它不仅实现了Component,使得所有的具体装饰器都是一个Componet(is instance of Component),还持有一个Component(保存被装饰对象的引用),这样在装饰器类中就可以使用被装饰器原来的功能,被装饰对象可以通过构造函数或则setter注入到装饰器类中。
具体装饰器类则负责不同风格的装饰任务(实现不同的增强逻辑)。
测试代码
interface Component
{
      void operation ();
}

class ConcreteConponent implements Component
{
      @Override
      public void operation()
      {
            System . out. println( "我是一个具体组件(ConcreteComponent)对象,我的能力是可以输出当前这句话" );
      }
}

/********************************************************************/

class Decorator implements Component
{
      private Component component;         //用于保存被装饰对象的引用。

      public Decorator ( Component component )  //将被装饰的对象注入到装饰类中
      {
            this .component = component ;
      }

      @Override
      public void operation()
      {
            component .operation ();       //保证被装饰对象的功能不丢失和破坏。

      }
}

/*
 * 具体装饰器类SuperComponent
 * */
class SuperComponent extends Decorator
{
      public SuperComponent ( Component component )
      {
            super (component );
      }


      @Override
      public void operation()
      {
            super .operation ();    //保证被装饰对象的功能不丢失和破坏。
            enhance ();
      }

      public void enhance() {   //增加的功能
            System . out. println( "经过装饰后,我已经被是一个超级组件了!我是在装饰类(SuperComponent)中额外添加的新功能" );
      }

}

/*
 * 具体装饰器类SmartComponent
 *
 * */
class SmartComponent extends Decorator
{

      public SmartComponent ( Component component )
      {
            super (component );
      }
      @Override
      public void operation()
      {
            super .operation ();
            smart ();
      }
      public void smart() {    //增加的功能
            System . out. println( "经过装饰后,我已经被是一个智能组件了!我是在装饰类(SmartComponent)中额外添加的新功能" );
      }

}
客户端代码
可以发现,客户端完全面向抽象编程,不论是具体组件,还是抽象装饰器,或是具体装饰器,对于客户端来说,都是Component。
由于每一个具体装饰器对象也属于一个Component,因此我们可以将具体装饰器再次注入到其它的装饰器中,进行叠加装饰。
public static void main (String [] args )
{
            Component normalComponent =  new ConcreteConponent ();     // 一个具体的 普通组件对象
            normalComponent .operation ();


            System . out. println( "---" );


            //将普通组件注入到SuperComponent装饰器中,装饰为 超级组件
            Component superComponent   = new SuperComponent (normalComponent );
            superComponent .operation ();


            System . out. println( "---" );

            //将普通组件注入到SmartComponent装饰器中,装饰为 智能组件
            Component smartComponent = new SmartComponent (normalComponent );
            smartComponent .operation ();


            System . out. println( "---" );

            //将超级组件注入到SmartComponent装饰器中,装饰为 智能 超级组件
            Component smartAndSuperComponent = new SmartComponent (superComponent );
            smartAndSuperComponent .operation ();
}
装饰器模式在JDK中的运用举例
我们讨论的是Java IO中的 InputStream 、FileInputStream 、 FilterInputStream 、 BufferedInputStream 之间的关系,他们的设计满足装饰器模式。
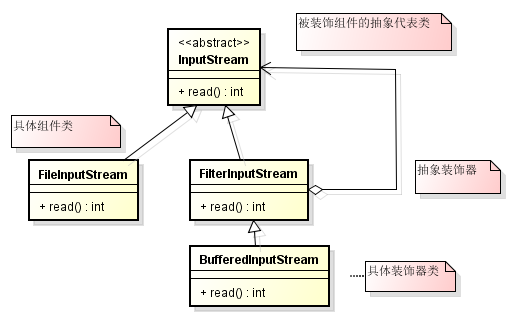
FileInputStream
是一个具体的InputStream实例,我们可以使用BufferedInputStream去装饰他。
InputStream
InputStream就是Component的地位,规定了 具体组件 的接。InputStream中定义了一些read()方法,用于从输入流中读取字节数据。我们就拿 里面的一个 调用一次读取一个字节的方法为例:
这是一个抽象方法,子类必须实现 : public abstract int read() throws IOException;
FilterInputStream
JDK文档对他的描述:
FilterInputStream 包含其他一些输入流,它将这些流用作其基本数据源,它可以直接传输数据或提供一些额外的功能。FilterInputStream 类本身只是简单地重写那些将所有请求传递给所包含输入流的 InputStream 的所有方法。FilterInputStream 的子类可进一步重写这些方法中的一些方法,并且还可以提供一些额外的方法和字段。
他持有了一个InputStream对象引用,且通过构造函数将被装饰对象InputStream注入,且对read方法进行简单实现。
public class FilterInputStream extends InputStream {

    protected volatile InputStream in ;

    protected FilterInputStream ( InputStream in ) {
        this .in = in ;
    }
    //......
    public int read() throws IOException {
       return in . read();
    }

}
BufferedInputStream
JDK文档对他的描述:
BufferedInputStream 为另一个输入流添加一些功能,即缓冲输入以及支持 mark 和 reset 方法的能力。在创建 BufferedInputStream 时,会创建一个内部缓冲区数组。在读取或跳过流中的字节时,可根据需要从包含的输入流再次填充该内部缓冲区,一次填充多个字节。mark 操作记录输入流中的某个点,reset 操作使得在从包含的输入流中获取新字节之前,再次读取自最后一次 mark 操作后读取的所有字节。
public class BufferedInputStream extends FilterInputStream
{

    public BufferedInputStream(InputStream in, int size)
    { // 通过构造函数将被装饰的对象 InputStream 注入
        super(in);
        if (size <= 0)
        {
            throw new IllegalArgumentException("Buffer size <= 0");
        }
        buf = new byte[size];
    }

    // 增强后的read方法:从缓冲数组中返回读取的字节数据
    public synchronized int read() throws IOException
    {
        if (pos >= count)
        {
            fill();
            if (pos >= count)
                return -1;
        }
        return getBufIfOpen()[pos++] & 0xff;
    }

    private byte[] getBufIfOpen() throws IOException
    {
        byte[] buffer = buf;
        if (buffer == null)
            throw new IOException("Stream closed");
        return buffer;
    }

    protected volatile byte buf[]; // 内部缓冲输入数据的字节数组
}
总结
装饰模式是一种用于替代继承的技术,它通过一种无须定义子类的方式来给对象动态增加职责,使用对象之间的关联关系取代类之间的继承关系。在装饰模式中引入了装饰类,在装饰类中既可以调用待装饰的原有类的方法,还可以增加新的方法,以扩充原有类的功能。
本文讨论的是标准的 透明装饰器模式,还有一种叫做半透明装饰器模式,这里不扩展。
装饰器模式的优点
(1) 对于扩展一个对象的功能,装饰模式比继承更加灵活性,不会导致类的个数急剧增加。
(2) 可以通过一种动态的方式来扩展一个对象的功能,通过配置文件可以在运行时选择不同的 具体装饰类,从而实现不同的行为。
(3) 可以对一个对象进行多次装饰,通过使用不同的具体装饰类以及这些装饰类的排列组合, 可以创造出很多不同行为的组合,得到功能更为强大的对象。
(4) 具体构件类与具体装饰类可以独立变化,用户可以根据需要增加新的具体构件类和具体装饰类,原有类库代码无须改变,符合“开闭原则”。
参考:刘伟设计模式