问题描述
在APIM中配置对传入的Token进行预验证,确保传入后端被保护的API的Authorization信息正确有效,可以使用validate-jwt策略。validate-jwt 策略强制要求从指定 HTTP 标头或指定查询参数提取的 JSON Web 令牌 (JWT) 必须存在且有效。validate-jwt 策略支持 HS256 和 RS256 签名算法。
- 对于 HS256,必须在策略中以 base64 编码形式提供内联方式的密钥。
- 对于 RS256,密钥可以通过 Open ID 配置终结点来提供,或者通过提供包含公钥或公钥的模数指数对的已上传证书的 ID 来提供。
HS256配置
 <validate-jwt header-name="Authorization" failed-validation-httpcode="401" failed-validation-error-message="Unvalid authorization" require-expiration-time="true" require-signed-tokens="true">
            <issuer-signing-keys>
                <key>在HS256算法中使用的密钥,进行base64编码后的值</key>
            </issuer-signing-keys>
            <audiences>
                <audience>在生成JWT Token时设置的aud值</audience>
            </audiences>
   </validate-jwt>
RS256配置(附带错误消息)
<validate-jwt header-name="Authorization" failed-validation-httpcode="401" failed-validation-error-message="Unvalid authorization" require-expiration-time="true" require-signed-tokens="true">
            <issuer-signing-keys>
            <key><RS256 公钥内容通过base64编码后的值></key>
            </issuer-signing-keys>
            <audiences>
                <audience>在生成JWT Token时设置的aud值</audience>
            </audiences>
</validate-jwt>
在进行验证时错误消息(文末附录中包含如何在APIM门户中通过Test功能检测策略的执行结果及错误)
validate-jwt (-0.132 ms)
    {
"message": "JWT Validation Failed: IDX10503: Signature validation failed.
Keys tried: 'Microsoft.IdentityModel.Tokens.SymmetricSecurityKey, KeyId: '', InternalId: 'HuvkEY3HBhujvk2qeDfgPFD2iYc-GYrnlDX6Yd1LsYQ'. ,
 KeyId:
'.
Exceptions caught:
 'System.NotSupportedException: IDX10634: Unable to create the SignatureProvider.
Algorithm: 'RS256',
SecurityKey: 'Microsoft.IdentityModel.Tokens.SymmetricSecurityKey, KeyId: '',
InternalId: 'HuvkEY3HBhujvk2qeDfgPFD2iYc-GYrnlDX6Yd1LsYQ'.'
 is not supported.
The list of supported algorithms is available here: https://aka.ms/IdentityModel/supported-algorithms

at Microsoft.IdentityModel.Tokens.CryptoProviderFactory.CreateSignatureProvider(SecurityKey key, String algorithm, Boolean willCreateSignatures, Boolean cacheProvider)

at Microsoft.IdentityModel.Tokens.CryptoProviderFactory.CreateForVerifying(SecurityKey key, String algorithm, Boolean cacheProvider)

at System.IdentityModel.Tokens.Jwt.JwtSecurityTokenHandler.ValidateSignature(Byte[] encodedBytes, Byte[] signature, SecurityKey key, String algorithm, SecurityToken securityToken, TokenValidationParameters validationParameters)

at System.IdentityModel.Tokens.Jwt.JwtSecurityTokenHandler.ValidateSignature(String token,
TokenValidationParameters validationParameters)
'.

token: '{"typ":"jwt","alg":"RS256"}.{"aud":"xxxxx.azure-api.cn","user_id":123456,"username":"lutpython","exp":1631786725}'.."
}
那么, 如何来解决RS256 JWT的验证问题呢?
解决方案
正如APIM官网中特别提醒的一句话“对于 RS256,密钥可以通过 Open ID 配置终结点来提供,或者通过提供包含公钥或公钥的模数指数对的已上传证书的 ID 来提供 (英文原文:For RS256 the key may be provided either via an Open ID configuration endpoint, or by providing the ID of an uploaded certificate that contains the public key or modulus-exponent pair of the public key.)” , 所以APIM 中的validate-jwt是不支持使用直接配置公钥(Public Key)。 目前的方案有两种:
1) 使用openid configuration, OpenID Configuration中包含了公钥的内容,是有提供Token的权限服务器管理提供(如 Azure AD中就自动包含OpenID Configuration Endpoint). 注:这部分的详细介绍可以参考官网:https://docs.azure.cn/zh-cn/api-management/api-management-access-restriction-policies#azure-active-directory-token-validation
2) 把有证书机构(CA)颁发的包含公钥(Publick Key)的 .pfx证书上传到APIM中,然后配置 key certificate-id="<上传在APIM证书中的ID值>"
<validate-jwt header-name="Authorization" failed-validation-httpcode="401" failed-validation-error-message="Unvalid authorization" require-expiration-time="true" require-signed-tokens="true">
            <issuer-signing-keys>
                <key certificate-id="<上传在APIM证书中的ID值>" />
            </issuer-signing-keys>
            <audiences>
                <audience>在生成JWT Token时设置的aud值</audience>
            </audiences>
        </validate-jwt>
方案步骤
可以使用以下的步骤来验证RS256 JWT:
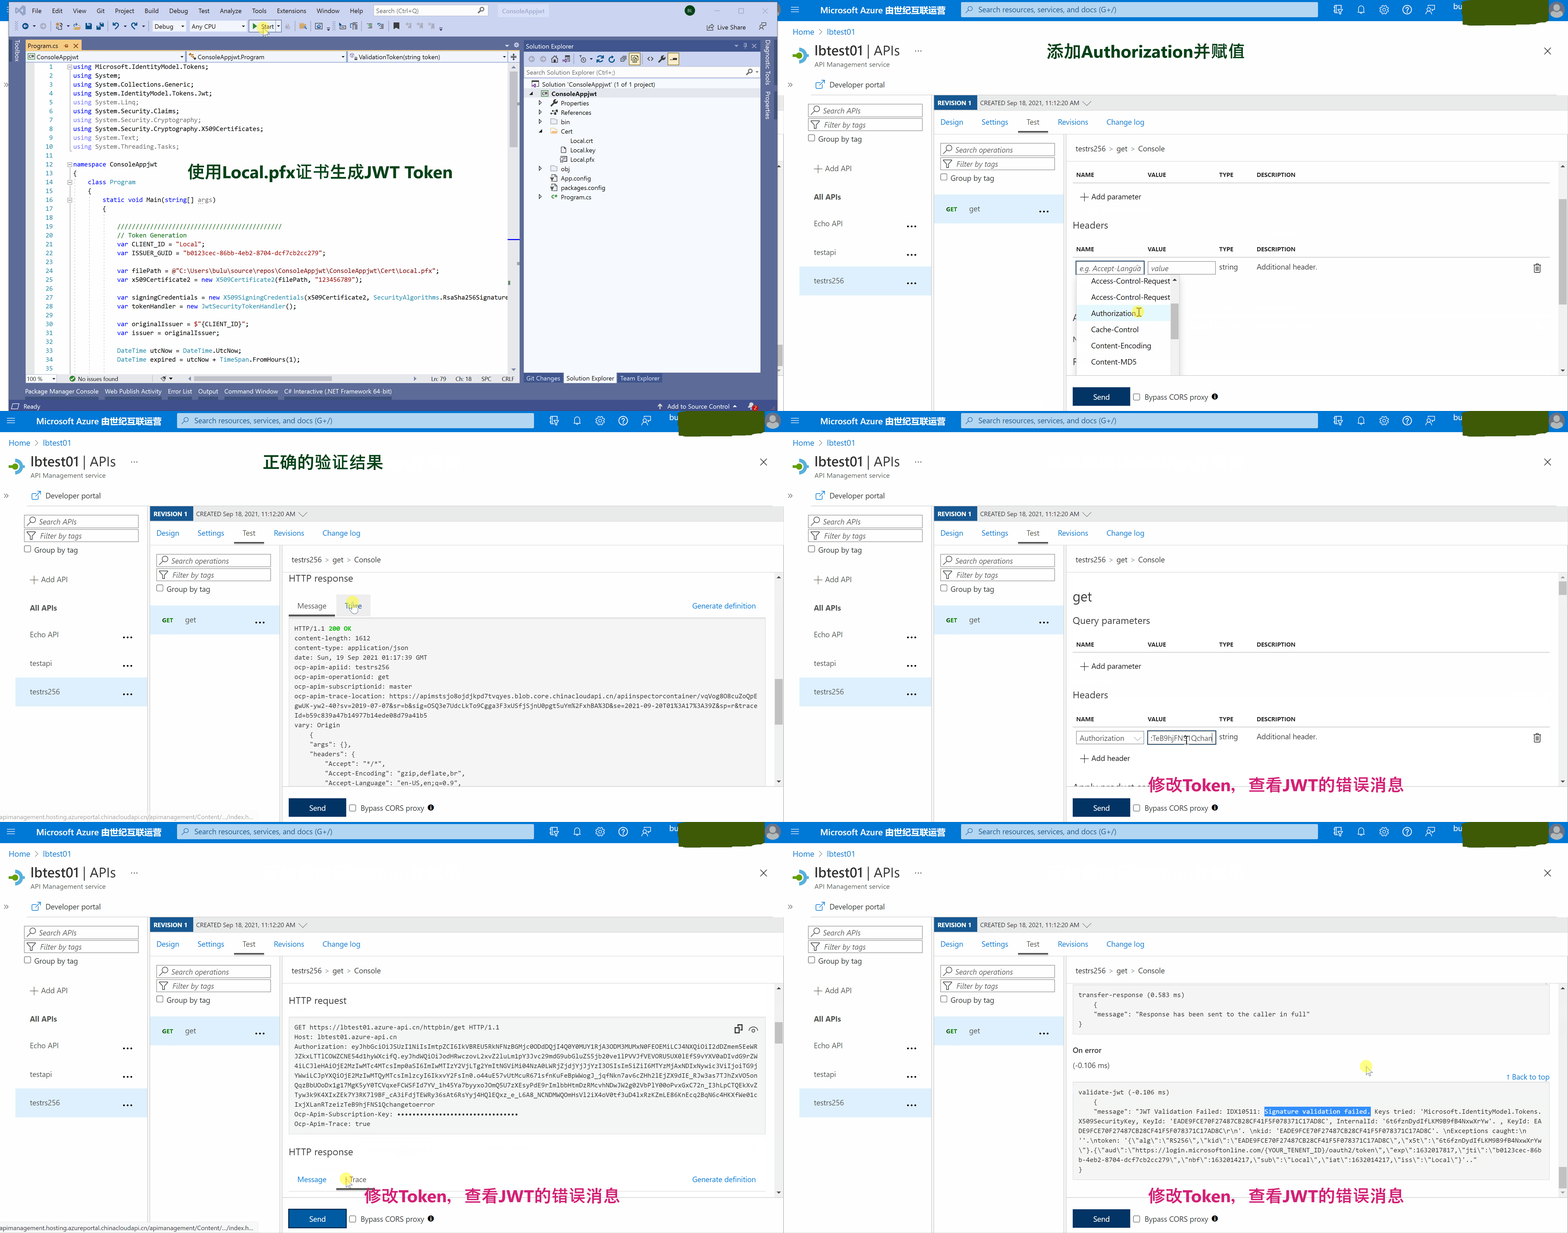
1) 使用 openssl 指令创建 证书 (Local.pfx)
openssl.exe req -x509 -nodes -sha256 -days 3650 -subj "/CN=Local" -newkey rsa:2048 -keyout Local.key -out Local.crt

openssl.exe pkcs12 -export -in Local.crt -inkey Local.key -CSP "Microsoft Enhanced RSA and AES Cryptographic Provider" -out Local.pfx
openssl.exe 下载地址:https://slproweb.com/products/Win32OpenSSL.html, 使用时需要 cd到 openssl.exe所在的bin目录中

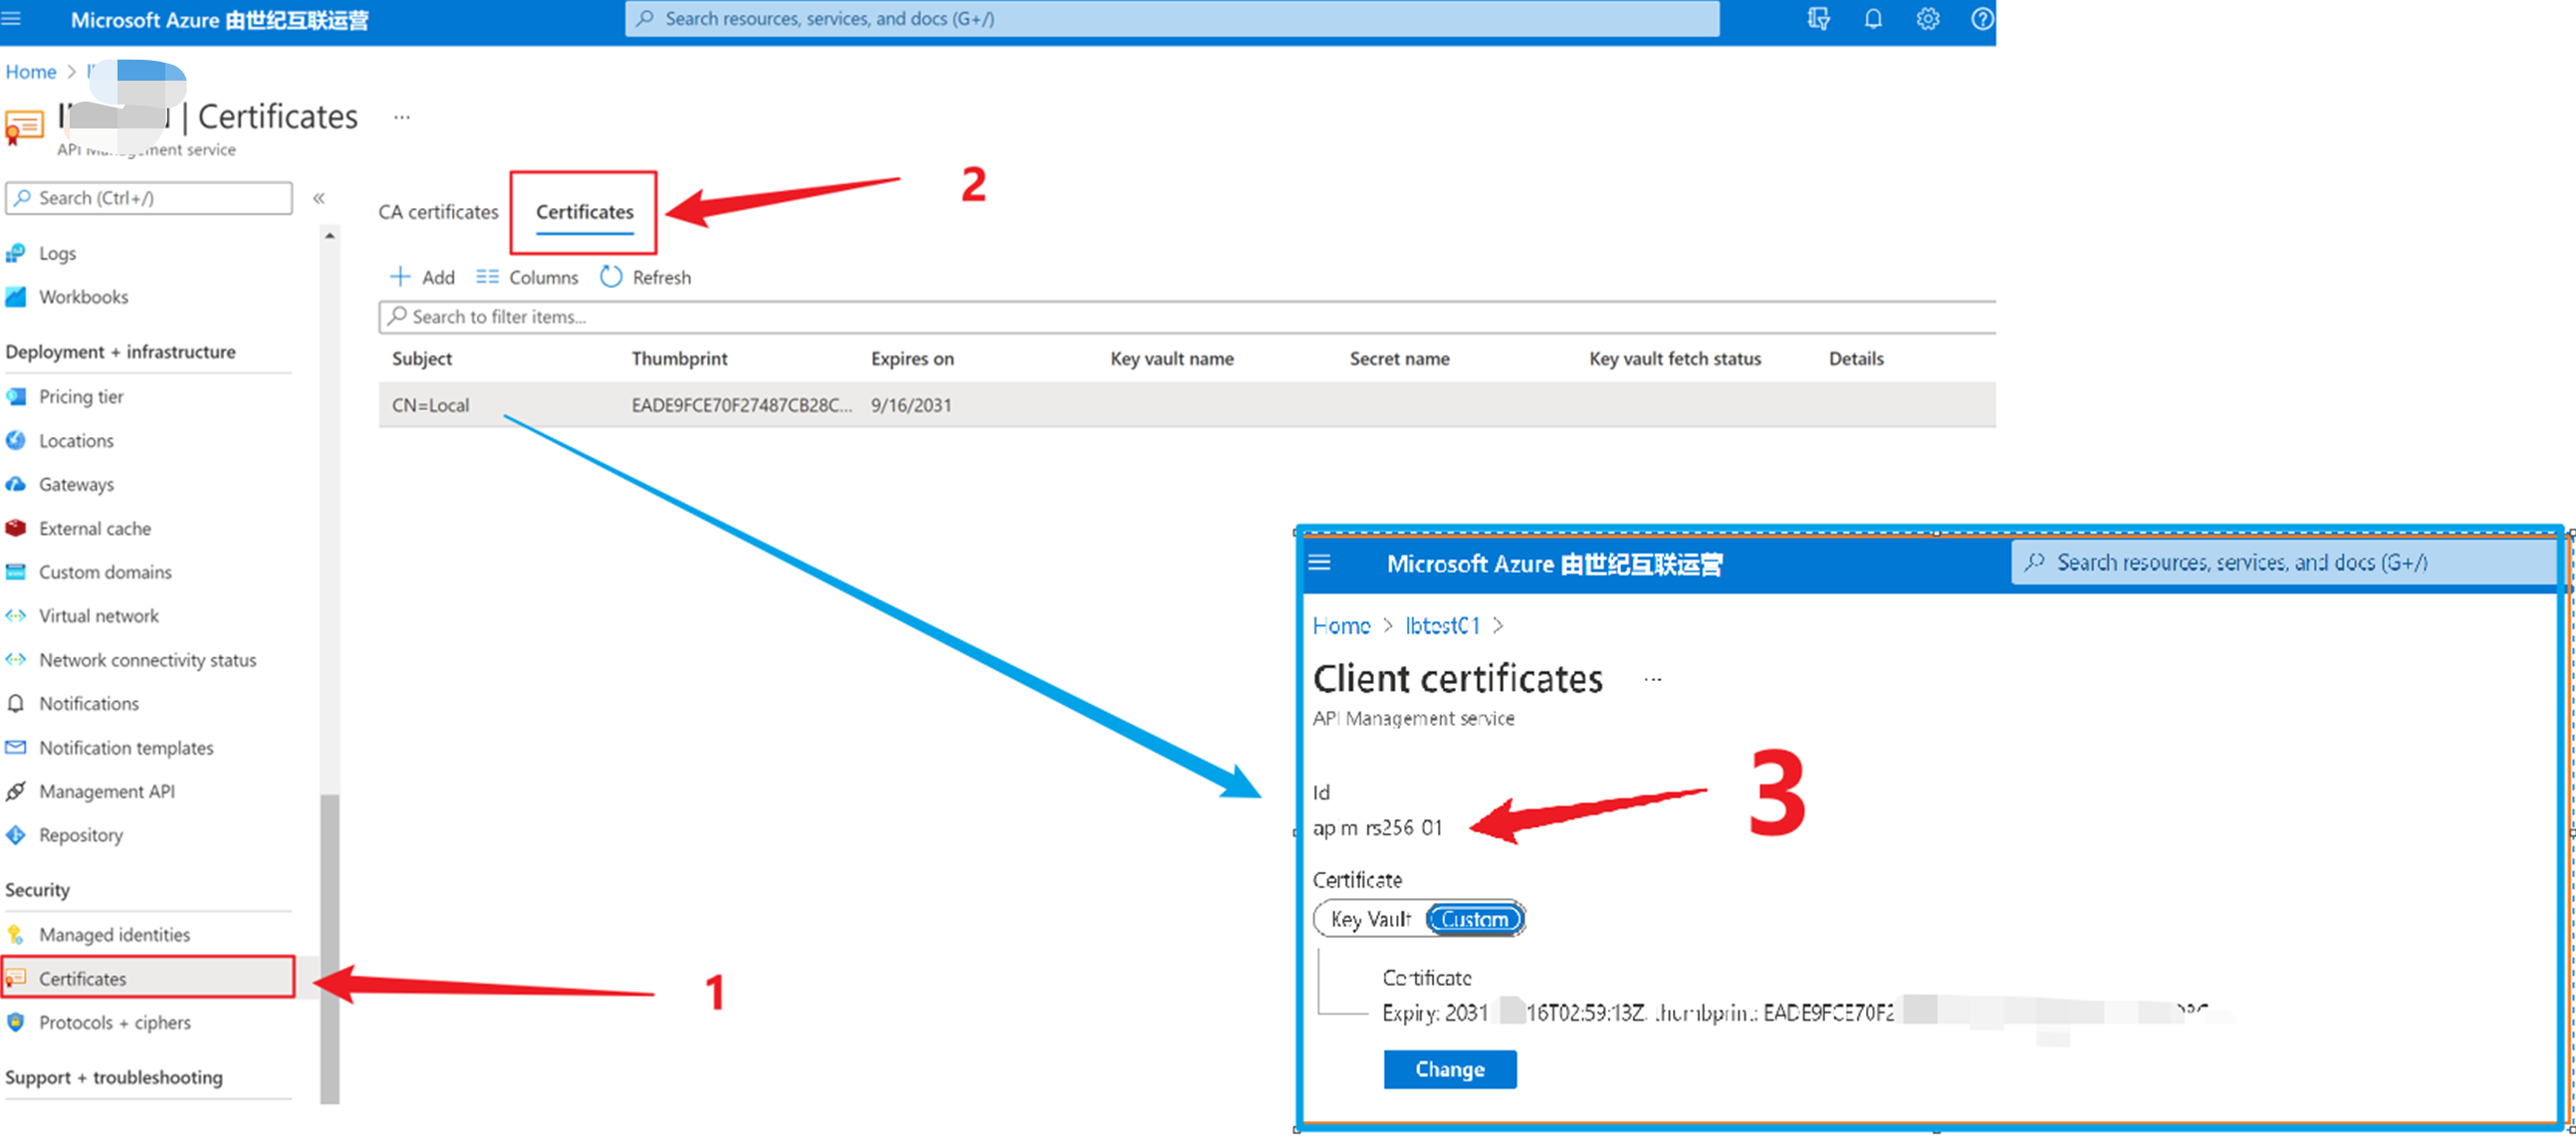
2)上传 Local.pfx 文件到APIM,并自定义证书ID, 如:apim-rs256-01

3)在APIM的策略中(API级,单个操作级别,或者一组API[产品], 或者全部的APIs)。validate-jwt 内容如下:
<policies>
    <inbound>
        <base />
        <validate-jwt header-name="Authorization" failed-validation-httpcode="401" failed-validation-error-message="401 unauthorized">
            <issuer-signing-keys>
                <key certificate-id="apim-rs256-01" />
            </issuer-signing-keys>
        </validate-jwt>
    </inbound>
    <backend>
        <base />
    </backend>
    <outbound>
        <base />
    </outbound>
    <on-error>
        <base />
    </on-error>
</policies>
4) 使用以下的C#代码生成 Token
using Microsoft.IdentityModel.Tokens;
using System;
using System.Collections.Generic;
using System.IdentityModel.Tokens.Jwt;
using System.Linq;
using System.Security.Claims;
using System.Security.Cryptography;
using System.Security.Cryptography.X509Certificates;
using System.Text;
using System.Threading.Tasks;

namespace ConsoleAppjwt
{
    class Program
    {
        static void Main(string[] args)
        {            // Token Generation
            var CLIENT_ID = "Local";
            var ISSUER_GUID = "b0123cec-86bb-4eb2-8704-dcf7cb2cc279";

            var filePath = @"C:Usersxxxxsource
eposConsoleAppjwtConsoleAppjwtCertLocal.pfx";
            var x509Certificate2 = new X509Certificate2(filePath, "123456789");

            var signingCredentials = new X509SigningCredentials(x509Certificate2, SecurityAlgorithms.RsaSha256Signature); //, SecurityAlgorithms.Sha256Digest
            var tokenHandler = new JwtSecurityTokenHandler();

            var originalIssuer = $"{CLIENT_ID}";
            var issuer = originalIssuer;

            DateTime utcNow = DateTime.UtcNow;
            DateTime expired = utcNow + TimeSpan.FromHours(1);

            var claims = new List<Claim> {
         new Claim("aud", "https://login.microsoftonline.com/{YOUR_TENENT_ID}/oauth2/token", ClaimValueTypes.String, issuer, originalIssuer),
         new Claim("exp", "1460534173", ClaimValueTypes.DateTime, issuer, originalIssuer),
         new Claim("jti", $"{ISSUER_GUID}", ClaimValueTypes.String, issuer, originalIssuer),
         new Claim("nbf", "1460533573", ClaimValueTypes.String, issuer, originalIssuer),
         new Claim("sub", $"{CLIENT_ID}", ClaimValueTypes.String, issuer, originalIssuer)
     };

            ClaimsIdentity subject = new ClaimsIdentity(claims: claims);

            var tokenDescriptor = new SecurityTokenDescriptor
            {
                Subject = subject,
                Issuer = issuer,
                Expires = expired,
                SigningCredentials = signingCredentials,
            };

            JwtSecurityToken jwtToken = tokenHandler.CreateToken(tokenDescriptor) as JwtSecurityToken;
            jwtToken.Header.Remove("typ");
            var token = tokenHandler.WriteToken(jwtToken);

            Console.WriteLine(token);
            //Start to Verify Token
            Console.WriteLine("Start to Verify Token");
            ValidationToken(token);

            Console.ReadLine();
        }

        static void ValidationToken(string token)
        {
            try
            {
                JwtSecurityTokenHandler jwtHandler = new JwtSecurityTokenHandler();
                var filePath = @"C:Usersxxxxsource
eposConsoleAppjwtConsoleAppjwtCertLocal.pfx";

                TokenValidationParameters tvParameter = new TokenValidationParameters
                {
                    ValidateIssuerSigningKey = true,
                    IssuerSigningKey = new X509SecurityKey(new X509Certificate2(filePath, "123456789")),
                    ValidateIssuer = false,
                    ValidateAudience = false,
                    // set clockskew to zero so tokens expire exactly at token expiration time (instead of 5 minutes later)
                    ClockSkew = TimeSpan.Zero
                };
                SecurityToken stoken;
                jwtHandler.ValidateToken(token, tvParameter, out stoken);
                Console.WriteLine(stoken);
                Console.WriteLine("Validate Token Success");
            }
            catch (Exception ex)
            {
                Console.WriteLine(ex);
            }
        }
    }
}
5) 调用APIM接口对Authorization验证

当然,也可以直接在调用APIM的客户端中进行验证。
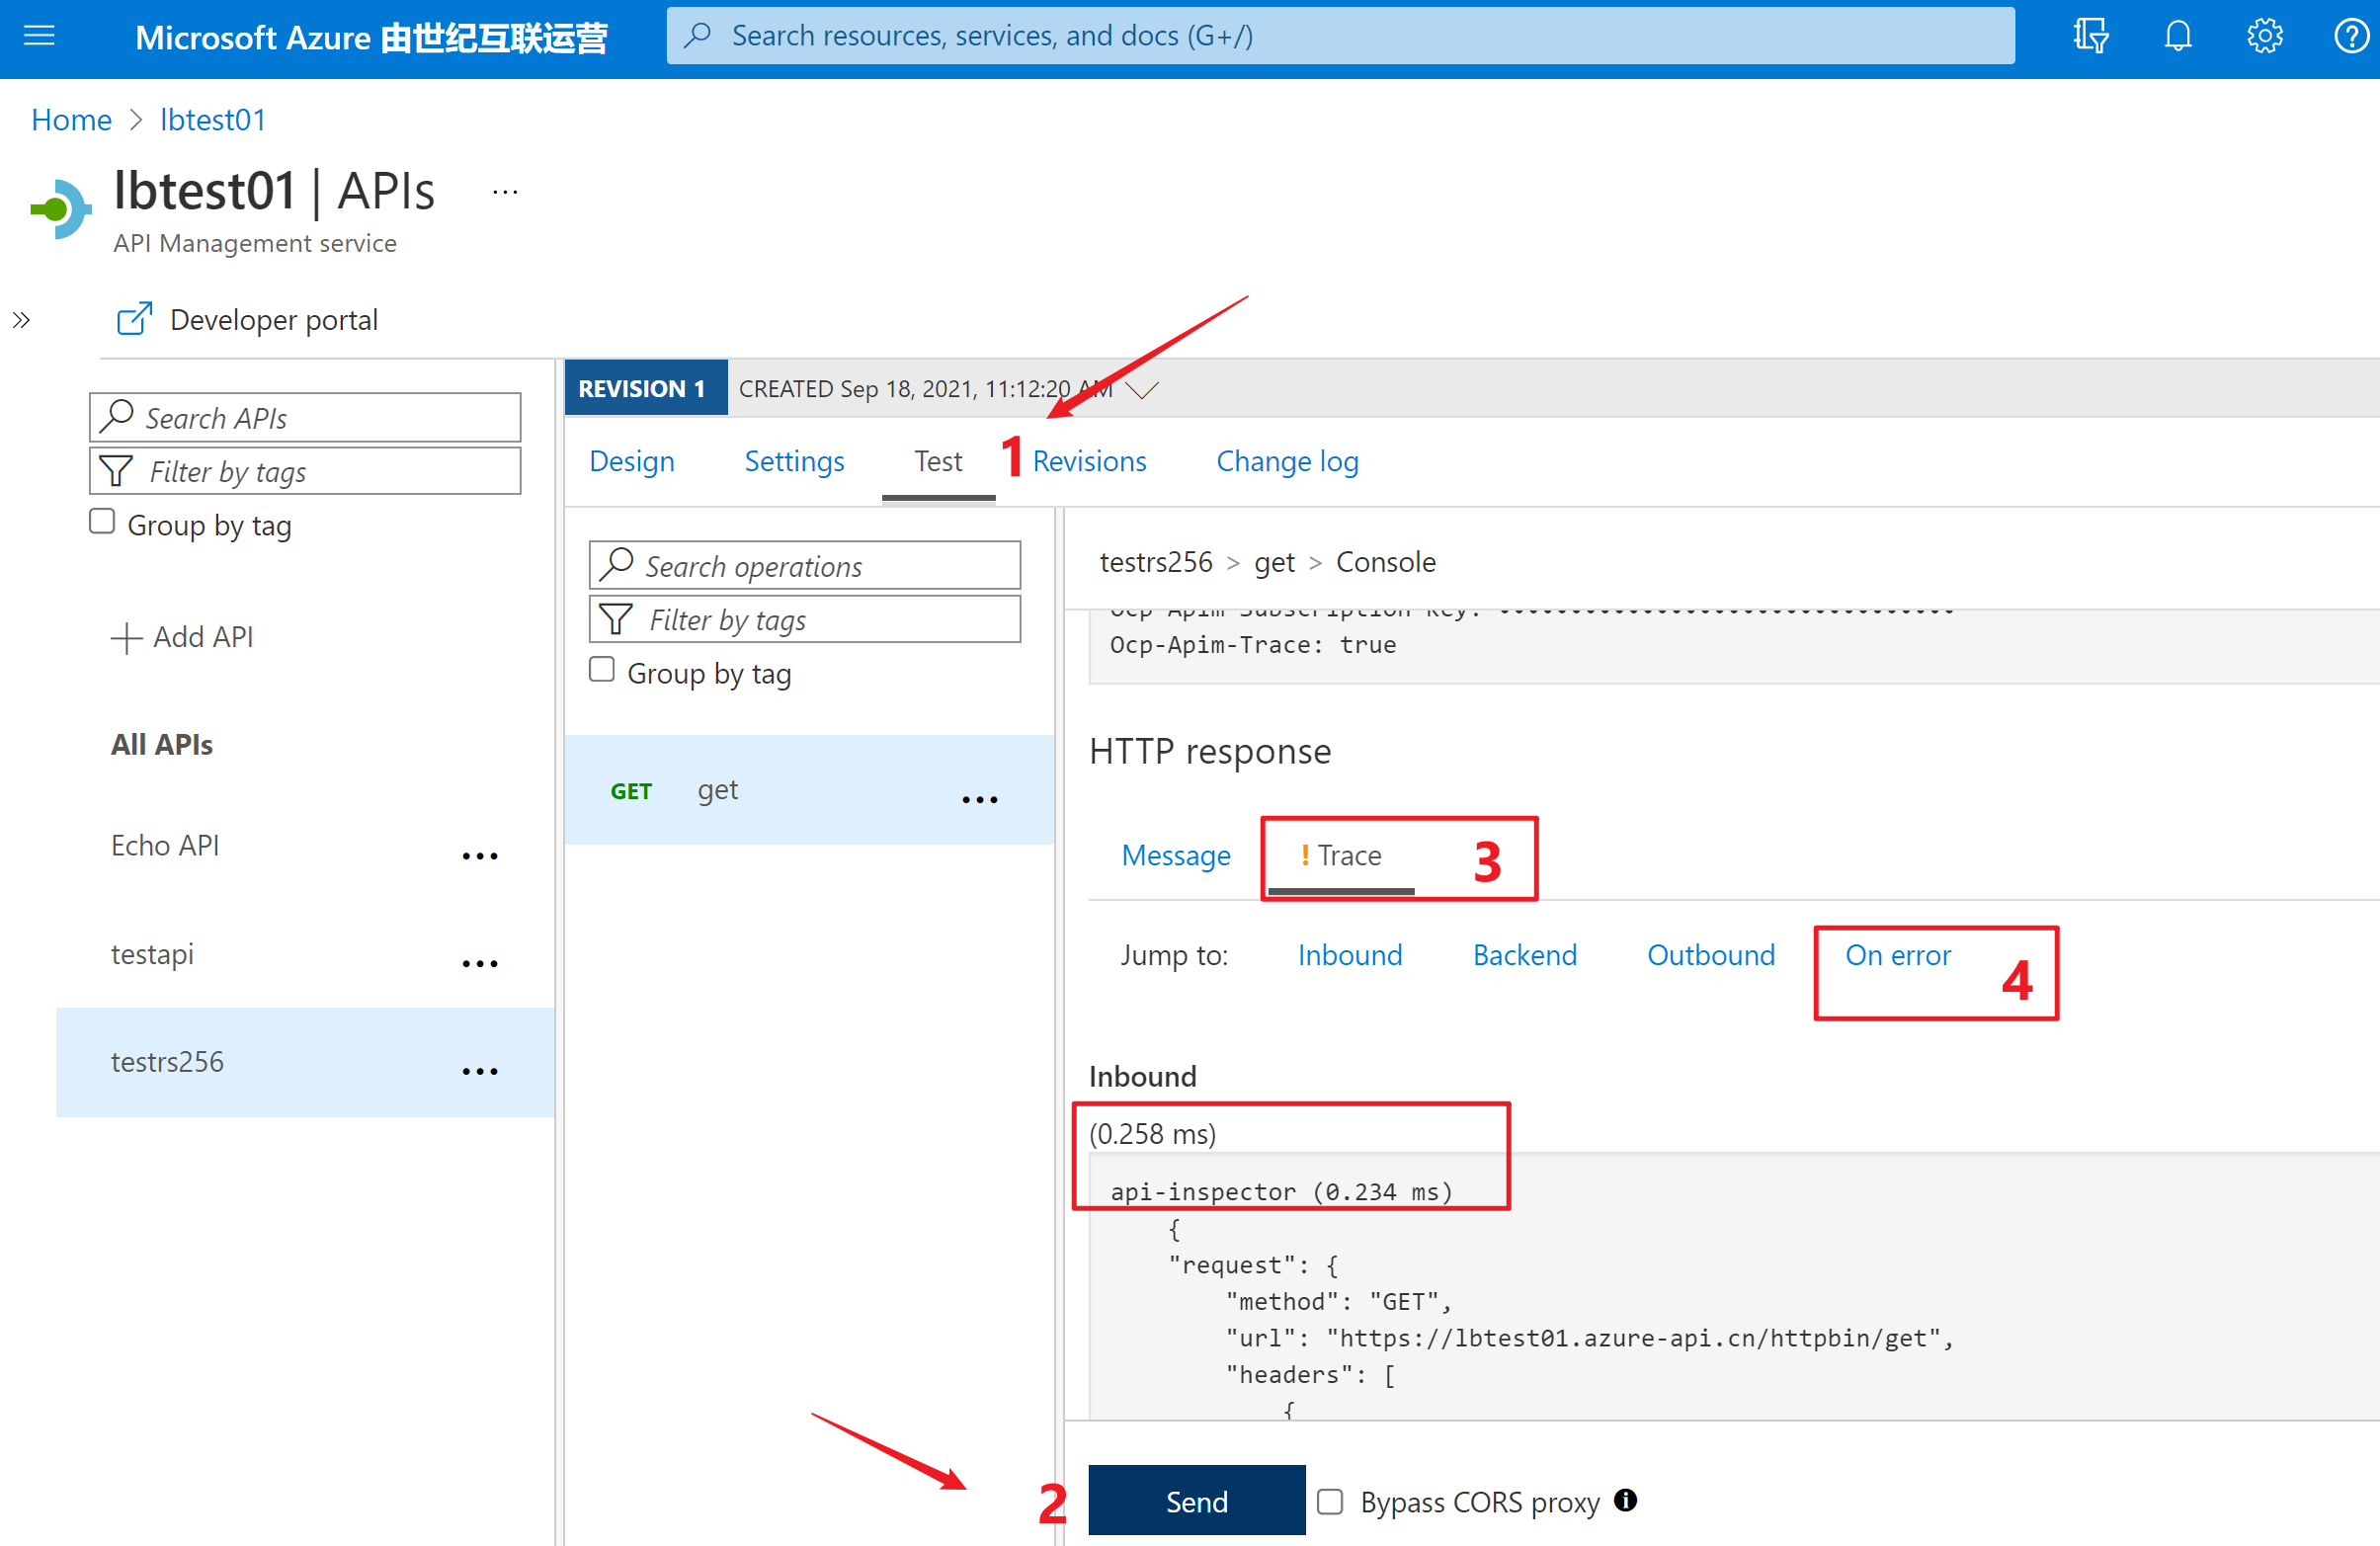
附录一:在APIM的接口配置页中,Test页面点击Send按钮,发送API的请求,通过页面中的Trace部分查看每一部分的耗时,处理结果,或错误详情。

参考资料
验证 JWT:https://docs.azure.cn/zh-cn/api-management/api-management-access-restriction-policies#validate-jwt
How to validate JWT signed with RS256 Algorithm with validate-jwt policy in Azure API management :https://stackoverflow.com/questions/37050233/how-to-validate-jwt-signed-with-rs256-algorithm-with-validate-jwt-policy-in-azur