1.下载软件包
下载链接:https://dev.mysql.com/downloads/mysql/5.6.html#downloads
centos6--MySQL-5.6.35-1.el6.x86_64.rpm-bundle.tar
centos7--MySQL-5.6.35-1.el7.x86_64.rpm-bundle.tar
选择对应版本,否则会出现依赖不满足问题。
2.解压安装数据库
说明:以-Uvh安装是为了保险起见;测试发现依以下顺序安装是没有问题的,但如果出现某个包无法安装则先跳过放最后安装。
tar -xf MySQL-5.6.36-1.el6.x86_64.rpm-bundle.tar

rpm -Uvh MySQL-client-5.6.36-1.el6.x86_64.rpm
rpm -Uvh MySQL-shared-5.6.36-1.el6.x86_64.rpm
rpm -Uvh MySQL-devel-5.6.36-1.el6.x86_64.rpm
rpm -Uvh MySQL-shared-compat-5.6.36-1.el6.x86_64.rpm
rpm -Uvh MySQL-embedded-5.6.36-1.el6.x86_64.rpm
rpm -Uvh MySQL-test-5.6.36-1.el6.x86_64.rpm
rpm -Uvh MySQL-server-5.6.36-1.el6.x86_64.rpm
附server包安装后的提示:
PLEASE REMEMBER TO SET A PASSWORD FOR THE MySQL root USER !
To do so, start the server, then issue the following commands:

/usr/bin/mysqladmin -u root password 'new-password'
/usr/bin/mysqladmin -u root -h ls password 'new-password'

Alternatively you can run:
/usr/bin/mysql_secure_installation

which will also give you the option of removing the test
databases and anonymous user created by default.  This is
strongly recommended for production servers.
这步安装和yum install mysql mysql-server mysql-devel是等效的。
3.配置my.cnf文件
mkdir /etc/my.cnf.d

cat >/etc/my.cnf<<EOF
[mysqld]
datadir=/mysql/data
socket=/mysql/data/mysql.sock
user=mysql
symbolic-links=0

[mysqld_safe]
log-error=/mysql/log/mysql.log
pid-file=/mysql/log/mysql.pid

# include all files from the config directory
!includedir /etc/my.cnf.d
EOF
4.配置password文件
说明:如所知的一样mysql的配置文件就是my.cnf,之所以还有下边这几个文件是因为my.cnf中的!includedir语句。
cat > /etc/my.cnf.d/password.cnfx<<EOF
[client]
user=root
password=abcd1234
EOF
5.配置客户端
cat >/etc/my.cnf.d/client.cnf <<EOF
[client]
socket=/mysql/data/mysql.sock
EOF
6.配置服务端
说明:如果要配置主备则不同主机下边的server_id不能相同;一些内存参数的大小可能需要根据机器情况进行修改
cat >/etc/my.cnf.d/server.cnf <<EOF
[mysqld]
port=3306
bind-address=0.0.0.0
default_storage_engine=innodb
symbolic_links=0
skip_name_resolve
skip_external_locking
lower_case_table_names=1
character_set_server=utf8
init_connect='SET NAMES utf8'
collation_server=utf8_general_ci
transaction_isolation='read-committed'

# Avoid Warning
explicit_defaults_for_timestamp=true

server_id=1

binlog_format=row
log_bin=mysql-bin
relay_log=relay-bin
skip_slave_start
expire_logs_days=3
max_binlog_size=1G
binlog_cache_size=64M
max_binlog_cache_size=128M
log-bin-trust-function-creators=1
back_log=600
max_connections=5000
max_user_connections=4000
max_connect_errors=6000
connect_timeout=60
query_cache_type=1
query_cache_size=256M
query_cache_limit=32M

#query_cache_min_res_unit=2k
table_open_cache=4096
sort_buffer_size=32M
join_buffer_size=32M
thread_cache_size=300
long_query_time=2
key_buffer_size=256M
read_buffer_size=4M
read_rnd_buffer_size=16M
tmp_table_size=256M
max_heap_table_size=1G
max_allowed_packet=32M
bulk_insert_buffer_size=64M
innodb_buffer_pool_size=6G
innodb_log_file_size=512M
innodb_log_buffer_size=16M
innodb_log_files_in_group=2
innodb_max_dirty_pages_pct=90
innodb_lock_wait_timeout=120
innodb_file_per_table=1
innodb_file_io_threads=4
innodb_read_io_threads=8
innodb_write_io_threads=8
innodb_thread_concurrency=4
innodb_flush_log_at_trx_commit=2

EOF
7.相应修改启动文件中相应的datadir等项的值
/etc/init.d/mysqld中修改datadir/errlogfile/mypidfile三项的值(不同版本赋值形式可能不一样)
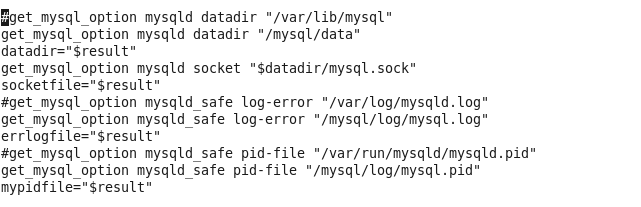
/usr/bin/mysqld_safe中修改DATADIR的值(此操作似乎只是CentOS需要)

8.在mysql家目录下创建基本目录
mkdir /mysql
cd /mysql
mkdir adm
mkdir data
mkdir log
ln -s /etc/my.cnf.d/ /mysql/conf
ln -s /var/data/mysql/data/mysql.sock /mysql/data/mysql.sock
9.将配置文件赋权给mysql用户
chown -R mysql:mysql /mysql
chown mysql:mysql /etc/my.cnf
chown -R mysql:mysql /etc/my.cnf.d
10.配置mysql可sudo
cat >/etc/sudoers.d/mysql <<EOF
mysql ALL=NOPASSWD: /sbin/service mysql *
EOF
11.安装数据库
说明:
在最后一个命令中要求的root初始密码在/root/.mysql_secret文件中
如果是5.1等旧版本root为空密码要求输入密码时直接回车即可
在Set root password和Reload privilege tables选择Y将密码修改为为password.cnf中配置的密码。
setenforce 0               #关闭selinux,不然可能service无法启动mysql(mysqld_safe可以)
mysql_install_db           #依配置文件初始化数据库data,并创建系统表
service mysql start        #启动mysql
ln -s /mysql/data/mysql.sock /var/lib/mysql/mysql.sock   #mysql_secure_installation中的sock文件位置未修改所以要创软链接包过去
mysql_secure_installation                                #增删用户和修改密码等
12.将password文件名字改.cnf以使配置生效
mv /etc/my.cnf.d/password.cnfx /etc/my.cnf.d/password.cnf
到此单个数据库的安装已经安装完成启动后即可修用password文件中的用户名密码登录。
其实由于我们在password.cnf中设了用户名密码所以直接执行mysql命令即可登录,mysql会自动使用password.cnf中的用户名和密码去登录。
如果配置主从,则主从都按以上步骤完成安装后继续执行以下步骤。
13.安装半同步组件
登录数据库后都执行:
INSTALL PLUGIN rpl_semi_sync_master SONAME 'semisync_master.so';(主)

INSTALL PLUGIN rpl_semi_sync_slave SONAME 'semisync_slave.so';(从)

SHOW PLUGINS;
14.创建用于同步的REPLICATION用户
grant replication slave, replication client on *.* to 'repl'@'91.2.9.21' identified by 'rEp^1@3#';(主)

grant replication slave, replication client on *.* to 'repl'@'91.2.9.22' identified by 'rEp^1@3#';(从)

flush privileges;

select * from mysql.userG;
15.主库查看同步信息
show master status G;
16.从库指向主库
CHANGE MASTER TO MASTER_HOST='192.168.220.136',

-> MASTER_USER='ls',--之前在主中添加的用以同步的用户

-> MASTER_PASSWORD='ls',--之前添加的用户的密码

-> MASTER_LOG_FILE='mysql-bin.000001',--值为主中查询到的File

-> MASTER_LOG_POS=1210; --值为从主中查询到的Position
17.从库启动slave
start slave;

show slave statusG;
18.启动半同步
动态修改(即登录数据库后执行,主备都要):
set global rpl_semi_sync_master_enabled =1;(主)

set global rpl_semi_sync_master_timeout = 10000;(主)

set global rpl_semi_sync_slave_enabled =1;(从)
静态修改(即在6中的server.cnf文件中加入,主从都要):
rpl_semi_sync_master_enabled=1

rpl_semi_sync_slave_enabled=1

rpl_semi_sync_master_timeout=10000
19.设置从库只读
即在从库的server.cnf中再加:
read_only=1
20.从查看是否成功启动同步
show slave status G;
如果Slave_IO_Running和Slave_SQL_Running的值为yes表示启动成功
启动报错: log file ./ib_logfile0 is of different size 0 5242880 bytes InnoDB: than specified in the .cnf file 0 536870912 bytes!
find / -name ib_logfile0                   #定位文件位置
mv ib_logfile0 ib_logfile0.bak
mv ib_logfile1 ib_logfile1.bak
service mysqld start                       #再次启动即可