简介:常见的组件间通信有6种:
1、props和$emit(常用)
2、中央事件总线(bus,$emit/$on)
3、$attrs和$listeners
4、provide和Inject
5、$parent / $children 与ref
6、v-model与props里面的value
7、vuex
1、props和$emit(常用)
简介:父组件向子组件传递数据是通过prop传递的,子组件传递数据给父组件是通过$emit触发事件来做到的。
// 子组件 ChildOne.vue
<template>
  <div class="container">
    <!--input的input事件:在用户输入时触发,它是在元素值发生变化时立即触发-->
    <input type="text" v-model="myMsg" @input="passData(myMsg)"/>
  </div>
</template>
<script>
export default{
  name: 'ChildOne',
  // 设置props属性值,得到父组件传递过来的数据
  props: {
    msg: {
      type: String
      // default: '组件间通信:props和$emit(常用)'
    }
  },
  data () {
    return {
      myMsg: this.msg
    }
  },
  methods: {
    passData (val) {
      // 触发父组件中的事件,向父组件传值
      this.$emit('getChildData', val)
    }
  }
}
// 父组件 ComponentCommunication.vue
<template>
  <div class="container">
    <div class="content">
       <p>父组件接收到子组件的值: {{childOneRes}}</p>
        <child-one
           class="good-margin"
            :msg="childOneMsg"
            @getChildData="getChildOneData">
         </child-one>
      </div>
    </div>
</template>
<script>
import ChildOne from './components/ChildOne'
export default {
  name: 'ComponentCommunication',
  components: {
    ChildOne
  },
  data () {
    return {
      childOneMsg: '',
      childOneRes: '',
     }
  },
  methods: {
    /**
     * 1、props和$emit(常用)
     * */
    getChildOneData (val) {
      this.childOneRes = val
    },
  }
}
</script>
在上面的例子中,有父组件和子组件。
1).父组件传递了childOneMsg数据给子组件,并且通过v-on绑定了一个getChildOneData事件来监听子组件的触发事件;
2).子组件通过props得到相关的msg数据,最后通过this.$emit触发了getChildOneData事件,并将值赋值给父组件的参数childOneRes
2、中央事件总线(bus,$emit/$on)
简介:这种方法通过一个空的Vue实例bus对象作为中央事件总线(事件中心),通过bus.$emit触发事件,通过bus.$on监听触发的事件,巧妙而轻量地实现了任何组件间的通信,包括父子、兄弟、跨级。当我们的项目比较大时,可以选择更好的状态管理解决方案vuex。
1、首先单独创建一个js文件,初始化一个Vue实例
// bus.js
import Vue from 'vue'
export default new Vue()
2、将上面的bus.js在子组件BrotherOne.vue和BrotherTwo.vue中引入并使用
// 子组件A: BrotherOne.vue
<template>
  <div class="container">
    <input
        class="good-margin"
        type="text"
        v-model="myMsg"
        @input="passData(myMsg)">
  </div>
</template>
<script>
// bus总线
import bus from '@/utils/bus'
export default{
  name: 'BusBrotherOne',
  data () {
    return {
      myMsg: ''
    }
  },
  methods: {
    passData (val) {
      // 触发全局事件globalEvent
      bus.$emit('globalEvent', val)
    }
  }
}
</script>
// 子组件B: BrotherTwo.vue
<template>
  <div class="container">
    <div>接收到组件1输入框的值:{{brothermessage}}</div>
  </div>
</template>
<script>
// bus总线
import bus from '@/utils/bus'
export default{
  name: 'BusBrotherTwo',
  data () {
    return {
      // 接收到非父子组件的组件1传递的值
      brothermessage: ''
    }
  },
  mounted () {
    // 绑定全局事件globalEvent
    bus.$on('globalEvent', (val) => {
      this.brothermessage = val
    })
  },
  destroyed () {
    // 销毁这个监听事件
    bus.$off('globalEvent')
  }
}
</script>
// 父组件 ComponentCommunication.vue
<template>
  <div class="container">
    <div class="content">
        <div>
              组件1:
              <bus-brother-one class="good-margin"></bus-brother-one>
            </div>
            <div class="good-margin">
              组件2:
              <bus-brother-two class="good-margin"></bus-brother-two>
            </div>
      </div>
    </div>
</template>
<script>
import BusBrotherOne from './components/BrotherOne'
import BusBrotherTwo from './components/BrotherTwo'
export default {
  name: 'ComponentCommunication',
  components: {
    BusBrotherOne,
    BusBrotherTwo,
  },
  data () {
    return {
      childOneMsg: '',
      childOneRes: '',
     }
  }
}
</script>
在上面的例子中,有一个父组件和子组件A和子组件B,子组件B中在挂载的时候绑定了全局事件globalEvent,子组件A中通过改变input的值来触发passData事件,调用bus.$emit去触发全局事件globalEvent,从而修改子组件B中的brothermessage的值。
3、$attrs和$listeners
简介:多级组件嵌套需要传递数据时,通常使用的方法是通过vuex。但如果仅仅是传递数据,而不做中间处理,使用 vuex 处理,未免有点大材小用。为此Vue2.4 版本提供了另一种方法----$attrs/$listeners
知识点:
1、$attrs:包含了父作用域中不被 prop 所识别 (且获取) 的特性绑定 (class 和 style 除外)。当一个组件没有声明任何 prop 时,这里会包含所有父作用域的绑定 (class 和 style 除外),并且可以通过 v-bind="$attrs" 传入内部组件。通常配合 interitAttrs 选项一起使用。
2、$listeners:包含了父作用域中的 (不含 .native 修饰器的) v-on 事件监听器。它可以通过 v-on="$listeners" 传入内部组件。
// 子组件A: AttrsChildOne.vue
<template>
  <div class="container">
    <p>
      第一层子组件: {{aoo}}
    </p>
    <p class="margin-small">
      AttrsChildOne的$attrs: {{ $attrs }}
    </p>
    <input
        class="margin-small"
        type="text"
        v-model="msg"
        @input="passData(msg)">
    <attrs-child-two v-bind="$attrs" v-on="$listeners"></attrs-child-two>
  </div>
</template>
<script>
import AttrsChildTwo from './AttrsChildTwo'
export default {
  name: 'AttrsChildOne',
  components: {
    AttrsChildTwo
  },
  // 可以关闭自动挂载到组件根元素上的没有在props声明的属性
  inheritAttrs: false,
  props: {
    aoo: String // foo作为props属性绑定
  },
  data () {
    return {
      msg: ''
    }
  },
  methods: {
    passData (val) {
      this.$emit('getAttrsOne', val)
    }
  }
}
</script>
// 子组件B: AttrsChildTwo.vue
<template>
  <div class="container margin-middle">
    <p>
      第二层子组件: {{boo}}
    </p>
    <p class="margin-small">
      AttrsChildTwo的$attrs: {{ $attrs }}
    </p>
    <input
        class="margin-small"
        type="text"
        v-model="msg"
        @input="passData(msg)">
    <attrs-child-three
        v-bind="$attrs"
        v-on="$listeners"
    ></attrs-child-three>
  </div>
</template>
<script>
import AttrsChildThree from './AttrsChildThree'
export default {
  name: 'AttrsChildTwo',
  components: {
    AttrsChildThree
  },
  // 可以关闭自动挂载到组件根元素上的没有在props声明的属性,控制台审查元素可以看到顶层标签元素中(本例子的div元素)
  // 会渲染出父组件传递过来的$attrs的属性
  inheritAttrs: true,
  props: {
    boo: String
  },
  data () {
    return {
      msg: ''
    }
  },
  methods: {
    passData (val) {
      this.$emit('getAttrsTwo', val)
    }
  }
}
</script>
// 子组件C: AttrsChildThree.vue
<template>
  <div class="container margin-middle">
    <p>
      第三层子组件: {{coo}}
    </p>
    <p class="margin-small">
      AttrsChildThree的$attrs: {{ $attrs }}
    </p>
    <input
        class="margin-small"
        type="text"
        v-model="msg"
        @input="passData(msg)">
  </div>
</template>
<script>
export default {
  name: 'AttrsChildOne',
  inheritAttrs: false,
  props: {
    coo: String
  },
  data () {
    return {
      msg: ''
    }
  },
  methods: {
    passData (val) {
      this.$emit('getAttrsThree', val)
    }
  }
}
</script>
// 父组件 ComponentCommunication.vue
<template>
  <div class="container">
    <div class="content">
        <div class="margin-small">
              接受到组件1输入框的值:{{attrsOneMsg}}
            </div>
            <div class="margin-small">
              接受到组件2输入框的值:{{attrsTwoMsg}}
            </div>
            <div class="margin-small">
              接受到组件3输入框的值:{{attrsThreeMsg}}
            </div>
            <attrs-child-one
                class="margin-middle"
                :aoo="aoo"
                :boo="boo"
                :coo="coo"
                :doo="doo"
                title="前端技术"
                @getAttrsOne='getAttrsOne'
                @getAttrsTwo='getAttrsTwo'
                @getAttrsThree='getAttrsThree'
            ></attrs-child-one>
      </div>
    </div>
</template>
<script>
import AttrsChildOne from './components/AttrsChildOne'
export default {
  name: 'ComponentCommunication',
  components: {
   AttrsChildOne,
  },
  data () {
    return {
      aoo: 'Javascript',
      boo: 'Html',
      coo: 'CSS',
      doo: 'Vue',
      attrsOneMsg: '',
      attrsTwoMsg: '',
      attrsThreeMsg: '',
     }
  },
   methods: {
     /**
     * $attrs和$listeners的组件1的方法
     */
    getAttrsOne (val) {
      this.attrsOneMsg = val
    },
    /**
     * $attrs和$listeners的组件2的方法
     */
    getAttrsTwo (val) {
      this.attrsTwoMsg = val
    },
    /**
     * $attrs和$listeners的组件3的方法
     */
    getAttrsThree (val) {
      this.attrsThreeMsg = val
    }
  }
}
</script>
在上面的列子中,父组件提供了5个属性:aoo,boo,coo,dooh和title,以及三个事件getAttrsOne 、getAttrsTwo、getAttrsThree 。在子组件A中props中声明了属性aoo,子组件B的props中声明了属性boo,到达子组件C的时候$attrs的属性只剩下coo,doo和title,然而在子组件C的props中声明了属性coo,这样一来$attrs的属性只剩下doo和title。由于三个事件都是不含 .native 修饰器的,所有都可以访问。
运行结果:

简单来说:$attrs与$listeners 是两个对象,$attrs 里存放的是父组件中绑定的非 Props 属性,$listeners里存放的是父组件中绑定的非原生事件。
4、provide和Inject
简介:
1、以允许一个祖先组件向其所有子孙后代注入一个依赖,不论组件层次有多深,并在起上下游关系成立的时间里始终生效。一言而蔽之:祖先组件中通过provider来提供变量,然后在子孙组件中通过inject来注入变量。
2、provide / inject API 主要解决了跨级组件间的通信问题,不过它的使用场景,主要是子组件获取上级组件的状态,跨级组件间建立了一种主动提供与依赖注入的关系。
注意:provide 和 inject 绑定并不是可响应的。这是刻意为之的。然而,如果你传入了一个可监听的对象,那么其对象的属性还是可响应的----vue官方文档
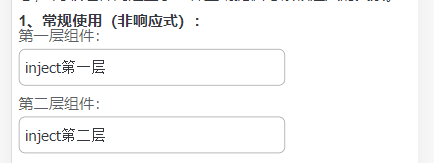
一、常规使用(非响应式):
// 子组件A: InjectChildOne.vue
<template>
  <div class="container">
    <p>第一层组件:</p>
    <!--input的input事件:在用户输入时触发,它是在元素值发生变化时立即触发-->
    <input
        class="input-middle margin-small"
        type="text"
        v-model="msg"/>
    <inject-child-two></inject-child-two>
  </div>
</template>
<script>
import InjectChildTwo from './InjectChildTwo'
export default{
  name: 'InjectChildOne',
  components: {
    InjectChildTwo
  },
  inject: ['injectOne'],
  data () {
    return {
      msg: this.injectOne
    }
  }
}
</script>
// 子组件B: InjectChildTwo.vue
<template>
  <div class="container margin-middle">
    <p>第二层组件:</p>
    <!--input的input事件:在用户输入时触发,它是在元素值发生变化时立即触发-->
    <input
        class="input-middle margin-small"
        type="text"
        v-model="msg"/>
  </div>
</template>
<script>
export default{
  name: 'InjectChildTwo',
  inject: ['injectTwo'],
  data () {
    return {
      msg: this.injectTwo
    }
  }
}
</script>
// 父组件 ComponentCommunication.vue
<template>
  <div class="container">
    <div class="content">
        <inject-child-one></inject-child-one>
      </div>
    </div>
</template>
<script>
import InjectChildOne from './components/InjectChildOne'
export default {
  name: 'ComponentCommunication',
  components: {
   InjectChildOne
  },
  // 这是常规provide 和 inject的使用
  provide: {
    injectOne: 'inject第一层',
    injectTwo: 'inject第二层',
  }
}
</script>
在上面的例子中:父组件provide提供了两个属性‘injectOne’和‘injectTwo’,分布在子组件A和子组件B中Inject注入,然后这两个属性都可以在注入的组件中通过‘this.属性名’访问。
运行结果:
二、provide与inject 怎么实现数据响应式:
一般来说,有两种实现方法:
1、provide祖先组件的实例,然后在子孙组件中注入依赖,这样就可以在子孙组件中直接修改祖先组件的实例的属性,不过这种方法有个缺点就是这个实例上挂载很多没有必要的东西比如props,methods
2、使用2.6最新API Vue.observable 优化响应式 provide(推荐)
// 子组件A: InjectResA.vue
<template>
  <div class="container margin-middle">
    <p>第一层子组件A</p>
    <inject-res-c></inject-res-c>
  </div>
</template>
<script>
import InjectResC from './InjectResC'
export default{
  name: 'InjectResA',
  components: {
    InjectResC
  }
}
</script>
<style lang="stylus" scoped>

</style>
// 子组件B: InjectResB.vue
<template>
  <div class="container margin-middle">
    <p>第一层子组件B</p>
    <inject-res-d></inject-res-d>
  </div>
</template>
<script>
import InjectResD from './InjectResD'
export default{
  name: 'InjectResB',
  components: {
    InjectResD
  }
}
</script>
<style lang="stylus" scoped>

</style>
// 子组件C:InjectResC.vue
<template>
  <div class="container margin-middle">
    <p :style="{ color: theme.color }">
      第二层子组件C(父组件:A)
    </p>
  </div>
</template>
<script>
export default{
  name: 'InjectResC',
  inject: ['theme'],
  data () {
    return {
      theme: this.theme
    }
  },
  mounted () {
    console.log('provide与inject 数据响应式:', this.theme)
  }
}
</script>
<style lang="stylus" scoped>

</style>
// 子组件D:InjectResD.vue
<template>
  <div class="container margin-middle">
    <p :style="{ color: theme.color }">
      第二层子组件D(父组件:B)
    </p>
  </div>
</template>
<script>
export default{
  name: 'InjectResD',
  inject: ['theme'],
  data () {
    return {
      theme: this.theme
    }
  }
}
</script>
<style lang="stylus" scoped>

</style>
// 父组件 ComponentCommunication.vue
<template>

<div class="container">
    <div class="content">
       <button
             class="btn-com"
             @click="changeColor">
             改变color
         </button>
         <inject-res-a></inject-res-a>
         <inject-res-b></inject-res-b>
      </div>
    </div>
</template>
<script>
import InjectResA from './components/InjectResA'
import InjectResB from './components/InjectResB'
export default {
  name: 'ComponentCommunication',
  components: {
    InjectResA,
    InjectResB
  },
 data() {
  return {
    color: 'blue'
  }
  }
  // 这是provide 和 inject数据响应式方法一
  provide () {
    return {
      theme: this// 方法一:提供祖先组件的实例
    }
  },
  // 方法二:使用2.6最新API Vue.observable 优化响应式 provide
  // provide () {
  //   this.theme = Vue.observable({
  //     color: 'blue'
  //   })
  //   return {
  //     theme: this.theme
  //   }
  // },
    methods: {
 /**
     * provide与inject响应式:方法一的改变颜色
     */
    changeColor () {
      this.color = this.color === 'blue' ? 'red' : 'blue'
    },
    // /**
    //  * provide与inject响应式:方法二的改变颜色
    //  */
    // changeColor () {
    //   this.theme.color = this.theme.color === 'blue' ? 'red' :'blue'
    // }
    }
}
</script>
在上面的例子中:父组件方法一provide整个父组件对象,方法二只提供了‘color’这个数据。
运行结果:
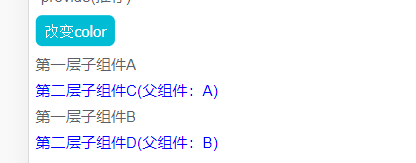 点击‘改变color’按钮
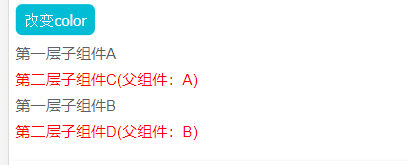
5、$parent / $children 与ref
简介:在组件内部可以直接通过子组件$parent对父组件进行操作,父组件通过$children对子组件进行操作。这两种都是直接得到组件实例,使用后可以直接调用组件的方法或访问数据。
知识点:
1、ref:如果在普通的 DOM 元素上使用,引用指向的就是 DOM 元素;如果用在子组件上,引用就指向组件实例
2、$parent/$children:访问父 / 子实例
// 子组件A:ParentChild.vue
<template>
  <div class="container">
    <div>子组件:{{getMsg}}</div>
    <input
        class="input-middle"
        type="text"
        v-model="msg"
        @input="passData(msg)">
  </div>
</template>
<script>
export default{
  name: 'ParentChild',
  data () {
    return {
      msg: '',
      getMsg: ''
    }
  },
  methods: {
    passData (val) {
      this.$parent.parentMsg = val
    }
  }
}
</script>
<style lang="stylus" scoped>

</style>
// 子组件B: RefChild.vue
<template>
  <div class="container">
  </div>
</template>
<script>
export default{
  name: 'RefChild',
  data () {
    return {
      title: 'ref组件传值使用'
    }
  },
  methods: {
    sayHello () {
      window.alert(this.title)
    }
  }
}
</script>
<style lang="stylus" scoped>

</style>
// 父组件 ComponentCommunication.vue
<template>
  <div class="container">
    <div class="content">
         <div class="fun-con">
            <div class="fun-person">
              <div class="fun-title">
                1、$parent / $children实例
              </div>
              <div class="margin-small">
                父组件:{{ parentMsg }}
                <button
                    class="btn-com margin-left-small"
                    @click="changeChildVal">
                  打招呼
                </button >
              </div>
              <parent-child></parent-child>
            </div>
            <div class="fun-person margin-middle">
              <div class="fun-title">
                1、ref实例
              </div>
              <div class="margin-small">
                <button
                    class="btn-com"
                    @click="changeRefChild">
                  触发ref子组件
                </button >
                <ref-child ref="comRef"></ref-child>
              </div>
            </div>
          </div>
      </div>
    </div>
</template>
<script>
import ParentChild from './components/ParentChild'
import RefChild from './components/RefChild'
export default {
  name: 'ComponentCommunication',
  components: {
   ParentChild,
    RefChild
  },
  data(){
    return {
         parentMsg: 'hello I am  your father',
    }
  },
   methods: {
     /**
     * $parent / $children实例
     */
    changeChildVal () {
    // 这里查看当前父组件绑定的所有子组件
      console.log(this.$children)
      this.$children[1].getMsg = 'hello father'
    },
    /**
     * ref实例
     */
    changeRefChild () {
      const comRef = this.$refs.comRef
      console.log('ref组件:', comRef)
      comRef.sayHello()
    }
   }
}
</script>
运行结果:
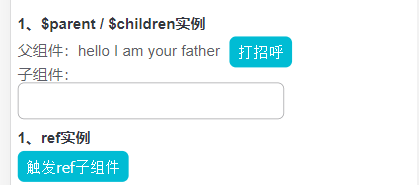
注意:$parent / $children与 ref这两种方法的弊端是,无法在跨级或兄弟间通信
6、v-model与props里面的value
简介:父组件通过v-model传递值给子组件时,会自动传递一个value的prop属性。
// 子组件:ModelChild.vue
<template>
  <div class="container">
    <input
        class="input-middle"
        type="text"
        v-model="msg"
        @input="handleInput(msg)">
  </div>
</template>
<script>
export default {
  name: 'ModelChild',
  props: {
    value: String // v-model会自动传递一个字段为value的prop属性
  },
  data () {
    return {
      msg: this.value
    }
  },
  methods: {
    handleInput (val) {
      // 通过如此调用可以改变父组件上v-model绑定的值,特别注意这里的事件名为input才生效
      this.$emit('input', val)
    }
  }
}
</script>
// 父组件 ComponentCommunication.vue
<template>
  <div class="container">
    <div class="content">
         <div class="fun-con">
            <div class="fun-person">
              <div class="fun-title">
                1、$parent / $children实例
              </div>
              <div class="margin-small">
                父组件:{{ parentMsg }}
                <button
                    class="btn-com margin-left-small"
                    @click="changeChildVal">
                  打招呼
                </button >
              </div>
              <parent-child></parent-child>
            </div>
            <div class="fun-person margin-middle">
              <div class="fun-title">
                1、ref实例
              </div>
              <div class="margin-small">
                <button
                    class="btn-com"
                    @click="changeRefChild">
                  触发ref子组件
                </button >
                <ref-child ref="comRef"></ref-child>
              </div>
            </div>
          </div>
      </div>
    </div>
</template>
<script>
import ModelChild from './components/ModelChild
export default {
  name: 'ComponentCommunication',
  components: {
    ModelChild
  },
  data(){
    return {
       modelChildMsg: 'hello'
    }
  }
}
</script>
运行结果:

7、vuex: 目前这个操作内容比较多,后期更
总结:
常见组件间通信使用场景可以分为三类:
1、父子通信:父向子传递数据是通过 props,子向父是通过 events($emit);通过父链 / 子链也可以通信($parent / $children),ref 也可以访问组件实例,provide / inject API,$attrs/$listeners 。
2、兄弟通信:Bus(中央事件总线);Vuex 。
3、跨级通信:Bus(中央事件总线);Vuex;provide / inject API、$attrs/$listeners