先看一张图,这是微信中的设置界面。
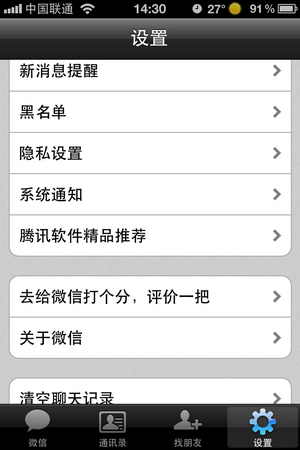
列表Item第一项需要上圆角,最后一项下圆角,若只有一项,上下四个圆角。按下效果也一样。在中间则不需要圆角。
解决方案同网上其他开发者答案差不多一样,在这里我自己只是做一个标记。
1. 先定义四种按下效果的drawable。
1.下方圆角
1 <?xml version="1.0" encoding="utf-8"?>
2 <shape xmlns:android="http://schemas.android.com/apk/res/android">
3     <gradient android:startColor="#e5e5e5"
4         android:endColor="#e5e5e5"
5         android:angle="270"/>
6     <corners android:bottomLeftRadius="6dip"
7         android:bottomRightRadius="6dip" />
8 </shape>
2.上方圆角
1 <?xml version="1.0" encoding="utf-8"?>
2 <shape xmlns:android="http://schemas.android.com/apk/res/android">
3     <gradient android:startColor="#e5e5e5"
4         android:endColor="#e5e5e5"
5         android:angle="270"/>
6     <corners android:topLeftRadius="6dip"
7         android:topRightRadius="6dip"/>
8 </shape>
3.上下都圆角
 1 <?xml version="1.0" encoding="utf-8"?>
 2 <shape xmlns:android="http://schemas.android.com/apk/res/android">
 3     <gradient android:startColor="#e5e5e5"
 4         android:endColor="#e5e5e5"
 5         android:angle="270"/>
 6     <corners android:topLeftRadius="6dip"
 7         android:topRightRadius="6dip"
 8         android:bottomLeftRadius="6dip"
 9         android:bottomRightRadius="6dip"/>
10 </shape>
4. 没有圆角
1 <?xml version="1.0" encoding="utf-8"?>
2 <shape xmlns:android="http://schemas.android.com/apk/res/android">
3     <gradient android:startColor="#e5e5e5"
4         android:endColor="#e5e5e5"
5         android:angle="270"/>
6 </shape>
将这四个xml文件命名好放在drawable下。
再来重写我们自定义的ListView。这里主要重写的是ListView的onInterceptTouchEvent方法。
 1 @Override
 2     public boolean onInterceptTouchEvent(MotionEvent ev) {
 3         switch (ev.getAction()) {
 4         case MotionEvent.ACTION_DOWN:
 5             int x = (int) ev.getX();
 6             int y = (int) ev.getY();
 7             int itemnum = pointToPosition(x, y);
 8
 9             if (itemnum == AdapterView.INVALID_POSITION) {
10                 break;
11             } else {
12                 if (itemnum == 0) {
13                     if (itemnum == (getAdapter().getCount() - 1)) {
14                         setSelector(R.drawable.app_list_corner_round);
15                     } else {
16                         setSelector(R.drawable.app_list_corner_round_top);
17                     }
18                 } else if (itemnum == (getAdapter().getCount() - 1)) {
19                     setSelector(R.drawable.app_list_corner_round_bottom);
20                 } else {
21                     setSelector(R.drawable.app_list_corner_shape);
22                 }
23             }
24
25             break;
26         case MotionEvent.ACTION_UP:
27             break;
28         }
29         return super.onInterceptTouchEvent(ev);
30     }
这个逻辑我就不多做介绍了,应该很容易看得懂。就是判断行号来设置不同的Selector。
学习过程中做一笔记。转载请注明出处~~~~