1.pgpool-II的概念
pgpool-II 是一个位于 PostgreSQL 服务器和 PostgreSQL 数据库客户端之间的中间件,它提供以下功能:
- 连接池
pgpool-II 保持已经连接到 PostgreSQL 服务器的连接, 并在使用相同参数(例如:用户名,数据库,协议版本) 连接进来时重用它们。 它减少了连接开销,并增加了系统的总体吞吐量。
- 复制
pgpool-II 可以管理多个 PostgreSQL 服务器。 激活复制功能并使在2台或者更多 PostgreSQL 节点中建立一个实时备份成为可能, 这样,如果其中一台节点失效,服务可以不被中断继续运行。
- 负载均衡
如果数据库进行了复制(可能运行在复制模式或者主备模式下), 则在任何一台服务器中执行一个 SELECT 查询将返回相同的结果。 pgpool-II 利用了复制的功能以降低每台 PostgreSQL 服务器的负载。 它通过分发 SELECT 查询到所有可用的服务器中,增强了系统的整体吞吐量。 在理想的情况下,读性能应该和 PostgreSQL 服务器的数量成正比。 负载均很功能在有大量用户同时执行很多只读查询的场景中工作的效果最好。
- 限制超过限度的连接
PostgreSQL 会限制当前的最大连接数,当到达这个数量时,新的连接将被拒绝。 增加这个最大连接数会增加资源消耗并且对系统的全局性能有一定的负面影响。 pgpoo-II 也支持限制最大连接数,但它的做法是将连接放入队列,而不是立即返回一个错误。
- 并行查询
使用并行查询时,数据可以被分割到多台服务器上, 所以一个查询可以在多台服务器上同时执行,以减少总体执行时间。 并行查询在查询大规模数据的时候非常有效。
pgpool-II 使用 PostgreSQL 的前后台程序之间的协议,并且在前后台之间传递消息。 因此,一个(前端的)数据库应用程序认为 pgpool-II 就是实际的 PostgreSQL 数据库, 而后端的服务进程则认为 pgpool-II 是它的一个客户端。 因为 pgpool-II 对于服务器和客户端来说是透明的, 现有的数据库应用程序基本上可以不需要修改就可以使用 pgpool-II 了。
摘抄于:http://www.pgpool.net/docs/pgpool-II-3.2.1/pgpool-zh_cn.html
2. pgpool-II的安装
pgpool-II 可以在 pgpool 开发页面下载到。 而且也提供包括 CentOS,RedHat Enterprise Linux,Fedora 和 Debian 在内的大量平台的二进制包。 请检查相关的软件库。可以在以下位置下载 pgpool-II 的源码:
下载地址:http://www.pgpool.net/mediawiki/index.php/Downloads
从源码安装 pgpool-II 需要 2.9 甚至或更高版本的 gcc,以及 GNU make。 而且,pgpool-II 需要链接到 libpq 库,所以在构建 pgpool-II 的机器上必须安装 libpq 库和它的开发头文件。 另外,还需要 OpenSSL 库和它的头文件以便在 pgpool-II 中提供 OpenSSL 支持。在解压源码包后,执行以下配置脚本
2.1 源码安装
#由于pool是基于postgres数据的中间件;所以需要安装postgres数据库服务
#安装postgres数据库服务器
查考《PostgreSQL on Linux 部署手册》
安装pgpool-II
#解压软件包
tar -zxvf pgpool-II-××.tar.gz
#编译安装
./configure --prefix=/opt/pgpool --with-pgsql=/opt/pgsql96
gmake
gmake install
2.2 安装pgpool_regclass
如果你在使用 PostgreSQL 8.0 或之后的版本,强烈推荐在需要访问的 PostgreSQL 中安装 pgpool_regclass 函数,因为它被 pgpool-II 内部使用。 如果不这样做,在不同的 schema 中处理相同的表名会出现问题(临时表不会出问题)。
cd pgpool-II-×.×.0/src/sql
make
make install
因为这个模板数据库将被克隆成新建的数据库。

postgres=# CREATE EXTENSION pgpool_regclass;
CREATE EXTENSION
postgres=# CREATE EXTENSION pgpool_recovery;
CREATE EXTENSION
postgres=# dx
                                List of installed extensions
      Name       | Version |   Schema   |                    Description
-----------------+---------+------------+----------------------------------------------------
 pgpool_recovery | 1.1     | public     | recovery functions for pgpool-II for V3.4 or later
 pgpool_regclass | 1.0     | public     | replacement for regclass
 plpgsql         | 1.0     | pg_catalog | PL/pgSQL procedural language
(3 rows)
2.3建立insert_lock表【可选】
如果你在复制模式中使用了 insert_lock ,强烈推荐建立 pgpool_catalog.insert_lock 表,用于互斥。 到现在为止,insert_lock 还能够工作。但是,在这种情况下,pgpool-II 需要锁定插入的目标表。 这种行为和 pgpool-II 2.2 和 2.3 系列类似。由于表锁与 VACUUM 冲突,所以 INSERT 操作可能因而等待很长时间。
cd pgpool-II-x.x.x/sql
psql -f insert_lock.sql template1
应在在每台通过 pgpool-II 访问的数据库中执行 insert_lock.sql。 你不需要在你执行“psql -f insert_lock.sql template1”后建立的数据库中这么做, 因为这个模板数据库将被克隆成新建的数据库
3. 搭建主/备模式
本例针对流复制模式
环境
OS:  CentOS release 6.5 (Final)
DB: postgresql 9.6
pgpool服务器:  pgpool 192.168.1.201
数据库主服务器:master 192.168.1.202
数据库从服务器:slave  192.168.1.203
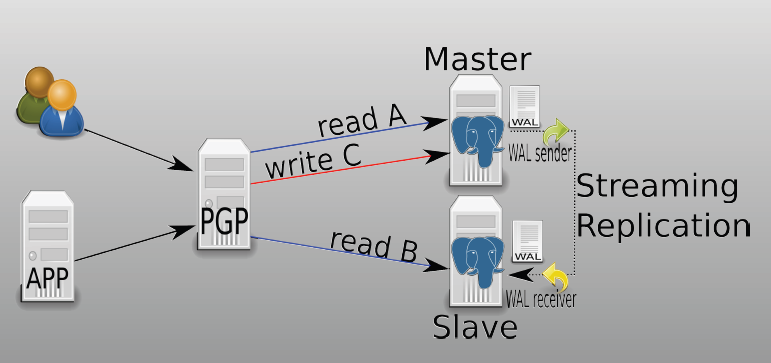
架构设计
3.1 配置主机环境
1. 对每个主机的/etc/hosts文件添加以下内容,
192.168.1.201 pgpool
192.168.1.202 master
192.168.1.203 slave

2. 配置环境变量
根据实际环境而定;示例
export PGHOME=/opt/pgsql96
export PGDATA=/home/postgres/data
export PATH=$PGHOME/bin:$PATH:$HOME/bin
export LD_LIBRARY_PATH=$PGHOME/lib:/lib64:/usr/lib64:/usr/local/lib64:/lib:/usr/lib:/usr/local/lib:$LD_LIBRARY_PATH
export LANG=en_US.utf8
export PGPORT=5432
export PGUSER=postgres
export PGDATABASE=postgres

PGPOOLHOME=/opt/pgpool
export PGPOOLHOME
PATH=$PATH:$HOME/.local/bin:$HOME/bin:$PGHOME/bin:$PGPOOLHOME/bin
export PATH

3. 主机互信
用postgres用户登录;
主要用途是使得pgpool所在主机能登录postgresql所在主机。
$ ssh-keygen -t rsa
在pool节点都操作
$ ssh-copy-id postgres@master
$ ssh-copy-id postgres@slave
3.2 搭建流复制
参考《PG主备流复制.txt》;
4. 在master库上创建监控角色。在后面配置pool.conf需要设置
postgres=# create user srcheck PASSWORD '*****';
postgres=# alter user postgres password '*****';
postgres=# select rolname,rolpassword from pg_authid;
      rolname      |             rolpassword
-------------------+-------------------------------------
 pg_signal_backend |
 replica           | md5a28004efa9973e28807c49c166594b9d
 postgres          | md517214fe84590864b4d75cbeb0c4d57e9
 srcheck           | md57535ba2e04de102b8c3089e84b0d0d3b
3.3. 安装pgpool-II
在pool节点操作;postgres软件安装查考《PostgreSQL on Linux 部署手册》
[root@pool opt]# tar -zxvf pgpool-II-3.6.0.tar.gz
[root@pool opt]# cd pgpool-II-3.6.0
[root@pool pgpool-II-3.6.0]# ./configure --prefix=/opt/pgpool --with-pgsql=/opt/pgsql96
[root@pool pgpool-II-3.6.0]# gmake
[root@pool pgpool-II-3.6.0]# gmake install
3.4 配置pgpool-II
[root@pool etc]$ cp pool_hba.conf.sample pool_hba.conf
[root@pool etc]$ cp pgpool.conf.sample-stream pgpool.conf
[root@pool etc]$ cp pcp.conf.sample pcp.conf
[root@pool etc]$ vim pgpool.conf
listen_addresses = '*'
port = 9999
pcp_listen_addresses = '*'
pcp_port = 9898

# - Backend Connection Settings -

backend_hostname0 = 'master'
                                   # Host name or IP address to connect to for backend 0
backend_port0 = 5432
                                   # Port number for backend 0
backend_weight0 = 1
                                   # Weight for backend 0 (only in load balancing mode)
backend_data_directory0 = '/home/postgres/data'
                                   # Data directory for backend 0
backend_flag0 = 'ALLOW_TO_FAILOVER'
                                   # Controls various backend behavior
                                   # ALLOW_TO_FAILOVER or DISALLOW_TO_FAILOVER
backend_hostname1 = 'slave'
backend_port1 = 5432
backend_weight1 = 1
backend_data_directory1 = '/home/postgres/data'
backend_flag1 = 'ALLOW_TO_FAILOVER'

#------------------------------------------------------------------------------
# FILE LOCATIONS
#------------------------------------------------------------------------------

pid_file_name = '/home/postgres/pgpool/pgpool.pid'
                                   # PID file name
                                   # (change requires restart)
logdir = '/home/postgres/log'
                                   # Directory of pgPool status file
                                   # (change requires restart)
#------------------------------------------------------------------------------
# LOAD BALANCING MODE
#------------------------------------------------------------------------------

load_balance_mode = on

#------------------------------------------------------------------------------
# MASTER/SLAVE MODE
#------------------------------------------------------------------------------

master_slave_mode = on
                                   # Activate master/slave mode
                                   # (change requires restart)
master_slave_sub_mode = 'stream'
                                   # Master/slave sub mode
                                   # Valid values are combinations slony or
                                   # stream. Default is slony.
                                   # (change requires restart)
# - Streaming -

sr_check_period = 10
                                   # Streaming replication check period
                                   # Disabled (0) by default
sr_check_user = 'srcheck'
                                   # Streaming replication check user
                                   # This is neccessary even if you disable streaming
                                   # replication delay check by sr_check_period = 0
sr_check_password = 'srcheck'
                                   # Password for streaming replication check user
sr_check_database = 'postgres'
                                   # Database name for streaming replication check
#------------------------------------------------------------------------------
# HEALTH CHECK
#------------------------------------------------------------------------------

health_check_period = 10
                                   # Health check period
                                   # Disabled (0) by default
health_check_timeout = 20
                                   # Health check timeout
                                   # 0 means no timeout
health_check_user = 'postgres'
                                   # Health check user
health_check_password = 'li0924'
                                   # Password for health check user
health_check_database = 'postgres'
                                   # Database name for health check. If '', tries 'postgres' frist,

#------------------------------------------------------------------------------
# FAILOVER AND FAILBACK
#------------------------------------------------------------------------------

failover_command = '/home/postgres/bin/failover_stream.sh %H'

其中需要创建对应的目录脚本;在pool主句
[postgres@pool ~]$ mkdir bin
[postgres@pool ~]$ mkdir log
[postgres@pool ~]$ mkdir pgpool
[postgres@pool ~]$ cd bin
[postgres@pool ~]$ cd bin
[postgres@pool bin]$ vi failover_stream.sh

#! /bin/sh
# Failover command for streaming replication.
# Arguments: $1: new master hostname.

new_master=$1
trigger_command="$PGHOME/bin/pg_ctl promote -D $PGDATA"

# Prompte standby database.
/usr/bin/ssh -T $new_master $trigger_command

exit 0;

配置pcp文件。配置管理pcp帐号
[root@pool etc]# pg_md5  li0924
5901cb2f82e1df6c9131753cc4cd3499
[root@pool etc]# vi pcp.conf
postgres:5901cb2f82e1df6c9131753cc4cd3499
[root@pool etc]# cat pool_hba.conf
# TYPE  DATABASE    USER        CIDR-ADDRESS          METHOD
local   all         all                               md5
# "local" is for Unix domain socket connections only
# IPv4 local connections:
#host    all         all         192.168.1.0/24          md5
host    all         all         0.0.0.0/0          md5
#在pgpool中添加pg数据库的用户名和密码
[root@pool etc]# pg_md5 -p -m -u postgres pool_passwd
输入密码;即可生成pool_passwd文件
[root@pool etc]# cat pool_passwd
postgres:md517214fe84590864b4d75cbeb0c4d57e9
或者直接vi pool_passwd;密码在    select rolname,rolpassword from pg_authid;寻找
4.启动服务
8.1在master/slave节点启动数据库
pg_start

8.2在pool节点启动pool服务
[postgres@pool ~]$ pgpool -n -d > pgpool.log 2>&1 &
[1] 1059
可以在/var/log/messages这样的信息。启动排查错误信息日志: /var/log/messages
Nov 21 07:14:52 pool pgpool[1171]: [6-1] 2017-11-21 07:14:52: pid 1171: LOG:  Setting up socket for 0.0.0.0:9999
Nov 21 07:14:52 pool pgpool[1171]: [7-1] 2017-11-21 07:14:52: pid 1171: LOG:  Setting up socket for :::9999
Nov 21 07:14:52 pool pgpool[1171]: [8-1] 2017-11-21 07:14:52: pid 1171: LOG:  pgpool-II successfully started. version 3.6.0 (subaruboshi)

8.3 关闭pool服务
pgpool -m fast stop
5. 查看信息
[postgres@pool ~]$  psql -p 9999
Password:
psql (9.6.0)
Type "help" for help.

postgres=# show pool_nodes;
 node_id | hostname | port | status | lb_weight |  role   | select_cnt | load_balance_node | replication_delay
---------+----------+------+--------+-----------+---------+------------+-------------------+-------------------
 0       | master   | 5432 | up     | 0.500000  | primary | 0          | false             | 0
 1       | slave    | 5432 | up     | 0.500000  | standby | 0          | true              | 0
(2 rows)
6. 高可用性
6.1  模拟主库数据库挂掉;是否可以继续提供服务
[postgres@pool ~]$ psql -p 9999
Password:
psql (9.6.0)
Type "help" for help.

postgres=# show pool_nodes;
 node_id | hostname | port | status | lb_weight |  role   | select_cnt | load_balance_node | replication_de
lay
---------+----------+------+--------+-----------+---------+------------+-------------------+---------------
----
 0       | master   | 5432 | down   | 0.500000  | standby | 0          | false             | 0
 1       | slave    | 5432 | up     | 0.500000  | primary | 1          | true              | 0
(2 rows)
从这里可以看出节点0的状态为down;

6.2 启动主库;在把节点0的状态恢复
[postgres@pool ~]$ pcp_attach_node -?
pcp_attach_node - attach a node from pgpool-II
Usage:
pcp_attach_node [OPTION...] [node-id]
Options:
  -U, --username=NAME    username for PCP authentication
  -h, --host=HOSTNAME    pgpool-II host
  -p, --port=PORT        PCP port number
  -w, --no-password      never prompt for password
  -W, --password         force password prompt (should happen automatically)
  -n, --node-id=NODEID   ID of a backend node
  -d, --debug            enable debug message (optional)
  -v, --verbose          output verbose messages
  -?, --help             print this help

[postgres@pool ~]$ pcp_attach_node -d -p 9898 -n 0
Password:
DEBUG: recv: tos="m", len=8
DEBUG: recv: tos="r", len=21
DEBUG: send: tos="C", len=6
DEBUG: recv: tos="c", len=20
pcp_attach_node -- Command Successful
DEBUG: send: tos="X", len=4

[postgres@pool ~]$ psql -p 9999
Password:
psql (9.6.0)
Type "help" for help.

postgres=# show pool_nodes;
 node_id | hostname | port | status | lb_weight |  role   | select_cnt | load_balance_node | replication_de
lay
---------+----------+------+--------+-----------+---------+------------+-------------------+---------------
----
 0       | master   | 5432 | up     | 0.500000  | standby | 0          | false             | 0
 1       | slave    | 5432 | up     | 0.500000  | primary | 1          | true              | 0
(2 rows)
参考文献:http://blog.163.com/digoal@126/blog/static/1638770402014413104753331/
《PostgreSQL修炼之道》