本概念
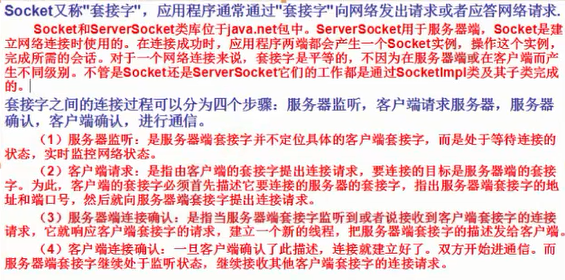
BIO编程
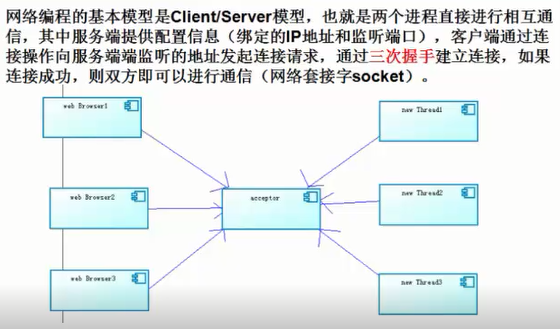
传统的BIO编程
代码示例:


public class Server {
    final static int PROT = 8765;

    public static void main(String[] args) {
        ServerSocket server = null;
        try {
            server = new ServerSocket(PROT);
            System.out.println(" server start .. ");
            // 进行阻塞
            Socket socket = server.accept();
            // 新建一个线程执行客户端的任务
            new Thread(new ServerHandler(socket)).start();

        } catch (Exception e) {
            e.printStackTrace();
        } finally {
            if (server != null) {
                try {
                    server.close();
                } catch (IOException e) {
                    e.printStackTrace();
                }
            }
            server = null;
        }
    }
}


public class ServerHandler implements Runnable {

    private Socket socket;

    public ServerHandler(Socket socket) {
        this.socket = socket;
    }

    @Override
    public void run() {
        BufferedReader in = null;
        PrintWriter out = null;
        try {
            in = new BufferedReader(new InputStreamReader(this.socket.getInputStream()));
            out = new PrintWriter(this.socket.getOutputStream(), true);
            String body = null;
            while (true) {
                body = in.readLine();
                if (body == null)
                    break;
                System.out.println("Server :" + body);
                out.println("服务器端回送响的应数据.");
            }

        } catch (Exception e) {
            e.printStackTrace();
        } finally {
            if (in != null) {
                try {
                    in.close();
                } catch (IOException e) {
                    e.printStackTrace();
                }
            }
            if (out != null) {
                try {
                    out.close();
                } catch (Exception e) {
                    e.printStackTrace();
                }
            }
            if (socket != null) {
                try {
                    socket.close();
                } catch (IOException e) {
                    e.printStackTrace();
                }
            }
            socket = null;
        }
    }
}


public class Client {
    final static String ADDRESS = "127.0.0.1";
    final static int PORT = 8765;
    public static void main(String[] args) {
        Socket socket = null;
        BufferedReader in = null;
        PrintWriter out = null;

        try {
            socket = new Socket(ADDRESS, PORT);
            in = new BufferedReader(new InputStreamReader(socket.getInputStream()));
            out = new PrintWriter(socket.getOutputStream(), true);

            // 向服务器端发送数据
            out.println("接收到客户端的请求数据...");
            // out.println("接收到客户端的请求数据1111...");
            String response = in.readLine();
            System.out.println("Client: " + response);

        } catch (Exception e) {
            e.printStackTrace();
        } finally {
            if (in != null) {
                try {
                    in.close();
                } catch (IOException e) {
                    e.printStackTrace();
                }
            }
            if (out != null) {
                try {
                    out.close();
                } catch (Exception e) {
                    e.printStackTrace();
                }
            }
            if (socket != null) {
                try {
                    socket.close();
                } catch (IOException e) {
                    e.printStackTrace();
                }
            }
            socket = null;
        }
    }
}
该模型最大的问题就是缺乏弹性伸缩能力,当客户端并发访问量增加后,服务端的线程个数和客户端并发访问数呈1:1的正比关系,Java中的线程也是比较宝贵的系统资源,线程数量快速膨胀后,系统的性能将急剧下降,随着访问量的继续增大,系统最终就死-掉-了。
伪异步I/O编程

代码示例:
public class Server {
    final static int PORT = 8765;
    public static void main(String[] args) {
        ServerSocket server = null;
        BufferedReader in = null;
        PrintWriter out = null;
        try {
            server = new ServerSocket(PORT);
            System.out.println("server start");
            Socket socket = null;
            HandlerExecutorPool executorPool = new HandlerExecutorPool(50, 1000);
            while (true) {
                socket = server.accept();
                executorPool.execute(new ServerHandler(socket));
            }

        } catch (Exception e) {
            e.printStackTrace();
        } finally {
            if (in != null) {
                try {
                    in.close();
                } catch (Exception e1) {
                    e1.printStackTrace();
                }
            }
            if (out != null) {
                try {
                    out.close();
                } catch (Exception e2) {
                    e2.printStackTrace();
                }
            }
            if (server != null) {
                try {
                    server.close();
                } catch (Exception e3) {
                    e3.printStackTrace();
                }
            }
            server = null;
        }
    }
}


public class ServerHandler implements Runnable {

    private Socket socket;

    public ServerHandler(Socket socket) {
        this.socket = socket;
    }

    @Override
    public void run() {
        BufferedReader in = null;
        PrintWriter out = null;
        try {
            in = new BufferedReader(new InputStreamReader(this.socket.getInputStream()));
            out = new PrintWriter(this.socket.getOutputStream(), true);
            String body = null;
            while (true) {
                body = in.readLine();
                if (body == null)
                    break;
                System.out.println("Server:" + body);
                out.println("Server response");
            }
        } catch (Exception e) {
            e.printStackTrace();
        } finally {
            if (in != null) {
                try {
                    in.close();
                } catch (Exception e1) {
                    e1.printStackTrace();
                }
            }
            if (out != null) {
                try {
                    out.close();
                } catch (Exception e2) {
                    e2.printStackTrace();
                }
            }
            if (socket != null) {
                try {
                    socket.close();
                } catch (Exception e3) {
                    e3.printStackTrace();
                }
            }
            socket = null;
        }
    }
}


public class HandlerExecutorPool {

    private ExecutorService executor;
    public HandlerExecutorPool(int maxPoolSize, int queueSize){
        this.executor = new ThreadPoolExecutor(
                Runtime.getRuntime().availableProcessors(),
                maxPoolSize,
                120L,
                TimeUnit.SECONDS,
                new ArrayBlockingQueue<Runnable>(queueSize));
    }

    public void execute(Runnable task){
        this.executor.execute(task);
    }
}


public class Client {

    final static String ADDRESS = "127.0.0.1";
    final static int PORT = 8765;

    public static void main(String[] args) {
        Socket socket = null;
        BufferedReader in = null;
        PrintWriter out = null;
        try {
            socket = new Socket(ADDRESS, PORT);
            in = new BufferedReader(new InputStreamReader(socket.getInputStream()));
            out = new PrintWriter(socket.getOutputStream(), true);

            out.println("Client request");

            String response = in.readLine();
            System.out.println("Client:" + response);

        } catch (Exception e) {
            // TODO Auto-generated catch block
            e.printStackTrace();
        } finally {
            if (in != null) {
                try {
                    in.close();
                } catch (Exception e1) {
                    e1.printStackTrace();
                }
            }
            if (out != null) {
                try {
                    out.close();
                } catch (Exception e2) {
                    e2.printStackTrace();
                }
            }
            if (socket != null) {
                try {
                    socket.close();
                } catch (Exception e3) {
                    e3.printStackTrace();
                }
            }
            socket = null;
        }
    }
}
该模式使用线程池,我们就有效的控制了线程的最大数量,保证了系统有限的资源的控制,实现了N:M的伪异步I/O模型。但是,正因为限制了线程数量,如果发生大量并发请求,超过最大数量的线程就只能等待,直到线程池中的有空闲的线程可以被复用。而对Socket的输入流就行读取时,会一直阻塞,直到发生:
- 有数据可读
- 可用数据以及读取完毕
- 发生空指针或I/O异常
所以在读取数据较慢时(比如数据量大、网络传输慢等),大量并发的情况下,其他接入的消息,只能一直等待,这就是最大的弊端。
NIO 编程
简介
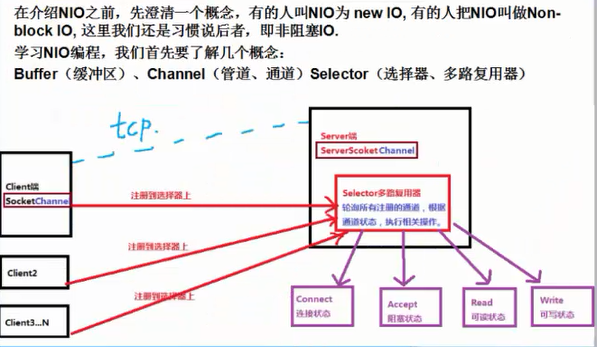
NIO提供了与传统BIO模型中的Socket和ServerSocket相对应的SocketChannel和ServerSocketChannel两种不同的套接字通道实现。
新增的着两种通道都支持阻塞和非阻塞两种模式。
阻塞模式使用就像传统中的支持一样,比较简单,但是性能和可靠性都不好;非阻塞模式正好与之相反。
对于低负载、低并发的应用程序,可以使用同步阻塞I/O来提升开发速率和更好的维护性;对于高负载、高并发的(网络)应用,应使用NIO的非阻塞模式来开发。
缓冲区 Buffer
Buffer是一个对象,包含一些要写入或者读出的数据。
在NIO库中,所有数据都是用缓冲区处理的。在读取数据时,它是直接读到缓冲区中的;在写入数据时,也是写入到缓冲区中。任何时候访问NIO中的数据,都是通过缓冲区进行操作。
缓冲区实际上是一个数组,并提供了对数据结构化访问以及维护读写位置等信息。
具体的缓存区有这些:ByteBuffe、CharBuffer、 ShortBuffer、IntBuffer、LongBuffer、FloatBuffer、DoubleBuffer。他们实现了相同的接口:Buffer。
具体介绍可参照 http://ifeve.com/buffers/
通道 Channel
我们对数据的读取和写入要通过Channel,它就像水管一样,是一个通道。通道不同于流的地方就是通道是双向的,可以用于读、写和同时读写操作。
底层的操作系统的通道一般都是全双工的,所以全双工的Channel比流能更好的映射底层操作系统的API。
Channel主要分两大类:
- SelectableChannel:用户网络读写
- FileChannel:用于文件操作
后面代码会涉及的ServerSocketChannel和SocketChannel都是SelectableChannel的子类。
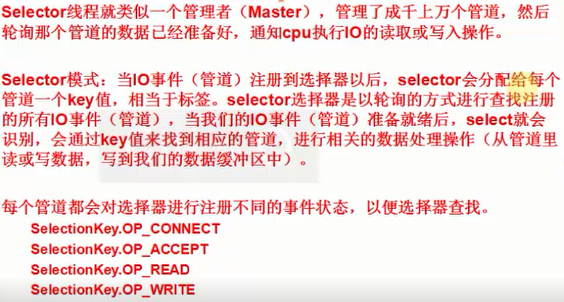
多路复用器 Selector
Selector是Java NIO 编程的基础。
Selector提供选择已经就绪的任务的能力:Selector会不断轮询注册在其上的Channel,如果某个Channel上面发生读或者写事件,这个Channel就处于就绪状态,会被Selector轮询出来,然后通过SelectionKey可以获取就绪Channel的集合,进行后续的I/O操作。
一个Selector可以同时轮询多个Channel,因为JDK使用了epoll()代替传统的select实现,所以没有最大连接句柄1024/2048的限制。所以,只需要一个线程负责Selector的轮询,就可以接入成千上万的客户端。
代码示例:
public class Server implements Runnable {
    // 1 多路复用器(管理所有的通道)
    private Selector seletor;
    // 2 建立缓冲区
    private ByteBuffer readBuf = ByteBuffer.allocate(1024);
    // 3
    private ByteBuffer writeBuf = ByteBuffer.allocate(1024);

    public Server(int port) {
        try {
            // 1 打开路复用器
            this.seletor = Selector.open();
            // 2 打开服务器通道
            ServerSocketChannel ssc = ServerSocketChannel.open();
            // 3 设置服务器通道为非阻塞模式
            ssc.configureBlocking(false);
            // 4 绑定地址
            ssc.bind(new InetSocketAddress(port));
            // 5 把服务器通道注册到多路复用器上,并且监听阻塞事件
            ssc.register(this.seletor, SelectionKey.OP_ACCEPT);

            System.out.println("Server start, port :" + port);

        } catch (IOException e) {
            e.printStackTrace();
        }
    }

    @Override
    public void run() {
        while (true) {
            try {
                // 1 必须要让多路复用器开始监听
                // 阻塞,等待客户端操作(连接或者写入数据)
                // 客户端刚连上时,key为isAcceptable;客户端输入数据时,key为isReadable;
                this.seletor.select();
                // 2 返回多路复用器已经选择的结果集
                Iterator<SelectionKey> keys = this.seletor.selectedKeys().iterator();
                // 3 进行遍历
                while (keys.hasNext()) {
                    // 4 获取一个选择的元素
                    SelectionKey key = keys.next();
                    // 5 直接从容器中移除就可以了
                    keys.remove();
                    // 6 如果是有效的
                    if (key.isValid()) {
                        // 7 如果为阻塞状态
                        if (key.isAcceptable()) {
                            this.accept(key);
                        }
                        // 8 如果为可读状态
                        if (key.isReadable()) {
                            this.read(key);
                        }
                        // 9 写数据
                        if (key.isWritable()) {
                            // this.write(key); //ssc
                        }
                    }

                }
            } catch (IOException e) {
                e.printStackTrace();
            }
        }
    }

    // 向客户端写数据是通过ServerSocketChannel的来写
    private void write(SelectionKey key) {
        // ServerSocketChannel ssc = (ServerSocketChannel) key.channel();
        // ssc.register(this.seletor, SelectionKey.OP_WRITE);
    }

    private void read(SelectionKey key) {
        try {
            // 1 清空缓冲区旧的数据
            this.readBuf.clear();
            // 2 获取之前注册的socket通道对象
            SocketChannel sc = (SocketChannel) key.channel();
            // 3 读取数据
            int count = sc.read(this.readBuf);
            // 4 如果没有数据
            if (count == -1) {
                key.channel().close();
                key.cancel();
                return;
            }
            // 5 有数据则进行读取 读取之前需要进行复位方法(把position 和limit进行复位)
            this.readBuf.flip();
            // 6 根据缓冲区的数据长度创建相应大小的byte数组,接收缓冲区的数据
            byte[] bytes = new byte[this.readBuf.remaining()];
            // 7 接收缓冲区数据
            this.readBuf.get(bytes);
            // 8 打印结果
            String body = new String(bytes).trim();
            System.out.println("Server : " + body);

            // 9..可以写回给客户端数据

        } catch (IOException e) {
            e.printStackTrace();
        }

    }

    private void accept(SelectionKey key) {
        try {
            // 1 获取服务通道
            ServerSocketChannel ssc = (ServerSocketChannel) key.channel();
            // 2 执行阻塞方法
            SocketChannel sc = ssc.accept();
            // 3 设置阻塞模式
            sc.configureBlocking(false);
            // 4 注册到多路复用器上,并设置读取标识
            sc.register(this.seletor, SelectionKey.OP_READ);
        } catch (IOException e) {
            e.printStackTrace();
        }
    }

    public static void main(String[] args) {

        new Thread(new Server(8765)).start();
        ;
    }

}


public class Client {

    // 需要一个Selector
    public static void main(String[] args) {

        // 创建连接的地址
        InetSocketAddress address = new InetSocketAddress("127.0.0.1", 8765);

        // 声明连接通道
        SocketChannel sc = null;

        // 建立缓冲区
        ByteBuffer buf = ByteBuffer.allocate(1024);

        try {
            // 打开通道
            sc = SocketChannel.open();
            // 进行连接
            sc.connect(address);

            while (true) {
                // 定义一个字节数组,然后使用系统录入功能:
                byte[] bytes = new byte[1024];
                System.in.read(bytes);

                // 把数据放到缓冲区中
                buf.put(bytes);
                // 对缓冲区进行复位
                buf.flip();
                // 写出数据
                sc.write(buf);
                // 清空缓冲区数据
                buf.clear();
            }
        } catch (IOException e) {
            e.printStackTrace();
        } finally {
            if (sc != null) {
                try {
                    sc.close();
                } catch (IOException e) {
                    e.printStackTrace();
                }
            }
        }

    }

}
AIO编程
代码示例:
public class Server {
    // 线程池
    private ExecutorService executorService;
    // 线程组
    private AsynchronousChannelGroup threadGroup;
    // 服务器通道
    public AsynchronousServerSocketChannel assc;

    public Server(int port) {
        try {
            // 创建一个缓存池
            executorService = Executors.newCachedThreadPool();
            // 创建线程组
            threadGroup = AsynchronousChannelGroup.withCachedThreadPool(executorService, 1);
            // 创建服务器通道
            assc = AsynchronousServerSocketChannel.open(threadGroup);
            // 进行绑定
            assc.bind(new InetSocketAddress(port));

            System.out.println("server start , port : " + port);
            // 进行阻塞
            assc.accept(this, new ServerCompletionHandler());
            // 一直阻塞 不让服务器停止
            Thread.sleep(Integer.MAX_VALUE);

        } catch (Exception e) {
            e.printStackTrace();
        }
    }

    public static void main(String[] args) {
        Server server = new Server(8765);
    }
}


public class ServerCompletionHandler implements CompletionHandler<AsynchronousSocketChannel, Server> {

    @Override
    public void completed(AsynchronousSocketChannel asc, Server attachment) {
        // 当有下一个客户端接入的时候 直接调用Server的accept方法,这样反复执行下去,保证多个客户端都可以阻塞
        attachment.assc.accept(attachment, this);
        read(asc);
    }

    private void read(final AsynchronousSocketChannel asc) {
        // 读取数据
        ByteBuffer buf = ByteBuffer.allocate(1024);
        asc.read(buf, buf, new CompletionHandler<Integer, ByteBuffer>() {
            @Override
            public void completed(Integer resultSize, ByteBuffer attachment) {
                // 进行读取之后,重置标识位
                attachment.flip();
                // 获得读取的字节数
                System.out.println("Server -> " + "收到客户端的数据长度为:" + resultSize);
                // 获取读取的数据
                String resultData = new String(attachment.array()).trim();
                System.out.println("Server -> " + "收到客户端的数据信息为:" + resultData);
                String response = "服务器响应, 收到了客户端发来的数据: " + resultData;
                write(asc, response);
            }

            @Override
            public void failed(Throwable exc, ByteBuffer attachment) {
                exc.printStackTrace();
            }
        });
    }

    private void write(AsynchronousSocketChannel asc, String response) {
        try {
            ByteBuffer buf = ByteBuffer.allocate(1024);
            buf.put(response.getBytes());
            buf.flip();
            asc.write(buf).get();
        } catch (InterruptedException e) {
            e.printStackTrace();
        } catch (ExecutionException e) {
            e.printStackTrace();
        }
    }

    @Override
    public void failed(Throwable exc, Server attachment) {
        exc.printStackTrace();
    }
}


public class Client implements Runnable{

    private AsynchronousSocketChannel asc ;

    public Client() throws Exception {
        asc = AsynchronousSocketChannel.open();
    }

    public void connect(){
        asc.connect(new InetSocketAddress("127.0.0.1", 8765));
    }

    public void write(String request){
        try {
            asc.write(ByteBuffer.wrap(request.getBytes())).get();
            read();
        } catch (Exception e) {
            e.printStackTrace();
        }
    }

    private void read() {
        ByteBuffer buf = ByteBuffer.allocate(1024);
        try {
            asc.read(buf).get();
            buf.flip();
            byte[] respByte = new byte[buf.remaining()];
            buf.get(respByte);
            System.out.println(new String(respByte,"utf-8").trim());
        } catch (InterruptedException e) {
            e.printStackTrace();
        } catch (ExecutionException e) {
            e.printStackTrace();
        } catch (UnsupportedEncodingException e) {
            e.printStackTrace();
        }
    }

    @Override
    public void run() {
        while(true){

        }
    }

    public static void main(String[] args) throws Exception {
        Client c1 = new Client();
        c1.connect();

        Client c2 = new Client();
        c2.connect();

        Client c3 = new Client();
        c3.connect();

        new Thread(c1, "c1").start();
        new Thread(c2, "c2").start();
        new Thread(c3, "c3").start();

        Thread.sleep(1000);

        c1.write("c1 aaa");
        c2.write("c2 bbbb");
        c3.write("c3 ccccc");
    }
}
各种I/O的对比
先以一张表来直观的对比一下:

具体选择什么样的模型或者NIO框架,完全基于业务的实际应用场景和性能需求,如果客户端很少,服务器负荷不重,就没有必要选择开发起来相对不那么简单的NIO做服务端;相反,就应考虑使用NIO或者相关的框架(Netty,Nima)了。
