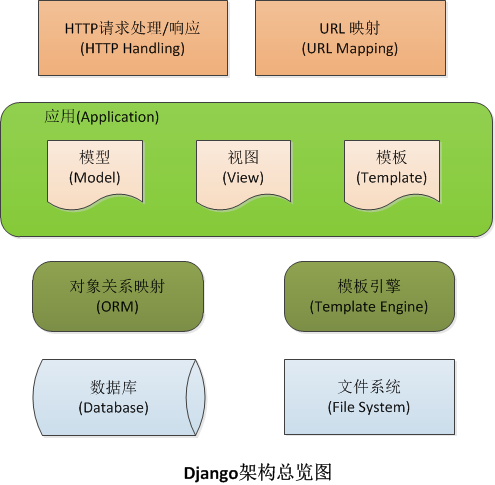
1.Django Intro
2.Django Install
(1) PIP安装
sudo apt-get isntall python-pip
sudo pip install Django
(2) 源代码安装
/usr/local/share/Django/Django-1.8.3.tar.gz
Django-1.8.3
├── AUTHORS
├── build
├── dist
├── django
├── Django.egg-info
├── docs
├── extras
├── INSTALL
├── LICENSE
├── MANIFEST.in
├── PKG-INFO
├── README.rst
├── scripts
├── setup.cfg
├── setup.py
└── tests
sudo python setup.py install 3.Django Project
(1) 创建项目
root@kallen:Django#django-admin startproject MyProj
root@kallen:Django# tree MyProj/
MyProj/
├── manage.py
└── MyProj
    ├── __init__.py
    ├── settings.py
    ├── urls.py
└── wsgi.py_init_.py:
Django项目是Python包。这个文件是用来告诉Python这个文件夹当做一个包。在Python术语中。包是一组模块的集合,主要用来把类似的文件分组,防止出现命名冲突。
manage.py:
这个脚本用来管理你的项目,你能够把它看做是你项目的的django-admin.py版本号,事实上,manage.py和django-admin.py是共用同样的后台代码。
settings.py:
这是Django项目的主要配置文件,在这个文件中面,你能够详细说明非常多选项,包括数据库设置、网页语言、须要turn
on的Django功能。
urls.py:
这是另外一个配置文件。你能够把它看做是介于URLS和用来处理它们的Python方法之间的匹配;
(2) 创建应用
root@kallen:Django#python manage.py startapp jobs
└── MyProj
    ├── jobs
    │   ├── admin.py
    │   ├── __init__.py
    │   ├── migrations
    │   │   └── __init__.py
    │   ├── models.py
    │   ├── tests.py
    │   └── views.py
    ├── manage.py
    └── MyProj
(3) 创建实体类
from django.db import models
class Job(models.Model):
    pub_date = models.DateField()
    job_title = models.CharField(max_length=50)
    job_description = models.TextField()
    location = models.ForeignKey(Location)
    def __str__(self):
        return "%s (%s)" % (self.job_title, self.location)
(4) 查看数据库模式
root@kallen:/home/kallen/Python/Django/MyProj# python manage.py sql jobs
BEGIN;
CREATE TABLE `jobs_location` (
    `id` integer AUTO_INCREMENT NOT NULL PRIMARY KEY,
    `city` varchar(50)NOT NULL,
    `state` varchar(50),
    `country` varchar(50)NOT NULL
);
CREATE TABLE `jobs_job` (
    `id` integer AUTO_INCREMENT NOT NULL PRIMARY KEY,
    `pub_date` date NOT NULL,
    `job_title` varchar(50)NOT NULL,
    `job_description` longtext NOT NULL,
    `location_id` integerNOT NULL
);
ALTER TABLE `jobs_job` ADD CONSTRAINT `location_id_refs_id_35f2feb6`
FOREIGN KEY (`location_id`) REFERENCES `jobs_location` (`id`);
COMMIT;
【常见错误】
$ python manage.py sql jobs
CommandError: App 'jobs' has migrations. Only the sqlmigrate and sqlflush commands
can be used when an app has migrations.
【解决的方法】 删除jobs下的migrations就能够了。
(5) 检查数据库模式
root@kallen:/home/kallen/Python/Django/MyProj#python manage.py validate
/usr/local/lib/python2.7/dist-packages/Django-1.8.3-py2.7.egg/django/core/
management/commands/validate.py:15: RemovedInDjango19Warning:"validate" has
been deprecated in favor of"check".RemovedInDjango19Warning)
System check identified no issues (0 silenced).
root@kallen:/home/kallen/Python/Django/MyProj#python manage.py makemigrations
Migrations for 'jobs':
0001_initial.py:
- Create model Job
- Create model Location
- Add field location to job
root@kallen:/home/kallen/Python/Django/MyProj#python manage.py migrate
Operations to perform:
  Synchronize unmigrated apps: staticfiles, messages
  Apply all migrations: admin, contenttypes, jobs, auth, sessions
Synchronizing apps without migrations:
  Creating tables...
    Running deferred SQL...
  Installing custom SQL...
Running migrations:
  Rendering model states... DONE
  Applying jobs.0001_initial... OK
(6) 启动測试服务器
root@kallen:/home/kallen/Python/Django/MyProj#python manage.py runserver
Performing system checks...
System check identified no issues (0 silenced).
You have unapplied migrations; your app may not work properly until they are applied.
Run 'python manage.py migrate' to apply them.
August 14,2015-05:55:23
Django version 1.8.3, using settings 'MyProj.settings'
Starting development server at http://127.0.0.1:8000/
Quit the server with CONTROL-C.
(7) 后台管理
root@kallen:/home/kallen/Python/Django/MyProj#python manage.py syncdb訪问url: http://127.0.0.1:8000/admin
(8) 注冊模型
from django.contrib issmport admin
# Register your models here.

# Register my models of job for mapping
# utility class Location & Job.
# Kallen Ding, Agu 17 2015

from .models import Location, Job

admin.site.register(Location)
admin.site.register(Job)
4.Django QuerySet
(1)条件查询
条件选取querySet的时候, filter表示 =,exclude表示 !=
querySet.distinct()
 __exact 精确等于 like 'aaa'
__iexact 精确等于 忽略大写和小写 ilike 'aaa'
__contains 包括 like '%aaa%'
__icontains 包括 忽略大写和小写 ilike '%aaa%',可是对于sqlite来说,contains的作用效果等同于icontains。
__gt 大于
__gte 大于等于
__lt 小于
__lte 小于等于
__in 存在于一个list范围内
__startswith 以...开头
__istartswith 以...开头 忽略大写和小写
__endswith 以...结尾
__iendswith 以...结尾。忽略大写和小写
__range 在...范围内
__year 日期字段的年份
__month 日期字段的月份
__day 日期字段的日
__isnull=True/False
5.Django Form
在html页面中,django会自己主动输出form表单。而无需自定义,详情请參考 The Forms API.
<form id="your-profile" action="/contact" method="post">
<table class="form-table">
(1) 在 <p> 中显示表单
{{ form.as_p }}实际输出的HTML例如以下:
<p><label for="id_subject">Subject:</label>
<input id="id_subject" type="text" name="subject" maxlength="100"/>
</p>
<p><label for="id_message">Message:</label>
<input type="text" name="message" id="id_message"/>
</p>
<p><label for="id_sender">Sender:</label>
<input type="email" name="sender" id="id_sender"/>
</p>
<p><label for="id_cc_myself">Cc myself:</label>
<input type="checkbox" name="cc_myself" id="id_cc_myself"/>
</p>
(2) 在 <ul> 中显示表单
{{ form.as_ul }} 实际输出的HTML例如以下:
<li><label for="id_subject">Subject:</label>
<input id="id_subject" type="text" name="subject" maxlength="100" />
</li>
<li><label for="id_message">Message:</label>
<input type="text" name="message" id="id_message"/></li>
<li><label for="id_sender">Sender:</label>
<input type="email" name="sender" id="id_sender"/>
</li>
<li><label for="id_cc_myself">Cc myself:</label>
<input type="checkbox" name="cc_myself" id="id_cc_myself"/>
</li>
(3) 在 <table> 中显示表单
{{ form.as_table }} 实际输出的HTML例如以下:
<tr><th><label for="id_subject">Subject:</label></th><td><input id="id_subject" type="text" name="subject" maxlength="100" /></td></tr>
<tr><th><label for="id_message">Message:</label></th><td><input type="text" name="message" id="id_message" /></td></tr>
<tr><th><label for="id_sender">Sender:</label></th><td><input type="email" name="sender" id="id_sender" /></td></tr>
<tr><th><label for="id_cc_myself">Cc myself:</label></th><td><input type="checkbox" name="cc_myself" id="id_cc_myself" /></td></tr>
(4) 以循环形式显示表单
{% for field in form %}
    {{ field.label_tag }}:{{ field }}
    {{ field.errors }}
{% endfor %}
为了自定义输出表单的样式,能够在Form对象中给组件加入 atts 属性:
attrs={
    'class': 'form-control',
    'placeholder': 'Username'
}
注冊按钮及Button:
</table>
<p class="submit">
<input type="submit" name="submit" id="submit"class="button-primary" value="注冊信息"/>
</p>
</form>
6.Django Request
request.META
一个Python字典。包括了全部本次HTTP请求的Header信息,比方用户IP地址和用户Agent(一般是 浏览器的名称 和 版本号号)。
注意。Header信息的完整列表取决于用户所发送的Header信息和服务器端设置的Header信息。 这个字典中几个常见的键值有:
HTTP_REFERRER 进站前链接网页,假设有
HTTP_USER_AGENT 览器的user-agent字符串。假设有的话。
比如:
 "Mozilla/5.0 (X11; U; Linux i686; fr-FR; rv:1.8.1.17) Gecko/20080829 Firefox/2.0.0.17".
REMOTE_ADDR
客户端IP。如:”12.345.67.89” 。
(假设申请是经过代理服务器的话,那么它可能是以逗号切割的多个IP地址。如:”12.345.67.89,23.456.78.90”)
[注意]
由于 request.META 是一个普通的Python字典,因此当你试图訪问一个不存在的键时,会触发一个 KeyError异常;
(HTTP header信息是由用户的浏览器所提交的、不应该给予信任的”额外”数据,因此你总是应该好好设计你的应用以便当一个特定的Header数据不存在时,给出一个优雅的回应)
你应该用 try/except 语句,或者用Python字典的 get() 方法来处理这些“可能不存在的键”:
# BAD!
def ua_display_bad(request):
    ua = request.META['HTTP_USER_AGENT']
    # Might raise KeyError!
    return HttpResponse("Your browser is%s" % ua)

# GOOD (VERSION 1)
def ua_display_good1(request):
    try:
        ua = request.META['HTTP_USER_AGENT']
    exceptKeyError:
        ua ='unknown'
    return HttpResponse("Your browser is%s" % ua)

# GOOD (VERSION 2)
def ua_display_good2(request):
    ua = request.META.get('HTTP_USER_AGENT','unknown')
    return HttpResponse("Your browser is%s" % ua)
7.Static & Media
from django.conf import settings
if settings.DEBUG:
    urlpatterns += patterns('',
        url(r'^upload/(?P<path>.*)$',
        'django.views.static.serve',
        {'document_root':settings.MEDIA_ROOT}),
    )
8.Migrations
在1.6之前, Django仅仅支持加入新的model到数据库, 而无法编辑或改动已经存在的model.
Django 1.7 为我们带来了三个新命令:
migrate: 用于执行迁移动作
makemigrations: 基于当前的model创建新的迁移策略文件
sqlmigrate: 显示迁移的SQL语句
值得注意的是,migration是基于App的, 因此, 我们能够针对某些app不启用migration功能.
migrations的使用非常easy: 改动model, 比方添加field, 然后执行
python manager.py makemigrations你的mmodel会被扫描, 然后与之前的版本号作比較, 在app的migrations文件夹下生成本次迁移文件.
我们建议查看一下该迁移文件, 确保没有问题. 然后执行:
python manager.py migratemigrate命令会进行比較, 并应用该迁移.
9.Django FAQ
(1) 导入MySQL错误
django.core.exceptions.ImproperlyConfigured: Error loading MySQLdb module【解决的方法】安装mysql-python模块
安装步骤:
sudo apt-get install python-setuptools
sudo apt-get install libmysqld-dev
sudo apt-get install libmysqlclient-dev
sudo apt-get install python-dev
sudo easy_install mysql-python
測试下: 在python交互式窗体,import MySQLdb 试试,不报错的话,就证明安装好了。
(2) 导入model对象出错
>>> from jobs.models import Job
django.core.exceptions.ImproperlyConfigured: Requested setting DEFAULT_INDEX_TABLESPACE, but settings are not configured. You must either define the environment variable DJANGO_SETTINGS_MODULE or call settings.configure() before accessing settings.
【解决的方法】
>>>from django.conf import settings
>>> settings.configure()
(3) CSRF Verification Failed
Forbidden (403)
CSRF verification failed. Request aborted.
Help
Reason given for failure:
    CSRF token missing or incorrect.
In general, this can occur when there is a genuine Cross Site Request Forgery, or when Django's CSRF mechanism has not been used correctly. For POST forms, you need to ensure:
Your browser is accepting cookies.
The view function passes a request to the template's render method.
In the template, there is a {% csrf_token %} template tag inside each POST form that targets an internal URL.
If you are not using CsrfViewMiddleware, then you must use csrf_protect on any views that use the csrf_token template tag, as well as those that accept the POST data.
You're seeing the help section of this page because you have DEBUG =Truein your Django settings file. Change that to False, and only the initial error message will be displayed.
You can customize this page using the CSRF_FAILURE_VIEW setting.
【解决的方法】
第一种:在表单里加上{% csrf_token %}即可了;
另外一种:在Settings里的MIDDLEWARE_CLASSES添加配置:
'django.middleware.csrf.CsrfViewMiddleware',
'django.middleware.csrf.CsrfResponseMiddleware',
方法二不可行:
ImportError: Module "django.middleware.csrf" does not define a "CsrfResponseMiddleware" attribute/class在測试环境下仅仅须要将这两行凝视即可;
(4) Exception
Exception happened during processing of request from ('127.0.0.1', 59311)
Traceback (most recent call last):
  File "/usr/lib/python2.7/SocketServer.py", line 593, in process_request_thread
Exception happened during processing of request from ('127.0.0.1', 59312)
Traceback (most recent call last):
  File "/usr/lib/python2.7/SocketServer.py", line 593, in process_request_thread
(5) IPAddressField
arigue.Server.ipaddr: (fields.W900) IPAddressField has been deprecated. Support forit(except in historical migrations) will be removed in Django 1.9.
    HINT: Use GenericIPAddressField instead.
【解决的方法】推荐使用 GenericIPAddressField()
(6) Forbidden
CSRF verification failed. Request aborted.

Help
Reason given for failure:
    CSRF token missing or incorrect.

In general, this can occur when there is a genuine Cross Site Request Forgery, or when Django's CSRF mechanism has not been used correctly. For POST forms, you need to ensure:
Your browser is accepting cookies.
The view function passes a request to the template's render method.
In the template, there is a {% csrf_token %} template tag inside each POST form that targets an internal URL.
If you are not using CsrfViewMiddleware, then you must use csrf_protect on any views that use the csrf_token template tag, as well as those that accept the POST data.
You're seeing the help section of this page because you have DEBUG = True in your Django settings file. Change that to False, and only the initial error message will be displayed.
You can customize this page using the CSRF_FAILURE_VIEW setting.
(7) AppRegistryNotReady
django.core.exceptions.AppRegistryNotReady: Models aren't loaded yet.这个异常是在windows上使django-xadmin时产生的,一直没解决。望各位知道的Pythoner回复。
【參考文章】
http://queengina.com/2014/10/15/Django%E7%B3%BB%E5%88%97%EF%BC%88%E4%BA%8C%EF%BC%89/