Node 旨在解决什么问题?
支持数万个并发连接,解决大量用户访问、高并发问题
Node 肯定不是什么?
Node 是一个服务器程序。但是,基础 Node 产品肯定不 像 Apache 或 Tomcat。本质上,那些服务器 “安装就绪型” 服务器产品,支持立即部署应用程序。通过这些产品,您可以在一分钟内启动并运行一个服务器。Node 肯定不是这种产品。Apache 能通过添加一个 PHP 模块来允许开发人员创建动态 Web 页,添加一个 SSL 模块来实现安全连接,与此类似,Node 也有模块概念,允许向 Node 内核添加模块。实际上,可供选择的用于 Node 的模块有数百个之多,社区在创建、发布和更新模块方面非常活跃,一天甚至可以处理数十个模块。
Node如何工作?
Node 实际上会使用 Google 编写的 V8 JavaScript 引擎,并将其重建为可在服务器上使用。
事件驱动编程模型
清单 1. 客户端上使用 jQuery 的事件驱动编程
1 // jQuery code on the client-side showing how Event-Driven programming works
2
3 // When a button is pressed, an Event occurs - deal with it
4 // directly right here in an anonymous function, where all the
5 // necessary variables are present and can be referenced directly
6 $("#myButton").click(function(){
7      if ($("#myTextField").val() != $(this).val())
8          alert("Field must match button text");
9 });
JavaScript 是一种很棒的事件驱动编程语言,因为它允许使用匿名函数和闭包,更重要的是,任何写过代码的人都熟悉它的语法。事件发生时调用的回调函数可以在捕获事件处进行编写。这样可以使代码容易编写和维护,没有复杂的面向对象框架,没有接口,没有过度设计的可能性。只需监听事件,编写一个回调函数,其他事情都可以交给系统处理!
示例 Node 应用程序
创建一个非常简单的 Web 应用程序,一个为实现最快速度而构建的应用程序。应用程序的具体要求:创建一个随机数字生成器 RESTful API。这个应用程序应该接受一个输入:一个名为 “number” 的参数。然后,应用程序返回一个介于 0 和该参数之间的随机数字,并将生成的数字返回给调用者。由于希望该应用程序成为一个广泛流行的应用程序,因此它应该能处理 50,000 个并发用户。我们来看看以下代码:
清单 2. Node 随机数字生成器
 1 // these modules need to be imported in order to use them.
 2 // Node has several modules.  They are like any #include
 3 // or import statement in other languages
 4 var http = require("http");
 5 var url = require("url");
 6
 7 // The most important line in any Node file.  This function
 8 // does the actual process of creating the server.  Technically,
 9 // Node tells the underlying operating system that whenever a
10 // connection is made, this particular callback function should be
11 // executed.  Since we're creating a web service with REST API,
12 // we want an HTTP server, which requires the http variable
13 // we created in the lines above.
14 // Finally, you can see that the callback method receives a 'request'
15 // and 'response' object automatically.  This should be familiar
16 // to any PHP or Java programmer.
17 http.createServer(function(request, response) {
18
19      // The response needs to handle all the headers, and the return codes
20      // These types of things are handled automatically in server programs
21      // like Apache and Tomcat, but Node requires everything to be done yourself
22      response.writeHead(200, {"Content-Type": "text/plain"});
23
24      // Here is some unique-looking code.  This is how Node retrives
25      // parameters passed in from client requests.  The url module
26      // handles all these functions.  The parse function
27      // deconstructs the URL, and places the query key-values in the
28      // query object.  We can find the value for the "number" key
29      // by referencing it directly - the beauty of JavaScript.
30      var params = url.parse(request.url, true).query;
31      var input = params.number;
32
33      // These are the generic JavaScript methods that will create
34      // our random number that gets passed back to the caller
35      var numInput = new Number(input);
36      var numOutput = new Number(Math.random() * numInput).toFixed(0);
37
38      // Write the random number to response
39      response.write(numOutput);
40
41      // Node requires us to explicitly end this connection.  This is because
42      // Node allows you to keep a connection open and pass data back and forth,
43      // though that advanced topic isn't discussed in this article.
44      response.end();
45
46    // When we create the server, we have to explicitly connect the HTTP server to
47    // a port.  Standard HTTP port is 80, so we'll connect it to that one.
48 }).listen(80);
49
50 // Output a String to the console once the server starts up, letting us know everything
51 // starts up correctly
52 console.log("Random Number Generator Running...");
启动应用程序
将上面的代码放入一个名为 “random.js” 的文件中。现在,要启动这个应用程序并运行它(以便创建 HTTP 服务器并监听端口 80 上的连接),只需在您的命令提示中输入以下命令:% node random.js。下面是服务器已经启动并运行时看起来的样子:
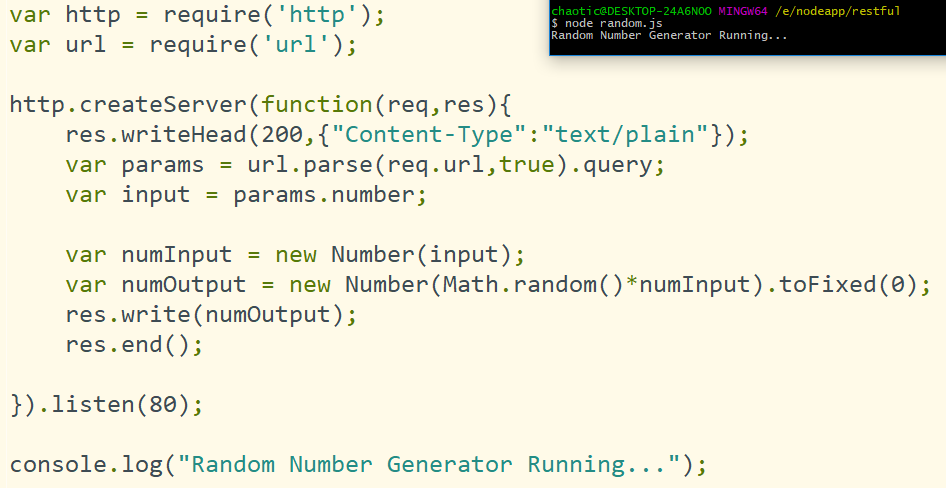
root@ubuntu:/home/moila/ws/mike# node random.js
Random Number Generator Running...
下面是我练习时的代码及运行效果:
访问应用程序
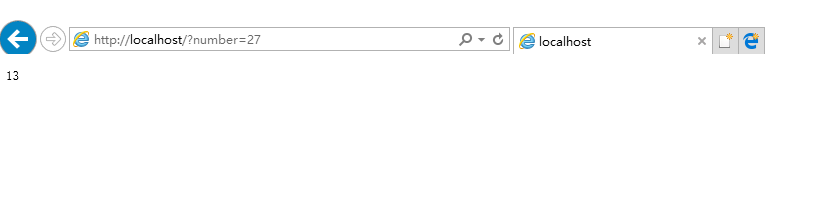
应用程序已经启动并运行。Node 正在监听所有连接,我们来测试一下。由于我们创建了一个简单的 RESTful API,所以可以使用 Web 浏览器来访问这个应用程序。键入以下地址(确保您已完成了上面的步骤):http://localhost/?number=27。
您的浏览器窗口将更改到一个介于 0 到 27 之间的随机数字。单击浏览器上的 “重新载入” 按钮,您会得到另一个随机数字。就是这样,这就是您的第一个 Node 应用程序!
访问效果: