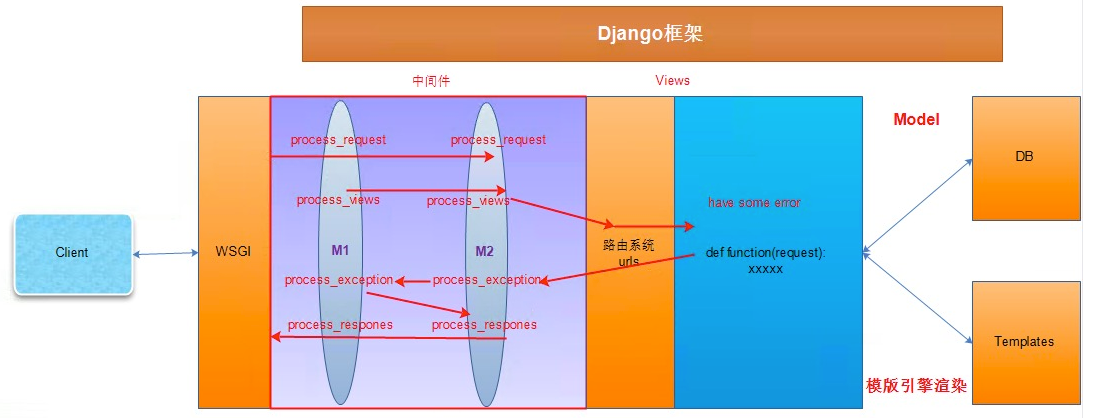
一、中间件
中间件是一类,在请求到来和结束后,django会根据自己的规则在合适的时机执行中间件中相应的方法;在django项目的settings模块中,有一个 MIDDLEWARE 变量,其中每一个元素就是一个中间件。
# MIDDLEWARE = [
# 'django.middleware.security.SecurityMiddleware',
# 'django.contrib.sessions.middleware.SessionMiddleware',
# ......
# 'django.middleware.clickjacking.XFrameOptionsMiddleware',
# ]
中间件中可以定义四个方法:
①process_request(self,request) 请求来时执行,不写时直接跳过,执行下一个中间件;当有return HttpResonse时,下面中间件不再执行
②process_view(self, request, callback, callback_args, callback_kwargs) 先执行process_request,执行完后,再从起始执行proces_view
③process_template_response(self,request,response) 如果Views中的函数返回的对象中,具有render方法,此方法执行
④process_exception(self, request, exception) 异常触发执行,当views.py函数执行出错后,此方法执行;出错时,最低层的exception优先级最高,执行最近的一个,然后执行respnse方法
⑤process_response(self, request, response) 请求返回时执行,不写时直接跳过,执行下一个中间件;当有return HttpResonse时,会替换原数据
以上方法的返回值可以是None和HttpResonse对象,如果是None,则继续按照django定义的规则向下执行,如果是HttpResonse对象,则直接将该对象返回给用户。
注:Django版本1.10之后 直接执行同级的process_response,而不是从最低层process_response开始执行

2、自定义中间件
Django主目录下创建middleware目录(名字任意),在目录下创建m.py文件
① process_request、process_response


from django.utils.deprecation import MiddlewareMixin
from django.shortcuts import HttpResponse

class Row1(MiddlewareMixin):
    def process_request(self,request):
        print("王森1")
        # return HttpResponse("DDDD")
    def process_response(self,request,response):
        print("扛把子1")
        return response

class Row2(MiddlewareMixin):
    def process_request(self,request):
        print("王森2")
    def process_response(self, request, response):
        print("扛把子3")
        return response

class Row3(MiddlewareMixin):
    def process_request(self,request):
        print("王森3")
    def process_response(self, request, response):
        print("扛把子3")
        return response
from django.shortcuts import render,redirect,HttpResponse
def test(request):
    print('走你')
from django.middleware.csrf import  CsrfViewMiddleware
MIDDLEWARE = [
    'django.middleware.security.SecurityMiddleware',
    'django.contrib.sessions.middleware.SessionMiddleware',
    'django.middleware.common.CommonMiddleware',
    'django.middleware.csrf.CsrfViewMiddleware',
    'django.contrib.auth.middleware.AuthenticationMiddleware',
    'django.contrib.messages.middleware.MessageMiddleware',
    'django.middleware.clickjacking.XFrameOptionsMiddleware',
    'middleware.m.Row1',  #
    'middleware.m.Row2',  #
    'middleware.m.Row3',  #


from app01 import views
urlpatterns = [
    url(r'^test/$', views.test),
]
王森1
王森2
王森3
走你
扛把子3
扛把子3
扛把子1
② process_view
from django.utils.deprecation import MiddlewareMixin
from django.shortcuts import HttpResponse

class Row1(MiddlewareMixin):
    def process_request(self,request):
        print("王森1")
    def process_view(self, request, view_func, view_func_args, view_func_kwargs):
        print("James1")
    def process_response(self,request,response):
        print("扛把子1")
        return response

class Row2(MiddlewareMixin):
    def process_request(self,request):
        print("王森2")
    def process_view(self, request, view_func, view_func_args, view_func_kwargs):
        print("James2")
    def process_response(self, request, response):
        print("扛把子3")
        return response

class Row3(MiddlewareMixin):
    def process_request(self,request):
        print("王森3")
    def process_view(self, request, view_func, view_func_args, view_func_kwargs):
        print("James3")
    def process_response(self, request, response):
        print("扛把子3")
        return response
王森1
王森2
王森3
James1
James2
James3
走你
扛把子3
扛把子3
扛把子1
二、CSRF
1、概述
CSRF(Cross Site Request Forgery)跨站点伪造请求,举例来讲,某个恶意的网站上有一个指向你的网站的链接,如果某个用户已经登录到你的网站上了,那么当这个用户点击这个恶意网站上的那个链接时,就会向你的网站发来一个请求,你的网站会以为这个请求是用户自己发来的,其实呢,这个请求是那个恶意网站伪造的。
为了避免上面情况的出现,Django引用了CSRF防护机制;Django第一次响应来自某个客户端的请求时,会在服务器端随机生成一个 token,并把这个 token 放在 cookie 里。然后每次 POST 请求都会带上这个 token,这样就能避免被 CSRF 攻击。如果POST请求中没有token随机字符串,则返回403拒绝服务
---在返回的 HTTP 响应的 cookie 里,django 会为你添加一个 csrftoken 字段,其值为一个自动生成的 token
---在所有的 POST 表单时,必须包含一个 csrfmiddlewaretoken 字段 (只需要在模板里加一个 tag, django 就会自动帮你生成,见下面)
---在处理 POST 请求之前,django 会验证这个请求的 cookie 里的 csrftoken 字段的值和提交的表单里的 csrfmiddlewaretoken 字段的值是否一样。如果一样,则表明这是一个合法的请求,否则,这个请求可能是来自于别人的 csrf 攻击,返回 403 Forbidden。
---在所有 ajax POST 请求里,添加一个 X-CSRFTOKEN header,其值为 cookie 里的 csrftoken 的值
下面我们需要在settings.py中把中间件django.middleware.csrf.CsrfViewMiddleware启用:
MIDDLEWARE = [
    'django.middleware.csrf.CsrfViewMiddleware',
]
局部使用方式:
@csrf_protect,为当前函数强制设置防跨站请求伪造功能,即便settings中没有设置全局中间件。
@csrf_exempt,取消当前函数防跨站请求伪造功能,即便settings中设置了全局中间件。
CBA中的使用方式:
from django.utils.decorators import method_decorator
class AssetView(View):
    @method_decorator(csrf_exempt)     #必须加到dispatch上,get、post上都不好使
    def dispatch(self, request, *args, **kwargs):
        return super(AssetView, self).dispatch(request, *args, **kwargs)
2、Form表单/Ajax 提交POST请求
from django.shortcuts import render,HttpResponse,redirect

def login(request):
    if request.method == 'GET':
        return render(request,'login.html')
    elif request.method == 'POST':
        user = request.POST.get('user')
        pwd = request.POST.get('pwd')
        if user == 'root' and pwd == "123":
            # 生成随机字符串
            # 写到用户浏览器Cookie
            # 保存到Session中
            # 在随机字符串对应的字典中设置相关内容...
            request.session['username'] = user
            request.session['if_login'] = True        #可不加 直接判断username也可以
            if request.POST.get('session') == '1':    #单独设置超时时间,当前session生效,不影响全局
                request.session.set_expiry(10)        #10秒
            return redirect('/index/')
        else:
            return redirect('/login/')

def index(request):
    # 获取当前用户的随机字符串
    # 根据随机字符串获取对应信息
    if request.session.get('if_login'):
        return render(request, 'index.html')
    else:
        return redirect('/login/')
<!DOCTYPE html>
<html lang="en">
<head>
    <meta charset="UTF-8">
    <title>Title</title>
</head>
<body>
    <form action="/login/" method="post">
        {% csrf_token %}      ##
        <input type="text" name="user" />
        <input type="text" name="pwd" />
        <input type="checkbox" name="session" value="1"/> 保存1个月
        <input type="submit" value="提交" />
    </form>
</body>
</html>
{# Ajax提交时要添加headers值 #}
<!DOCTYPE html>
<html lang="en">
<head>
    <meta charset="UTF-8">
    <title>Title</title>
</head>
<body>
    <form action="/login/" method="post">
        {% csrf_token %}    ##
        <input type="text" name="user" />
        <input type="text" name="pwd" />
        <input type="checkbox" name="session" value="1"/> 保存1个月
        <input id='btn' type="button" value="Ajax提交" />
    </form>
    <script src="/static/jquery-1.12.4.js"></script> #与下面的顺序不要颠倒
    <script src="/static/jquery.cookie.js"></script>
    <script>
        $(function () {
            $('#btn').click(function () {
                $.ajax({
                    url:'/login/',
                    type:'POST',
                    data:{'user':'root','pwd':'123'},
                    headers:{'X-CSRFtoken':$.cookie('csrftoken')},##
                    success:function (arg) {
                    }
                })
            })
        })
    </script>
</body>
</html>
往往一个程序不止一个Ajax请求,所以我们需要对每个Ajax请求都添加headers请求头,这样未免增加很多工作量;这时就需要做全局设置,不必每个都添加请求头
<!DOCTYPE html>
<html lang="en">
<head>
    <meta charset="UTF-8">
    <title>Title</title>
</head>
<body>
    <form action="/login/" method="post">
        {% csrf_token %}
        <input type="text" name="user" />
        <input type="text" name="pwd" />
        <input type="checkbox" name="session" value="1"/> 保存1个月
        <input id='btn' type="button" value="Ajax提交" />
    </form>
    <script src="/static/jquery-1.12.4.js"></script>
    <script src="/static/jquery.cookie.js"></script>
    <script>
        $(function () {
{#            全局配置,所有Ajax请求都先执行下面操作#}
            $.ajaxSetup({                                                       ##
                beforeSend:function (xhr,settings) {                            ##
                    xhr.setRequestHeader('X-CSRFtoken',$.cookie('csrftoken'));  ##
                }                                                               ##
            });                                                                 ##

            $('#btn').click(function () {
                $.ajax({
                    url:'/login/',
                    type:'POST',
                    data:{'user':'root','pwd':'123'},
                    success:function (arg) {

                    }
                })
            })
        })
    </script>
</body>
</html>
<!DOCTYPE html>
<html>
<head lang="en">
    <meta charset="UTF-8">
    <title></title>
</head>
<body>
    {% csrf_token %}

    <input type="button" onclick="Do();"  value="Do it"/>

    <script src="/static/plugin/jquery/jquery-1.8.0.js"></script>
    <script src="/static/plugin/jquery/jquery.cookie.js"></script>
    <script type="text/javascript">
        var csrftoken = $.cookie('csrftoken');                             ##

        function csrfSafeMethod(method) {                                  ##
            // these HTTP methods do not require CSRF protection           ##
            return (/^(GET|HEAD|OPTIONS|TRACE)$/.test(method));            ##GET|HEAD|OPTIONS|TRACE 四种请求
        }                                                                  ##
        $.ajaxSetup({                                                      ##
            beforeSend: function(xhr, settings) {                          ##
                if (!csrfSafeMethod(settings.type) && !this.crossDomain) { ##
                    xhr.setRequestHeader("X-CSRFToken", csrftoken);        ##
                }                                                          ##
            }                                                              ##
        });                                                                ##
        function Do(){

            $.ajax({
                url:"/app01/test/",
                data:{id:1},
                type:'POST',
                success:function(data){
                    console.log(data);
                }
            });

        }
    </script>
</body>
</html>
三、缓存
由于Django是动态网站,所有每次请求均会去数据进行相应的操作,当程序访问量大时,耗时必然会更加明显,最简单解决方式是使用:缓存,缓存将一个某个views的返回值保存至内存或者memcache中,5分钟内再有人来访问时,则不再去执行view中的操作,而是直接从内存或者Redis中之前缓存的内容拿到,并返回。
Django中提供了6种缓存方式:
--开发调试
--内存
--文件
--数据库
--Memcache缓存(python-memcached模块、pylibmc模块)
① 开发调试配置
# 此为开始调试用,实际内部不做任何操作
    # 配置:
        CACHES = {
            'default': {
                'BACKEND': 'django.core.cache.backends.dummy.DummyCache',     # 引擎
                'TIMEOUT': 300,                                               # 缓存超时时间(默认300,None表示永不过期,0表示立即过期)
                'OPTIONS':{
                    'MAX_ENTRIES': 300,                                       # 最大缓存个数(默认300)
                    'CULL_FREQUENCY': 3,                                      # 缓存到达最大个数之后,剔除缓存个数的比例,即:1/CULL_FREQUENCY(默认3)
                },
                'KEY_PREFIX': '',                                             # 缓存key的前缀(默认空)
                'VERSION': 1,                                                 # 缓存key的版本(默认1)
                'KEY_FUNCTION' 函数名                                          # 生成key的函数(默认函数会生成为:【前缀:版本:key】)
            }
        }


    # 自定义key
    def default_key_func(key, key_prefix, version):
        """
        Default function to generate keys.

        Constructs the key used by all other methods. By default it prepends
        the `key_prefix'. KEY_FUNCTION can be used to specify an alternate
        function with custom key making behavior.
        """
        return '%s:%s:%s' % (key_prefix, version, key)

    def get_key_func(key_func):
        """
        Function to decide which key function to use.

        Defaults to ``default_key_func``.
        """
        if key_func is not None:
            if callable(key_func):
                return key_func
            else:
                return import_string(key_func)
        return default_key_func
② 内存配置
# 此缓存将内容保存至内存的变量中
    # 配置:
        CACHES = {
            'default': {
                'BACKEND': 'django.core.cache.backends.locmem.LocMemCache',
                'LOCATION': 'unique-snowflake',
            }
        }

    # 注:其他配置同开发调试版本
③ 文件配置
# 此缓存将内容保存至文件
    # 配置:

        CACHES = {
            'default': {
                'BACKEND': 'django.core.cache.backends.filebased.FileBasedCache',
                'LOCATION': '/var/tmp/django_cache',
            }
        }
    # 注:其他配置同开发调试版本
④ 数据库配置
# 此缓存将内容保存至数据库

    # 配置:
        CACHES = {
            'default': {
                'BACKEND': 'django.core.cache.backends.db.DatabaseCache',
                'LOCATION': 'my_cache_table', # 数据库表
            }
        }

    # 注:执行创建表命令 python manage.py createcachetable
⑤ Memcache缓存
CACHES = {
        'default': {
            'BACKEND': 'django.core.cache.backends.memcached.MemcachedCache',
            'LOCATION': '127.0.0.1:11211',
        }
    }

    CACHES = {
        'default': {
            'BACKEND': 'django.core.cache.backends.memcached.MemcachedCache',
            'LOCATION': 'unix:/tmp/memcached.sock',
        }
    }

    CACHES = {
        'default': {
            'BACKEND': 'django.core.cache.backends.memcached.MemcachedCache',
            'LOCATION': [
                '172.19.26.240:11211',
                '172.19.26.242:11211',
            ]
        }
    }

    CACHES = {
        'default': {
            'BACKEND': 'django.core.cache.backends.memcached.MemcachedCache',
            'LOCATION': [
                # 权重
                ('172.19.26.240:11211',1),
                ('172.19.26.242:11211',15)
            ]
        }
    }
# 此缓存使用pylibmc模块连接memcache

    CACHES = {
        'default': {
            'BACKEND': 'django.core.cache.backends.memcached.PyLibMCCache',
            'LOCATION': '127.0.0.1:11211',
        }
    }

    CACHES = {
        'default': {
            'BACKEND': 'django.core.cache.backends.memcached.PyLibMCCache',
            'LOCATION': '/tmp/memcached.sock',
        }
    }

    CACHES = {
        'default': {
            'BACKEND': 'django.core.cache.backends.memcached.PyLibMCCache',
            'LOCATION': [
                '172.19.26.240:11211',
                '172.19.26.242:11211',
            ]
        }
    }
2、应用(静态文件的数据缓存,动态的文件数据不缓存)
① 全站使用
#全局生效
使用中间件,经过一系列的认证等操作,如果内容在缓存中存在,则使用FetchFromCacheMiddleware获取内容并返回给用户,当返回给用户之前,判断缓存中是否已经存在,如果不存在则UpdateCacheMiddleware会将缓存保存至缓存,从而实现全站缓存

    MIDDLEWARE = [
        # 写到最上面
        'django.middleware.cache.UpdateCacheMiddleware',
        # 其他中间件...

        # 写到最下面
        'django.middleware.cache.FetchFromCacheMiddleware',
    ]
② 单独视图缓存
方式一:
        from django.views.decorators.cache import cache_page

        @cache_page(60 * 15)
        def my_view(request):
            ...

    方式二:
        from django.views.decorators.cache import cache_page

        urlpatterns = [
            url(r'^foo/([0-9]{1,2})/$', cache_page(60 * 15)(my_view)),
        ]
③ 局部视图使用
    a. 引入TemplateTag

        {% load cache %}

    b. 使用缓存

        {% cache 5000 缓存key %}
            缓存内容
        {% endcache %}
3、单独视图缓存示例(cache方法处理的请求,都进行缓存10秒)
<!DOCTYPE html>
<html lang="en">
<head>
    <meta charset="UTF-8">
    <title>Title</title>
</head>
<body>
    <h1>{{ ctime }}</h1>
    <h1>{{ ctime }}</h1>
    <h1>{{ ctime }}</h1>
</body>
</html>
CACHES = {
    'default': {
        'BACKEND': 'django.core.cache.backends.filebased.FileBasedCache',
        'LOCATION': os.path.join(BASE_DIR,'cache'),
    }
}
from django.views.decorators.cache import cache_page
@cache_page(10)         # 装饰cache方法  #10S失效比默认配置的300S级别高
def cache(request):
    import time
    ctime = time.time()
    return render(request,'cache.html',{'ctime':ctime})
4、局部视图示例(缓存html文件某一部分)
{% load cache %}
<!DOCTYPE html>
<html lang="en">
<head>
    <meta charset="UTF-8">
    <title>Title</title>
</head>
<body>
    <h1>{{ ctime }}</h1>
    <h1>{{ ctime }}</h1>
    {% cache 10 c1 %}  #缓存10秒;c1为缓存key
    <h1>{{ ctime }}</h1>
    {% endcache %}
</body>
</html>
CACHES = {
    'default': {
        'BACKEND': 'django.core.cache.backends.filebased.FileBasedCache',
        'LOCATION': os.path.join(BASE_DIR,'cache'),
    }
}
def cache(request):
    import time
    ctime = time.time()
    return render(request,'cache.html',{'ctime':ctime})
5、全局生效
MIDDLEWARE = [
    'django.middleware.cache.UpdateCacheMiddleware',
                   ...........
    'django.middleware.cache.FetchFromCacheMiddleware',
]
其余文件都一致,全局优先级大;请求流程-->使用中间件,经过一系列的认证等操作,如果内容在缓存中存在,则使用FetchFromCacheMiddleware获取内容并返回给用户,如果不存在则接着往下走,执行views函数,最后经过UpdateCacheMiddleware会将缓存保存至缓存,从而实现全站缓存。
