一、IOC容器创建方式
Ioc容器的创建时通过ApplicationContext接口的相关实现类进行的。
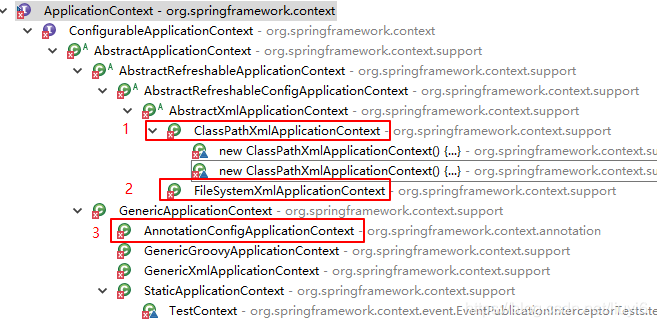
如上图所示:有三种创建IOC容器的方式。
ClassPathXmlApplicationContext:从项目的根目录下加载配置文件
FileSystemXmlApplicationContext:从磁盘中的加载配置文件
AnnotationConfigApplicationContext:当使用注解配置容器对象时使用此类进行注解读取,创建容器。
二、IOC容器创建入口
1、Java中IOC容器创建
Java中通过如下代码进行配置文件读取:
ApplicationContext context = new ClassPathXmlApplicationContext("xml路径");
创建ClassPathXmlApplicationContext对象的过程中,调用refresh方法完成容器的创建与初始化。
public ClassPathXmlApplicationContext(String[] configLocations, boolean refresh, @Nullable ApplicationContext parent) throws BeansException {
    super(parent);
    setConfigLocations(configLocations);
    if (refresh) {
        //容器的创建与初始化
        refresh();
    }
}
2、Web中IOC容器创建
web项目中,Spring启动是在web.xml配置监听器,如下所示:
 <listener>
    <listener-class>org.springframework.web.context.ContextLoaderListener</listener-class>
</listener>
ContextLoaderListener类实现了Tomcat容器的ServletContextListener接口,与其他Servlet监听一样,重写了两个方法:contextInitialized()方法进行web容器初始化,contextDestroyed()方法进行容器销毁。
//初始化
@Override
public void contextInitialized(ServletContextEvent event) {
	initWebApplicationContext(event.getServletContext());
}
//销毁
@Override
public void contextDestroyed(ServletContextEvent event) {
	closeWebApplicationContext(event.getServletContext());
	ContextCleanupListener.cleanupAttributes(event.getServletContext());
}
初始化的过程中调用ContextLoader中的initWebApplicationContext()方法,代码如下:
public WebApplicationContext initWebApplicationContext(ServletContext servletContext) {
	//判断ServletContext是否已经存在WebApplication,如果存在则抛出异常
    if (servletContext.getAttribute(WebApplicationContext.ROOT_WEB_APPLICATION_CONTEXT_ATTRIBUTE) != null) {
            //抛出异常...
		}

		Log logger = LogFactory.getLog(ContextLoader.class);
		servletContext.log("Initializing Spring root WebApplicationContext");
		if (logger.isInfoEnabled()) {
			logger.info("Root WebApplicationContext: initialization started");
		}
		long startTime = System.currentTimeMillis();

		try {
			if (this.context == null) {
                //创建WebApplicationContext
				this.context = createWebApplicationContext(servletContext);
			}
			if (this.context instanceof ConfigurableWebApplicationContext) {
				ConfigurableWebApplicationContext cwac = (ConfigurableWebApplicationContext) this.context;
				if (!cwac.isActive()) {
					if (cwac.getParent() == null) {
                        //得到根上下文的父上下文,然后设置到根上下文,一般的web项目parent为空
						ApplicationContext parent = loadParentContext(servletContext);
						cwac.setParent(parent);
					}
                    //从web.xml加载参数,初始化根上下文WebApplicationContext,创建bean工厂和bean对象
					configureAndRefreshWebApplicationContext(cwac, servletContext);
				}
			}
			servletContext.setAttribute(WebApplicationContext.ROOT_WEB_APPLICATION_CONTEXT_ATTRIBUTE, this.context);

			ClassLoader ccl = Thread.currentThread().getContextClassLoader();
			if (ccl == ContextLoader.class.getClassLoader()) {
				currentContext = this.context;
			}
			else if (ccl != null) {
				currentContextPerThread.put(ccl, this.context);
			}

			if (logger.isDebugEnabled()) {
				logger.debug("Published root WebApplicationContext as ServletContext attribute with name [" +WebApplicationContext.ROOT_WEB_APPLICATION_CONTEXT_ATTRIBUTE + "]");
			}
			if (logger.isInfoEnabled()) {
				long elapsedTime = System.currentTimeMillis() - startTime;
				logger.info("Root WebApplicationContext: initialization completed in " + elapsedTime + " ms");
			}

			return this.context;
		}
		//异常处理...
	}
这个方法中ServletContext是由web容器监听器(ContextLoaderListener)提供。首先判断servlectContext中是否已经存在根上下文,如果存在,则抛出异常;否则通过createWebApplicationContext方法创建新的根上下文。然后通过loadParentContext()方法为其设置父上下文。再通过configureAndRefreshWebApplicationContext为根上下文构建bean工厂和bean对象。最后把上下文存入servletContext,并且存入currentContextPerThread。至此初始化过程完毕,接下来可以获取WebApplicationContext,进而用getBean("bean name")得到bean。
2.1、创建上下文
下面首先针对createWebApplicationContext进行分析,createWebApplicationContext方法用于创建跟上下文,其代码如下:
protected WebApplicationContext createWebApplicationContext(ServletContext sc) {
    //从web.xml配置的contextClass参数中获取上下文类名,如果contextClass为空,则使用默认的。
    Class<?> contextClass = determineContextClass(sc);
    //根上下文必须是ConfigurableWebApplicationContext的子类,否则抛出异常
    if (!ConfigurableWebApplicationContext.class.isAssignableFrom(contextClass)) {
        throw new ApplicationContextException("Custom context class [" + contextClass.getName() + "] is not of type [" + ConfigurableWebApplicationContext.class.getName() + "]");
    }
    //根据类名创建类
    return (ConfigurableWebApplicationContext) BeanUtils.instantiateClass(contextClass);
}
determineContextClass方法用于返回根上下文的类名,代码如下:
protected Class<?> determineContextClass(ServletContext servletContext) {
    //从web.xml获得参数contextClass,在一般的web项目中,此参数为null
    String contextClassName = servletContext.getInitParameter(CONTEXT_CLASS_PARAM);
    if (contextClassName != null) {
        try {
            return ClassUtils.forName(contextClassName, ClassUtils.getDefaultClassLoader());
        }
        catch (ClassNotFoundException ex) {
            throw new ApplicationContextException(
                "Failed to load custom context class [" + contextClassName + "]", ex);
        }
    }
    else {
        //获得根上下文WebApplicationContext的默认实现类的类名,defaultStrategies是Properties类型,在CotnextLoader类开头static语句块中初始化
        contextClassName = defaultStrategies.getProperty(WebApplicationContext.class.getName());
        try {
            return ClassUtils.forName(contextClassName, ContextLoader.class.getClassLoader());
        }
        catch (ClassNotFoundException ex) {
            throw new ApplicationContextException(
                "Failed to load default context class [" + contextClassName + "]", ex);
        }
    }
}
Properties类型的初始化静态代码块:
static {
		try {
             //获取当前包下面的ContextLoader.properties文件
			ClassPathResource resource = new ClassPathResource(DEFAULT_STRATEGIES_PATH, ContextLoader.class);
			defaultStrategies = PropertiesLoaderUtils.loadProperties(resource);
		}
		catch (IOException ex) {
			throw new IllegalStateException("Could not load 'ContextLoader.properties': " + ex.getMessage());
		}
	}
2.2、初始化根上下文
初始化上下文的方法configureAndRefreshWebApplicationContext代码如下:
protected void configureAndRefreshWebApplicationContext(ConfigurableWebApplicationContext wac, ServletContext sc) {
	//设置应用程序上下文Id
    if (ObjectUtils.identityToString(wac).equals(wac.getId())) {
        String idParam = sc.getInitParameter(CONTEXT_ID_PARAM);
        if (idParam != null) {
            wac.setId(idParam);
        }
        else {
            wac.setId(ConfigurableWebApplicationContext.APPLICATION_CONTEXT_ID_PREFIX +
                      ObjectUtils.getDisplayString(sc.getContextPath()));
        }
    }

    wac.setServletContext(sc);
    String configLocationParam = sc.getInitParameter(CONFIG_LOCATION_PARAM);
    if (configLocationParam != null) {
        wac.setConfigLocation(configLocationParam);
    }
	//获取环境中配置的属性
    ConfigurableEnvironment env = wac.getEnvironment();
    if (env instanceof ConfigurableWebEnvironment) {
        ((ConfigurableWebEnvironment) env).initPropertySources(sc, null);
    }

    customizeContext(sc, wac);
    //容器的创建与初始化
    wac.refresh();
}
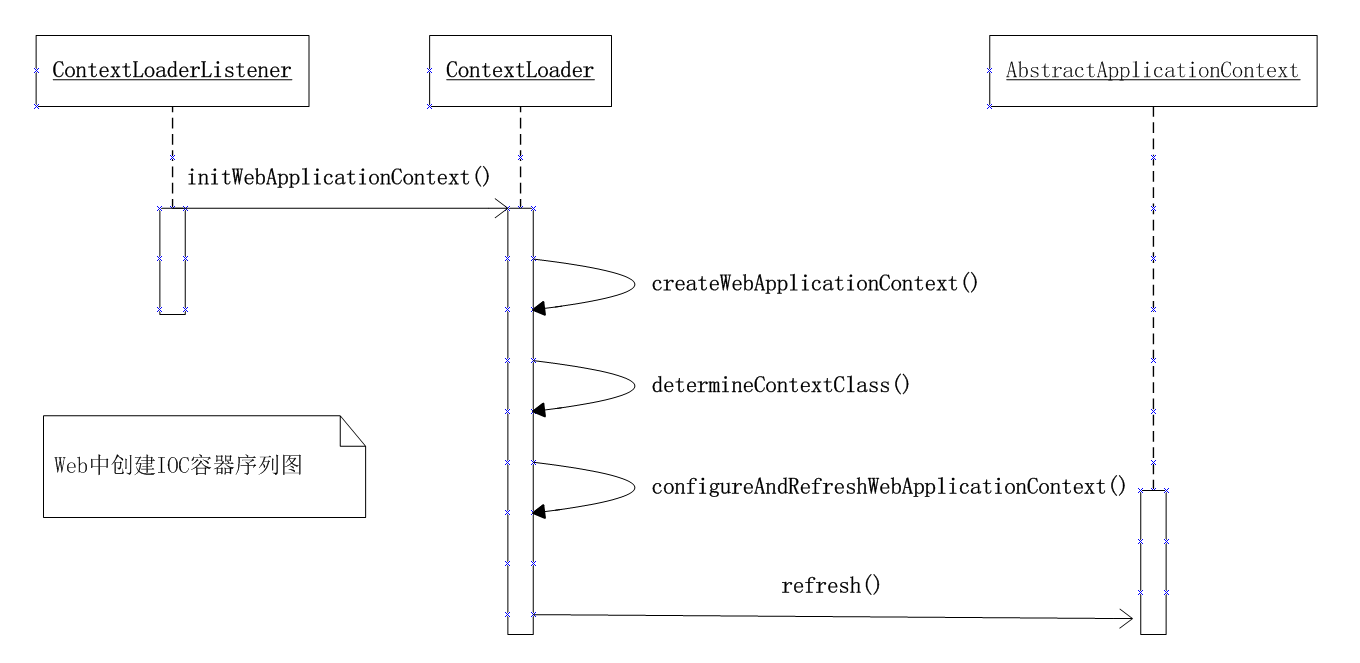
综上,对Web中创建IOC容器的流程总结的序列图如下:
3、refresh方法
从上面的分析看到,无论是Java或Web,最后的容器创建于初始化都会进入refresh方法中,下面对refresh进行分析,refresh方法在AbstractApplicationContext类中实现,其代码如下:
// 完成IoC容器的创建及初始化工作
public void refresh() throws BeansException, IllegalStateException {
    synchronized (this.startupShutdownMonitor)
        // 1: 刷新预处理
        prepareRefresh();
        // 2:
        // a) 创建IoC容器(DefaultListableBeanFactory)
        // b) 加载解析XML文件(最终存储到Document对象中)
        // c) 读取Document对象,并完成BeanDefinition的加载和注册工作
        ConfigurableListableBeanFactory beanFactory = obtainFreshBeanFactory();

        // 3: 对IoC容器进行一些预处理(设置一些公共属性)
        prepareBeanFactory(beanFactory);

        try {
            // 4:post-processing对BeanDefinition处理
            postProcessBeanFactory(beanFactory);

            // 5: 调用BeanFactoryPostProcessor后置处理器对BeanDefinition处理
            invokeBeanFactoryPostProcessors(beanFactory);

            // 6: 注册BeanPostProcessor后置处理器
            registerBeanPostProcessors(beanFactory);

            // 7: 初始化一些消息源(比如处理国际化的i18n等消息源)
            initMessageSource();

            // 8: 初始化应用事件广播器
            initApplicationEventMulticaster();

            // 9: 初始化一些特殊的bean
            onRefresh();

            // 10: 注册一些监听器
            registerListeners();

            // 11: 实例化剩余的单例bean(非懒加载方式)
            // 1)、bean的实例化(创建)
            // 2)、bean的属性填充
            // 3)、bean的初始化(实现InitializingBean接口的类,在bean标签中的init-method属性)
            // 注意事项:Bean的IoC、DI和AOP都是发生在此步骤
            finishBeanFactoryInitialization(beanFactory);

            // STEP 12: 完成刷新时,需要发布对应的事件
            finishRefresh();
        }
        catch (BeansException ex) {
            if (logger.isWarnEnabled()) {
                logger.warn("Exception encountered during context initialization - "
                            + "cancelling refresh attempt: " + ex);
            }
            destroyBeans();
            cancelRefresh(ex);
            throw ex;
        }
        finally {
            resetCommonCaches();
        }
    }
}
refresh方法是初始化Spring容器的核心代码,共分为12个步骤,具体功能如代码所示,将在后续文章中将对refresh中的步骤进行说明。