1.获取text文本框输入的信息
wxml代码
<view class="weui-cells">
  <view class="weui-cell weui-cell_input">
    <view class="weui-cell__bd">
      <input class="weui-input" bindinput="changepapertitle" maxlength="100" placeholder="请输入问卷标题(最多100个字)" value='{{papertitle}}' />
    </view>
  </view>
</view>
后端js
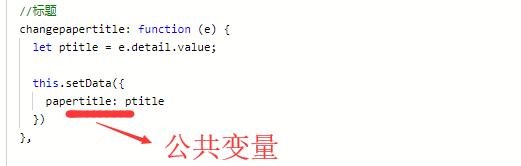
划重点:通过bindinput事件,在后端能够获取到输入值
2.获取同一个控件的多个属性
wxml代码
<input type='text' style='200px' bindinput="ratiotxtchange" data-qid='{{item.qid}}' id="{{dqdata.dqid}}" placeholder='其他'></input>
js代码
//单选其他选项输入
  ratiotxtchange:function(e){
    debugger;
    var id = e.currentTarget.id; //选项ID
    var qid = e.currentTarget.dataset.qid;//问题ID
    var value = e.detail.value; //单选框的值
    this.data.radtxts[qid] =id+"|"+ value;
    this.data.tschecks["A"+qid] = id + "|" + value;//存入特殊选项的ID

  }
划重点:前端通过设置data-xx的信息,后端用
e.currentTarget.dataset.xx 获取其中的值,
此方法可以获取同一个控件的多个属性,对处理某些复杂点的逻辑,比较有用

3.微信小程序AJAX请求
    wx.request({
      url: posturl + "/Form/AddAnswerPaper",
      method: 'POST',
      header: {
        'content-type': 'application/x-www-form-urlencoded'
      },
      data: {
        "paperid": paperid, //问卷ID
        "openid": getApp().globalData.openid, //当前登录人
        "rich": JSON.stringify(rich),
        "txts": JSON.stringify(txts),
        "redio": JSON.stringify(rads),
        "checks": JSON.stringify(checks),
        "img": JSON.stringify(imgs),
        "addresses": JSON.stringify(addresses),

      },
      success: function (rdata) {
        if (rdata.data.result == true) {

          that.setData({
            modalHidden: !that.data.modalHidden
          })

        } else {
          wx.showToast({
            title: "保存失败",
            icon: 'loading',
            duration: 3000
          })
        }
      }
    })
4.后端获取微信小程序openid
        /// <summary>
        /// 获取微信用户OPENID
        /// </summary>
        /// <returns></returns>
        public string QueryOpenId()
        {
            seesionmodel m = new seesionmodel();
            try
            {
                string code = Request["code"];
                string Appid = ConfigurationSettings.AppSettings["Appid"];
                string AppSecret = ConfigurationSettings.AppSettings["AppSecret"];
                string html = string.Empty;
                string url = "https://api.weixin.qq.com/sns/jscode2session?appid=" + Appid + "&secret=" + AppSecret + "&js_code=" + code + "&grant_type=authorization_code";
                HttpWebRequest request = (HttpWebRequest)HttpWebRequest.Create(url);
                request.Method = "GET";
                HttpWebResponse response = request.GetResponse() as HttpWebResponse;
                Stream ioStream = response.GetResponseStream();
                StreamReader sr = new StreamReader(ioStream, Encoding.UTF8);
                html = sr.ReadToEnd();
                sr.Close();
                ioStream.Close();
                response.Close();
                m = JsonConvert.DeserializeObject<seesionmodel>(html);
                return m.openid;
            }
            catch (Exception ex)
            {
                logger.Debug(ex.Message);
                m.openid = "获取OpenID失败";
            }

            return JsonConvert.SerializeObject(m);


        }
    public class seesionmodel
    {
        public string session_key { get; set; }
        public string expires_in { get; set; }
        public string openid { get; set; }
    }
通过后端获取微信用户唯一的ID,一是提高安全性,二是可以避免授权弹框。
5.微信小程序弹出可输入的对话框
实例:点击红线,弹出可输入对话框,然后保存。
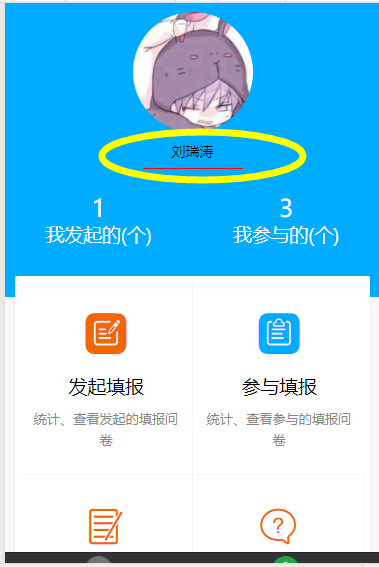
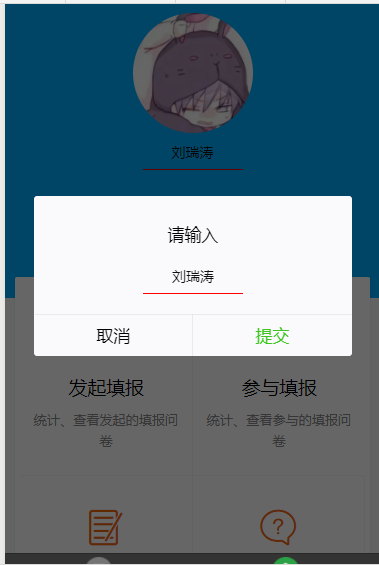
 文本框部分代码:

<view class="p">
      <view bindtap='namechange' style='120px;margin:0 auto'>
        <input type='text' class='txtname' value='{{RealName2}}' disabled='disabled' placeholder='请输入您的姓名' />
      </view>
 </view>


弹出框部分代码:

<modal hidden="{{hiddenmodalput}}" title="请输入" confirm-text="提交" bindcancel="cancel" bindconfirm="confirm">
    <input type='text' bindinput='nameinput' value='{{RealName}}'  class='txtname' placeholder="请输入您的名字" auto-focus/>
</modal>
var posturl = getApp().globalData.posturl;
Page({
  data: {
    IcreateNum: 0,
    IJoinNum: 0,
    nickName:"",
    hiddenmodalput:true,
    RealName:"",
    RealName2: ""
  },
  onLoad: function(options) {
    var realname= wx.getStorageSync('RealName');
    if(realname!=""){
      this.setData({
        RealName2: realname
      })
      console.log("从缓存读取姓名");
    }else{
      var openid = getApp().globalData.openid;
      var that=this;
      console.log("从数据库读取姓名");
      wx.request({
        url: posturl + "/Form/QueryRealNameByOpenId", //自己的服务接口地址
        method: 'POST',
        header: {
          'content-type': 'application/x-www-form-urlencoded'
        },
        data: {

          "OpenID": openid
        },
        success: function (data) {
          that.setData({
            RealName2: data.data,

          });
          wx.setStorageSync('RealName', data.data);

        }
      });
    }
  },
  //单击名字
  namechange:function(e){
    console.log("444");
    var RealName2 = this.data.RealName2;
    this.setData({
      hiddenmodalput: false,
      RealName: RealName2
    })
  },
  cancel:function(e){
    this.setData({
      hiddenmodalput: true
    })
  },
  //获取姓名
  nameinput:function(e){
    let name = e.detail.value;
    console.log(name);
    this.setData({
      RealName: name
    })
  },
  //提交姓名
  confirm:function(e){
    var Name = this.data.RealName;
    var openid = getApp().globalData.openid; //唯一标识
    var RealName = this.data.RealName;

    var that=this;
    wx.request({
      url: posturl + "/Form/UpdateRealNameByOpenId", //自己的服务接口地址
      method: 'POST',
      header: {
        'content-type': 'application/x-www-form-urlencoded'
      },
      data: {
        "RealName": RealName,
        "OpenID": openid
      },
      success: function (data) {
        if (data.data.result == true) {

          that.setData({
            hiddenmodalput:true,
            RealName2:RealName
          });
          wx.setStorageSync('RealName', RealName);
        } else {
          wx.showModal({
            title: '错误提示',
            content: '修改姓名失败',
            showCancel: false,
            success: function (res) { }
          })
        }


      }
    });

  },
  onReady: function() {


  },
  onShow: function() {
    // 页面显示
    // 页面初始化 options为页面跳转所带来的参数
    this.queryNumIcreate();
    this.queryNumIJoin();
  },
  onHide: function() {
    // 页面隐藏
  },
  onUnload: function() {
    // 页面关闭
  },

  userNickNameclick:function(){
    console.log("3333");
  }
})
6.微信小程序上传图片
wxml
<view class="uploader-text" bindtap="chooseImage2">添加图片</view>
js
chooseImage2: function (e) {
    var that = this;
    wx.chooseImage({
      sizeType: ['original', 'compressed'], // 可以指定是原图还是压缩图,默认二者都有
      sourceType: ['album', 'camera'], // 可以指定来源是相册还是相机,默认二者都有
      count: 1, // 最多可以选择的图片张数
      success: function (res) {


        // 返回选定照片的本地文件路径列表,tempFilePath可以作为img标签的src属性显示图片
        var tempFilePaths = res.tempFilePaths;
        //启动上传等待中...
        wx.showToast({
          title: '正在上传...',
          icon: 'loading',
          mask: true,
          duration: 10000
        })

        wx.uploadFile({
          url: posturl + '/Form/uploadfilenew',
          filePath: tempFilePaths[0],
          name: 'uploadfile_ant',
          formData: {
            'imgIndex': 0
          },
          header: {
            "Content-Type": "multipart/form-data"
          },
          success: function (res) {

            tempFilePaths = [];
            var saveurl = posturl + JSON.parse(res.data).Url.replace("..", "");
            tempFilePaths.push(saveurl);
            that.setData({
              files2: [],
            });
            // 返回选定照片的本地文件路径列表,tempFilePath可以作为img标签的src属性显示图片
            that.setData({

              files2: that.data.files2.concat(tempFilePaths)
            });

            wx.hideToast();
          },
          fail: function (res) {
            wx.hideToast();
            wx.showModal({
              title: '错误提示',
              content: '上传图片失败',
              showCancel: false,
              success: function (res) { }
            })
          }
        });


      }
    })
  },
c#
  /// <summary>
        /// 上传文件、图片
        /// </summary>
        /// <returns></returns>
        public ContentResult UploadFileNew()
        {
            UploadFileDTO model = new UploadFileDTO();
            try
            {
                HttpPostedFileBase file = Request.Files["uploadfile_ant"];
                if (file != null)
                {
                    //公司编号+上传日期文件主目录
                    model.Catalog = DateTime.Now.ToString("yyyyMMdd");
                    model.ImgIndex = Convert.ToInt32(Request.Form["imgIndex"]);

                    //获取文件后缀
                    string extensionName = System.IO.Path.GetExtension(file.FileName);

                    //文件名
                    model.FileName = System.Guid.NewGuid().ToString("N") + extensionName;

                    //保存文件路径
                    string filePathName = Server.MapPath("~/images/") + model.Catalog;
                    if (!System.IO.Directory.Exists(filePathName))
                    {
                        System.IO.Directory.CreateDirectory(filePathName);
                    }
                    //相对路径
                    string relativeUrl = "../images";
                    file.SaveAs(System.IO.Path.Combine(filePathName, model.FileName));

                    //获取临时文件相对完整路径
                    model.Url = System.IO.Path.Combine(relativeUrl, model.Catalog, model.FileName).Replace("\", "/");
                }

            }
            catch (Exception ex)
            {
                logger.Error(ex.Message);
            }
            return Content(Newtonsoft.Json.JsonConvert.SerializeObject(model));
        }
6.微信小程序点击图片预览
wxml
<image wx:if='{{DescribeImg!=""&&DescribeImg!=null}}' style='400rpx;height:400rpx' src='{{DescribeImg}}' bindtap='previewImg'></image>
js
//图片放大
  previewImg: function (e) {

    var img = this.data.DescribeImg;//图片网址
    var ary = new Array();
    ary.push(img);
    wx.previewImage({
      current: ary[0],     //当前图片地址
      urls: ary,//路径集合,必须是数组
      success: function (res) { },
      fail: function (res) { },
      complete: function (res) { },
    })
  }