DNS域名解析服务的三种服务器:
主服务器:管理域名和IP地址的对应关系
从服务器:同步域名和IP地址的对应关系(缓解跟服务器压力,提高解析速度)
缓存服务器:转发域名和IP地址的对应关系(缓解根服务器压力,提高解析速度)
DNS从服务器要解决的问题:
从主服务器中获取指定的区域数据文件,起到备份同步和负载均衡的作用,缓解主服务器压力,提高DNS解析效率。
下面实验中要用到两台虚拟机,分别为PC1(主服务器)和PC2(从服务器)。IP分别为192.168.10.10和192.168.10.20。
1、查看主服务器和从服务器基本信息,测试联通性
[root@PC1 ~]# ifconfig | head -n 3  ## 查看主服务器IP
eno16777728: flags=4163<UP,BROADCAST,RUNNING,MULTICAST>  mtu 1500
        inet 192.168.10.10  netmask 255.255.255.0  broadcast 192.168.10.255
        inet6 fe80::20c:29ff:fe66:37f7  prefixlen 64  scopeid 0x20<link>
[root@PC2 ~]# ifconfig | head -n 3  ## 查看从服务器IP
eno16777728: flags=4163<UP,BROADCAST,RUNNING,MULTICAST>  mtu 1500
        inet 192.168.10.20  netmask 255.255.255.0  broadcast 192.168.10.255
        inet6 fe80::20c:29ff:fe25:bb3e  prefixlen 64  scopeid 0x20<link>
[root@PC2 ~]# ping -c 3 192.168.10.10  ## 测试从服务器和主服务器的连通性,没有问题
PING 192.168.10.10 (192.168.10.10) 56(84) bytes of data.
64 bytes from 192.168.10.10: icmp_seq=1 ttl=64 time=0.222 ms
64 bytes from 192.168.10.10: icmp_seq=2 ttl=64 time=0.202 ms
64 bytes from 192.168.10.10: icmp_seq=3 ttl=64 time=0.228 ms

--- 192.168.10.10 ping statistics ---
3 packets transmitted, 3 received, 0% packet loss, time 2001ms
rtt min/avg/max/mdev = 0.202/0.217/0.228/0.016 ms
2、主服务器上一实验已经配置好BIND服务,只需给从服务器配置好BIND服务。
[root@PC2 network-scripts]# yum install bind-chroot  ## 安装bind服务
Loaded plugins: langpacks, product-id, subscription-manager
This system is not registered to Red Hat Subscription Management. You can use subscription-manager to register.
Resolving Dependencies
--> Running transaction check
---> Package bind-chroot.x86_64 32:9.9.4-14.el7 will be installed
--> Processing Dependency: bind = 32:9.9.4-14.el7 for package: 32:bind-chroot-9.9.4-14.el7.x86_64
--> Running transaction check
---> Package bind.x86_64 32:9.9.4-14.el7 will be installed
--> Finished Dependency Resolution

Dependencies Resolved

==============================================================================================
 Package                Arch              Version                      Repository        Size
==============================================================================================
Installing:
 bind-chroot            x86_64            32:9.9.4-14.el7              rhel7             81 k
Installing for dependencies:
 bind                   x86_64            32:9.9.4-14.el7              rhel7            1.8 M

Transaction Summary
==============================================================================================
Install  1 Package (+1 Dependent package)

Total download size: 1.8 M
Installed size: 4.3 M
Is this ok [y/d/N]: y
Downloading packages:
----------------------------------------------------------------------------------------------
Total                                                         189 MB/s | 1.8 MB  00:00:00
Running transaction check
Running transaction test
Transaction test succeeded
Running transaction
  Installing : 32:bind-9.9.4-14.el7.x86_64                                                1/2
  Installing : 32:bind-chroot-9.9.4-14.el7.x86_64                                         2/2
rhel7/productid                                                        | 1.6 kB  00:00:00
  Verifying  : 32:bind-9.9.4-14.el7.x86_64                                                1/2
  Verifying  : 32:bind-chroot-9.9.4-14.el7.x86_64                                         2/2

Installed:
  bind-chroot.x86_64 32:9.9.4-14.el7

Dependency Installed:
  bind.x86_64 32:9.9.4-14.el7

Complete!
[root@PC2 network-scripts]# vim /etc/named.conf   ## 修改主配置文件,修改第11行和第17行
  1 //
  2 // named.conf
  3 //
  4 // Provided by Red Hat bind package to configure the ISC BIND named(8) DNS
  5 // server as a caching only nameserver (as a localhost DNS resolver only).
  6 //
  7 // See /usr/share/doc/bind*/sample/ for example named configuration files.
  8 //
  9
 10 options {
 11         listen-on port 53 { any; };  ## 表示服务器上的所有的IP(网卡)均可提供DNS服务
 12         listen-on-v6 port 53 { ::1; };
 13         directory       "/var/named";
 14         dump-file       "/var/named/data/cache_dump.db";
 15         statistics-file "/var/named/data/named_stats.txt";
 16         memstatistics-file "/var/named/data/named_mem_stats.txt";
 17         allow-query     { any; };  ## 表示允许任何人使用DNS查询服务
 18
 19         /*
 20          - If you are building an AUTHORITATIVE DNS server, do NOT enable recursion.
 21          - If you are building a RECURSIVE (caching) DNS server, you need to enable
 22            recursion.
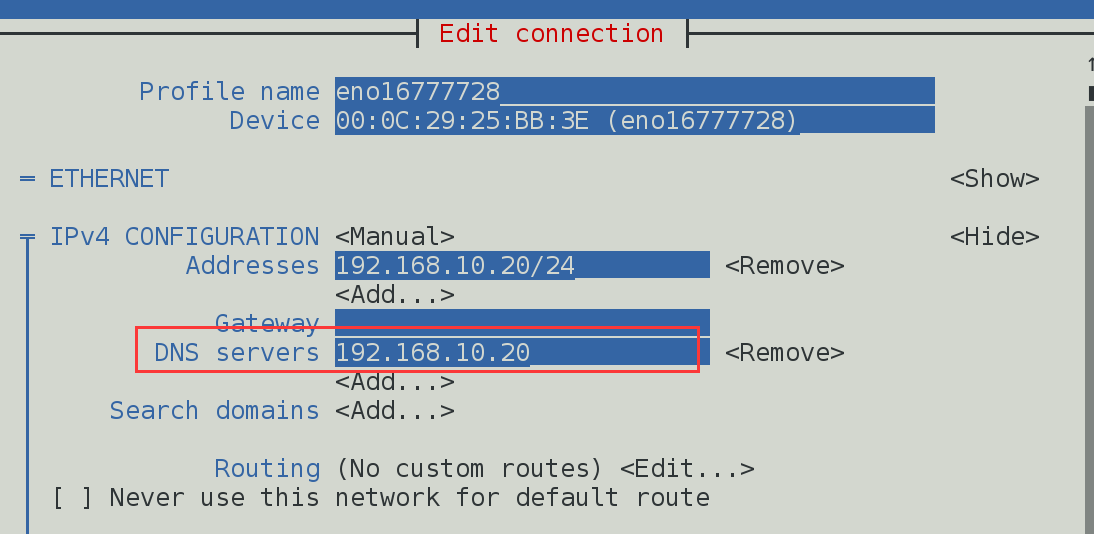
修改从服务器网卡参数,将DNS服务改为本机的IP:
[root@PC2 Desktop]# systemctl restart named  ## 重启bind服务
[root@PC2 Desktop]# systemctl restart network  ## 重启网卡服务
2、在主服务器中修改区域配置文件,允许从服务器的更新请求,并重启bind服务程序
[root@PC1 ~]# vim /etc/named.rfc1912.zones
zone "linuxprobe.com" IN {
type master;
file "linuxprobe.com.zone";
allow-update {192.168.10.20;};
};
zone "10.168.192.in-addr.arpa" IN {
type master;
file "192.168.10.arpa";
allow-update {192.168.10.20;};
};
[root@PC1 ~]# systemctl restart named  ## 重启服务,加入开机自启
[root@PC1 ~]# systemctl enable named
ln -s '/usr/lib/systemd/system/named.service' '/etc/systemd/system/multi-user.target.wants/named.service'
3、修改从服务器的区域配置文件,指定将要去主服务器同步的信息
[root@PC2 ~]# vim /etc/named.rfc1912.zones  ## 修改从服务器的区域配置文件,删除原始的信息,按照如下进行编辑
zone "linuxprobe.com" IN {               ## 指定同步域名
type slave;                              ## 指定服务器类型为从服务器
masters { 192.168.10.10; };              ## 指定主服务器的IP
file "slaves/linuxprobe.com.zone";       ## 指定从主服务器同步数据的保存路径
};
zone "10.168.192.in-addr.arpa" IN {      ## 指定反向解析的IP
type slave;                              ## 指定服务器类型为从服务器
masters { 192.168.10.10; };              ## 指定主服务器的IP
file "slaves/192.168.10.arpa";           ## 指定从主服务器同步数据的保存路径
};
[root@PC2 ~]# systemctl restart named   ## 重启服务
[root@PC2 ~]# systemctl enable named    ## 设定开机自启
ln -s '/usr/lib/systemd/system/named.service' '/etc/systemd/system/multi-user.target.wants/named.service'
[root@PC2 ~]# cd /var/named/slaves/  ## 进入指定同步数据的目录检查是否同步,没有
[root@PC2 slaves]# ls
4、 清空主服务器防火墙
[root@PC1 ~]# iptables -F ## 这一步很重要,不知道为啥
5、 在从服务器中重新启动bind服务,检查是否同步
[root@PC2 slaves]# systemctl restart named   ## 重启服务
[root@PC2 slaves]# ls  ## 检查,已经同步
192.168.10.arpa  linuxprobe.com.zone
6、测试从服务器的同步备份效果
[root@PC2 slaves]# nslookup   ## 测试从服务的备份效果,通过
> www.linuxprobe.com
Server:        192.168.10.20
Address:    192.168.10.20#53

Name:    www.linuxprobe.com
Address: 192.168.10.10
> 192.168.10.10
Server:        192.168.10.20
Address:    192.168.10.20#53

10.10.168.192.in-addr.arpa    name = www.linuxprobe.com.
> xxx.linuxprobe.com
Server:        192.168.10.20
Address:    192.168.10.20#53

Name:    xxx.linuxprobe.com
Address: 111.123.145.23
> 192.168.10.20
Server:        192.168.10.20
Address:    192.168.10.20#53

20.10.168.192.in-addr.arpa    name = mmm.xxxxxxxx.com.
以上测试说明了以上部署方法可以实现从服务器的备份效果。