<!DOCTYPE html>
<html>
<head>
<meta charset="utf-8">
<title>Vue 测试实例</title>
<script src="https://cdn.staticfile.org/vue/2.2.2/vue.min.js"></script>
<script src="https://cdn.staticfile.org/vue-router/2.7.0/vue-router.min.js"></script>
</head>
<body>
    <div id="app">
        <!--测试指令-->
        <p v-if="seen">测试v-if</p>
        <p v-else>测试v-else</p>
        <p v-show="show">测试v-show</p>
        <ul>
            <li v-for="fors in test_for">{{fors.number}},{{fors.name}}</li>
        </ul>
        <p v-on:click="myclick">点击我</p>
        <p @click="myclick">快捷点击方式</p>

        <!--复选框绑定,测试v-model-->
        <input type="checkbox" id="runoob" value="Runoob" v-model="checkedNames">
        <label for="runoob">Runoob</label>
        <input type="checkbox" id="google" value="Google" v-model="checkedNames">
        <label for="google">Google</label>
        <input type="checkbox" id="taobao" value="Taobao" v-model="checkedNames">
        <label for="taobao">taobao</label>
        <h3>复选框选择内容: {{checkedNames}}</h3>

        <!--1.1调用组件-->
        <div id = "reallytemp">
            <temp1></temp1>
        </div>

        <!--1.2组件间传值:1、父组件传值给子组件,2、子组件传值给父组件-->
        <!--1.2.1、父组件传值给子组件-->
        <div>
            <temp2 :value1='fathervalue'></temp2>
        </div>
        <!--1.2.1、父组件传值给子组件-->
        <div>
            <temp3 v-on:send='getData'></temp3>
        </div>

        <!--1.2路由的使用-->
        <div>
            <router-link to='/login'>登录</router-link>
            <!--路由传值-->
            <router-link to='/register/liuhui'>注册</router-link>
            <!-- 路由匹配到的组件将渲染在这里 -->
            <router-view></router-view>
        </div>
    </div>

    <!--1.1测试组件,定义组件-->
    <template id="temp">
        <div>
            <h3 v-on:click="login">测试组件 {{msg}}</h3>
            <a href="" >账号</a>
            <a href="">密码</a>
        </div>
    </template>
    <!--1.2.1子组件,定义组件-->
    <template id="fathToson">
        <div>
            父组件传值给子组件,显示结果:{{value1}}
        </div>
    </template>
    <!--1.2.2子组件,定义组件-->
    <template id="sonTofath">
        <div>
            <h3 @click="sendData">子组件点击发送数据给父组件</h3>
        </div>
    </template>
</body>


<script type="text/javascript">
    Vue.component('temp1',{            //temp1为后续调用模板的标签名
        template:'#temp',             //对应模板的id
        data:function(){             //此处data的显示和之前的方式不同,采用函数返回的方式
            return {
                msg:'信息显示'
            }
        },
        methods:{
            login:function(){
                console.log("点击")
            }
        }
    })
    //1.2.1
    Vue.component('temp2',{
        template:'#fathToson',
        //接受数据
        props:{
            value1:String           //如果传入值为数字,则为number
        }
    })
    //1.2.2
    Vue.component('temp3',{
        template:'#sonTofath',
        methods:{
            sendData(){
                this.$emit('send',123)        //第一个参数对应父组件中v-on绑定的函数名称,第二个参数为发送内容
            }
        }
    })
    //路由的使用
    //1、定义根组件
    var rootapp = Vue.extend()
    //2、定义注册和登录组件
    var login = Vue.extend({
        template : '<h3>您已进入登录页面</h3>'
    })
    var register = Vue.extend({
        template : '<h3>您已进入注册页面,注册明为{{receivename}}</h3>',
        //路由传值设定
        data :function(){
            return {
                receivename : ''
            }
        },
        created:function(){
            this.receivename = this.$route.params.uname
        }
    })

    //3、定义路由并且注册路由规则
    var vueRoute = new VueRouter({
        routes : [
            {path:'/',redirect:'/login'},
            {path:'/login',component:login},
            {path:'/register/:uname',component:register}
        ]
    })
    //4、使用路由,加入route,见下面

    new Vue({
    el: '#app',
    data: {
        seen: false,
        show:false,
        test_for:[
            {number:1,name:"qq"},
            {number:2,name:"qqq"},
            {number:3,name:"qqqq"},
            {number:4,name:"qqqqq"},
        ],
        checkedNames:[],
        fathervalue:'父组件的值'
    },
    methods:{
        myclick:function(){
            console.log("我被点击了")
        },
        getData:function(tag){
            console.log(tag)
        }
    },
    router : vueRoute
    })


</script>

</html>
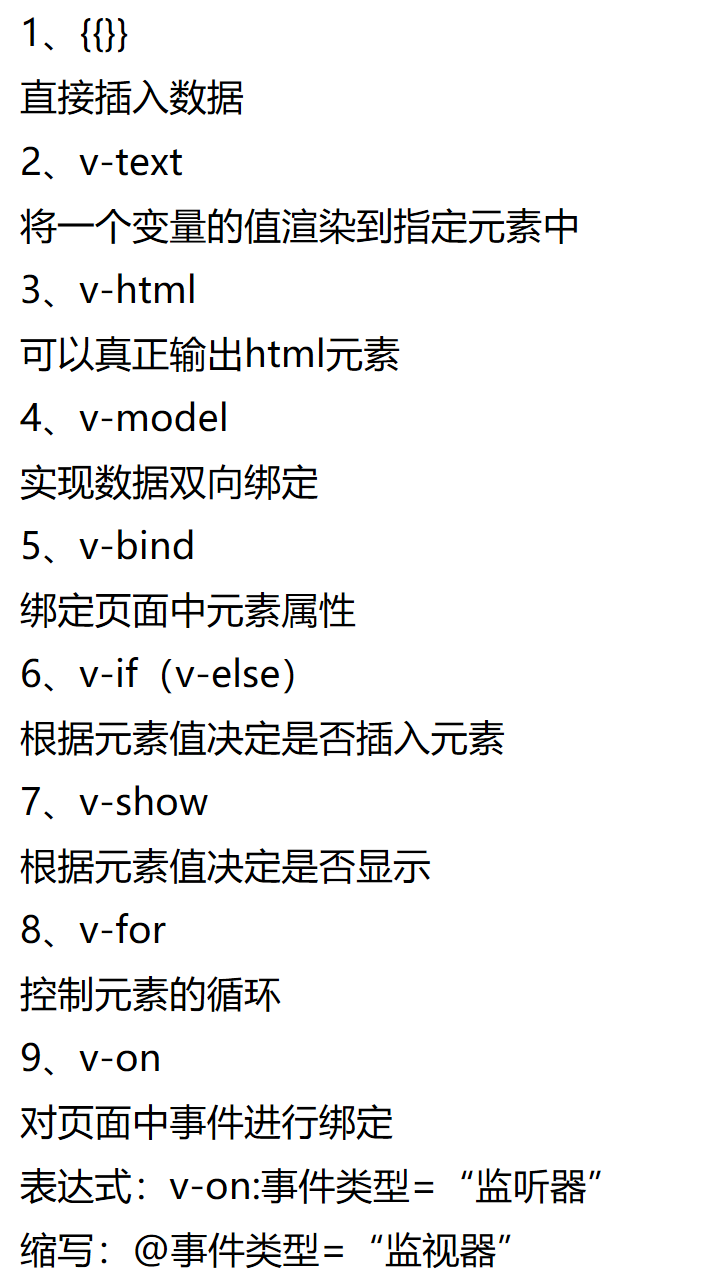
基本指令

2、代码中包含调用组件,父组件传值给子组件,子组件传值给父组件,以及使用vue路由,和路由间传值