简介
在很多数据采集场景下,Flume作为一个高性能采集日志的工具,相信大家都知道它。许多人想起Flume这个组件能联想到的大多数都是Flume跟Kafka相结合进行日志的采集,这种方案有很多他的优点,比如高性能、高吞吐、数据可靠性等。但是我们如果要求对日志进行实时的采集,这显然不是一个好的解决方案。原因如下:
就目前来说,Flume能支持实时监控一个目录的数据文件,一旦对某个目录的文件采集完成,就会打上completed的标志,若之后再有数据进入这个文件中,Flume则不会检测到。
所以,我们更多的是使用这种方案进行定时采集,只要有一个新的数据目录产生,我们就采集这个目录下的数据文件。
那么接下来本篇文章将为大家介绍基于Openresty+Lua+Kafka对日志进行实时的采集。
需求
很多时候,我们需要对用户的埋点数据进行一个实时的采集,然后用这些数据对用户的行为做一些实时的分析。所以,第一步当然是先解决怎样对数据进行实时的采集。
这里我们用到的方案是Openresty+Lua+Kafka。
原理介绍
那么什么是Openresty呢?这里引用官方的一段话:
OpenResty是一个基于Nginx与Lua的高性能Web平台,其内部集成了大量精良的Lua库、第三方模块以及大多数的依赖项。用于方便地搭建能够处理超高并发、扩展性极高的动态 Web 应用、Web 服务和动态网关。
OpenResty通过汇聚各种设计精良的Nginx模块,从而将Nginx有效地变成一个强大的通用Web应用平台。这样,Web开发人员和系统工程师可以使用Lu 脚本语言调动Nginx支持的各种C以及Lua模块,快速构造出足以胜任10K乃至1000 以上单机并发连接的高性能Web应用系统。
OpenResty的目标是让你的Web服务直接跑在Nginx服务内部,充分利用Nginx的非阻塞 I/O 模型,不仅仅对 HTTP 客户端请求,甚至于对远程后端诸如MySQL、PostgreSQL、Memcached 以及 Redis 等都进行一致的高性能响应。
简单来说,就是将客户端的请求(本文指的是用户的行为日志)通过Nginx把用户的数据投递到我们指定的地方(Kafka),而为了实现这个需求,我们用到了Lua脚本,因为Openresty封装了各种Lua模块,其中有一个模块就是对Kafka模块进行了分装,我们只需要写一个简单的脚本就可以将用户的数据通过Nginx转发到Kafka中,以便后续对数据进行消费。
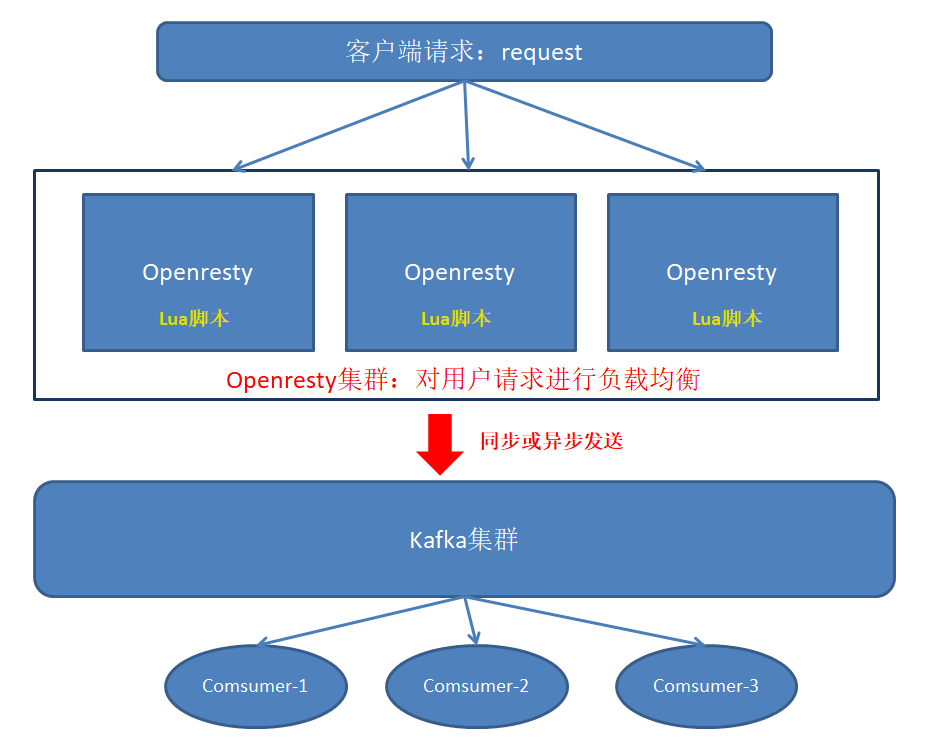
这里给出一张架构图,方便大家理解:
在这里简单总结一下使用Openresty+Lua+Kafka的优点:
1.支持多种业务数据,不同的业务数据,只需要配置不同的Lua脚本,就可以将不同的业务数据发送到Kafka不同的topic中。
2.对用户触发的埋点数据进行实时的采集
3.高可靠的集群,Openresty由于是基于Nginx,其集群拥有非常高的性能和稳定性。
4.高并发,相比tomcat、apache等web服务器,Nginx的并发量远远高于其他两种。正常情况下处理上万的并发量都不是什么难事。
那么接下来我们就动手实操一下。
Openresty的安装
本实例采用的单机部署形式,当单机部署成功了之后,集群的搭建跟单机一样,只是在不同的机器上执行相同的步骤而已。
注:本实验基于centos7.0操作系统
1.下载Openresty依赖:
yum install readline-devel pcre-devel openssl-devel gcc
2.编译安装Openresty:
#1.安装openresty:
mkdir /opt/software
mkdir /opt/module
cd /opt/software/ # 安装文件所在目录
wget https://openresty.org/download/openresty-1.9.7.4.tar.gz
tar -xzf openresty-1.9.7.4.tar.gz -C /opt/module/
cd /opt/module/openresty-1.9.7.4
#2.配置:
# 指定目录为/opt/openresty,默认在/usr/local。
./configure --prefix=/opt/openresty
            --with-luajit
            --without-http_redis2_module
            --with-http_iconv_module
make
make install
3.安装lua-resty-kafka
因为我们需要将数据通过nginx+lua脚本转发到Kafka中,编写lua脚本时需要用到lua模块中的一些关于Kafka的依赖。
#下载lua-resty-kafka:
cd /opt/software/
wget https://github.com/doujiang24/lua-resty-kafka/archive/master.zip
unzip master.zip -d /opt/module/

#拷贝kafka相关依赖脚本到openresty
cp -rf /opt/module/lua-resty-kafka-master/lib/resty/kafka/ /opt/openresty/lualib/resty/
注:由于kafka大家都比较熟知,这里就不介绍它的安装了。
Openresty安装完成之后目录结构如下:
drwxr-xr-x  2 root root 4096 Mar 24 14:26 bin
drwxr-xr-x  6 root root 4096 Mar 24 14:26 luajit
drwxr-xr-x  7 root root 4096 Mar 24 14:29 lualib
drwxr-xr-x 12 root root 4096 Mar 24 14:40 nginx
4.配置文件
编辑/opt/openresty/nginx/conf/nginx.conf
user  nginx;  #Linux的用户
worker_processes  auto;
worker_rlimit_nofile 100000;

#error_log  logs/error.log;
#error_log  logs/error.log  notice;
#error_log  logs/error.log  info;

#pid        logs/nginx.pid;

events {
    worker_connections  102400;
    multi_accept on;
    use epoll;
}


http {
    include       mime.types;
    default_type  application/octet-stream;

    log_format  main  '$remote_addr - $remote_user [$time_local] "$request" '
                      '$status $body_bytes_sent "$http_referer" '
                      '"$http_user_agent" "$http_x_forwarded_for"';

    access_log  /var/log/nginx/access.log  main;

    resolver 8.8.8.8;
    #resolver 127.0.0.1 valid=3600s;

    sendfile        on;

    keepalive_timeout  65;

    underscores_in_headers on;

    gzip  on;

    include /opt/openresty/nginx/conf/conf.d/common.conf; #common.conf这个文件名字可自定义

}
编辑 /opt/openresty/nginx/conf/conf.d/common.conf
##api
lua_package_path "/opt/openresty/lualib/resty/kafka/?.lua;;";
lua_package_cpath "/opt/openresty/lualib/?.so;;";

lua_shared_dict ngx_cache 128m;  # cache
lua_shared_dict cache_lock 100k; # lock for cache

server {
    listen       8887; #监听端口
    server_name  192.168.3.215; #埋点日志的ip地址或域名,多个域名之间用空格分开
    root         html; #root指令用于指定虚拟主机的网页根目录,这个目录可以是相对路径,也可以是绝对路径。
    lua_need_request_body on; #打开获取消息体的开关,以便能获取到消息体

    access_log /var/log/nginx/message.access.log  main;
    error_log  /var/log/nginx/message.error.log  notice;

    location = /lzp/message {
        lua_code_cache on;
        charset utf-8;
        default_type 'application/json';
        content_by_lua_file "/opt/openresty/nginx/lua/testMessage_kafka.lua";#引用的lua脚本
    }
}
编辑 /opt/openresty/nginx/lua/testMessage_kafka.lua
#创建目录mkdir /opt/openresty/nginx/lua/
vim /opt/openresty/nginx/lua/testMessage_kafka.lua
#编辑内存如下:
-- require需要resty.kafka.producer的lua脚本,没有会报错
local producer = require("resty.kafka.producer")

-- kafka的集群信息,单机也是可以的
local broker_list = {
    {host = "192.168.3.215", port = 9092},
}

-- 定义最终kafka接受到的数据是怎样的json格式
local log_json = {}
--增加read_body之后即可获取到消息体,默认情况下可能会是nil
log_json["body"] = ngx.req.read_body()
log_json["body_data"] = ngx.req.get_body_data()

-- 定义kafka同步生产者,也可设置为异步 async
-- -- 注意!!!当设置为异步时,在测试环境需要修改batch_num,默认是200条,若大不到200条kafka端接受不到消息
-- -- encode()将log_json日志转换为字符串
-- -- 发送日志消息,send配套之第一个参数topic:
-- -- 发送日志消息,send配套之第二个参数key,用于kafka路由控制:
-- -- key为nill(空)时,一段时间向同一partition写入数据
-- -- 指定key,按照key的hash写入到对应的partition

-- -- batch_num修改为1方便测试
local bp = producer:new(broker_list, { producer_type = "async",batch_num = 1 })
-- local bp = producer:new(broker_list)

local cjson = require("cjson.safe")
local sendMsg = cjson.encode(log_json)
local ok, err = bp:send("testMessage",nil, sendMsg)
if not ok then
   ngx.log(ngx.ERR, 'kafka send err:', err)
elseif ok then
   ngx.say("the message send successful")
else
   ngx.say("未知错误")
end
5.启动服务运行:
useradd nginx #创建用户
passwd nginx #设置密码

#设置openresty的所有者nginx
chown -R nginx:nginx /opt/openresty/

#启动服务
cd /opt/openresty/nginx/sbin
./nginx -c /opt/openresty/nginx/conf/nginx.conf

查看服务:
ps -aux | grep nginx
nginx     2351  0.0  0.1 231052 46444 ?        S    Mar30   0:33 nginx: worker process
nginx     2352  0.0  0.1 233396 48540 ?        S    Mar30   0:35 nginx: worker process
nginx     2353  0.0  0.1 233396 48536 ?        S    Mar30   0:33 nginx: worker process
nginx     2354  0.0  0.1 232224 47464 ?        S    Mar30   0:34 nginx: worker process
nginx     2355  0.0  0.1 231052 46404 ?        S    Mar30   0:33 nginx: worker process
nginx     2356  0.0  0.1 232224 47460 ?        S    Mar30   0:34 nginx: worker process
nginx     2357  0.0  0.1 231052 46404 ?        S    Mar30   0:34 nginx: worker process
nginx     2358  0.0  0.1 232224 47484 ?        S    Mar30   0:34 nginx: worker process
root      7009  0.0  0.0 185492  2516 ?        Ss   Mar24   0:00 nginx: master process ./nginx -c /opt/openresty/nginx/conf/nginx.conf


查看端口:
netstat -anput | grep 8887
tcp        0      0 0.0.0.0:8887            0.0.0.0:*               LISTEN      2351/nginx: worke
看到以上进程,证明服务已正常运行
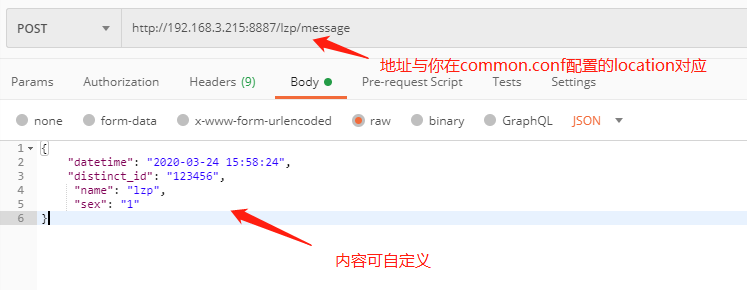
6.使用postman,发送post请求进行简单的测试,查看kafka是否能否接受到数据
7.kafka消费数据:
kafka-console-consumer --bootstrap-server 192.168.3.215:9092 --topic testMessage --from-beginning
若消费到数据,则证明配置成功,若未调通可查看/var/log/nginx/message.access.log和/var/log/nginx/message.error.log相关错误日志进行调整
总结
使用Openresty+Lua+Kafka就可以将用户的埋点数据实时采集到kafka集群中,并且Openresty是基于Nginx的,而Nginx能处理上万的并发量,所以即使用户的数据在短时间内激增,这套架构也能轻松的应对,不会导致集群崩溃。另一方面,若数据过多导致集群的超负荷,我们也可以随时加多一台机器,非常方便。
另外一个小小的拓展:若业务数据非常多,需要发送到不同的topic中,我们也不用编写多个脚本,而是可以联系后端在json格式里面加一个字段,这个字段的值就是topic的名称。我们只需要编写一个通用脚本,解析Json数据将topic名称拿出来就可以了。