我的github iSAM2016
目录
中途有一段时间去隔壁家的php玩了一遭,回头看来,vuex、vue-router有了改变,一开始就对vue-route的细节不是很了解,今天总结一下。
官网的例子:
自己的一句话:
-
定义路由组件(汽车)
const Foo = { template: '
foo' }
const Bar = { template: 'bar' -
定义路由(公路或导航)
cost ruter = {
{ path: '/foo', component: Foo },
{ path: '/bar', component: Bar }
} -
创建实例(红路灯)
cosnt app = new Vue({
router}).$mount('#app')
动态的路由匹配
一个页面是经常重复使用的,传递一个参数就可以了,比如传递一个ID号baidu.com?userId=123,这样
就需要一个动态的路由来解决。
cost ruter = {
     { path: '/user:12', component: user }
}
当一个路由使用是后面有动态的参数,会映射到this.$router.param 中,这是函数体内调用路由的方法
响应路由参数的变化
因为没有仔细看官网的实例,这点没有看待,我遇到一次坑。这次教训并不是粗心,是因为没有仔细看文档的好习惯,这个不好的习惯必须的改。就像数学老师说的回归到基本理论
这也是一个常见的问题,我问需要监听hash值的改变,来查询参数如:
- book/search?cat=1
- book/search?cat=2
可是只有参数发生了改变,vue-router 认为组件式可以重用的,参数变化是不能引起从新向服务器获取数据
const user = {
    wacth: {
        '$route' (to, from) {
        // 对路由变化作出响应...
        }
    }
}
嵌套路由
像这样的的嵌套 /user/foo/profile
<div id="root">
     <router-view> </router-view>
</div><router-view>是最顶层的出口,渲染最高级路由匹配到的组件。同样地,一个被渲染
组件同样可以包含自己的嵌套
    const router = new VueRouter({
      routes: [
        { path: '/user/:id', component: User,
          children: [
            // UserHome will be rendered inside User's <router-view>
            // when /user/:id is matched
            { path: '', component: UserHome },

            // UserProfile will be rendered inside User's <router-view>
            // when /user/:id/profile is matched
            { path: 'profile', component: UserProfile },

            // UserPosts will be rendered inside User's <router-view>
            // when /user/:id/posts is matched
            { path: 'posts', component: UserPosts }
          ]
        }
      ]
    })
函数式导航
注意 this.$route 和 this.router在使用上是有区别的
this.$router.push()
    调用的方法
    // 字符串
    this.$router.push('home')

    // 对象
    this.$router.push({ path: 'home' })

    // 命名的路由
    this.$router.push({ name: 'user', params: { userId: 123 }})

    // 带查询参数,变成 /register?plan=private
    this.$router.push({ path: 'register', query: { plan: 'private' }})
this.$router.go(n)
意思是在 history 记录中向前或者后退多少步
路由的命名
可以为路由设置,别名方便使用。如设置name, isshow
    const router = new VueRouter({
      routes: [
        {
          path: '/user/:userId',
          name: 'user',
          isShow: false
          component: User
        }
      ]
    })
路由的命名:示例
切换路由的时候可以修改页面的标题
router.afterEach(transition => {
    document.title = transition.name
})
导航钩子
导航钩子
全局钩子
const router = new VueRouter({ ... })

router.beforeEach((to, from, next) => {
  // ...
})
主要用来拦截导航,让他完成跳转或取消。
参数:
to :Route: 标识即将进入的目标路由对象
from: Route 当前导航正要离开的路由
next: function 调用该方法来resolve 钩子,它的参数:
- next(): 进行管道中的下一个钩子
- next(false): 中断当前的导航
- next('/') 或者 next({ path: '/' }): 跳转到一个不同的地址。当前的导航被中断,然后进行一个新的导航。
实例:检测用户登录
全局的钩子主要用来是,判断用户是否登录
router.beforeEach((to, from, next) => {
  //页面滚动到顶部
  window.scroll(0, 0);
  //用户没有登录了,并且还想访问别的页面,强制跳转login页
  if (!auth.login() && to.path !== '/login') {
      next('login');
    } else {
      //用户已经登录了,不在让用户访问login页
      if (auth.login() && to.path === '/login') {
          next({
            path: '/demo/user/list'
          });
      } else {
        next();
      }
    }
})
某个路由独享的钩子(VIP组件)
 const router = new VueRouter({
  routes: [
    path: '/foo',
    component: Foo,
    beforeEach: (to, from, next) => {

    }
  ]
})
路由元信息
较难理解
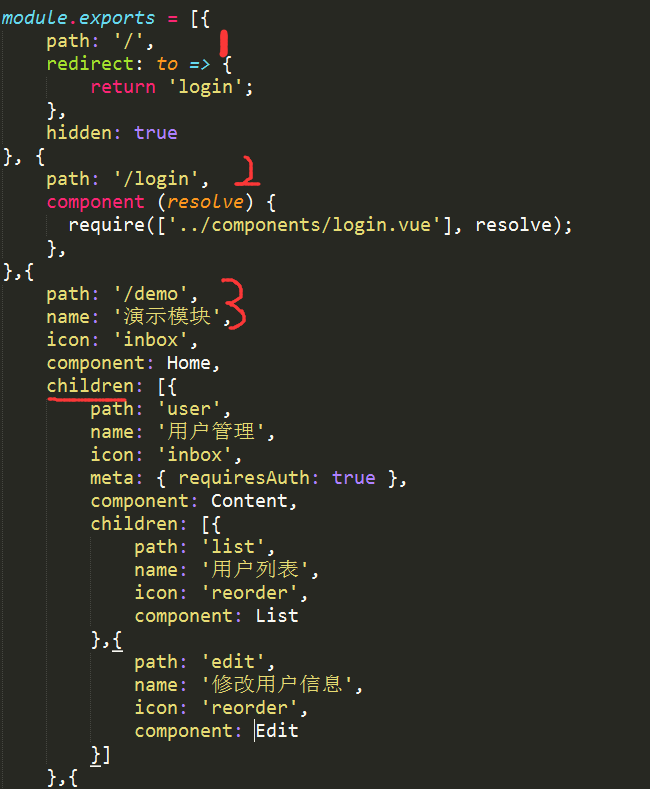
我们称呼routers 配置中的每个路由对象为路由记录。路由记录可以是嵌套的。比如http://localhost:3000/#/demo/user/list
这个地址中可以说明路由记录有三个,分别是:
- /demo
- /demo/use
- /demo/use/list


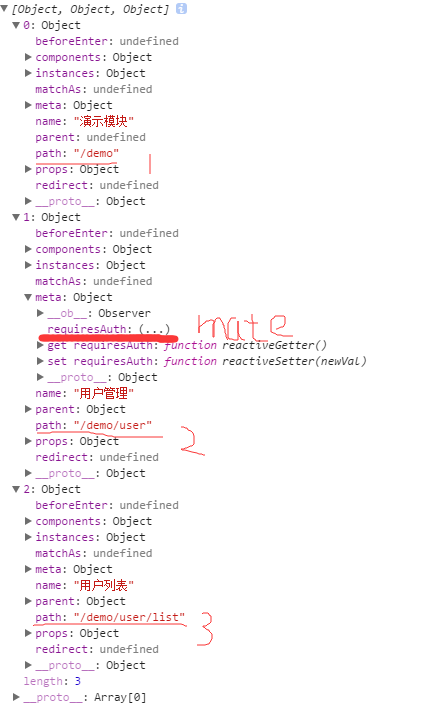
一个路由匹配到的多有路由记录暴露在$route对象当中的$route.matched 数组当中,我们需要遍历 $route.matched 来检查路由记录中的 meta 字段。
示例
路由对象信息
对象出现的地方,注意是route 没有r结尾
| route Object出现的地方 |
|---|
| router.match(location) |
| this.$route |
| 全局钩子 |
对象的属性就不书写了见路由信息对象的属性
Router 实例
Router注意是 有r结尾
Router 实例属性
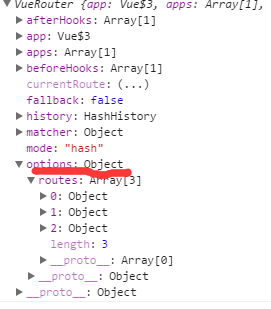
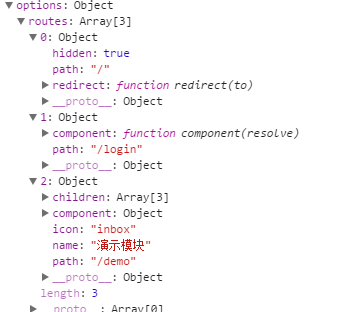
$router.options
在$router 中有个鬼是$router.options 官网没有找到,说明。
这个属性包含了路由的树形结构,可以借助这个来实现menu层级的划分
上机作业5.14
android 计算器
安卓第四周作业
课后作业
5.28上机作业
5.22作业
5.21 作业
5.20作业
上机作业5.14