前言
上篇博客说到命令行执行测试用例的部分参数如何使用?今天将继续更新其他一些命令选项的使用,和pytest收集测试用例的规则!
Pytest执行用例命令行参数
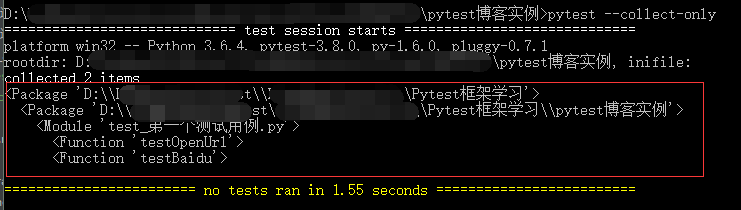
--collect-only:罗列出所有当前目录下所有的测试模块,测试类及测试函数
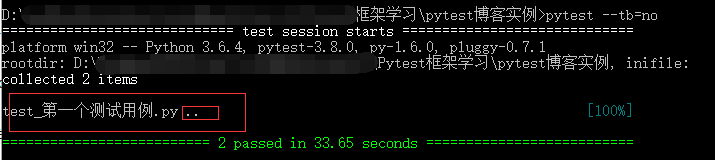
--tb=style:屏蔽测试用例执行输出的回溯信息,可以简化用例失败时的输出信息。style可以是 on,line,short,具体区别请自行体验
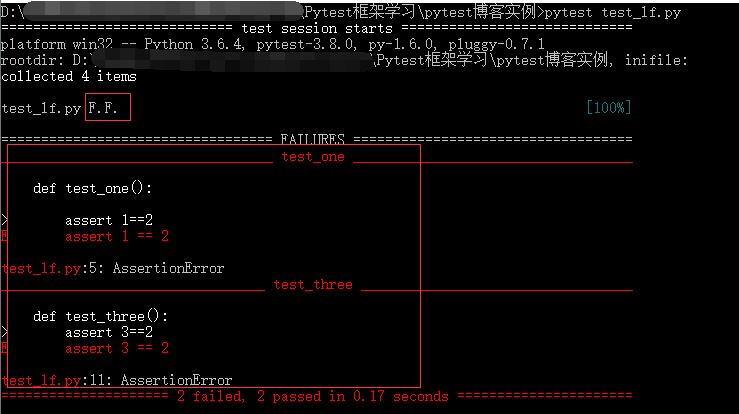
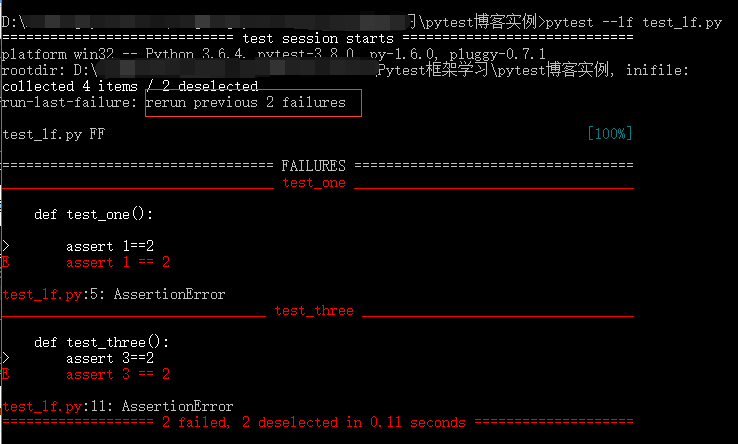
--lf:当一次用例执行完成后,如果其中存在失败的测试用例,那么我们可以使用此命令重新运行失败的测试用例
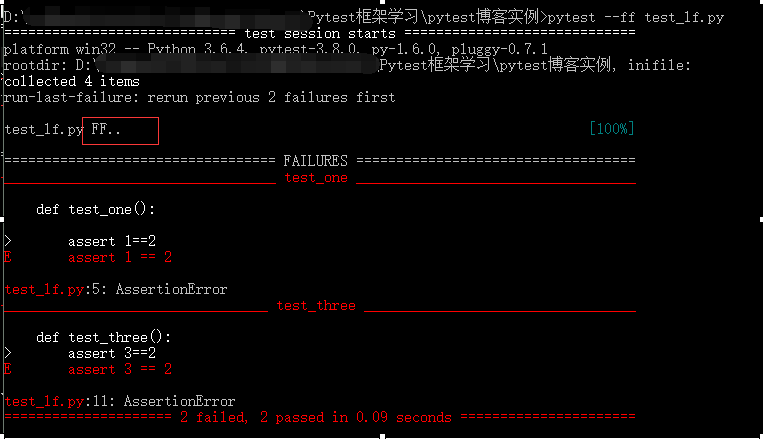
我们第一次执行用例,会看到有2个用例失败
我们使用--lf参数再次运行用例,可以发现只有之前失败的两个用例重新执行了一次
--ff:如果上次测试用例出现失败的用例,当使用--ff后,失败的测试用例会首先执行,剩余的用例也会再次执行一次
小结
以上就是命令行运行测试用例时经常使用到的参数,这些参数不仅可以单独使用,也可以组合一起使用,后期还会涉及到使用fixture时的一些命令,现在不需要了解。你可以使用--help来查看一些命令帮助信息!
Pytest收集测试用例的规则
1)从一个或者多个目录开始查找,你可以在命令行指定文件或者目录,如果未指定那么从当前目录开始收集用例
2)在该目录和所有子目录下递归查找测试模块
3)测试模块是指文件名为test_*.py或者*_test.py的文件
4)在测试模块中查找以test_开头的函数
5)查找名字以Test开头的类。其中首先筛选掉包含__init__()函数的类,再查找类中以Test_开头的类方法
规则验证
现在我们就依次演示pytest搜索测试用例的过程
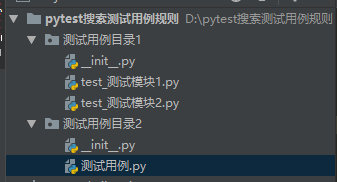
首先我们按照以下目录结构新建一个项目
每个文件编写如下代码(我们只是为了验证规则,所以用例些的很简单,实际项目不会存在这样简单的用例)
test_测试模块1.py
 1 # 测试函数
 2
 3 def test_2():
 4     assert 1 == 1
 5
 6
 7 # 普通函数
 8 def func_2():
 9     print('普通函数')
10
11 # 测试类
12 class TestClass_2(object):
13
14     # 测试函数
15     def test_class_3(self):
16         assert 1 == 1
17     # 普通函数
18     def func_class_3(self):
19         assert 1 == 1
20
21 # 普通类
22 class NoTestClass_2(object):
23     # 测试函数
24     def test_class_4(self):
25         assert 1 == 1
26
27     # 普通函数
28     def func_class_4(self):
29         assert 1 == 1
test_测试模块2.py
 1 # 测试函数
 2
 3 def test_1():
 4
 5     assert 1==1
 6 # 普通函数
 7 def func_1():
 8     print('普通函数')
 9
10 # 测试类
11 class TestClass_1(object):
12     # 测试函数
13     def test_class_1(self):
14         assert 1==1
15
16     # 普通函数
17     def func_class_1(self):
18         assert 1==1
19 # 普通类
20 class NoTestClass_1(object):
21
22     # 测试函数
23     def test_class_2(self):
24         assert 1 == 1
25
26     # 普通函数
27     def func_class_2(self):
28         assert 1 == 1
测试用例.py
1 # 测试函数
2 def test_one():
3     assert 1==1
4
5 # 普通函数
6 def func():
7     assert 1==1
代码分析
我们现在根据理论分析并结合代码,可以大致计算出,从项目根目录执行用例,应该会执行4条有效测试用例!
我们在项目根目录下执行pytest --collect-only看下情况,可以发现 搜索了test_测试模块1和test_测试模块2文件,并包括TestClass_2和TestClass_1类及内部test_class_3和test_class_1 和外部的测试函数test_2,test_1.
D:pytest搜索测试用例规则>pytest --collect-only
============================= test session starts =============================
platform win32 -- Python 3.6.4, pytest-3.8.0, py-1.6.0, pluggy-0.7.1
rootdir: D:pytest搜索测试用例规则, inifile:
collected 4 items
<Package 'D:\pytest搜索测试用例规则\测试用例目录1'>
<Module 'test_测试模块1.py'>
<Function 'test_2'>
<Class 'TestClass_2'>
<Instance '()'>
<Function 'test_class_3'>
<Module 'test_测试模块2.py'>
<Function 'test_1'>
<Class 'TestClass_1'>
<Instance '()'>
<Function 'test_class_1'>
======================== no tests ran in 0.14 seconds =========================
我们大致已经能看出pytest的搜索规则,现在们再执行一下所有用例看下 使用命令 pytest -v。可以看出确实只有4个用例被执行了,也就是只识别到了4个用例,根据下面的输出信息可以看出每个用例所在的位置
D:pytest搜索测试用例规则>pytest -v
============================= test session starts =============================
platform win32 -- Python 3.6.4, pytest-3.8.0, py-1.6.0, pluggy-0.7.1 -- c:python36python.exe
cachedir: .pytest_cache
rootdir: D:pytest搜索测试用例规则, inifile:
collected 4 items
测试用例目录1/test_测试模块1.py::test_2 PASSED [ 25%]
测试用例目录1/test_测试模块1.py::TestClass_2::test_class_3 PASSED [ 50%]
测试用例目录1/test_测试模块2.py::test_1 PASSED [ 75%]
测试用例目录1/test_测试模块2.py::TestClass_1::test_class_1 PASSED [100%]
========================== 4 passed in 0.07 seconds ===========================
大家可以自己试试修改文件,函数,类名称,然后执行用例,查看是否会按照自己的想法执行用例!
总结
ok,通过这两篇文章,我们大概已经知道如何命名测试模块,测试类,测试函数,并且如何使用简单的命令行执行测试用例。那么就赶紧动手试试吧!