一、什么是生命周期
看过我 React 系列文章的朋友知道我在 React 中说过生命周期,在这里我再说一次,生命周期指的是一个对象的生老病死。当然生命周期又为广义和狭义的。具体分为以下几类。
- 1、动物的生命周期:从初生到死亡。
- 2、产品的生命周期:从开始到淘汰。(一般指提市场寿命)
- 3、语言或平台中某个组件的生命周期:比如 activity 的生命周期,指的就是 activity 的创建到销毁的过程。
- 4、其它生命周周期
二、Vue 的生命周期
1、Vue 生命周期状态和方法
这里说的 Vue 的生命周期指的是 Vue 组件的生命周期
先来看官方的 Vue 生命周期的图
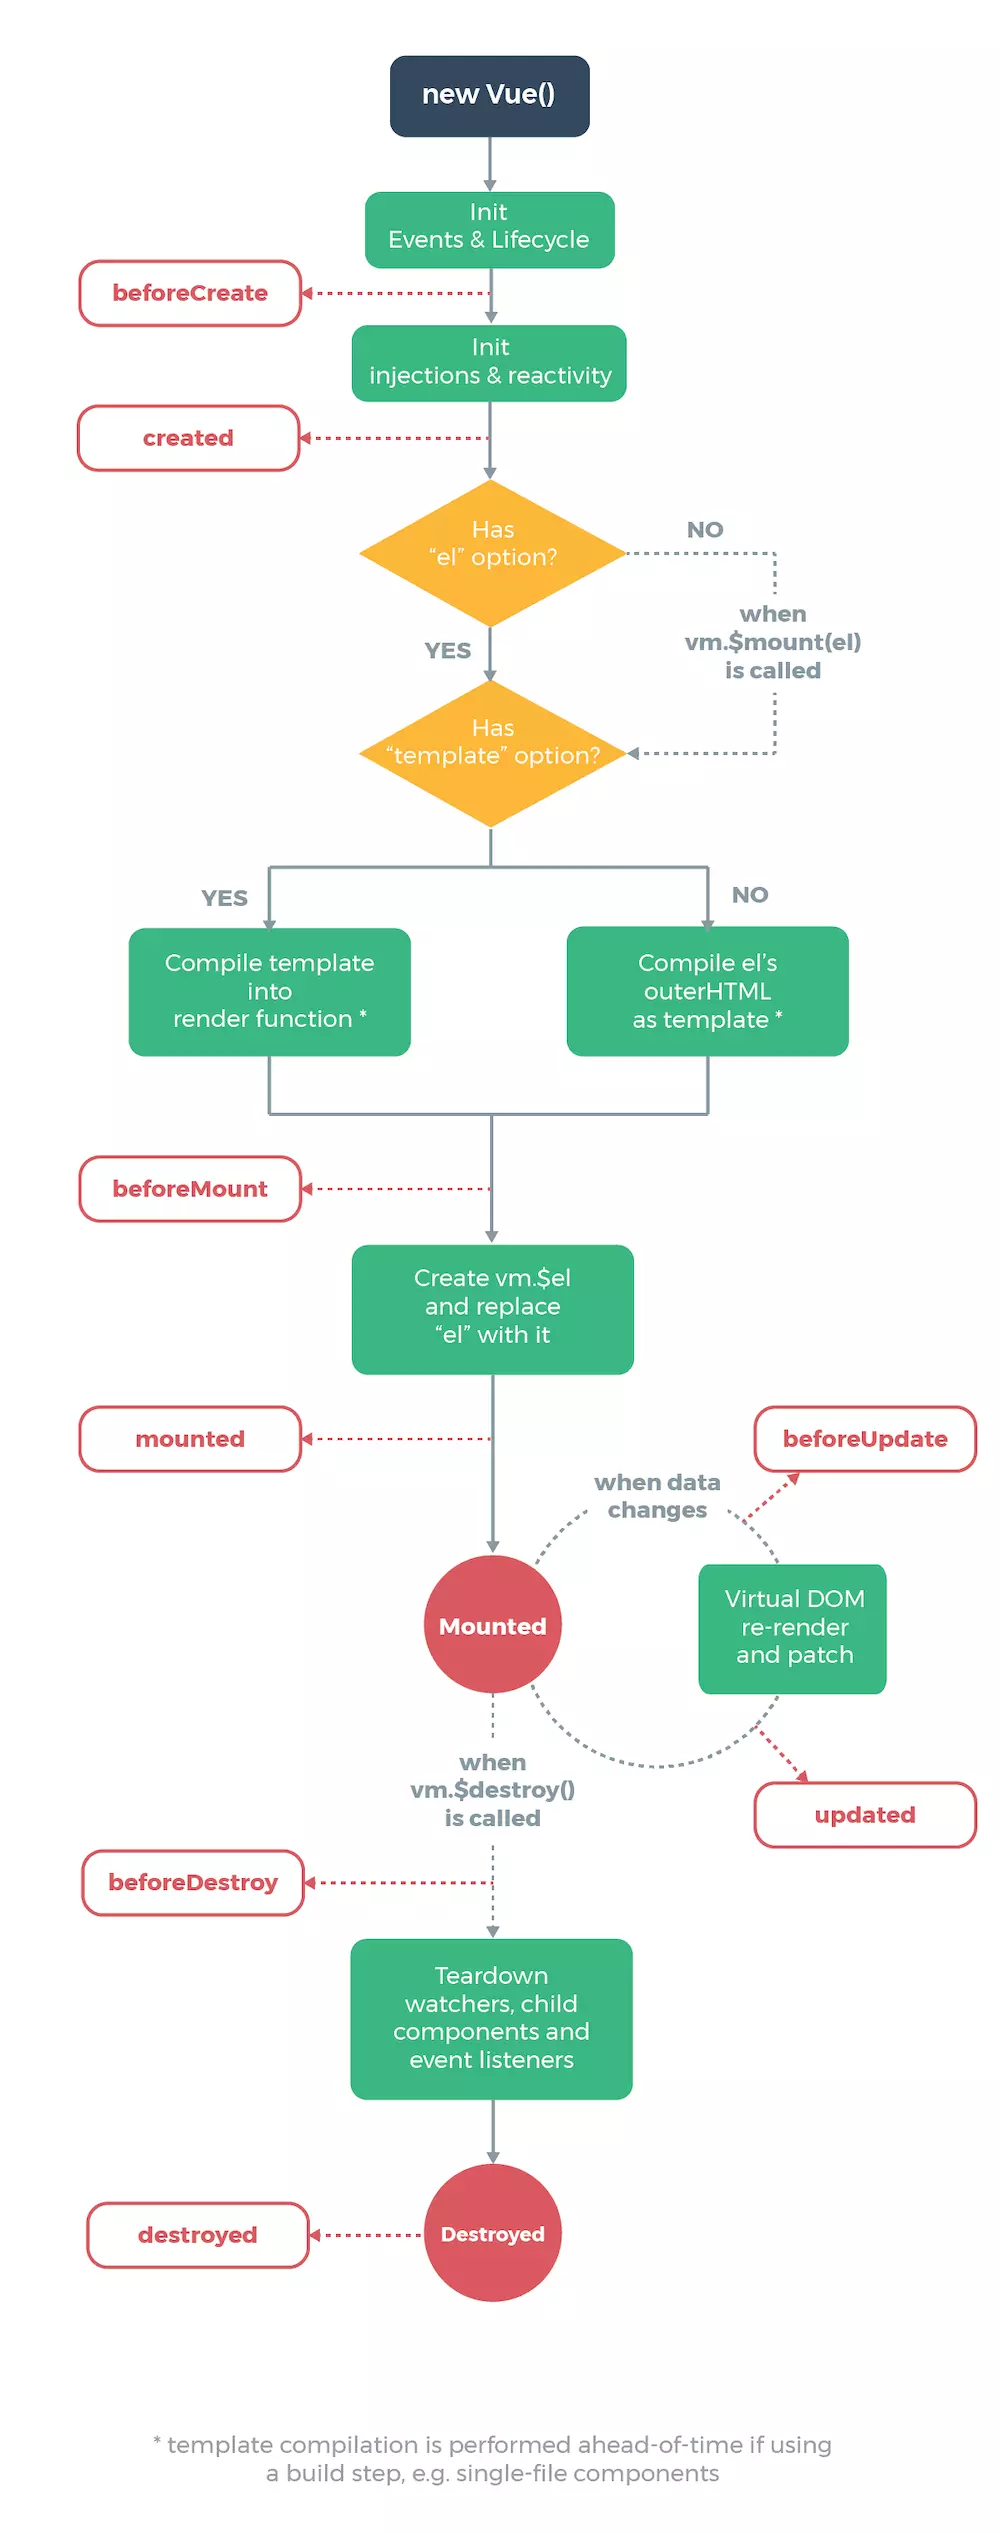
这幅图非常详细的介绍了 Vue 的生命周期,刚开始看,可能有点懵,没关系,随着慢慢的深入,回过头来再看这幅图,就会豁然开朗
总的来说 Vue 的生命周期包括四个状态
1、creating 状态--vue 实例被创建的过程
2、mounting 状态--挂到到真实的 DOM 节点
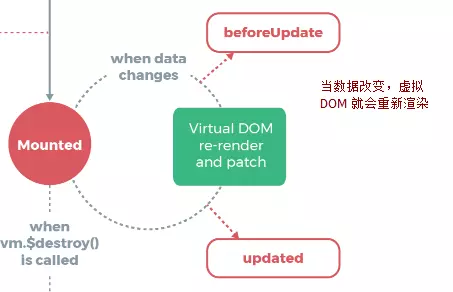
3、updating 状态--如果 data 中的数据改变就会触发对应组件的重新渲染
4、destroying 状态--实例销毁
2、Vue 生命周期方法和介绍
上面个四个状态对应 8 个方法
| 方法名 | 状态 | 含义 |
|---|---|---|
| beforeCreate | creating 状态 | 实例创建之前调用 |
| created | creating 状态 | 实例创建成功,此时 data 中的数据显示出来了 |
| beforeMount | mounting 状态 | 数据中的 data 在模版中先占一个位置 |
| mounted | mounting 状态 | 模版中的 data 数据直接显示出来了 |
| beforeUpdate | updating 状态 | 当 data 数据发生变化调用,发生在虚拟 DOM 重新渲染和打补丁之前 |
| updated | updating 状态 | 数据更改导致的虚拟 DOM 重新渲染和打补丁 |
| beforeDestroy | destroying 状态 | 在 vue 实例销毁之前调用,此时实例任然可用 |
| destroyed | destroying 状态 | 在 vue 实例销毁之后调用,vue 实例指示的所有东西都会解绑定,所有的事件监听器会被移除,所有的子实例也会被销毁 |
三、实例验证
编写一个和 Vue 生命周期相关的代码,来展示各个生命周期的调用时机
一、看看核心代码
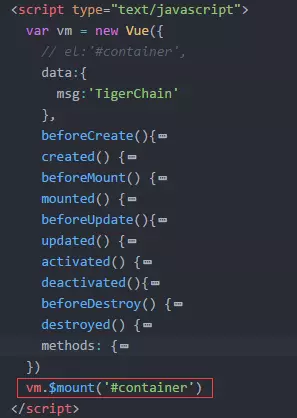
<div id="container">
  <button @click="changeMsg()">change</button>
  <span>{{msg}}</span>
 </div>

<script type="text/javascript">
 var vm = new Vue({
  el:'#container',
  data:{
    msg:'TigerChain'
  },
  beforeCreate(){
    console.group("%c%s","color:red",'beforeCreate--实例创建前状态')
    console.log("%c%s","color:blue","el  :"+this.$el)
    console.log("%c%s","color:blue","data  :"+this.$data)
    console.log("%c%s","color:blue","message  :"+this.msg)
  },
  created() {
    console.group("%c%s","color:red",'created--实例创建完成状态')
    console.log("%c%s","color:blue","el  :"+this.$el)
    console.log("%c%s","color:blue","data  :"+this.$data)
    console.log("%c%s","color:blue","message  :"+this.msg)
  },
  beforeMount() {
    console.group("%c%s","color:red",'beforeMount--挂载之前的状态')
    console.log("%c%s","color:blue","el  :"+this.$el)
    console.log(this.$el);
    console.log("%c%s","color:blue","data  :"+this.$data)
    console.log("%c%s","color:blue","message  :"+this.msg)
  },
  mounted() {
    console.group("%c%s","color:red",'mounted--已经挂载的状态')
    console.log("%c%s","color:blue","el  :"+this.$el)
    console.log(this.$el);
    console.log("%c%s","color:blue","data  :"+this.$data)
    console.log("%c%s","color:blue","message  :"+this.msg)
  },
  beforeUpdate(){
    console.group("%c%s","color:red",'beforeUpdate--数据更新前的状态')
    console.log("%c%s","color:blue","el  :"+this.$el.innerHTML)
    console.log(this.$el);
    console.log("%c%s","color:blue","data  :"+this.$data)
    console.log("%c%s","color:blue","message  :"+this.msg)
    console.log("%c%s","color:green","真实的 DOM 结构:"+document.getElementById('container').innerHTML)
  },
  updated() {
    console.group("%c%s","color:red",'updated--数据更新完成时状态')
    console.log("%c%s","color:blue","el  :"+this.$el.innerHTML)
    console.log(this.$el);
    console.log("%c%s","color:blue","data  :"+this.$data)
    console.log("%c%s","color:blue","message  :"+this.msg)
    console.log("%c%s","color:green","真实的 DOM 结构:"+document.getElementById('container').innerHTML)
  },
  activated() {
    console.group("%c%s","color:red",'activated-- keep-alive 组件激活时调用')
    console.log("%c%s","color:blue","el  :"+this.$el)
    console.log(this.$el);
    console.log("%c%s","color:blue","data  :"+this.$data)
    console.log("%c%s","color:blue","message  :"+this.msg)
  },
  deactivated(){
    console.group("%c%s","color:red",'deactivated-- keep-alive 停用时调用')
    console.log("%c%s","color:blue","el  :"+this.$el)
    console.log(this.$el);
    console.log("%c%s","color:blue","data  :"+this.$data)
    console.log("%c%s","color:blue","message  :"+this.msg)
  },
  beforeDestroy() {
    console.group("%c%s","color:red",'beforeDestroy-- vue实例销毁前的状态')
    console.log("%c%s","color:blue","el  :"+this.$el)
    console.log(this.$el);
    console.log("%c%s","color:blue","data  :"+this.$data)
    console.log("%c%s","color:blue","message  :"+this.msg)
  },
  destroyed() {
    console.group("%c%s","color:red",'destroyed-- vue实例销毁完成时调用')
    console.log("%c%s","color:blue","el  :"+this.$el)
    console.log(this.$el);
    console.log("%c%s","color:blue","data  :"+this.$data)
    console.log("%c%s","color:blue","message  :"+this.msg)
  },
  methods: {
    changeMsg() {
      this.msg = 'TigerChain111'
    }
  }
})
</script>
二、运行结果分析
1、先看首次加载组件调用的生命周期方法
- 把上面的代码运行起来,我们在 chrome 的调试窗口出得出以下结果,如下图
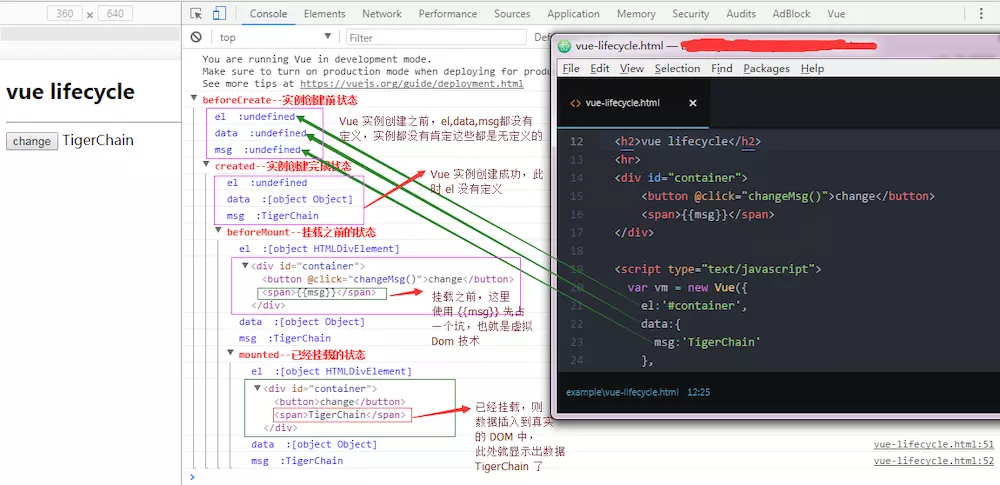
当代码运行的时候,依次调用 Vue 的 beforeCreate、created、beforeMount、mounted 四个方法直至完成组件的挂载
- 什么是挂载?
在 Vue 中指的就是 el 被实例的 vm.$el 所替换,并且挂载到该实例中,通俗的说就是 Vue 的实例挂靠到某个 DOM 元素「挂载点」的这一个过程,在上面的例子中就是把 Vue 的实例挂靠到 id 为 container 的 div 元素上,还不明白?
也就是说使用 vm.$el 就相当于使用了 document.getElementById('container') 来找到这个元素了
根据上图的 chrome 调试日志,我们可以看到
- 1、 在
created的时候数据已经和data属性msg进行绑定了,但是此时还没有el选项「还没有挂载呢」 - 2、
created方法和beforeMout方法之间有一些条件「从官方的生命周期图上可以看出」

从图中可以看出,el 和 template 好像会对生命周期有所影响,那我们就来试试。我们分 4 种情况分别来看
(1)、把 el:"#contaier" 代码注释掉,结果如下

从结果图中我们看到了,没有调用 beforeMout 和 mounted 方法,也很好理解,没有了挂载点,Vue 实例没有办法和 html 绑定起来,此时生命周期就停止了,除非手动调用 vm.$mount(el)
(2)、在 (1) 的基础上,手动调用 vm.$mount(el),修改如下:
然后再看结果:
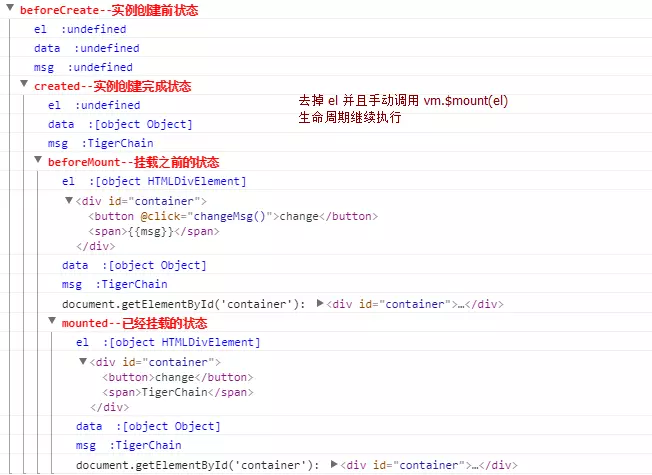
我们看到在去掉 el 并且手动调用 vm.$mount('#container') 的时候,beforeMount 和 mounted 方法调用了「生命周期方法继续进行了」
(3)、我们看有无 template 的情况
我们在原有代码的基础上,在 vue 的 methods 方法后面添加一个模版
methods: {
    changeMsg() {
      this.msg = 'TigerChain'+parseInt(10*Math.random());
    }
  },
// 添加一个模版
template:"<h4>{{'template 中的 msg:'+this.msg}}</h4>",
我们运行查看结果
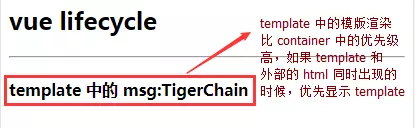
通过结果我们得出的结论是:当 template 和 div 中的 container 中的 html 同时出现的时候,优先使用 template
(4)、添加 render 函数
在 vue 中我们直接可以调用 render 函数来渲染一个页面,一般使用方法如下:
render(createElement):{
    return createElement('标签','内容')
}
我们在代码中的 template 后面添加如下代码
// 使用 render 方法来渲染模版
render(h){
    return h('h4', "这是render 方法渲染出来的")
},
查看结果, 目前我们 template 和 render 、outerhtml 三个同时使用看结果
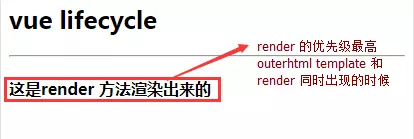
我们到,只显示了 render 方法渲染出来的页面,template 和 outerhtml 都没有显示
PS: 综上所述我们可以得出结论
render 函数的优先级 > template 模版 > outerhtml,也就验证上面生命周期图
- 3、
beforeMount和mounted生命周期函数

修改代码,注释掉 template 和 render 方法
// 添加一个模版
// template:"<h4>{{'template 中的 msg:'+this.msg}}</h4>",
// // 使用 render 方法来渲染模版
// render(h){
//   return h('h4', "这是render 方法渲染出来的")
// },
在这个阶段会使用 vm.$el 把 el 标签替换掉,结果如下:
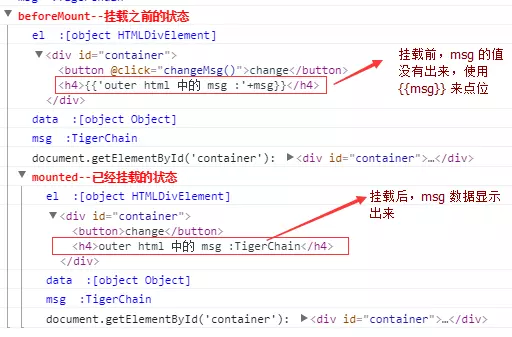
在挂载之前数据使用 {{msg}} 占位,这就是虚拟 DOM 的优势,先把坑占了,到时光放数据,在挂载之后,我们明显的看到了 {{msg}} 被真实的数据替换了
2、beforeUpdate 和 updated 生命周期函数
我们点击页面上的 change 按钮 chorme 中的结果如下:
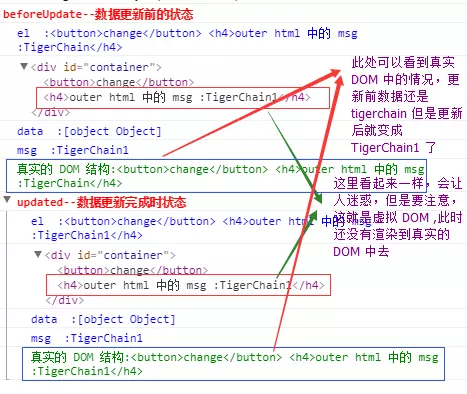
从上图我们可以看到虚拟 DOM 和真实 DOM 的改变,真实 DOM 在更新前没有改变,更新后才发生改变,而虚拟 DOM 则在更新前的时候就改变了
3、beforeDestroy 和 destroyed 生命周期函数
我们看 Vue 的生命周期图如下

我们在代码上添加一个 button 并且调用 destroy() 点击事件去手动调用 vue 的 destroy 方法
<button @click="destroy()">destroy</button>

......

 destroy() {
   this.$destroy()
 }
我们点击 destroy 按钮的时候,查看结果:

单纯的从这个结果上看 beforeDestroy 和 destroyed 结果是一模一样的,其实还是有区别的
在 beforeDestroy 阶段,Vue 实例是完全可以使用的,当调用了 destroyed Vue 实例就会解除所有绑定,所有事件被移除,子组件被销毁,所以以当 destroyed
方法执行了以后,再点击界面上的 change 就再也没有效果了
这样我们就把 Vue 的生命周期做了一个详细的梳理,当然生命周期还有其它的函数,主要的函数就是这些了
四、了解生命周期的作用
那么这些生命周期有什么用呢?我们以在不同的生命周期方法中做不同的操作处理,比如:
PS: 一般情况下我们在 beforecreate 方法中可以加 Loading 事件,在 created 方法中结束 Loading,并且还可以在此方法中做一些初始化操作,在 mounted 方法中进行发起异步服务端请求。当然,如果你想页面没有加载完成就请求数据那么在 created 方法请求数据也没有什么问题,可以在 beforeDestroy 方法中弹出确认删除,destroyed 中清除相关数据达到资源的有效利用
作者:TigerChain
链接:https://www.jianshu.com/p/0d50ea1cef93
来源:简书
简书著作权归作者所有,任何形式的转载都请联系作者获得授权并注明出处。