今天来写一个属于自己的聊天机器人。
思路:当用户点击发送后,需要根据用户输入的内容,提交到服务器,然后由服务器根据你输入的内容,返回对应的结果,我们拿到结果展示到界面上当做机器人的回答即可。
这里使用的接口是图灵机器人,网址:
 1 <div class="chatBox">
 2
 3      <!-- 聊天记录区域 -->
 4      <ul class="container">
 5          <li class="robot">
 6                  <span class="chat-icon"></span>
 7                  <p class="text">我是您的机器人,快来聊天吧!</p>
 8          </li>
 9
10
11          <!-- <li class="user">
12              <p>你好!</p>
13          </li> -->
14      </ul>
15
16
17      <!-- 输入文字区域 -->
18      <div class="sendBox">
19          <input type="text" id="msg">
20          <a href="javascript:;" id="send">发送</a>
21      </div>
22
23  </div>
  1      .chatBox{
  2              position: relative;
  3          width: 346px;
  4          height: 618px;
  5          margin: 50px auto;
  6          background: url(img/phoneBg.png) no-repeat;
  7      }
  8
  9
 10      .container{
 11              position: absolute;
 12          width: 316px;
 13          height: 430px;
 14          padding: 0;
 15          top: 55px;
 16          left: 15px;
 17          list-style: none;
 18          overflow: auto;
 19          /*display: none;*/
 20      }
 21         .container::-webkit-scrollbar {
 22            display: none;
 23         }
 24
 25      .sendBox{
 26              /*display: none;*/
 27              position: absolute;
 28              top: 508px;
 29              left: 14px;
 30          width: 318px;
 31          text-align: center;
 32          padding: 5px 0;
 33          background-color: #eeeeeeb5;
 34          border-top: 1px solid #ccc;
 35      }
 36
 37
 38      .robot{
 39          margin-top: 15px;
 40          text-align: left;
 41      }
 42
 43
 44      .chat-icon,.user-icon{
 45          width: 40px;
 46          height: 40px;
 47          display:inline-block;
 48          border-radius: 20px;
 49      }
 50
 51
 52      .robot .text{
 53          border-radius: 8px;
 54          background-color: #f4f7f9;
 55          margin-left: 10px;
 56          max-width: 210px;
 57          line-height: 20px;
 58          word-break: break-all;
 59          word-wrap: break-word;
 60          display: inline-block;
 61          padding: 5px 0px 5px 5px;
 62      }
 63
 64
 65      .chat-icon{
 66          background: url('./img/haha.jpg') 0% 0% / 100% 100% no-repeat;
 67      }
 68
 69      .user-icon{
 70          background: url('./img/hehe.jpg') 0% 0%/100% 100% no-repeat;
 71      }
 72      .user{
 73          margin-top: 15px;
 74          text-align: right;
 75      }
 76      .user p{
 77          border-radius: 8px;
 78          background-color: #f4f7f9;
 79          margin-right: 10px;
 80          max-width: 210px;
 81          line-height: 20px;
 82          word-break: break-all;
 83          word-wrap: break-word;
 84          display: inline-block;
 85          padding: 5px;
 86          background-color:yellowgreen;
 87      }
 88      #msg{
 89          width: 220px;
 90          height: 25px;
 91          border-radius: 5px;
 92          outline: none;
 93          border: 1px solid #ccc;
 94          padding-left: 5px;
 95      }
 96      #send{
 97              display: inline-block;
 98              text-decoration: none;
 99          width: 60px;
100          height: 28px;
101          line-height: 26px;
102          background-color: yellowgreen;
103          color: #fff;
104          font-size: 14px;
105          border-radius: 5px;
106          outline: none;
107      }
进入http://www.tuling123.com/,点击界面右上方注册

进入注册页面填写相关信息注册


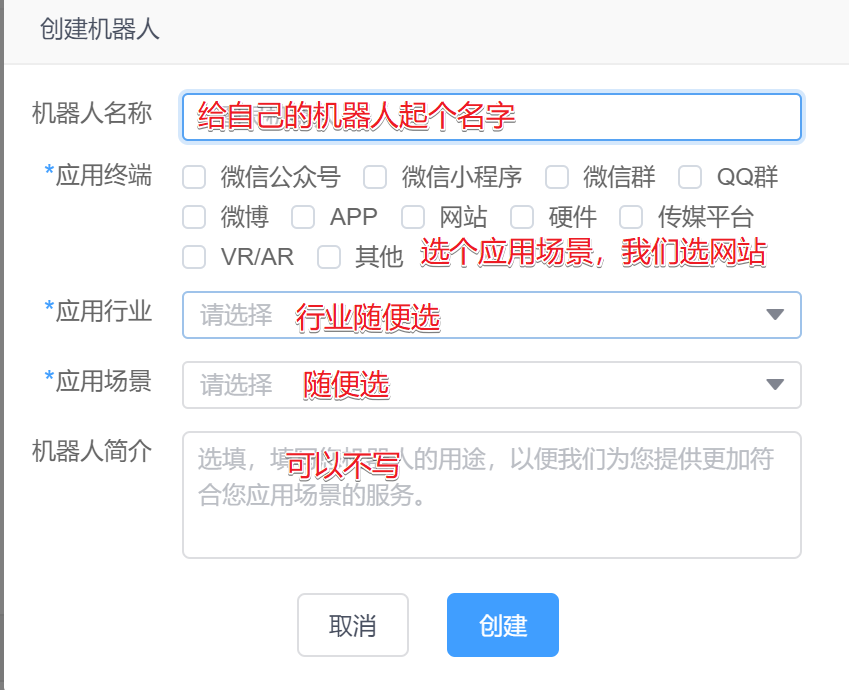
然后按下图填写
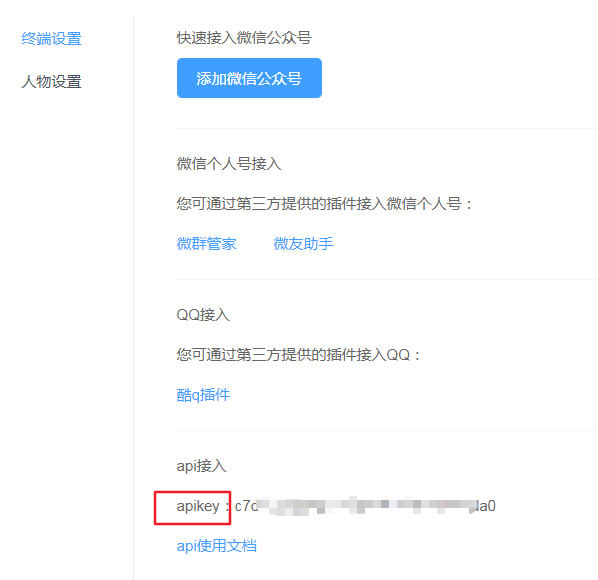
点创建后,会在机器人管理里看到下图


1 //找到聊天面板
2 var container=document.getElementsByClassName('container')[0];
3 //找到发送按钮
4 var send=document.getElementById('send');
5 //给发送按钮添加点击事件
6 send.onclick=function(){}
// 1. 找到输入的文本框
 var msgTxt = document.getElementById('msg');
 // 2. 获取文本框中的内容
 var userMsg = msgTxt.value;
 // 3. 清空文本框内容
 msgTxt.value = "";
 // 4. 创建自己的li标签
 var myLi = document.createElement('li');
 // 5. 设置类名
 myLi.className = "user";
 // 6. 设置内容
 myLi.innerHTML = "<p>"+ userMsg +"</p>";

 // 7. 把自己这部分聊天加到面板
 container.appendChild(myLi);
到此,实现了用户输入什么,界面就显示什么
-
创建异步请求对象(xhr)
-
设置请求行(请求到接口地址,用post请求)
-
设置请求头(POST请求要设置)
-
发送请求主体(请求体里要包含刚刚我们获取的
apikey以及用户输入的内容) -
监听响应完成,拿到服务器返回的内容,显示到界面上
代码如下:
// 1.创建请求对象
var xhr = new XMLHttpRequest();
// 2.设置请求行(get请求数据写在url后面)
xhr.open('POST','http://www.tuling123.com/openapi/api');
// 3.设置请求头(post请求要加)
xhr.setRequestHeader("Content-type","application/x-www-form-urlencoded");

// 4.请求主体发送 包含apikey和用户发送的聊天内容
xhr.send('key=a2b18016f0e44d12abc672c6e1f0c4d6&userid=123&info='+userMsg);
//5.监听响应完成
xhr.onload = function(){

    //5.1 得到返回结果
    var data = JSON.parse(xhr.responseText);

    //5.2 创建机器人的聊天框
    var robotLi = document.createElement('li');
    //5.3 设置类
    robotLi.className = "robot";
    //5.4 设置内容
    robotLi.innerHTML = '<span class="chat-icon"></span><p class="text">' + data.text + '</p>';
    //5.6 添加到页面上
    container.appendChild(robotLi);
}
// 计算container内容总高度
var height = 0;
for(var i = 0; i < container.children.length;i++){
    height += container.children[i].offsetHeight + 15;
}

// 聊天面板滚到最下
container.scrollTop = height;
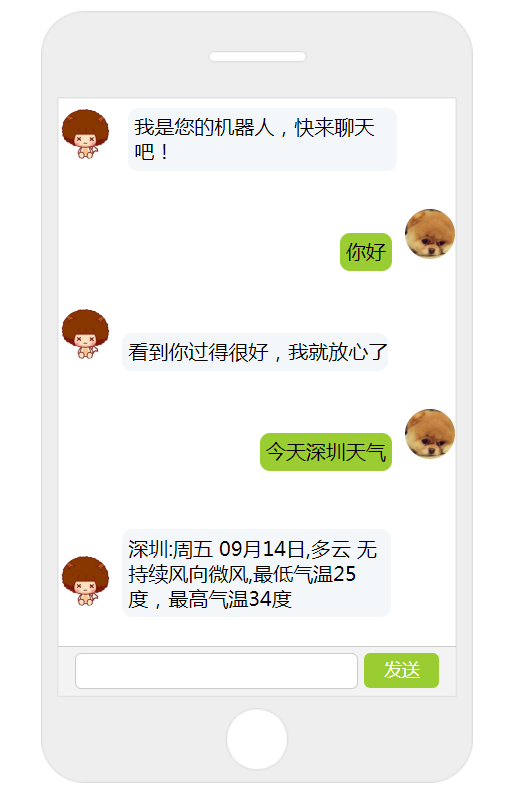
这样就完成创建了一个自己专属的聊天机器人
效果图如下:
完整代码有所改动,已上传至GitHub,有需要下载:https://github.com/KimKangin/robot/tree/master
代码演示:https://kimkangin.github.io/robot