一、Vue插件有什么用
插件通常会为 Vue 添加全局功能。
所谓全局:
即不需要像组件那样,每次使用他前都需要先引入一次。对于插件只要在最开始引入一次,在任何组件就可以直接使用。(类似于我们在window上添加的方法属性那样,任何地方都可以用)
插件能实现的功能没有限制,不过常见下面几种:
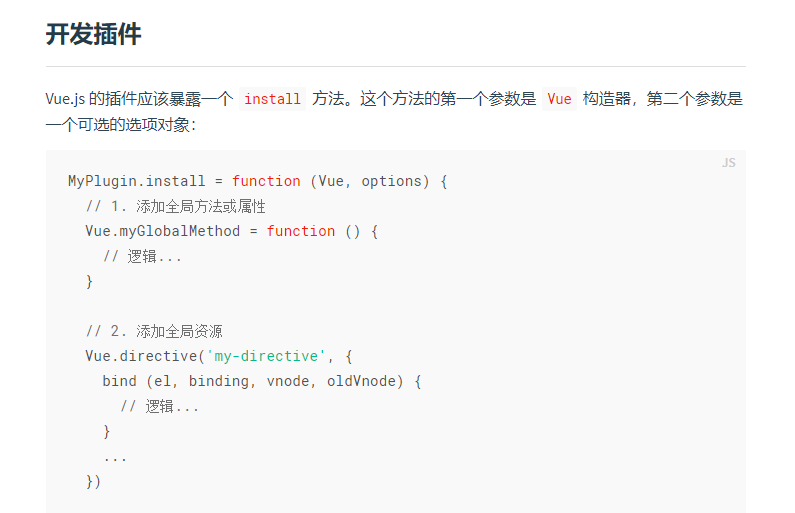
通过插件,添加全局方法或者属性
通过插件,添加全局资源:指令/过滤器/过渡等
通过插件(使用全局 mixin 方法),添加一些组件选项
通过插件,添加 Vue 实例方法,通过把它们添加到 Vue.prototype 上实现。
一个库,提供自己的 API,同时提供上面提到的一个或多个功能,如 vue-router
二、插件原理
所谓vue插件其实就是一个简单的js对象而已,然后这个插件对象有一个公开属性 install ,他的值为一个函数,此函数接受两个参数。第一个参数是 Vue 构造器 , 第二个参数是一个可选的选项对象。
三、插件编写及举例
1、编写插件
// install函数

let Valid = {}
Valid.install = function(Vue, options = { triggEvent: "input" }) {
    // static props 静态属性
    // Vue.t1703C="hello everyone"
    // Vue.t1703C = "1703C"
    // console.log(this) this指向vue  可一直往上查找,可查找到new Vue


    // 所有需要验证的组成一个列表
    let regList = [{
        "type": "phone",
        "RegExp": /^1[345679]d{9}$/,
        "msg": "手机需要11位数字"
    }, {
        "type": "pwd",
        "RegExp": /w{6,9}/
    }, {
        "type": "code",
        "RegExp": /d{4}/
    }]

    Vue.directive("valid", {
        bind(el, binding) {
            // el:dom节点 binding:对象(可使用value)
            // console.log(binding)

            // 失去焦点事件
            el.addEventListener(options.triggEvent, function(e) {
                // console.log(e.target.value)

                // 找到符合条件的对象
                let validObj = regList.find(item => item.type === binding.value)
                if (validObj.RegExp.test(e.target.value)) {
                    console.log("验证通过")
                    e.target.classList.remove(options.errorClass)
                } else {
                    // let span = document.createElement("span");
                    // span.innerText = validObj.msg
                    // e.target.parentNode.appendChild(span)
                    console.log("格式错误")
                    e.target.classList.add(options.errorClass)
                }

            })
        }
    })
}
export default Valid
2、使用
使用插件的时候,在main.js入口文件import引入,再使用use()方法使用即可
import Vue from 'vue'
import App from './App.vue'
import router from './router'
import store from './store'
import ElementUI from 'element-ui';
import 'element-ui/lib/theme-chalk/index.css';
//引入axios
import $http from "@/plugins/$http";
//引入自定义插件插件  v-vaild
import Valid from "@/plugins/validator";

Vue.config.productionTip = false
Vue.use(ElementUI);
//全局的axios
Vue.use($http, { timeout: 2000 });
//自定义插件
Vue.use(Valid, {
    triggEvent: "blur", //triggEvent:事件  value值必须是字符串,
    errorClass: "vaild-error" //errorClass:类名
})

new Vue({
    router,
    store,
    render: h => h(App)
        // created() {
        //     console.log(this)
        // },
}).$mount('#app')
3、在组件中访问
<template>
    <div class="login">
        <header class="loginHeader">登录/注册</header>
        <main class="loginMain">
            <div class="con">
          //在这里使用了自定义插件v-vaild
                <input v-valid="'phone'" placeholder="请输入姓名" v-model="user" class="user"/>
                <input v-valid="'pwd'" placeholder="请输入密码" v-model="password" show-password class="pwd"/>
                <input v-valid="'code'" placeholder="请输入验证码" v-model="code"  class="code"/>
                <span v-html="this.svg" class="captch" @click="upDataCaptch"></span>
                <el-button type="primary" class="btn" @click="handleLogin">登录</el-button>
                <router-link to="/register">注册</router-link>
            </div>
        </main>
    </div>
</template>
<script>
export default {
    props:{

    },
    components:{

    },
    data(){
        return {
            user:"",
            password:"",
            code:"",
            svg:""
        }
    },
    computed:{

    },
    methods:{
        handleLogin(){
            let data={username:this.user,password:this.password,captcha:this.code}
            this.$http.post("/api/buyer/user/login",data).then(res=>{
                window.sessionStorage.setItem("token",res.token)
                console.log(res)
                if(res.code===1){
                   this.$router.push("/list")
                }
            }).finally(()=>{
                // 登录失败再次调用
                this.upDataCaptch()
            })
        },
        upDataCaptch(){
            // 每次点击都请求一次验证码
             this.$http.get("/api/buyer/user/captcha").then(res=>{
                console.log(res)
                this.svg=res.data
            })
        }
    },
    created(){
        // 初始化
        this.upDataCaptch()
    },
    mounted(){

    }
}
</script>
<style  lang="scss">
*{
    padding: 0;
    margin: 0;
    list-style: none;
}
html,body{
     100%;
    height: 100%;
    font-size: calc(100/750*100vw);
}
.login{
     100%;
    height: 100%;
    font-size: calc(.16rem*2);
    display: flex;
    flex-direction: column;
    background: #ebebec;
}
.loginHeader{
     100%;
    height: calc(.5rem*2);
    display: flex;
    justify-content: center;
    align-items: center;
}
.loginMain{
    flex: 1;
    overflow: auto;
}
.con{
     80%;
    height: 80%;
    margin: 0 auto;
    input{
         100%;
        height: calc(.3rem*2);
    }
    .user{
        margin-top: 20px;
    }
    .pwd{
        margin-top: 20px;
    }
    .btn{
        100%;
       height: 10%;
       margin-top: 20px;
    }
    .code{
        margin-top: 20px;
         50%;
    }
     .captch{
        margin-top: 20px;
    }
}
</style>