shiro笔记
权限概述
什么是权限
权限管理,一般根据系统设置的安全策略或者安全规则,用户可以访问而且只能访问自己被授权的资源,不多不少。权限管理几乎出现在任何系统里面,只要有用户和密码的系统
系统管理在系统中一般分为:
- 访问权限
一般表示你能做什么样的操作,或者能够访问那些资源。例如:给张三赋予“店铺主管”角色,“店铺主管”具有“查询员工”、“添加员工”、“修改员工”和“删除员工”权限此时张三能够进入系统,则可以进行这些操作
- 数据权限
一般表示某些数据是否属于你,或者属于你可以操作范围。例如:张三是“店铺主管”角色,他可以看到他手下客服人员所有的服务的买家订单信息,它的手下只能查看自己的订单信息
认证概念
什么是认证
身份认证,就是判断一个用户是否为合法用户的处理过程,。最常用的简单身份认证方式是系统通过核对用户输入的用户名和口令,看其是否与系统中存储的该用户的用户名和口令一致,来判断用户身份是否正确。例如:密码、手机短信登录、三方授权等
认证流程
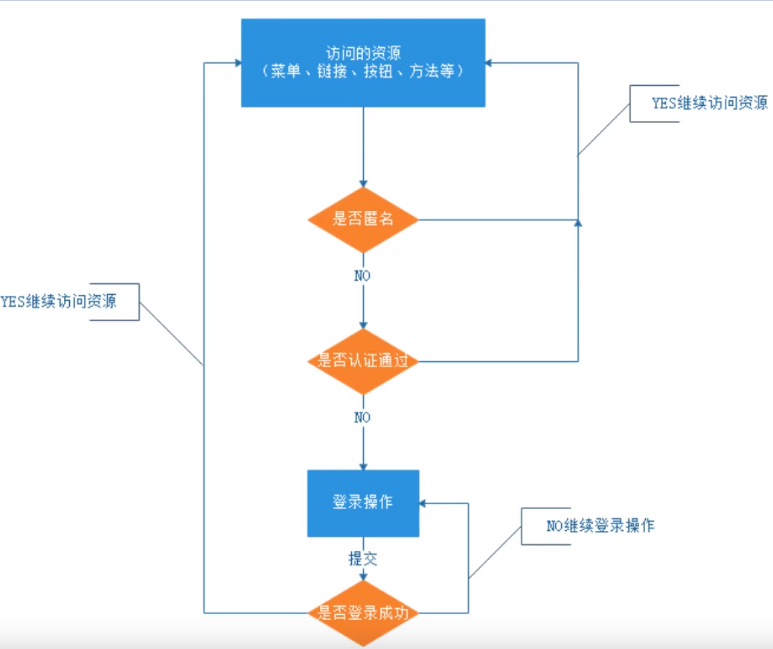
关键对象
上面的流程图中需要理解一下关键对象
Subject:主体:访问系统的用户,主体可以是用户、程序等,进行认证的都称为主体。
Principal:身份信息是主体(Subject)进行身份认证的标识,标识必须具有唯一性,如用户名、手机号、邮箱地址等,一个主体可以有多个身份,但是必须有一个主身份(Primary Principal)
credential:凭证信息: 是只有主体自己知道的安全信息。如密码、证书等。
授权概念
什么是授权
授权,即访问控制,控制谁能访问那些资源。主体进行身份认证后,系统会为其分配对应的权限,当访问资源时,会校验其是否有访问此资源的权限。
这里首先理解4个对象
用户对象user:当前操作的用户、程序
资源对象resource:当前被访问的对象
角色对象role:一组“权限操作许可权”的集合
权限对象permission:权限操作许可权
授权流程
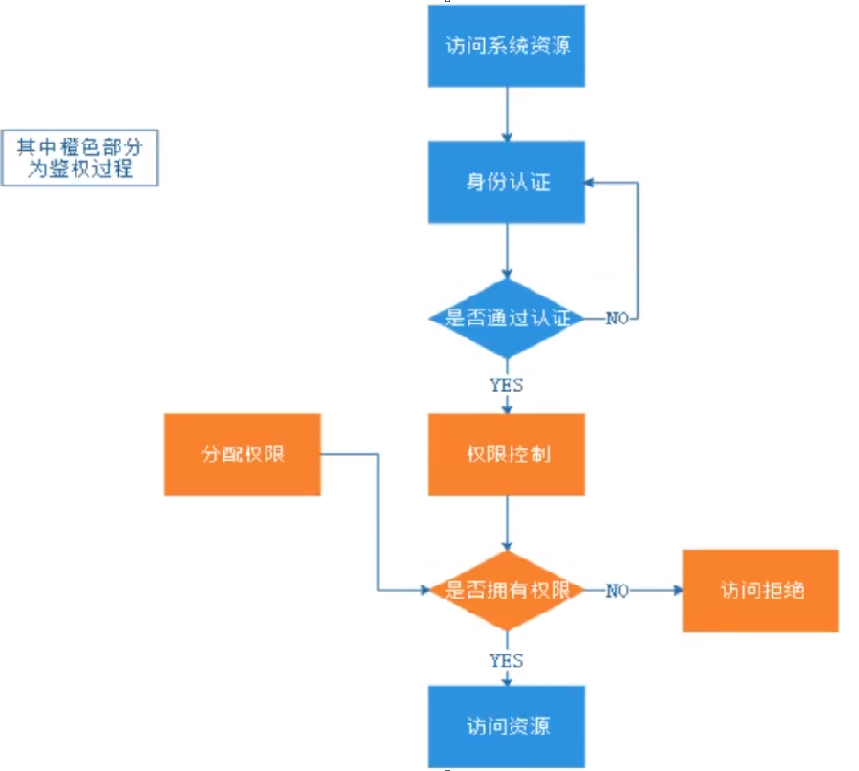
关键对象
授权可简单理解为who对what进行how操作
who:主体(Subject),可以是一个用户、也可以是一个程序
what:资源(Resource),如系统菜单、页面、按钮、方法、系统商品信息等
访问类型:商品菜单、订单菜单、分销商菜单
数据类型:我的商品、我的订单、我的评价
how:权限许可(Permission)
我的商品(资源)====》访问我的商品(权限许可)
分销菜单(资源)====》访问分销商列表(权限许可)
Shiro概述
Shiro简介
什么是Shiro
Shiro是apache旗下一个开源框架,它将软件系统的安全认证相关的功能抽取出来,实现用户身份认证,权限授权、加密、回话管理等功能,组成一个通用的安全认证框架。
Shiro的特点
shiro是一个强大而灵活的开源安全框架,能够非常清晰的处理认证、授权、管理会话以及密码加密。如下是它具有的特点:
- 易于理解的Java Security API;
- 简单的身份认证(登录),支持多种数据源(LDAP、JDBC等);
- 对角色的简单的鉴权(访问控制),也支持细粒度的鉴权;
- 支持一级缓存,以提升应用程序的性能;
- 内置的基于POJO企业会话管理,适用于Web以及非Web的环境
- 异构客户端会话访问;
- 非常简单的加密API;
- 不跟任何的框架或者容器捆绑,可以独立运行。
核心组件
Shiro架构图
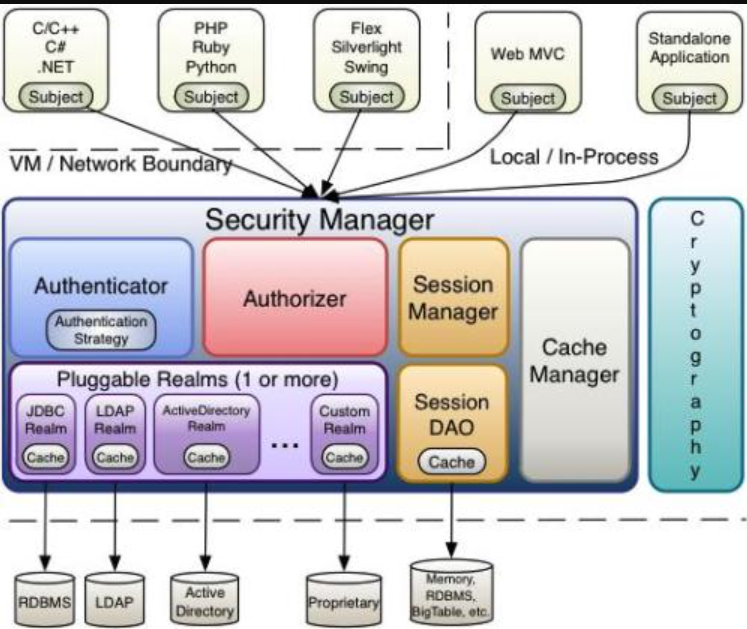
Subject
Subject主体,外部应用于subject进行交互,subject将用户作为当前操作的主体,这个主体:可以是通过浏览器请求的用户,也可能是一个运行的程序。Subject在shiro中是一个接口,接口中定义了很多认证授权相关的方法,外部程序通过subject进行认证授权,而 subject 是通过SecurityManager安全管理器进行认证授权
SecurityManager
SecurityManager权限管理器,它是shiro的核心,负责对所有的subject进行安全管理。通过SecurityManager可以完成subject的认证、授权等,SecurityManager是通过Authenticator进行认证,通过Authorizer进行授权,通过SessionManager进行会话管理等。SecurityManager是一个接口,继承了Authenticator,Authorizer,SessionManager这三个接口
Authenticator
Authenticator即认证器,对用户登录时进行身份认证
Authorizer
Authorizer授权器,用户通过认证器认证通过,在访问功能时需要通过授权其判断用户是否有此功能的操作权限。
Realm(数据库读取+认证功能+授权功能实现)
Realm领域,相当于datasource数据源,SecurityManager进行安全认证需要通过Realm获取用户权限数据
比如:
	如果用户身份数据在数据库那么realm就需要从数据库获取用户身份信息。
注意:
	不要把realm理解成只是从数据源取数据,在realm中还有认证授权的相关的代码
SessionManager
SessionManager会话管理,shiro框架定义了一套会话管理,它不依赖web容器的session,所以shiro可以使用在非web应用上,也可以将分布式应用的会话集中在一点管理,此特性可使它实现单点登录
SessionDAO
SessionDAO即会话dao,是对session会话操作的一套接口
比如:
	可以通过jdbc将会话存储到数据库
	也可以把session存储到缓存服务器
CacheManager
CacheManager缓存管理,将用户权限数据存储在缓存,这样可以提高性能
Cryptography
Cryptography密码管理,shiro提供了一套加密/解密的组件,方便开发。比如提供常用的散列、加/解密等功能
Shiro入门
身份认证
基本流程
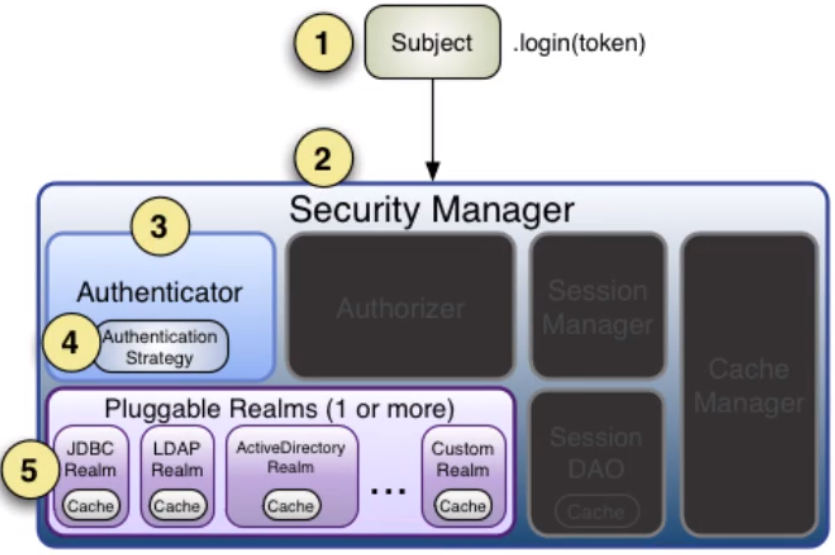
流程如下:
1、Shiro把用户的数据封装成标识token,token一般封装着用户名、密码等信息
2、使用Subject门面获取到封装着用户的数据的标识token
3、Subject把标识token交给SecurityManager,在SecurityManager安全中心,SecurityManager把标识token委托
给认证器Authenticator进行身份验证。认证器的作用一把是用来指定如何验证,它规定本次认证用到哪些Realm
4、认证器Authenticator将传入的标识token,与数据源Realm对比,验证token是否合法
案例演示
需求
使用shiro完成一个用户的登录
实现
导入pom
<dependencies>
    <dependency>
        <groupId>junit</groupId>
        <artifactId>junit</artifactId>
        <version>4.11</version>
    </dependency>
    <dependency>
        <groupId>commons-logging</groupId>
        <artifactId>commons-logging</artifactId>
        <version>1.1.3</version>
    </dependency>
    <dependency>
        <groupId>org.apache.shiro</groupId>
        <artifactId>shiro-core</artifactId>
        <version>1.3.2</version>
    </dependency>
</dependencies>
代码
shiro.ini
# 声明用户账号
[users]
jay=123
HelloShiro.java
public class HelloShiro {

    @Test
    public void shiroLogin() {
        //导入权限ini文件构建权限工厂
        IniSecurityManagerFactory factory
                = new IniSecurityManagerFactory( "classpath:shiro.ini" );
        //工厂构建安全器
        SecurityManager securityManager = factory.getInstance();
        //使用SecurityUtils工具生效安全管理器
        SecurityUtils.setSecurityManager( securityManager );
        //使用Securi tyUtils获得主体
        Subject subject = SecurityUtils.getSubject();
        //构建帐号token
        UsernamePasswordToken token
                = new UsernamePasswordToken( "jay", "123" );
        //登录操作
        subject.login( token );
        //isAuthenticated返回是否认证成功
        System.out.println( "是否登录成功:" + subject.isAuthenticated() );
    }

}
结果:
是否登录成功:true
Realm
Realm接口
shiro默认提供的Realm
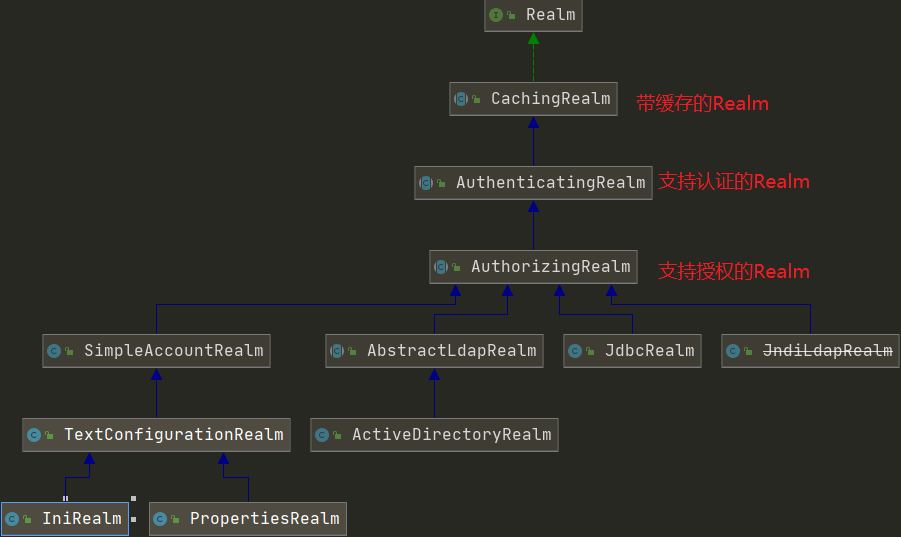
所以,一般真实的项目中,不会直接实现Realm接口,一般的情况就是直接继承AuthorizingRealm,能够继承到认证与授权功能。他需要强制重写两个方法
public class DefinitionRealm extends AuthorizingRealm {

    /**
     * @Description 授权
     * @param principalCollection 令牌
     * @return
     */
    @Override
    protected AuthorizationInfo doGetAuthorizationInfo(PrincipalCollection principalCollection) {
        return null;
    }

    /**
     * @Description 认证
     * @param authenticationToken token对象
     * @return
     * @throws AuthenticationException
     */
    @Override
    protected AuthenticationInfo doGetAuthenticationInfo(AuthenticationToken authenticationToken) throws AuthenticationException {
        return null;
    }
}
自定义Realm
public class DefinitionRealm extends AuthorizingRealm {

    /**
     * @param authenticationToken
     * @return
     * @throws AuthenticationException
     * @Description 认证方法
     */
    @Override
    protected AuthenticationInfo doGetAuthenticationInfo(AuthenticationToken authenticationToken) throws AuthenticationException {
        //获取登录名
        String loginName = (String) authenticationToken.getPrincipal();
        SecurityService securityService = new SecurityServiceImpl();
        String password = securityService.findPasswordByName( loginName );

        if("".equals( password )){
            throw new UnknownAccountException("帐号不存在");
        }

        return new SimpleAuthenticationInfo(loginName,password,getName());
    }

    /**
     * @param principalCollection
     * @return
     * @Description 授权方法
     */
    @Override
    protected AuthorizationInfo doGetAuthorizationInfo(PrincipalCollection principalCollection) {
        return null;
    }
}
public interface SecurityService {
    String findPasswordByName(String name);
}
public class SecurityServiceImpl implements SecurityService {

    @Override
    public String findPasswordByName(String name) {
        return "123";
    }
}
public class HelloShiro {

    @Test
    public void shiroLogin(){
        Factory<SecurityManager> factory
                =  new IniSecurityManagerFactory( "classpath:shiro.ini" );
        SecurityManager securityManager = factory.getInstance();
        SecurityUtils.setSecurityManager( securityManager );
        Subject subject = SecurityUtils.getSubject();
        UsernamePasswordToken token = new UsernamePasswordToken( "zhangsan", "123" );
        subject.login( token );
        System.out.println("登录结果"+subject.isAuthenticated());
    }
}
shiro.ini
[main]
# 声明我们自己的realm
definitionRealm= org.ybl.shiro.realm.DefinitionRealm
securityManager.realms=$definitionRealm
编码、散列算法
编码与解码
Shiro提供了base64和16进制字符串编码/解码的API支持,方便一些编码解码操作。
Shiro内部的一些数据的【存储/表示】都使用了base64和16进制字符串
需求
理解base64和16进制字符串编码/解码
演示
public class EncodesUtil {

    /**
     * @Description Hex-byte[]--String转换
     * @param input 输入数组
     * @return String
     */
    public static String encodeHex(byte[] input) {
        return Hex.encodeToString(input);
    }

    /**
     * @Description Hex-String--byte[]转换
     * @param input 输入字符串
     * @return byte[]
     */
    public static byte[] decodeHex(String input) {
        return Hex.decode( input );
    }

    /**
     * @Description Base64-bytew[]--String转换
     * @param input 输入数组
     * @return String
     */
    public static String encodeBase64(byte[] input) {
        return Base64.encodeToString( input );
    }

    /**
     * @Description Base-String--byte[]转换
     * @param input 输入字符串
     * @return byte数组
     */
    public static byte[] decodeBase64(String input) {
        return Base64.decode( input );
    }
}
public class ClientTest {

    /**
     * @Description 测试16进制编码
     */
    @Test
    public void testHex() {
        String val = "hello";
        String flag = EncodesUtil.encodeHex( val.getBytes() );
        String valHandler = new String( EncodesUtil.decodeHex( flag ) );
        System.out.println( "比较结果:" + val.equals( valHandler ) );
    }

    /**
     * @Description 测试Base64编码
     */
    @Test
    public void testBase64() {
        String val = "hello";
        String flag = EncodesUtil.encodeBase64( val.getBytes() );
        String valHandler = new String( EncodesUtil.decodeBase64( flag ) );
        System.out.println( "比较结果:" + val.equals( valHandler ) );
    }

}
散列算法
散列算法一般用于生成数据的摘要信息,是一种不可逆的算法,一般适合存储密码之类的数据,常见的散列算法如MD5,SHA等。一般进行散列时最好提供一个salt(盐),比如加密密码“admin”,产生的散列值是"21232f297a57a5a743894a0e4a801fc3",可以到一些md5解密网站很容易的通过散列值得到密码"admin",即如果直接对密码进行散列相对来说更容易破解,此时我们可以加一些只有系统知道的干扰数据,如salt(盐);这样散列的对象是“密码+salt”,这样生成的散列值相对来说更难破解。
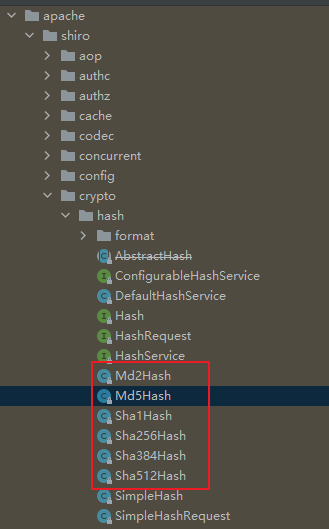
shiro支持的散列算法:
Md2Hash、Md5Hash、Sha1Hash、Sha256Hash、Sha384Hash、Sha521Hash
演示
public class DigestsUtil {

    //加密方式
    private static final String SHA1 = "SHA-1";
    //加密次数
    private static final Integer ITERATIONS = 512;

    /**
     * @param input 需要散列的字符串
     * @param salt  盐字符串
     * @return
     * @Description sha1方法
     */
    public static String sha1(String input, String salt) {
        return new SimpleHash( SHA1, input, salt, ITERATIONS ).toString();
    }

    /**
     * @return Hex编码的salt
     * @Description 随机获得salt字符串
     */
    public static String generateSalt() {
        //用于生成随机字符串
        SecureRandomNumberGenerator random = new SecureRandomNumberGenerator();
        return random.nextBytes().toHex();
    }

    /**
     * @param passwordPlain
     * @return
     * @Description 生成密码字符密文和salt密文
     */
    public static Map<String, String> entryptPassword(String passwordPlain) {
        HashMap<String, String> map = new HashMap<>();
        String salt = generateSalt();
        String password = sha1( passwordPlain, salt );
        map.put( "salt", salt );
        map.put( "password", password );
        return map;
    }

}
@Test
public void TestDigestsUtil() {
    Map<String, String> map = DigestsUtil.entryptPassword( "123" );

    System.out.println("salt:"+map.get( "salt" ));
    System.out.println("password:"+map.get( "password" ));
}
Realm使用散列算法
演示
public class DigestsUtil {
    //加密方式
    public static final String SHA1 = "SHA-1";
    //加密次数
    public static final Integer ITERATIONS = 512;
    /**
     * @param input 需要散列的字符串
     * @param salt  盐字符串
     * @return
     * @Description sha1方法
     */
    public static String sha1(String input, String salt) {
        return new SimpleHash( SHA1, input, salt, ITERATIONS ).toString();
    }
    /**
     * @return Hex编码的salt
     * @Description 随机获得salt字符串
     */
    public static String generateSalt() {
        //用于生成随机字符串
        SecureRandomNumberGenerator random = new SecureRandomNumberGenerator();
        return random.nextBytes().toHex();
    }
    /**
     * @param passwordPlain
     * @return
     * @Description 生成密码字符密文和salt密文
     */
    public static Map<String, String> entryptPassword(String passwordPlain) {
        HashMap<String, String> map = new HashMap<>();
        String salt = generateSalt();
        String password = sha1( passwordPlain, salt );
        map.put( "salt", salt );
        map.put( "password", password );
        return map;
    }
}
public interface SecurityService {
    Map<String,String> findPasswordByName(String name);
}
public class SecurityServiceImpl implements SecurityService {
    @Override
    public Map<String, String> findPasswordByName(String name) {
        return DigestsUtil.entryptPassword( "123" );
    }
}
public class DefinitionRealm extends AuthorizingRealm {

    public DefinitionRealm() {
        //指定密码匹配方式
        HashedCredentialsMatcher hashedCredentialsMatcher
                = new HashedCredentialsMatcher( DigestsUtil.SHA1);
        //指定密码迭代次数
        hashedCredentialsMatcher.setHashIterations( DigestsUtil.ITERATIONS );

        //使用父层方法使匹配方式生效
        setCredentialsMatcher( hashedCredentialsMatcher );
    }

    /**
     * @param authenticationToken
     * @return
     * @throws AuthenticationException
     * @Description 认证方法
     */
    @Override
    protected AuthenticationInfo doGetAuthenticationInfo(AuthenticationToken authenticationToken) throws AuthenticationException {
        //获取登录名
        String loginName = (String) authenticationToken.getPrincipal();
        SecurityService securityService = new SecurityServiceImpl();
        Map<String, String> map = securityService.findPasswordByName( loginName );


        if (map.isEmpty()) {
            throw new UnknownAccountException( "帐号不存在" );
        }

        String salt = map.get( "salt" );
        String password = map.get( "password" );

        return new SimpleAuthenticationInfo( loginName, password, ByteSource.Util.bytes( salt ), getName() );
    }

    /**
     * @param principalCollection
     * @return
     * @Description 授权方法
     */
    @Override
    protected AuthorizationInfo doGetAuthorizationInfo(PrincipalCollection principalCollection) {
        return null;
    }
}
[main]
definitionRealm= org.ybl.shiro.realm.DefinitionRealm
securityManager.realms=$definitionRealm
身份授权
基本流程
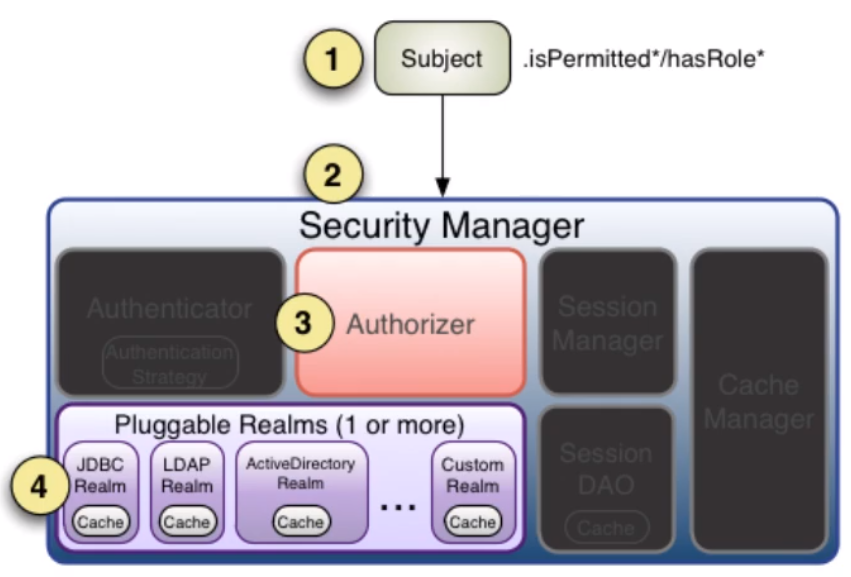
1、首先调用Subject.isPermitted/hashRole接口,其会委托给SecurityManager
2、SecurityManager接着会委托给内部组件Authorizer
3、Authorizer再将其请求委托给我们的Realm去做,Realm才是真正干活的。
4、Realm将用户请求的参数封装成权限对象。再从我们重写的doGetAuthorizationInfo方法中获取从数据库中查询到的权限集合
5、Realm将用户传入的权限对象,与从数据库中查出来的权限对象,进行一一对比。如果用户传入的权限对象在从数据库中查出来的权限对象中,则返回true,否则返回false
进行授权操作的前提:用户必须通过认证。
在项目中,角色与权限存放在数据库中。为了快速上手,我们先创建一个自定义的DefinitionRealm,模拟它已经登录成功。直接返回一个登录验证凭证,告诉Shiro框架,我们从数据库中查询出来的密码就是输入的密码。所以不管用户输入什么,本次登录验证都是通过的。
演示
public class HelloShiro {


    public Subject shiroLogin() {
        Factory<SecurityManager> factory
                = new IniSecurityManagerFactory( "classpath:shiro.ini" );
        SecurityManager securityManager = factory.getInstance();
        SecurityUtils.setSecurityManager( securityManager );
        Subject subject = SecurityUtils.getSubject();
        UsernamePasswordToken token = new UsernamePasswordToken( "zhangsan", "123" );
        subject.login( token );

        return subject;
    }

    @Test
    public void testPermissionRealm() {
        Subject subject = shiroLogin();
        System.out.println( "登录结果" + subject.isAuthenticated() );
        //校验当前用户是否拥有管理员的权限
        System.out.println( "是否拥有管理员角色:" + subject.hasRole( "admin" ) );

        try {
            subject.checkRole( "coder" );
            System.out.println("当前用户有coder角色");
        } catch (Exception e) {
            System.out.println("当前用户没有coder角色");
        }

        //校验当前用户的权限信息
        System.out.println( "是否又查看订单的权限:" + subject.isPermitted( "order:list" ) );

        try {
            subject.checkPermission( "order:update" );
            System.out.println("当前用户有update权限");
        } catch (Exception e) {
            System.out.println("当前用户没有update权限");
        }
    }
}
/**
 * @Description 查询角色
 * @param name 登录名
 * @return 角色信息
 */
List<String>  findRoleByLoginName(String name);

/**
 * @Description 查询资源
 * @param name 用户名
 * @return 资源字符串列表
 */
List<String> findPermissinByLoginName(String name);
@Override
public List<String> findRoleByLoginName(String name) {
    ArrayList<String> roleList = new ArrayList<>();
    roleList.add("admin");
    roleList.add("dev");

    return roleList;
}

@Override
public List<String> findPermissinByLoginName(String name) {
    ArrayList<String> permList = new ArrayList<>();
    permList.add("order:add");
    permList.add("order:list");
    permList.add("order:del");
    return permList;
}
/**
 * @param principalCollection
 * @return
 * @Description 授权方法
 */
@Override
protected AuthorizationInfo doGetAuthorizationInfo(PrincipalCollection principalCollection) {
    //拿到凭证信息
    String loginName = (String) principalCollection.getPrimaryPrincipal();
    //从数据库中查询对应的角色、资源
    SecurityService securityService = new SecurityServiceImpl();
    List<String> roles
            = securityService.findRoleByLoginName( loginName );
    List<String> permList
            = securityService.findPermissinByLoginName( loginName );
    //构建资源,校验对象

    SimpleAuthorizationInfo simpleAuthorizationInfo = new SimpleAuthorizationInfo();
    simpleAuthorizationInfo.addRoles( roles );
    simpleAuthorizationInfo.addStringPermissions( permList );
    return simpleAuthorizationInfo;
}
Web项目集成Shiro
Web集成原理分析
web集成的配置
在没有WEB环境进行集成的时候,为了生成SecurityManager对象,是通过手动读取配置文件生成工厂对象的,再通过工厂对象获取到SecurityManager的。就像下面的代码:
public void shiroLogin() {
    //导入权限ini文件构建权限工厂
    Factory<SecurityManager> factory
            = new IniSecurityManagerFactory( "classpath:shiro.ini" );
    //工厂构建安全器
    SecurityManager securityManager = factory.getInstance();
    //使用SecurityUtils工具生效安全管理器
    SecurityUtils.setSecurityManager( securityManager );
    //使用SecurityUtils获得主体
    Subject subject = SecurityUtils.getSubject();
    //构建帐号token
    UsernamePasswordToken token
            = new UsernamePasswordToken( "jay", "123" );
    //登录操作
    subject.login( token );
    //isAuthenticated返回是否认证成功
    System.out.println( "是否登录成功:" + subject.isAuthenticated() );
}
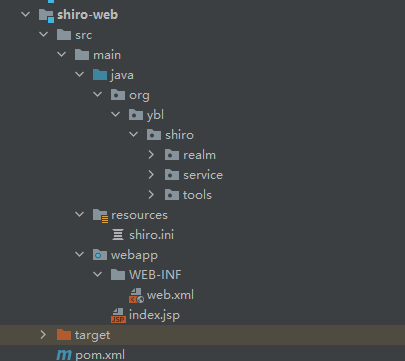
不过,现在我们既然锁要与WEB集成,那么首先要做的事情就是把我们的shiro.ini配置文件复制到WEB项目中,shiro.ini文件如下
[main]
definitionRealm= org.ybl.shiro.realm.DefinitionRealm
securityManager.realms=$definitionRealm
新建项目
shiro-web
导入pom
<dependencies>
    <dependency>
        <groupId>junit</groupId>
        <artifactId>junit</artifactId>
        <version>4.11</version>
    </dependency>
    <dependency>
        <groupId>commons-logging</groupId>
        <artifactId>commons-logging</artifactId>
        <version>1.1.3</version>
    </dependency>
    <dependency>
        <groupId>org.apache.shiro</groupId>
        <artifactId>shiro-core</artifactId>
        <version>1.3.2</version>
    </dependency>
    <dependency>
        <groupId>org.apache.shiro</groupId>
        <artifactId>shiro-web</artifactId>
        <version>1.3.2</version>
    </dependency>
</dependencies>

<build>
    <plugins>
        <plugin>
            <groupId>org.apache.tomcat.maven</groupId>
            <artifactId>tomcat7-maven-plugin</artifactId>
            <version>2.2</version>
            <configuration>
                <uriEncoding>utf-8</uriEncoding>
                <port>8080</port>
                <path>/platform</path>
            </configuration>
        </plugin>
        <plugin>
            <groupId>org.apache.maven.plugins</groupId>
            <artifactId>maven-compiler-plugin</artifactId>
            <version>3.1</version>
            <configuration>
                <source>8</source>
                <target>8</target>
                <showWarnings>true</showWarnings>
            </configuration>
        </plugin>
    </plugins>
</build>
web.xml
 <!--启动时加载shiro的环境-->
<listener>
    <listener-class>org.apache.shiro.web.env.EnvironmentLoaderListener</listener-class>
</listener>
<!--创建权限管理器的上下文-->
<context-param>
    <param-name>shiroEvnironmentClass</param-name>
    <param-value>org.apache.shiro.web.env.IniWebEnvironment</param-value>
</context-param>
<!--加载ini文件-->
<context-param>
    <param-name>shiroConfigLocations</param-name>
    <param-value>classpath:shiro.ini</param-value>
</context-param>
<!--配置shiro的统一过滤路径-->
<filter>
    <filter-name>shiroFilter</filter-name>
    <filter-class>org.apache.shiro.web.servlet.ShiroFilter</filter-class>
</filter>
<filter-mapping>
    <filter-name>shiroFilter</filter-name>
    <url-pattern>/*</url-pattern>
</filter-mapping>
SecurityManager对象创建
上面集成shiro到web项目了,下面我们来追踪源码,看下SecurityManager对象是如何创建的
1、启动服务器,监听器捕获到服务器启动事件,现在所处的位置EnvironmentLoaderListener监听器
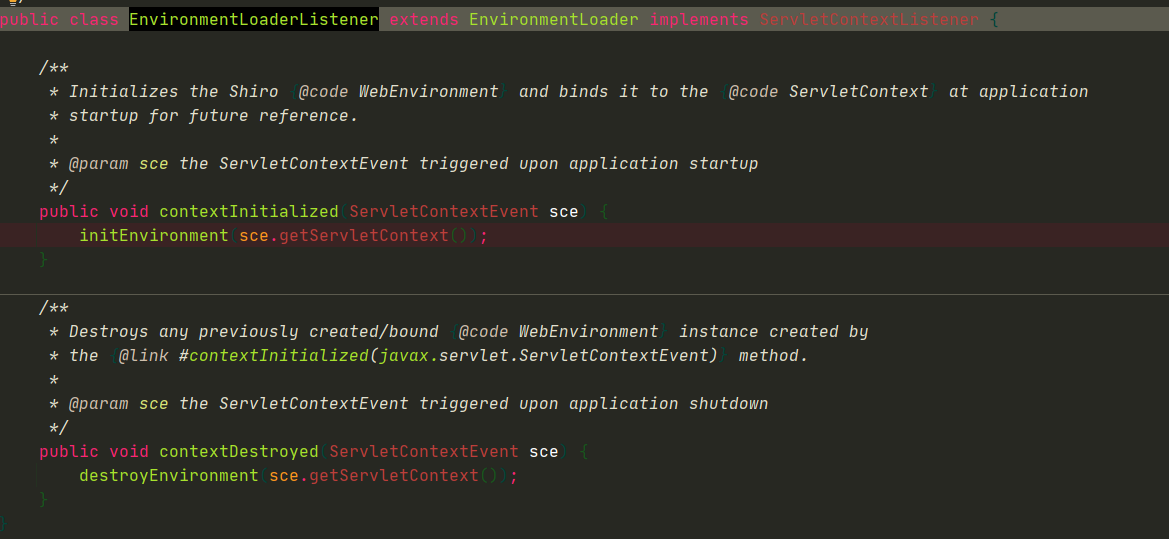
2、调用initEnvironment方法
public WebEnvironment initEnvironment(ServletContext servletContext) throws IllegalStateException {

    if (servletContext.getAttribute(ENVIRONMENT_ATTRIBUTE_KEY) != null) {
        String msg = "There is already a Shiro environment associated with the current ServletContext.  " +
            "Check if you have multiple EnvironmentLoader* definitions in your web.xml!";
        throw new IllegalStateException(msg);
    }

    servletContext.log("Initializing Shiro environment");
    log.info("Starting Shiro environment initialization.");

    long startTime = System.currentTimeMillis();

    try {
        WebEnvironment environment = createEnvironment(servletContext);
3、来到15行,调用createEnvironment创建环境
protected WebEnvironment createEnvironment(ServletContext sc) {
	//创建了一个IniWebEnvironment类
    Class<?> clazz = determineWebEnvironmentClass(sc);
    if (!MutableWebEnvironment.class.isAssignableFrom(clazz)) {
        throw new ConfigurationException("Custom WebEnvironment class [" + clazz.getName() +
                                         "] is not of required type [" + MutableWebEnvironment.class.getName() + "]");
    }

    //从shiroConfigLocations,也就是shiro.ini文件中获取配置
    String configLocations = sc.getInitParameter(CONFIG_LOCATIONS_PARAM);
    boolean configSpecified = StringUtils.hasText(configLocations);

    if (configSpecified && !(ResourceConfigurable.class.isAssignableFrom(clazz))) {
        String msg = "WebEnvironment class [" + clazz.getName() + "] does not implement the " +
            ResourceConfigurable.class.getName() + "interface.  This is required to accept any " +
                "configured " + CONFIG_LOCATIONS_PARAM + "value(s).";
        throw new ConfigurationException(msg);
    }

    MutableWebEnvironment environment = (MutableWebEnvironment) ClassUtils.newInstance(clazz);

    environment.setServletContext(sc);

    if (configSpecified && (environment instanceof ResourceConfigurable)) {
        ((ResourceConfigurable) environment).setConfigLocations(configLocations);
    }

    customizeEnvironment(environment);
	//这里就是用来初始化IniWebEnvironment的
    LifecycleUtils.init(environment);

    return environment;
}
public void init() {
    Ini ini = getIni();
    /**
    	中间省略
    */
    configure();
}
protected void configure() {

    this.objects.clear();
	//WebSecurityManager这个类是继承自SecurityManager
    WebSecurityManager securityManager = createWebSecurityManager();
    setWebSecurityManager(securityManager);

    FilterChainResolver resolver = createFilterChainResolver();
    if (resolver != null) {
        setFilterChainResolver(resolver);
    }
}
Shiro默认过滤器
Shiro内置了很多默认的过滤器,比如身份验证、授权等相关的。默认过滤器可以参考
org.apache.shiro.web.filter.mgt.DefaultFilter中的枚举过滤器
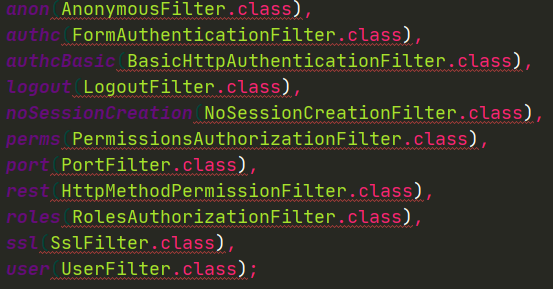
认证相关
| 过滤器 | 过滤器类 | 说明 | 默认 |
|---|---|---|---|
| authc | FormAuthenticationFilter | 指定url需要form表单登录,默认会从请求中获取,username,password,rememberMe等参数并尝试登录,如果登录不了就会跳转到loginUrl配置的路径。也可以用这个过滤器做默认的登录逻辑,但是一般都是自己在控制器写登录逻辑的。自己写的话出错返回的信息都可以定制 |
无 |
| authcBasic | BasicHttpAuthenticationFIlter | 指定url需要basic登录 | |
| logout | LogoutFilter | 退出过滤器,主要属性:redirectUrl:退出成功后重定向的地址,如"logout=logout" | / |
| anon | AnonymousFilter | 匿名过滤器,即不需要登录即可访问;一般用于静态资源过滤;实例“/static/**=anon” | 无 |
授权相关
| 过滤器 | 过滤器类 | 说明 | |
|---|---|---|---|
| noSessionCreation | NoSessionCreationFilter | 禁止创建会话 | |
| roles | RolesAuthorizationFilter | 角色授权过滤器,验证用户是否拥有所有角色;主要属性:loginUrl:登录页面地址(/login.jsp);unauthorizedUrl:未授权后重定向的地址;示例:“/admin/**=roles[admin]” | |
| perms | PermissionsAuthorizationFilter | 权限授权拦截器,验证用户是否拥有所有权限;属性和roles一样;示例"/user/**=perms["user:create"]" | |
| port | PortFilter | 端口拦截器,主要属性:port(80):可以通过的端口;示例:“/test=port(80)”,如果用户访问该页面时非80端口,将自动将请求端口改为80,并重定向到该80端口,其他路径/参数等都一样 | |
| rest | HttpMethodPermissionFilter | rest风格拦截器,自动根据请求方法构建权限字符串(GET=read,POST=create,PUT=update,DELETE=delete,HEAD=read,TRACE=reaad,OPTIONS=read,MKCOL=create)构建权限字符串:示例:“/user=rest[user]”会自动拼处“user:read,user:create:user:update,user:delete”权限字符串进行权限匹配(所有都得匹配,isPermittedALl) | |
| ssl | SslFilter | SSL拦截器,只有请求协议https才能通过;否则自动跳转回https端口(443);其他和port拦截器一样; | |
| user | UserFilter | 需要已登录或“记住我”的用户才能访问 |
Web集成完整案例
pom.xml
<dependency>
    <groupId>junit</groupId>
    <artifactId>junit</artifactId>
    <version>4.11</version>
</dependency>
<dependency>
    <groupId>commons-logging</groupId>
    <artifactId>commons-logging</artifactId>
    <version>1.1.3</version>
</dependency>
<dependency>
    <groupId>org.apache.shiro</groupId>
    <artifactId>shiro-core</artifactId>
    <version>1.3.2</version>
</dependency>
<dependency>
    <groupId>org.apache.shiro</groupId>
    <artifactId>shiro-web</artifactId>
    <version>1.3.2</version>
</dependency>
<dependency>
    <groupId>javax.servlet</groupId>
    <artifactId>servlet-api</artifactId>
    <version>2.2</version>
    <scope>provided</scope>
</dependency>
<dependency>
    <groupId>javax.servlet.jsp.jstl</groupId>
    <artifactId>jstl</artifactId>
    <version>1.2</version>
</dependency>
<dependency>
    <groupId>org.apache.taglibs</groupId>
    <artifactId>taglibs-standard-impl</artifactId>
    <version>1.2.5</version>
</dependency>
shiro.ini
[main]
definitionRealm= org.ybl.shiro.realm.DefinitionRealm
securityManager.realms=$definitionRealm
#用户退出后跳转指定JSP页面
logout.redirectUrl=/login.jsp
#若没有登录,则被authc过滤器重定向到login.jsp
authc.loginUrl=/login.jsp
[urls]
/login=anon
#发送/home请求需要先登录
/home=authc
#发送/order/list请求需要先登录
/order-list=roles[admin]
#添加订单需要order:add权限
/order-add=perms["order:add"]
#删除订单需要order:del权限
/order-del=perms["order:del"]
#发送退出请求则用退出过滤器
/logout=logout
LoginService
public interface LoginService {
    /**
     * @Description 登录方法
     * @param token 登录对象
     * @return 是否登录成功
     */
    boolean login(UsernamePasswordToken token);
    /**
     * @Description 登出方法
     */
    void logout();
}
LoginServiceImpl
public class LoginServiceImpl implements LoginService {
    @Override
    public boolean login(UsernamePasswordToken token) {
        Subject subject = SecurityUtils.getSubject();
        try {
            subject.login( token );
            return true;
        } catch (Exception e) {
            System.out.println( e.getMessage() );
        }
        return subject.isAuthenticated();
    }
    @Override
    public void logout() {
        Subject subject = SecurityUtils.getSubject();
        subject.logout();
    }
}
SecurityServiceImpl
public class SecurityServiceImpl implements SecurityService {
    @Override
    public Map<String, String> findPasswordByName(String name) {
        return DigestsUtil.entryptPassword( "123" );
    }
    @Override
    public List<String> findRoleByLoginName(String name) {
        ArrayList<String> roleList = new ArrayList<>();
        if("admin".equals( name )){
            roleList.add("admin");
        }
        roleList.add("dev");
        return roleList;
    }
    @Override
    public List<String> findPermissinByLoginName(String name) {
        ArrayList<String> permList = new ArrayList<>();
        if("jar".equals(name)){
            permList.add("order:add");
            permList.add("order:list");
            permList.add("order:del");
        }
        return permList;
    }
}
Web层
HomeServlet
@WebServlet(urlPatterns = "/home")
public class HomeServlet extends HttpServlet {
    @Override
    public void doGet(HttpServletRequest req, HttpServletResponse resp) throws IOException, ServletException {
        doPost( req, resp );
    }

    @Override
    protected void doPost(HttpServletRequest req, HttpServletResponse resp) throws IOException, ServletException {
        req.getRequestDispatcher( "/home.jsp" ).forward( req,resp );
    }
}
LoginServlet
@WebServlet(urlPatterns = "/login")
public class LoginServlet extends HttpServlet {

    @Override
    public void doGet(HttpServletRequest req, HttpServletResponse resp) throws IOException, ServletException {
        doPost( req, resp );
    }

    @Override
    protected void doPost(HttpServletRequest req, HttpServletResponse resp) throws IOException, ServletException {
        //获得用户名和密码
        String loginName = req.getParameter( "loginName" );
        String password = req.getParameter( "password" );
        //构建登录用的token
        UsernamePasswordToken token = new UsernamePasswordToken( loginName, password );
        //登录操作
        LoginService loginService = new LoginServiceImpl();
        boolean isLogin = loginService.login( token );
        //登录成功,挑中home.jsp
        if (isLogin) {
            req.getRequestDispatcher( "/home" ).forward( req, resp );
        }
        //如果登录失败,跳转到登录页面
        resp.sendRedirect( "login.jsp" );
    }
}
LogoutServlet
@WebServlet(urlPatterns = "/logout")
public class LogoutServlet extends HttpServlet {
    @Override
    public void doGet(HttpServletRequest req, HttpServletResponse resp) throws IOException, ServletException {
        doPost( req, resp );
    }

    @Override
    protected void doPost(HttpServletRequest req, HttpServletResponse resp) throws IOException, ServletException {
        LoginServiceImpl loginService = new LoginServiceImpl();
        loginService.logout();
    }
}
OrderAddServlet
@WebServlet(urlPatterns = "/order-add")
public class OrderAddServlet extends HttpServlet {
    @Override
    public void doGet(HttpServletRequest req, HttpServletResponse resp) throws IOException, ServletException {
        doPost( req, resp );
    }
    @Override
    protected void doPost(HttpServletRequest req, HttpServletResponse resp) throws IOException, ServletException {
        req.getRequestDispatcher( "/order-add.jsp" ).forward( req, resp );
    }
}
OrderListServlet
@WebServlet(urlPatterns = "/order-list")
public class OrderListServlet extends HttpServlet {
    @Override
    public void doGet(HttpServletRequest req, HttpServletResponse resp) throws IOException, ServletException {
        doPost( req, resp );
    }

    @Override
    protected void doPost(HttpServletRequest req, HttpServletResponse resp) throws IOException, ServletException {
        req.getRequestDispatcher( "/order-list.jsp" ).forward( req, resp );
    }
}
JSP页面
home.jsp
<%@ taglib prefix="c" uri="http://java.sun.com/jsp/jstl/core" %>
<%@ page contentType="text/html;charset=UTF-8" language="java" %>
<html>
<head>
    <title>home</title>
</head>
<body>
<h6>
    <a href="/logout">退出</a>
    <a href="/order-list">列表</a>
    <a href="/order-add">添加</a>
</h6>
</body>
</html>
login.jsp
<%@ page contentType="text/html;charset=UTF-8" language="java" %>
<html>
  <head>

    <title>login</title>
  </head>
  <body>
    <form method="post" action="/login">
        <table>
            <tr>
                <th>登录名</th>
                <td><input type="text" name="loginName"/></td>
            </tr>
            <tr>
                <th>密码</th>
                <td><input type="password" name="password"/></td>
            </tr>
            <tr>
                <td>
                    <input type="submit" value="提交"/>
                </td>
            </tr>
        </table>
    </form>
  </body>
</html>
order-add.jsp
<%@ page contentType="text/html;charset=UTF-8" language="java" %>
<html>
<head>

    <title>order-add</title>
</head>
<body>
    添加页面
</body>
</html>
用户列表页面
<%@ page contentType="text/html;charset=UTF-8" language="java" %>
<%@ taglib prefix="c" uri="http://java.sun.com/jsp/jstl/core" %>
<html>
<head>

    <title>用户列表页面</title>
    <style>
        table {
            border: 1px solid #000000;
        }

        table th {
            border: 1px solid #000000;
        }

        table td {
            border: 1px solid #000000;
        }
    </style>
</head>
<body>
    <table cellpadding="0" cellspacing="0" width="80%">
        <tr>
            <th>编号</th>
            <th>公司名称</th>
            <th>信息来源</th>
            <th>所属行业</th>
            <th>级别</th>
            <th>联系地址</th>
            <th>联系电话</th>
        </tr>
        <tr>
            <th>1</th>
            <th>传智播客</th>
            <th>网络营销</th>
            <th>互联网</th>
            <th>普通客户</th>
            <th>津安创意园</th>
            <th>123456789</th>
        </tr>
        <tr>
            <th>2</th>
            <th>黑马程序员</th>
            <th>j2ee</th>
            <th>互联网</th>
            <th>VIP客户</th>
            <th>津安创意园</th>
            <th>321654987</th>
        </tr>
        <tr>
            <th>3</th>
            <th>黑马程序员</th>
            <th>大数据</th>
            <th>互联网</th>
            <th>VIP客户</th>
            <th>津安创意园</th>
            <th>321654987</th>
        </tr>
    </table>
</body>
</html>
Web项目授权
前面我们学习了基于ini文件配置方式来完成授权,下面我们来看看其他2种方式的授权
基于代码
登录相关
| Subject登录相关方法 | 描述 |
|---|---|
| isAuthenticated() | 返回true表示已经登录,否则返回false |
角色相关
| Subject角色相关方法 | 描述 |
|---|---|
| hashRole(String roleName) | 返回true如果Subject被分配了指定的角色,否则返回false |
| hashRole(List |
返回true 如果Subject被分配了所有指定的角色,否则返回false |
| hashAllRoles(Collection |
返回一个与方法参数目录一致的hasRole结果的集合。有性能的提高,如果许多角色需要执行检查(例如,当自定义一个复杂的视图的时候) |
| checkRole(String roleName) | 安静地返回,如果Subject被分配了指定的角色,不然的话就抛出AuthorizationException |
| checkRoles(Collection |
安静地返回,如果Subject被分配了所有的指定的角色,不然的话就抛出AuthorizationException |
| checkRoles(String... roleNames) | 与上面的checkRoles方法的效果相同,但允许Java5的var-args类型的参数 |
资源相关
| Subject资源相关方法 | 描述 |
|---|---|
| isPermitted(Permission p) | 返回true 如果该Subject被允许执行某动作或访问被权限实例指定的资源集合,否则返回false |
| isPermitted(List |
返回一个与方法参数中目录一致的isPermitted结果的集合 |
| isPermittedAll(Collection |
返回true 如果该Subject被允许所有指定的权限,否则返回false 有性能的提高,如果需要执行许多检查(例如,当自定义一个复杂的视图) |
| isPermitted(String perm) | 返回true 如果该SUbject被允许执行某动作或访问被字符串权限指定的资源,否则返回false |
| isPermitted(String... perms) | 返回一个与方法参数中目录一致的isPermitted结果的数组。有性能的提高许多字符串权限检查需要被执行(例如,当自定义一个复杂的视图) |
| isPermittedAll(String... perms) | 返回true 如果该Subject被允许所有指定的字符串权限,否则返回false |
| checkPermission(Permission p) | 安静地返回,如果该Subject被允许执行某动作或访问被特定的权限实例指定的资源,不然的话就抛出AuthorizationException异常 |
| checkPermission(String perm) | 安静地返回,如果该Subject被允许执行某动作或访问被特定的权限实例指定的资源,不然的话就抛出AuthorizationException异常 |
| checkPermissions(Collection |
安静地返回,如果该Subject被允许所有的权限,不然的话就抛出AuthorizationException异常,有性能的提高。如果需要执行许多检查(例如,自定义一个复杂的视图) |
| checkPermissions(String... perms) | 和上面的checkPermissions方法效果相同,但是使用的是基于字符串的权限 |
基于jsp标签
使用方式
Shiro提供了一套JSP标签库来实现页面级的授权控制,在使用Shiro标签库前,需要在JSP中引入shiro标签:
<%@ taglib prefix="shiro" uri="http://shiro.apache.org/tags" %>
相关标签
| 标签 | 说明 |
|---|---|
| <shiro:guest> | 验证当前用户是否为“访客”,即未认证(包含未记住)的用户 |
| <shiro:user> | 认证通过或已记住的用户 |
| <shiro:authenticated> | 已认证通过的用户。不包含已记住的用户,这是user标签的区别所在 |
| <shiro:notAuthenticated> | 未认证通过用户。与guest标签的区别是,该标签包含已记住用户 |
| <shiro:principal> | 输出当前用户信息,通常为登录帐号信息 |
| <shiro:hasRole name="角色"> | 验证当前用户是否属于该角色 |
| <shiro:locksRole name="角色" | 与hasRole标签逻辑相反,当用户不属于该角色时验证通过 |
| <shiro:hasAnyRoles name="a.b"> | 验证当前用户是否属于以下任意一个角色 |
| <shiro:hasPermission name="资源"> | 验证当前用户是否拥有指定权限 |
| <shiro:locksPermission name="资源"> | 与permission标签逻辑相反,当前用户没有指定权限时,验证通过 |
示例
<%@ taglib prefix="c" uri="http://java.sun.com/jsp/jstl/core" %>
<%@ taglib prefix="shiro" uri="http://shiro.apache.org/tags" %>
<%@ page contentType="text/html;charset=UTF-8" language="java" %>
<html>
<head>
    <title>home</title>
</head>
<body>
<h6>
    <a href="/logout">退出</a>
    <shiro:hasRole name="admin">
        <a href="/order-list">列表</a>
    </shiro:hasRole>
    <shiro:hasPermission name="order:add">
        <a href="/order-add">添加</a>
    </shiro:hasPermission>
</h6>
</body>
</html>
注意:这些标签只能控制标签是否显示,如果知道地址的话,也是可以直接访问的。这种只能作为是否显示,不能作为防盗链的一种控制
SpringBoot项目集成Shiro
主要技术栈
主框架:SpringBoot
响应层:springMVC
持久层:mybatis
事务控制:jta
前端:easyui
数据库脚本
CREATE TABLE `user` (
  `id` int(6) NOT NULL AUTO_INCREMENT,
  `username` varchar(40) DEFAULT NULL COMMENT '用户名',
  `password` varchar(40) DEFAULT NULL COMMENT '密码',
  `salt` varchar(255) DEFAULT NULL COMMENT '盐',
  PRIMARY KEY (`id`)
) ENGINE=InnoDB DEFAULT CHARSET=utf8;
新建SpringBoot项目
springboot_jsp_shiro
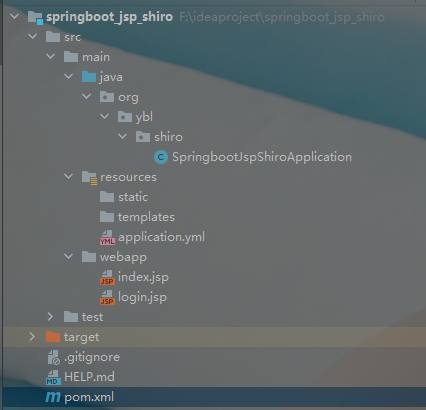
导入POM
<dependencies>
    <dependency>
        <groupId>org.springframework.boot</groupId>
        <artifactId>spring-boot-starter-web</artifactId>
    </dependency>

    <dependency>
        <groupId>org.springframework.boot</groupId>
        <artifactId>spring-boot-devtools</artifactId>
        <scope>runtime</scope>
        <optional>true</optional>
    </dependency>
    <dependency>
        <groupId>org.projectlombok</groupId>
        <artifactId>lombok</artifactId>
        <optional>true</optional>
    </dependency>
    <dependency>
        <groupId>org.springframework.boot</groupId>
        <artifactId>spring-boot-starter-test</artifactId>
        <scope>test</scope>
    </dependency>
    <dependency>
        <groupId>org.apache.tomcat.embed</groupId>
        <artifactId>tomcat-embed-jasper</artifactId>
    </dependency>
    <dependency>
        <groupId>jstl</groupId>
        <artifactId>jstl</art`ifactId>
        <version>1.2</version>
    </dependency>
    <dependency>
        <groupId>org.apache.shiro</groupId>
        <artifactId>shiro-spring-boot-starter</artifactId>
        <version>1.5.3</version>
    </dependency>
</dependencies>

<build>
    <plugins>
        <plugin>
            <groupId>org.springframework.boot</groupId>
            <artifactId>spring-boot-maven-plugin</artifactId>
            <configuration>
                <excludes>
                    <exclude>
                        <groupId>org.projectlombok</groupId>
                        <artifactId>lombok</artifactId>
                    </exclude>
                </excludes>
            </configuration>
        </plugin>
    </plugins>
</build>
配置shiro环境
shiro配置
@Configuration
public class ShiroConfig {
    /**
     * 创建ShiroFilter
     *
     * @param securityManager 安全管理器
     * @return shiroFilterFactoryBean
     */
    @Bean
    public ShiroFilterFactoryBean getShiroFilterFactoryBean(DefaultWebSecurityManager securityManager) {
        ShiroFilterFactoryBean shiroFilter
                = new ShiroFilterFactoryBean();
        //给filter设置安全管理器
        shiroFilter.setSecurityManager( securityManager );
        //默认认证界面的路径/login.jsp,不写也是login.jsp
        shiroFilter.setLoginUrl( "/login.jsp" );
        //配置系统受限资源

        //配置系统公共资源
        Map<String, String> map
                = new HashMap<String, String>();
        //authc表示这个资源需要认证和授权
        map.put( "/index.jsp", "authc" );
        shiroFilter.setFilterChainDefinitionMap( map );

        return shiroFilter;
    }
    /**
     * 创建安全管理器
     *
     * @return securityManager
     */
    @Bean
    public DefaultWebSecurityManager getSecurityManager(Realm realm) {
        DefaultWebSecurityManager securityManager
                = new DefaultWebSecurityManager();
        securityManager.setRealm( realm );
        return securityManager;
    }
    /**
     * 创建realm
     *
     * @return realm
     */
    @Bean
    public Realm getRealm() {

        return new CustomerRealm();
    }
}
server:
  port: 80
  servlet:
    context-path: /shiro
spring:
  application:
    name: shiro
  mvc:
    view:
      suffix: /
      prefix: .jsp
public class CustomerRealm extends AuthorizingRealm {
    /**
     * 认证
     * @param authenticationToken token
     * @return AuthenticationInfo对象
     * @throws AuthenticationException 异常
     */
    @Override
    protected AuthenticationInfo doGetAuthenticationInfo(AuthenticationToken authenticationToken) throws AuthenticationException {
        return null;
    }
    /**
     * 授权
     * @param principalCollection 身份信息
     * @return AuthorizationInfo对象
     */
    @Override
    protected AuthorizationInfo doGetAuthorizationInfo(PrincipalCollection principalCollection) {
        return null;
    }
}
实现退出登录功能
public class UserController {
    /**
     * 用来登录
     *
     * @param username 用户名
     * @param password 面膜
     * @return 首页
     */
    @RequestMapping("/login")
    public String login(String username, String password) {
        Subject subject = SecurityUtils.getSubject();
        try {
            UsernamePasswordToken token = new UsernamePasswordToken( username, password );
            subject.login( token );
            return "redirect:/index.jsp";
        } catch (UnknownAccountException e) {
            e.printStackTrace();
            System.out.println("用户名错误");
        }catch (IncorrectCredentialsException e) {
            e.printStackTrace();
            System.out.println("密码错误");
        }
        return "redirect:/login.jsp";
    }


    @RequestMapping("/logout")
    public String lougOut(){
        Subject subject = SecurityUtils.getSubject();
        subject.logout();
        return "redirect:/login.jsp";
    }

}
<%@page contentType="text/html; utf-8"  pageEncoding="UTF-8" isELIgnored="false" %>
<!doctype html>
<html lang="zh">
<head>


    <title>index</title>
</head>
<body>
    <h1>用户登录</h1>

<form action="${pageContext.request.contextPath}/user/login" method="post">
    用户名:<input type="text" name="username"><br/>
    密码:<input type="password" name="password">
    <input type="submit" value="提交">
</form>
</body>
</html>
/**
* 认证
* @param token token
* @return AuthenticationInfo对象
* @throws AuthenticationException 异常
*/
@Override
protected AuthenticationInfo doGetAuthenticationInfo(AuthenticationToken token) throws AuthenticationException {
    String principal = (String) token.getPrincipal();

    if("admin".equals( principal )){
        return new SimpleAuthenticationInfo( principal,"123456", this.getName() );
    }
    return null;
}
<%@page contentType="text/html; utf-8"  pageEncoding="UTF-8" isELIgnored="false" %>
<!doctype html>
<html lang="zh">
<head>


    <title>index</title>
</head>
<body>
<h1>系统主页V1.0</h1>
<a href="${pageContext.request.contextPath}/user/logout">退出</a>
<ul>
    <li><a href="">用户管理</a></li>
    <li><a href="">商品管理</a></li>
    <li><a href="">订单管理</a></li>
    <li><a href="">物流管理</a></li>
</ul>
</body>
</html>
认证加上MD5和salt
导入mybatis、mysql、druid
<dependency>
    <groupId>org.mybatis.spring.boot</groupId>
    <artifactId>mybatis-spring-boot-starter</artifactId>
    <version>2.1.2</version>
</dependency>
<dependency>
    <groupId>mysql</groupId>
    <artifactId>mysql-connector-java</artifactId>
    <version>5.1.47</version>
</dependency>
<!--druid-->
<dependency>
    <groupId>com.alibaba</groupId>
    <artifactId>druid</artifactId>
    <version>1.1.21</version>
</dependency>
application.yml
server:
  port: 80
  servlet:
    context-path: /shiro
spring:
  application:
    name: shiro
  mvc:
    view:
      suffix: /
      prefix: .jsp
  datasource:
    url: jdbc:mysql://192.168.101.135/shiro?useUnicode=true&characterEncoding=UTF-8&useSSL=false
    driver-class-name: com.mysql.jdbc.Driver
    username: root
    password: 123456
    type: com.alibaba.druid.pool.DruidDataSource
mybatis:
  type-aliases-package: org.ybl.shiro.entity
  mapper-locations: classpath:mappers/*.xml
logging:
  level:
    org.ybl.shiro.dao: debug
UserController
@Autowired
private UserService userService;
/**
     * 用户注册
     *
     * @param user 用户实体类
     * @return 登录页面
     */
@RequestMapping("/register")
public String register(User user) {
    try {
        userService.register( user );
        return "redirect:/login.jsp";
    } catch (Exception e) {
        e.printStackTrace();
        return "redirect:/register.jsp";
    }
}
UserService
public interface UserService {
    /**
     * 注册用户
     * @param user 用户实体
     */
    void register(User user);

    /**
     * 根据username查询用户
     * @param username
     */
    User getUser(String username);
}
UserServiceImpl
@Service
@Transactional
public class UserServiceImpl implements UserService {

    @Autowired
    private UserDao userDao;

    @Override
    public void register(User user) {
        String salt = SaltUtil.getSalt( 16 );

        //明文密码进行md5+salt+hash散列
        Md5Hash password = new Md5Hash(user.getPassword(),salt,1024);
        user.setPassword( password.toHex() );
        user.setSalt( salt );
        userDao.save( user );
    }

    @Override
    public User getUser(String username) {
        return userDao.getUserByusername( username );
    }
}
SaltUtil
public class SaltUtil {

    /**
     * 获取指定字符长度的盐
     *
     * @param n 指定盐的长度
     * @return salt字符串
     */
    public static String getSalt(int n) {
        ////用于生成随机字符串
        //SecureRandomNumberGenerator random = new SecureRandomNumberGenerator();
        //System.out.println(random.nextBytes().toHex());
        //return random.nextBytes().toHex();
        char[] chars = "ABCDEFGHIJKLMNOPQRSTUVWXYZabcdefghijklmnopqrstuvwxyz0123456789.!@#$%^&*()".toCharArray();
        StringBuilder sb = new StringBuilder();
        for (int i = 0; i < n; i++) {
            char c = chars[new Random().nextInt( chars.length )];
            sb.append( c );
        }
        return sb.toString();
    }
}
ApplicationContextUtils
@Component
public class ApplicationContextUtils implements ApplicationContextAware {

    private static ApplicationContext context;

    @Override
    public void setApplicationContext(ApplicationContext applicationContext) throws BeansException {
        this.context = applicationContext;
    }

    /**
     * 根据bean的名字获取工厂中指定的bean
     * @param beanName bean的名字
     * @return bean对象
     */
    public static Object getBean(String beanName) {
        return context.getBean( beanName );
    }
}
UserDao.java
@Mapper
public interface UserDao {
    /**
     * 注册用户
     * @param user User对象
     */
    void save(User user);
    /**
     * 根据用户名获取user对象
     * @param username
     * @return
     */
    User getUserByusername(String username);
}
UserMapper.xml
<?xml version="1.0" encoding="UTF-8"?>
<!DOCTYPE mapper
        PUBLIC "-//mybatis.org//DTD Mapper 3.0//EN"
        "http://mybatis.org/dtd/mybatis-3-mapper.dtd">
<mapper namespace="org.ybl.shiro.dao.UserDao">
    <insert id="save" parameterType="User" useGeneratedKeys="true" keyProperty="id">
        insert into user values (#{id},#{username},#{password},#{salt})
    </insert>
    <select id="getUserByusername" resultType="User" parameterType="string">
        select id,username,password,salt from user
        where username =#{username}
    </select>
</mapper>
修改ShiroConfig
@Configuration
public class ShiroConfig {
    /**
     * 创建ShiroFilter
     *
     * @param securityManager 安全管理器
     * @return shiroFilterFactoryBean
     */
    @Bean
    public ShiroFilterFactoryBean getShiroFilterFactoryBean(DefaultWebSecurityManager securityManager) {
        ShiroFilterFactoryBean shiroFilter
                = new ShiroFilterFactoryBean();
        //给filter设置安全管理器
        shiroFilter.setSecurityManager( securityManager );
        //默认认证界面的路径/login.jsp,不写也是login.jsp
        shiroFilter.setLoginUrl( "/login.jsp" );
        //配置系统受限资源

        //配置系统公共资源
        Map<String, String> map
                = new LinkedHashMap<String, String>();
        //authc表示这个资源需要认证和授权
        map.put( "/user/login", "anon" );
        map.put( "/user/register", "anon" );
        map.put( "/register.jsp", "anon" );
        map.put( "/**", "authc" );

        shiroFilter.setFilterChainDefinitionMap( map );

        return shiroFilter;
    }

    /**
     * 创建安全管理器
     *
     * @return securityManager
     */
    @Bean
    public DefaultWebSecurityManager getSecurityManager(Realm realm) {
        DefaultWebSecurityManager securityManager
                = new DefaultWebSecurityManager();
        securityManager.setRealm( realm );
        return securityManager;
    }

    /**
     * 创建realm
     *
     * @return realm
     */
    @Bean
    public Realm getRealm() {
        CustomerRealm customerRealm = new CustomerRealm();

        //修改凭证校验匹配器
        HashedCredentialsMatcher credentialsMatcher = new HashedCredentialsMatcher();
        //设置加密算法为md5
        credentialsMatcher.setHashAlgorithmName( "MD5" );
        //设置散列次数
        credentialsMatcher.setHashIterations( 1024 );
        customerRealm.setCredentialsMatcher( credentialsMatcher );
        return customerRealm;
    }
}
修改CustomerRealm
public class CustomerRealm extends AuthorizingRealm {

    /**
     * 认证
     *
     * @param token token
     * @return AuthenticationInfo对象
     * @throws AuthenticationException 异常
     */
    @Override
    protected AuthenticationInfo doGetAuthenticationInfo(AuthenticationToken token) throws AuthenticationException {
        String principal = (String) token.getPrincipal();
        //从工厂中获取service对象
        UserService userService
                = (UserService) ApplicationContextUtils.getBean( "userServiceImpl" );
        User user = userService.getUser( principal );
        if (!ObjectUtils.isEmpty( user )) {
            return new SimpleAuthenticationInfo
                    ( user.getUsername(), user.getPassword(),
                    ByteSource.Util.bytes( user.getSalt() ), this.getName() );
        }
        return null;
    }

    /**
     * 授权
     *
     * @param principalCollection 身份信息
     * @return AuthorizationInfo对象
     */
    @Override
    protected AuthorizationInfo doGetAuthorizationInfo(PrincipalCollection principalCollection) {
        return null;
    }
}
授权操作
基于角色的授权
授权操作会走CustomerRealm的doGetAuthorizationInfo方法,要想获取授权信息,我们先要创建数据表。接下来,我们先来创建数据表。
当然,在建数据表前,我们先来模拟一些数据,来测试一下。
jsp要想使用shiro相关标签,需要引入约束<%@taglib prefix="shiro" uri="http://shiro.apache.org/tags" %>
<%@page contentType="text/html; utf-8" pageEncoding="UTF-8" isELIgnored="false" %>
<%@taglib prefix="shiro" uri="http://shiro.apache.org/tags" %>
<!doctype html>
<html lang="zh">
<head>


    <title>index</title>
</head>
<body>
<h1>系统主页V1.0</h1>
<a href="${pageContext.request.contextPath}/user/logout">退出</a>
<ul>
        <li><a href="">用户管理</a></li>
    <shiro:hasRole name="admin">
        <li><a href="">商品管理</a></li>
        <li><a href="">订单管理</a></li>
        <li><a href="">物流管理</a></li>
    </shiro:hasRole>
</ul>
</body>
</html>
在CustomerRealm中修改AuthorizationInfo,如果登录的用户是zhangsan,就给他一个admin权限。
/**
     * 授权
     *
     * @param principals 身份信息
     * @return AuthorizationInfo对象
     */
@Override
protected AuthorizationInfo doGetAuthorizationInfo(PrincipalCollection principals) {
    //构造身份信息
    String principal = (String) principals.getPrimaryPrincipal();
    //根据主身份信息获取角色和权限信息
    if("zhangsan".equals( principal )){
        SimpleAuthorizationInfo simpleAuthorizationInfo = new SimpleAuthorizationInfo();
        simpleAuthorizationInfo.addRole( "admin" );
        return simpleAuthorizationInfo;
    }
    return null;
}
测试结果:
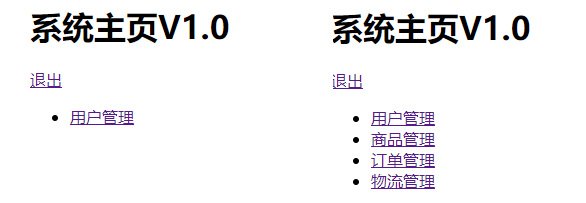
可以看到我们用lisi这个用户登录,没有admin权限,只能显示用户管理的界面,用zhangsan用户登录,有admin权限,可以显示所有的标签。
上面是基于角色的管理。下面来看看基于资源的管理。
基于资源的授权
doGetAuthorizationInfo
权限字符串的书写规则:资源标志符:对应的操作:资源类型/资源实例
if("zhangsan".equals( principal )){
    SimpleAuthorizationInfo authorizationInfo = new SimpleAuthorizationInfo();
    authorizationInfo.addRole( "user" );
    authorizationInfo.addStringPermission( "user:*:*" );
    return authorizationInfo;
}
上面这个表示当前用户对user模块下面的所有资源具有所有的操作权限。
<shiro:hasAnyRoles name="user,admin">
    <li><a href="">用户管理</a>
        <ul>
            <shiro:hasPermission name="user:add:*">
                <li><a href="">添加用户</a></li>
            </shiro:hasPermission>
            <shiro:hasPermission name="user:del:*">
                <li><a href="">删除用户</a></li>
            </shiro:hasPermission>
            <shiro:hasPermission name="user:update:*">
                <li><a href="">修改用户</a></li>
            </shiro:hasPermission>
            <shiro:hasPermission name="user:select:*">
                <li><a href="">查询用户</a></li>
            </shiro:hasPermission>
        </ul>
    </li>
</shiro:hasAnyRoles>
修改addStringPermission
authorizationInfo.addStringPermission( "user:del:*" );
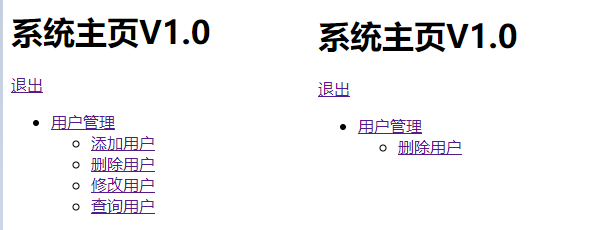
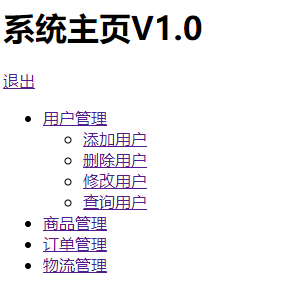
对比发现,如果我们给的是user:del:*,就只能看见删除用户这个标签,如果是user:*:*就能看到所有关于用户的标签。
上面基于资源和角色的授都讲了,但是这种在jsp中写标签的办法是不好的,如果知道对应的连接,也是可以直接访问的,所以,我们需要在Controller层来控制,不让没有权限的用户访问到后台。
代码方式来实现不让访问后台:
@Controller
@RequestMapping("/order")
public class OrderController {

    @RequestMapping("/save")
    //@RequiresPermissions("order:save:*")
    public String save() {

        //获取主体对象
        Subject subject = SecurityUtils.getSubject();
        boolean isRole = subject.hasRole( "admin" );
        if(isRole) {
            System.out.println("保存订单");
        }else{
            System.out.println("没有权限");
        }
        return "redirect:/index.jsp";
    }
}
登录后直接访问http://localhost/shiro/order/save
结果

将角色改为admin,

注解方式来实现不让访问后台:
shiro给我们提供了几个注解,我们来看看
# 判断需要哪个角色
@RequiresRoles("")
# 表示同时具有admin和user才可以访问
@RequiresRoles(value={"admin","user"})
# 判断需要哪个权限字符串
@RequiresPermissions("")
授权数据持久化
权限数据库设计:最经典的就是RBAC(Resource-Based Access Control),基于资源的访问控制,
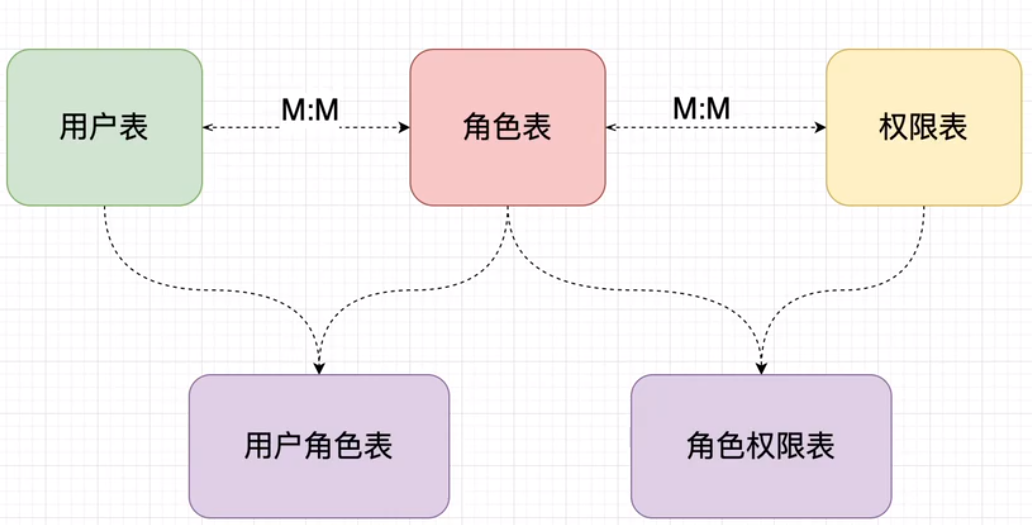
建表语句
role
CREATE TABLE `role` (
  `id` int(6) NOT NULL AUTO_INCREMENT,
  `name` varchar(60) DEFAULT NULL,
  PRIMARY KEY (`id`)
) ENGINE=InnoDB DEFAULT CHARSET=utf8;
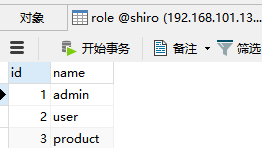
perms
CREATE TABLE `perms` (
  `id` int(6) NOT NULL AUTO_INCREMENT,
  `name` varchar(80) DEFAULT NULL COMMENT '权限字符串',
  `url` varchar(255) DEFAULT NULL,
  PRIMARY KEY (`id`)
) ENGINE=InnoDB DEFAULT CHARSET=utf8;
role_perms
CREATE TABLE `role_perms` (
  `id` int(6) NOT NULL AUTO_INCREMENT,
  `roleid` int(6) DEFAULT NULL,
  `permsid` int(6) DEFAULT NULL,
  PRIMARY KEY (`id`)
) ENGINE=InnoDB DEFAULT CHARSET=utf8;
user_role
CREATE TABLE `user_role` (
  `id` int(6) NOT NULL AUTO_INCREMENT,
  `userid` int(6) DEFAULT NULL,
  `roleid` int(6) DEFAULT NULL,
  PRIMARY KEY (`id`)
) ENGINE=InnoDB DEFAULT CHARSET=utf8;
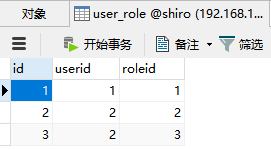
zhangsan用户拥有admin权限
lisi用户有用user、product权限
实体类
@Data
@AllArgsConstructor
@NoArgsConstructor
@Accessors(chain=true)
public class Role {
    private Integer id;
    private String name;
}
@Data
@NoArgsConstructor
@AllArgsConstructor
@Accessors(chain = true)
public class perms {
    private Integer id;
    private String name;
    private String url;
}
@Data
@Accessors(chain=true)
@AllArgsConstructor
@NoArgsConstructor
public class User {
    private Integer id;
    private String username;
    private String password;
    private String salt;

    //定义角色集合
    private List<Role> roles;
}
DAO
/**
 * 根据用户名查询角色
 * @param username
 * @return
 */
User getRoleByUserName(String username);
Mapper
<resultMap id="userMap" type="org.ybl.shiro.entity.User">
    <id column="uid" property="id"/>
    <result column="username" property="username"/>
    <collection property="roles" javaType="list" ofType="org.ybl.shiro.entity.Role">
        <id column="id" property="id"></id>
        <result column="rname" property="name"/>
    </collection>
</resultMap>
<select id="getRoleByUserName" resultType="Role" parameterType="string" resultMap="userMap">
    SELECT u.id uid,u.username,r.id,r.name rname
    FROM user u
    LEFT JOIN user_role ur
    ON u.id = ur.userid
    LEFT JOIN role r
    ON ur.roleid = r.id
    WHERE u.username=#{username}
</select>
UserService
/**
 * 根据用户名查询角色
 * @param username
 * @return
 */
User getRoleByUserName(String username);
UserServiceImpl
@Override
public User getRoleByUserName(String username) {
    return userDao.getRoleByUserName( username );
}
CustomerRealm
/**
     * 授权
     * @param principals 身份信息
     * @return AuthorizationInfo对象
     */
@Override
protected AuthorizationInfo doGetAuthorizationInfo(PrincipalCollection principals) {
    //构造身份信息
    String principal = (String) principals.getPrimaryPrincipal();

    //根据主身份信息获取角色和权限信息
    UserService userService = (UserService) ApplicationContextUtils.getBean( "userServiceImpl" );
    User users = userService.getRoleByUserName( principal );

    if (!ObjectUtils.isEmpty( users.getRoles() )) {
        SimpleAuthorizationInfo authorizationInfo = new SimpleAuthorizationInfo();
        users.getRoles().forEach( role ->{
            //获取权限信息
            List<Perms> perms = userService.getPermsByRoleId( role.getId() );
            if(!CollectionUtils.isEmpty( perms )){
                perms.forEach( permission ->{
                    //添加权限信息
                    authorizationInfo.addStringPermission( permission.getName() );
                });
            }
            authorizationInfo.addRole( role.getName() );

        });
        return authorizationInfo;
    }
    return null;
}
index.jsp
<%@page contentType="text/html; utf-8" pageEncoding="UTF-8" isELIgnored="false" %>
<%@taglib prefix="shiro" uri="http://shiro.apache.org/tags" %>
<!doctype html>
<html lang="zh">
<head>


    <title>index</title>
</head>
<body>
<h1>系统主页V1.0</h1>
<a href="${pageContext.request.contextPath}/user/logout">退出</a>
<ul>
    <shiro:hasAnyRoles name="user,admin">
        <li><a href="">用户管理</a>
            <ul>
                <shiro:hasPermission name="user:add:*">
                    <li><a href="">添加用户</a></li>
                </shiro:hasPermission>
                <shiro:hasPermission name="user:del:*">
                    <li><a href="">删除用户</a></li>
                </shiro:hasPermission>
                <shiro:hasPermission name="user:update:*">
                    <li><a href="">修改用户</a></li>
                </shiro:hasPermission>
                <shiro:hasPermission name="user:select:*">
                    <li><a href="">查询用户</a></li>
                </shiro:hasPermission>
            </ul>
        </li>
    </shiro:hasAnyRoles>
    <shiro:hasRole name="admin">
        <li><a href="">商品管理</a></li>
        <li><a href="">订单管理</a></li>
        <li><a href="">物流管理</a></li>
    </shiro:hasRole>
</ul>
</body>
</html>
zhangsan用户测试结果
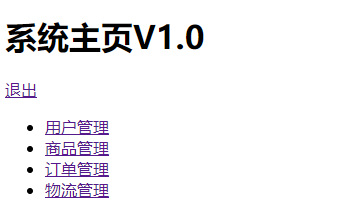
上面是基于角色的授权,下面我们来编写基于资源的授权代码。
Role
@Data
@AllArgsConstructor
@NoArgsConstructor
@Accessors(chain=true)
public class Role {
    private Integer id;
    private String name;

    //定义权限集合
    private List<perms> perms;
}
UserDao
/**
 * 根据角色Id查询权限
 * @param roleId
 * @return
 */
List<Perms> getPermsByRoleId(Integer roleId);
Mapper.xml
<select id="getPermsByRoleId" parameterType="Integer" resultType="org.ybl.shiro.entity.Perms">
    SELECT p.id,p.name,p.url,r.name rnmae from role r
    LEFT JOIN role_perms rp
    ON r.id=rp.roleid
    LEFT JOIN perms p
    ON rp.permsid=p.id
    WHERE r.id = #{roleId}
</select>
UserService
/**
 * 根据角色id查询权限
 * @param roleId
 * @return
 */
List<Perms> getPermsByRoleId(Integer roleId);
UserServiceImpl
@Override
public List<Perms> getPermsByRoleId(Integer roleId) {
    return userDao.getPermsByRoleId( roleId );
}
添加权限信息

添加权限—角色信息
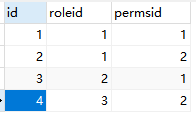
测试:
zhangsan用户登录,zhangsan具有admin角色,user:*:*,product:*:01权限
Shiro整合EhCache
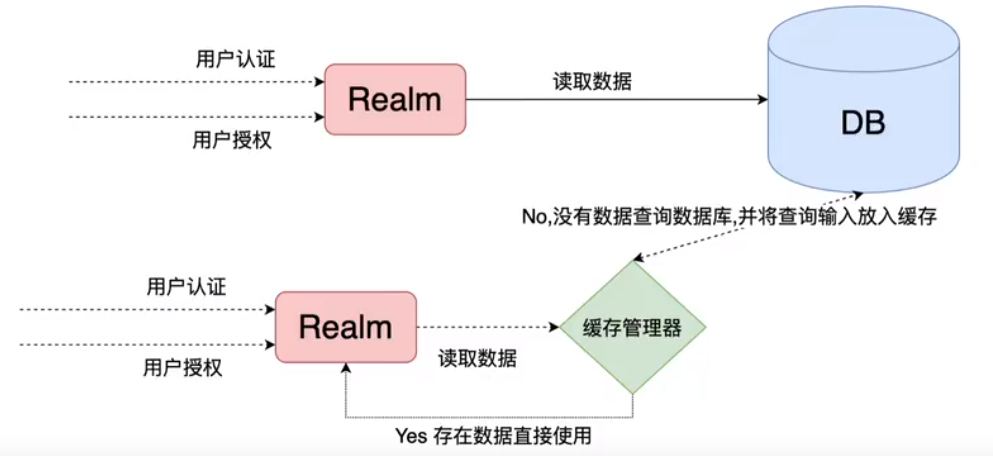
我们前面的都是要查询数据库的,而权限信息和角色信息一般确定后,就不会改变,如果有缓存来缓存这些信息就好了,而且还减轻DB压力,所以就有了EhCache。
cache作用
- Cache缓存:计算机内存中一段数据
- 作用:用来减轻DB的访问压力,从而提高系统的查询效率
- 流程:
shiro中默认EchCache实现缓存
引入依赖
<dependency>
    <groupId>org.apache.shiro</groupId>
    <artifactId>shiro-ehcache</artifactId>
    <version>1.5.3</version>
</dependency>
开启缓存
ShiroConfig
@Bean
public Realm getRealm() {
    CustomerRealm customerRealm = new CustomerRealm();

    //修改凭证校验匹配器
    HashedCredentialsMatcher credentialsMatcher = new HashedCredentialsMatcher();
    //设置加密算法为md5
    credentialsMatcher.setHashAlgorithmName( "MD5" );
    //设置散列次数
    credentialsMatcher.setHashIterations( 1024 );
    customerRealm.setCredentialsMatcher( credentialsMatcher );

    //开启缓存管理
    customerRealm.setCacheManager( new EhCacheManager() );
    customerRealm.setCachingEnabled( true );
    //开启认证缓存
    customerRealm.setAuthenticationCachingEnabled( true );
    customerRealm.setAuthenticationCacheName( "authenticationCache" );
    //开启授权缓存
    customerRealm.setAuthorizationCachingEnabled( true );
    customerRealm.setAuthorizationCacheName( "authorizationCache" );
    return customerRealm;
}
Shiro中使用Redis作为缓存实现
引入redis依赖
<dependency>
    <groupId>org.springframework.boot</groupId>
    <artifactId>spring-boot-starter-data-redis</artifactId>
</dependency>
配置Redis
spring:
  redis:
    port: 6379
    host: 192.168.101.135
    database: 0
开发RedisChacheManager
上面的用EhCache作为缓存来使用,我们看到有一个重要的类CacheManager,我们来看看

可以看到,EhCacheManager实现了CacheManager,那么,我们用Redis作为缓存时,是不是也只要实现CacheManager就可以了呢?
我们先来看看CacheManager
public interface CacheManager {
    <K, V> Cache<K, V> getCache(String var1) throws CacheException;
}
CacheManager只有一个接口, 就是用来获取缓存的,我们自定义一个RedisCacheManager来实现CacheManager。
public class RedisCacheManager implements CacheManager {

    @Override
    public <K, V> Cache<K, V> getCache(String cacheName) throws CacheException {
        System.out.println("=========>" + cacheName);
        return null;
    }
}
这样就实现好了,但是我们还不知道这个参数s是啥,我们来测试看看(当然,要使用我们自己的RedisCacheManager)

可以看到,参数就是认证或者授权缓存的统一名称。
如果想要真正的使用我们的Cache,那就需要实现Cache<K, V>,这个Cache也是一个借口,需要我们自己写一个RedisCache。
既然要实现RedisCache,就需要在getChache中返回一个RedisCache。
 @Override
public <K, V> Cache<K, V> getCache(String cacheName) throws CacheException {
    System.out.println( "=========>" + cacheName );
    return new RedisCache<K,V>(cacheName);
}
接下来,我们就来实现RedisCache
/**
 * @author Mr.yang
 * @author 2020-12-22
 * @Description 自定义Redis缓存的实现
 **/

public class RedisCache<K, V> implements Cache<K, V> {

    private String CacheName;

    public RedisCache() {
    }

    public RedisCache(String cacheName) {
        CacheName = cacheName;
    }

    @Override
    public V get(K k) throws CacheException {
        return (V) getRedisTemplate().opsForHash().get( this.CacheName, k.toString() );
    }

    @Override
    public V put(K k, V v) throws CacheException {

        getRedisTemplate().opsForHash().put( this.CacheName, k.toString(), v );
        return null;
    }

    @Override
    public V remove(K k) throws CacheException {
        return (V) getRedisTemplate().opsForHash().delete( this.CacheName, k.toString() );
    }

    @Override
    public void clear() throws CacheException {
        getRedisTemplate().delete( this.CacheName );
    }

    @Override
    public int size() {
        return getRedisTemplate().opsForHash().size( this.CacheName ).intValue();
    }

    @Override
    public Set<K> keys() {
        return getRedisTemplate().opsForHash().keys( this.CacheName );
    }

    @Override
    public Collection<V> values() {
        return getRedisTemplate().opsForHash().values( this.CacheName );
    }

    private RedisTemplate getRedisTemplate() {
        RedisTemplate redisTemplate = (RedisTemplate) ApplicationContextUtils.getBean( "redisTemplate" );
        getRedisTemplate().setKeySerializer( new StringRedisSerializer() );
        getRedisTemplate().setHashKeySerializer( new StringRedisSerializer() );
        return redisTemplate;
    }
}
当然,要想使用,我们需要给实体类实现Serializable接口,这样才能序列化,而且前面的CustomerRealm中doGetAuthenticationInfo方法的ByteSource.Util.bytes( user.getSalt() )不能用了,也要实现序列化:
public class MyByteSource implements ByteSource, Serializable {
    private byte[] bytes;
    private String cachedHex;
    private String cachedBase64;

    public MyByteSource() {
    }

    public MyByteSource(byte[] bytes) {
        this.bytes = bytes;
    }

    public MyByteSource(char[] chars) {
        this.bytes = CodecSupport.toBytes( chars );
    }

    public MyByteSource(String string) {
        this.bytes = CodecSupport.toBytes( string );
    }

    public MyByteSource(ByteSource source) {
        this.bytes = source.getBytes();
    }

    public MyByteSource(File file) {
        this.bytes = (new MyByteSource.BytesHelper()).getBytes( file );
    }

    public MyByteSource(InputStream stream) {
        this.bytes = (new MyByteSource.BytesHelper()).getBytes( stream );
    }

    public static boolean isCompatible(Object o) {
        return o instanceof byte[] || o instanceof char[] || o instanceof String || o instanceof ByteSource || o instanceof File || o instanceof InputStream;
    }

    @Override
    public byte[] getBytes() {
        return this.bytes;
    }

    @Override
    public boolean isEmpty() {
        return this.bytes == null || this.bytes.length == 0;
    }

    @Override
    public String toHex() {
        if (this.cachedHex == null) {
            this.cachedHex = Hex.encodeToString( this.getBytes() );
        }

        return this.cachedHex;
    }

    @Override
    public String toBase64() {
        if (this.cachedBase64 == null) {
            this.cachedBase64 = Base64.encodeToString( this.getBytes() );
        }

        return this.cachedBase64;
    }

    @Override
    public String toString() {
        return this.toBase64();
    }

    @Override
    public int hashCode() {
        return this.bytes != null && this.bytes.length != 0 ? Arrays.hashCode( this.bytes ) : 0;
    }

    @Override
    public boolean equals(Object o) {
        if (o == this) {
            return true;
        } else if (o instanceof ByteSource) {
            ByteSource bs = (ByteSource) o;
            return Arrays.equals( this.getBytes(), bs.getBytes() );
        } else {
            return false;
        }
    }

    private static final class BytesHelper extends CodecSupport {
        private BytesHelper() {
        }

        public byte[] getBytes(File file) {
            return this.toBytes( file );
        }

        public byte[] getBytes(InputStream stream) {
            return this.toBytes( stream );
        }
    }

}
然后使用我们自己的MyByteSource
@Override
protected AuthenticationInfo doGetAuthenticationInfo(AuthenticationToken token) throws AuthenticationException {
    String principal = (String) token.getPrincipal();
    //从工厂中获取service对象
    UserService userService
        = (UserService) ApplicationContextUtils.getBean( "userServiceImpl" );
    User user = userService.getUser( principal );
    if (!ObjectUtils.isEmpty( user )) {
        return new SimpleAuthenticationInfo
            ( user.getUsername(), user.getPassword(),
             new MyByteSource( user.getSalt() ), this.getName() );
    }
    return null;
}
Shiro整合图片验证
导入hutool工具包
<dependency>
    <groupId>cn.hutool</groupId>
    <artifactId>hutool-all</artifactId>
    <version>5.5.4</version>
</dependency>
UserController
@RequestMapping("getImage")
public void getImage(HttpSession session, HttpServletResponse resp) throws IOException {
    LineCaptcha lineCaptcha = CaptchaUtil.createLineCaptcha(200, 100,5,1);
    lineCaptcha.createCode();
    String code = lineCaptcha.getCode();
    session.setAttribute( "code",code );
    ServletOutputStream os = resp.getOutputStream();
    lineCaptcha.write(resp.getOutputStream());
}
/**
     * 用来处理身份认证
     *
     * @param username 用户名
     * @param password 密码
     * @return 首页
     */
@RequestMapping("/login")
public String login(String username, String password, String code, HttpSession session) {
    //比较验证码
    String verCode = (String) session.getAttribute( "code" );
    try {
        if (verCode.equalsIgnoreCase( code )) {
            Subject subject = SecurityUtils.getSubject();
            UsernamePasswordToken token = new UsernamePasswordToken( username, password );
            subject.login( token );
            return "redirect:/index.jsp";
        } else {
            throw new RuntimeException( "验证码错误" );
        }
    } catch (UnknownAccountException e) {
        e.printStackTrace();
        System.out.println( "用户名错误" );
    } catch (IncorrectCredentialsException e) {
        e.printStackTrace();
        System.out.println( "密码错误" );
    } catch (Exception e) {
        System.out.println( "========>" + e.getMessage() );
    }

    return "redirect:/login.jsp";
}
login.jsp
<form action="${pageContext.request.contextPath}/user/login" method="post">
    用户名:<input type="text" name="username"><br/>
    密码:<input type="password" name="password">
    请输入验证码:<input type="text" name="code"><img src="${pageContext.request.contextPath}/user/getImage" alt="ver">
    <input type="submit" value="提交">
</form>
Shiro整合SpringBoot之thymeleaf
引入依赖
<dependency>
    <groupId>com.github.theborakompanioni</groupId>
    <artifactId>thymeleaf-extras-shiro</artifactId>
    <version>2.0.0</version>
</dependency>
引入命名空间
- xmlns:shiro="http://www.pollix.at/thymeleaf/shiro"
<html xmlns="http://www.w3.org/1999/xhtml" xmlns:th="http://www.thymeleaf.org"
      xmlns:shiro="http://www.pollix.at/thymeleaf/shiro"
.....
常见权限控制标签使用
<!--验证当前用户是否为“访客”,即未认证(包含为记住)的用户-->
<p shiro:guest="">Please<a href="login.html">login</a></p>
<!--认证通过或已记住的用户-->
<p shiro:user="">
    Welcome back John! Not John? Click<a href=login.html>here</a>to login.
</p>
<!--已认证通过的用户。不包含已经记住的用户,这是与user标签的区别所在。-->
<p shiro:authenticated="">
    hello,<span shiro:principal=""></span>,how are you today?
</p>
<a shiro:authenticated="" href="updateAccount.html">update your contact information</a>
<!--输出当前用户信息,通常为登录帐号信息-->
<p>hello,<shiro:principal/>,hao are yout today</p>
<!--未认证通过用户,与authenticated标签相对应,与guest标签的区别是,百标签包含已记住用户-->
<p shiro:noAuthenticated="">
    please <a href="login.html">login</a>in order to update your credit card information.
</p>
<!--验证当前用户是否属于该角色-->
<a shiro:hasRole="admin" href="admin.html">Administer the system</a><!--拥有该角色-->
<!--与hasRole标签逻辑相反,当用户不属于该角色时验证通过-->
<a shiro:locksRole="developer"><!--没有该角色-->
	Sorry,you are not allowed to developer the system.
</a>
<!--验证当前用户是否属于以下所有角色-->
<p shiro:hasAllRoles="developer,2"><!--角色与判断-->
    You are a developer and a admin.,
</p>
<!--验证当前用户是否属于以下任意一个角色-->
<p shir:hasAnyRoles="admin,vip,developer,1">
    You are a admin,vip,or developer
</p>
<!--验证当前用户是否拥有指定权限-->
<a shiro:hasPermission="userInfo:add" href="createUser.html">添加用户</a><!--拥有权限-->
<!--与hasPermission标签逻辑相反,当前用户没有指定权限是,验证通过-->
<p shiro:locksPermission="userInfo:del"><!--没有权限-->
    Sorry,you are not allowed to delete user accounts.
</p>
<!--验证当前用户是否拥有以下所有权限-->
<p shiro:hasAllPermissions="userInfo:view,userInfo:add"><!--权限与判断-->
    You can see or add users.
</p>
<!--验证当前用户是否拥有以下任意一个权限-->
<p shiro:hasAnyPermissions="userInfo:view,UserInfo:del"><!--权限与判断-->
    You can see or delete users.
</p>
<a shiro:hasPermission="pp" href="createUser.html">Create a new User</a>
yaml配置
spring:
  application:
    name: shiro
  thymeleaf:
    cache: false
    suffix: .html
    prefix: classpath:/templates/
  datasource:
    type: com.alibaba.druid.pool.DruidDataSource
    driver-class-name: com.mysql.jdbc.Driver
    url: https://192.168.101.135:3306/shiro?characterEncoding=UTF-8
    username: root
    password: 123456
  redis:
    port: 6379
    host: 192.168.101.135
    database: 0
server:
  servlet:
    context-path: /shiro
mybatis:
  type-aliases-package: org.ybl.shiro.entity
  mapper-locations: classpath:mappers/*.xml
加入shiro的方言配置
@Configuration
public class ShiroConfig{
    @Bean(name="shiroDialect")
    public ShiroDialect shiroDialect(){
        return new ShiroDialect();
    }
}