配置一个授权服务,你需要考虑几种授权类型(Grant Type),不同的授权类型为客户端(Client)提供了不同的获取令牌(Token)方式,为了实现并确定这几种授权,需要配置使用 ClientDetailsService 和 TokenService 来开启或者禁用这几种授权机制。到这里就请注意了,不管你使用什么样的授权类型(Grant Type),每一个客户端(Client)都能够通过明确的配置以及权限来实现不同的授权访问机制。这也就是说,假如你提供了一个支持"client_credentials"的授权方式,并不意味着客户端就需要使用这种方式来获得授权。
-
authorization_code:授权码类型。
-
-
password:资源所有者(即用户)密码类型。
-
client_credentials:客户端凭据(客户端ID以及Key)类型。
-
refresh_token:通过以上授权获得的刷新令牌来获取新的令牌。
可以用 @EnableAuthorizationServer 注解来配置OAuth2.0 授权服务机制,通过使用@Bean注解的几个方法一起来配置这个授权服务。下面咱们介绍几个配置类,这几个配置是由Spring创建的独立的配置对象,它们会被Spring传入AuthorizationServerConfigurer中:
-
ClientDetailsServiceConfigurer:用来配置客户端详情服务(ClientDetailsService),客户端详情信息在这里进行初始化,你能够把客户端详情信息写死在这里或者是通过数据库来存储调取详情信息。
-
AuthorizationServerSecurityConfigurer:用来配置令牌端点(Token Endpoint)的安全约束.
-
AuthorizationServerEndpointsConfigurer:用来配置授权(authorization)以及令牌(token)的访问端点和令牌服务(token services)。
(注:以下1.*中对所有代码都配置在继承AuthorizationServerConfigurerAdapter的配置类中)
1.1、配置客户端详情信息(Client Details):
ClientDetailsServiceConfigurer (AuthorizationServerConfigurer 的一个回调配置项,见上的概述) 能够使用内存或者JDBC来实现客户端详情服务(ClientDetailsService),有几个重要的属性如下列表:
-
clientId:(必须的)用来标识客户的Id。
-
secret:(需要值得信任的客户端)客户端安全码,如果有的话。
-
scope:用来限制客户端的访问范围,如果为空(默认)的话,那么客户端拥有全部的访问范围。
-
authorizedGrantTypes:此客户端可以使用的授权类型,默认为空。
-
authorities:此客户端可以使用的权限(基于Spring Security authorities)。
代码选自:
@Autowired private ClientDetailsService clientDetailsService; @Override public void configure(ClientDetailsServiceConfigurer clients) throws Exception { clients.withClientDetails(clientDetailsService); /* clients.inMemory() .withClient("c1") .secret(new BCryptPasswordEncoder().encode("secret"))//$2a$10$0uhIO.ADUFv7OQ/kuwsC1.o3JYvnevt5y3qX/ji0AUXs4KYGio3q6 .resourceIds("r1") .authorizedGrantTypes("authorization_code", "password", "client_credentials", "implicit", "refresh_token") .scopes("all") .autoApprove(false) .redirectUris("https://www.baidu.com");*/ }
代码选自:
 //为了测试客户端与凭证存储在内存(生产应该用数据库来存储,oauth有标准数据库模板)
    @Override
    public void configure(ClientDetailsServiceConfigurer clients) throws Exception {
        clients.inMemory()
                .withClient("client1-code") // client_id
                .secret(bCryptPasswordEncoder.encode("123")) // client_secret
                .authorizedGrantTypes("authorization_code") // 该client允许的授权类型
                .scopes("app") // 允许的授权范围
                .redirectUris("https://www.baidu.com")
                .resourceIds("goods", "mechant")    //资源服务器id,需要与资源服务器对应

                .and()
                .withClient("client2-credentials")
                .secret(bCryptPasswordEncoder.encode("123"))
                .authorizedGrantTypes("client_credentials")
                .scopes("app")
                .resourceIds("goods", "mechant")

                .and()
                .withClient("client3-password")
                .secret(bCryptPasswordEncoder.encode("123"))
                .authorizedGrantTypes("password")
                .scopes("app")
                .resourceIds("mechant")

                .and()
                .withClient("client4-implicit")
                .authorizedGrantTypes("implicit")
                .scopes("app")
                .resourceIds("mechant");
    }
代码选自:
    // 数据库连接池对象,SpringBoot 配置完成后自动注入
    @Autowired
    private DataSource dataSource;
    // 客户端信息来源
    @Bean
    public ClientDetailsService jdbcClientDetailsService(){
        return new JdbcClientDetailsService(dataSource);
    }
    // 指定客户端信息的数据库来源
    @Override
    public void configure(ClientDetailsServiceConfigurer clients) throws Exception {
        clients.withClientDetails(jdbcClientDetailsService());
    }
客户端详情(Client Details)能够在应用程序运行的时候进行更新,可以通过访问底层的存储服务(例如将客户端详情存储在一个关系数据库的表中,就可以使用 JdbcClientDetailsService)或者通过 ClientDetailsManager 接口(同时你也可以实现 ClientDetailsService 接口)来进行管理。
1.2、管理令牌(Managing Token):
AuthorizationServerTokenServices 接口定义了一些操作使得你可以对令牌进行一些必要的管理,在使用这些操作的时候请注意以下几点:
-
当一个令牌被创建了,你必须对其进行保存,这样当一个客户端使用这个令牌对资源服务进行请求的时候才能够引用这个令牌。
-
当一个令牌是有效的时候,它可以被用来加载身份信息,里面包含了这个令牌的相关权限。
代码选自:
@Autowired private TokenStore tokenStore; @Autowired private ClientDetailsService clientDetailsService; @Bean public AuthorizationServerTokenServices tokenServices(){ DefaultTokenServices services = new DefaultTokenServices(); services.setClientDetailsService(clientDetailsService); services.setSupportRefreshToken(true); services.setTokenStore(tokenStore); services.setAccessTokenValiditySeconds(7200); services.setRefreshTokenValiditySeconds(259200); return services; }
代码选自:
// 令牌管理 @Bean public AuthorizationServerTokenServices tokenServices() { DefaultTokenServices tokenServices = new DefaultTokenServices(); // token 保存策略 tokenServices.setTokenStore(tokenStore()); // 支持刷新模式 tokenServices.setSupportRefreshToken(true); // 客户端信息来源 tokenServices.setClientDetailsService(jdbcClientDetailsService()); // token 有效期自定义设置,默认 12 小时 tokenServices.setAccessTokenValiditySeconds(60 * 60 * 12); // refresh token 有效期自定义设置,默认 30 天 tokenServices.setRefreshTokenValiditySeconds(60 * 60 * 24 * 7); return tokenServices; }
当你自己创建 AuthorizationServerTokenServices 这个接口的实现时,你可能需要考虑一下使用 DefaultTokenServices 这个类,里面包含了一些有用实现,你可以使用它来修改令牌的格式和令牌的存储。默认的,当它尝试创建一个令牌的时候,是使用随机值来进行填充的,除了持久化令牌是委托一个 TokenStore 接口来实现以外,这个类几乎帮你做了所有的事情。并且 TokenStore 这个接口有一个默认的实现,它就是 InMemoryTokenStore ,如其命名,所有的令牌是被保存在了内存中。除了使用这个类以外,你还可以使用一些其他的预定义实现,下面有几个版本,它们都实现了TokenStore接口:
-
InMemoryTokenStore:这个版本的实现是被默认采用的,它可以完美的工作在单服务器上(即访问并发量压力不大的情况下,并且它在失败的时候不会进行备份),大多数的项目都可以使用这个版本的实现来进行尝试,你可以在开发的时候使用它来进行管理,因为不会被保存到磁盘中,所以更易于调试。
-
JdbcTokenStore:这是一个基于JDBC的实现版本,令牌会被保存进关系型数据库。使用这个版本的实现时,你可以在不同的服务器之间共享令牌信息,使用这个版本的时候请注意把"spring-jdbc"这个依赖加入到你的classpath当中。
-
JwtTokenStore:这个版本的全称是 JSON Web Token(JWT),它可以把令牌相关的数据进行编码(因此对于后端服务来说,它不需要进行存储,这将是一个重大优势),但是它有一个缺点,那就是撤销一个已经授权令牌将会非常困难,所以它通常用来处理一个生命周期较短的令牌以及撤销刷新令牌(refresh_token)。另外一个缺点就是这个令牌占用的空间会比较大,如果你加入了比较多用户凭证信息。JwtTokenStore 不会保存任何数据,但是它在转换令牌值以及授权信息方面与 DefaultTokenServices 所扮演的角色是一样的。
1.3、管理访问端点配置:
AuthorizationServerEndpointsConfigurer 这个对象的实例可以完成令牌服务以及令牌 endpoint 配置。通过设定以下属性决定支持的授权类型(Grant Types):
-
authenticationManager:认证管理器,当选择了密码(password)授权类型的时候,请设置这个属性注入一个 AuthenticationManager 对象。 -
userDetailsService:如果你设置了这个属性的话,那说明你有一个自己的 UserDetailsService 接口的实现,或者你可以把它设置到全局域上面去,当你设置了这个之后,那么 refresh_token 即刷新令牌授权类型模式的流程中就会包含一个检查,用来确保这个账号是否仍然有效。 -
authorizationCodeServices:这个属性是用来设置授权码服务的,主要用于 authorization_code 授权码类型模式。 -
implicitGrantService:这个属性用于设置隐式授权模式,用来管理隐式授权模式的状态。 -
tokenGranter:当你设置了这个东西,那么授权将会交由你来完全掌控,并且会忽略掉上面的这几个属性,这个属性一般是用作拓展用途的,即标准的四种授权模式已经满足不了你的需求的时候,才会考虑使用这个。
代码选自:
@Autowired private AuthenticationManager authenticationManager; @Override public void configure(AuthorizationServerEndpointsConfigurer endpoints) throws Exception { endpoints .authenticationManager(authenticationManager) //证管理器,当选择了密码(password)授权类型的时候,请设置这个属性注入一个 AuthenticationManager 对象。 .authorizationCodeServices(authorizationCodeServices) .tokenServices(tokenServices()) .allowedTokenEndpointRequestMethods(HttpMethod.POST); endpoints.pathMapping("/oauth/confirm_access","/custom/confirm_access"); }
代码选自:
@Autowired private AuthenticationManager authenticationManager; // OAuth2 的主配置信息 @Override public void configure(AuthorizationServerEndpointsConfigurer endpoints) throws Exception { endpoints .approvalStore(approvalStore()) .authenticationManager(authenticationManager) .authorizationCodeServices(authorizationCodeServices()) .tokenServices(tokenServices()); } }
代码选自:
    @Autowired
    private AuthenticationManager authenticationManager

    //配置token仓库
    @Override
    public void configure(AuthorizationServerEndpointsConfigurer endpoints) throws Exception {
        //authenticationManager配合password模式使用
        endpoints.authenticationManager(authenticationManager)
                //这里使用内存存储token,也可以使用redis和数据库
                .tokenStore(new InMemoryTokenStore());
        endpoints.allowedTokenEndpointRequestMethods(HttpMethod.GET,HttpMethod.POST);
        endpoints.tokenEnhancer(new TokenEnhancer() {
            @Override
            public OAuth2AccessToken enhance(OAuth2AccessToken oAuth2AccessToken, OAuth2Authentication oAuth2Authentication) {
                //在返回token的时候可以加上一些自定义数据
                DefaultOAuth2AccessToken token = (DefaultOAuth2AccessToken) oAuth2AccessToken;
                Map<String, Object> map = new LinkedHashMap<>();
                map.put("nickname", "测试姓名");
                token.setAdditionalInformation(map);
                return token;
            }
        });
AuthorizationServerEndpointsConfigurer 这个配置对象有一个叫做 pathMapping() 的方法用来配置端点 URL 链接,它有两个参数,第一个参数:String 类型的,这个端点URL的默认链接。第二个参数:String 类型的,你要进行替代的 URL 链接。以上的参数都将以 / 字符为开始的字符串,框架的默认 URL 链接如下列表,可以作为 pathMapping() 方法的第一个参数:
-
/oauth/authorize:授权端点。 -
/oauth/token:令牌端点。 -
/oauth/confirm_access:用户确认授权提交端点。 -
/oauth/error:授权服务错误信息端点。 -
/oauth/check_token:用于资源服务访问的令牌解析端点。 -
/oauth/token_key:提供公有密匙的端点,如果你使用JWT令牌的话。
2、资源服务配置
一个资源服务(可以和授权服务在同一个应用中,当然也可以分离开成为两个不同的应用程序)提供一些受token令牌保护的资源,Spring OAuth提供者是通过Spring Security authentication filter 即验证过滤器来实现的保护,你可以通过 @EnableResourceServer 注解到一个 @Configuration 配置类上,并且必须使用 ResourceServerConfigurer 这个配置对象来进行配置(可以选择继承自 ResourceServerConfigurerAdapter 然后覆写其中的方法,参数就是这个对象的实例),下面是一些可以配置的属性:
-
tokenServices:ResourceServerTokenServices 类的实例,用来实现令牌服务。
-
resourceId:这个资源服务的ID,这个属性是可选的,但是推荐设置并在授权服务中进行验证。
-
其他的拓展属性例如 tokenExtractor 令牌提取器用来提取请求中的令牌。
-
请求匹配器,用来设置需要进行保护的资源路径,默认的情况下是受保护资源服务的全部路径。
-
受保护资源的访问规则,默认的规则是简单的身份验证(plain authenticated)。
-
其他的自定义权限保护规则通过 HttpSecurity 来进行配置。
@EnableResourceServer 注解自动增加了一个类型为 OAuth2AuthenticationProcessingFilter 的过滤器链
(注:以下2.*中对所有代码都配置在继承ResourceServerConfigurerAdapter的配置类中)
代码来自:
    @Bean
    public ResourceServerTokenServices resourceServerTokenServices(){
        RemoteTokenServices remoteTokenServices = new RemoteTokenServices();
        remoteTokenServices.setCheckTokenEndpointUrl("http://127.0.0.1:30000/oauth/check_token");
        remoteTokenServices.setClientId("c1");
        remoteTokenServices.setClientSecret("secret");
        return remoteTokenServices;
    }
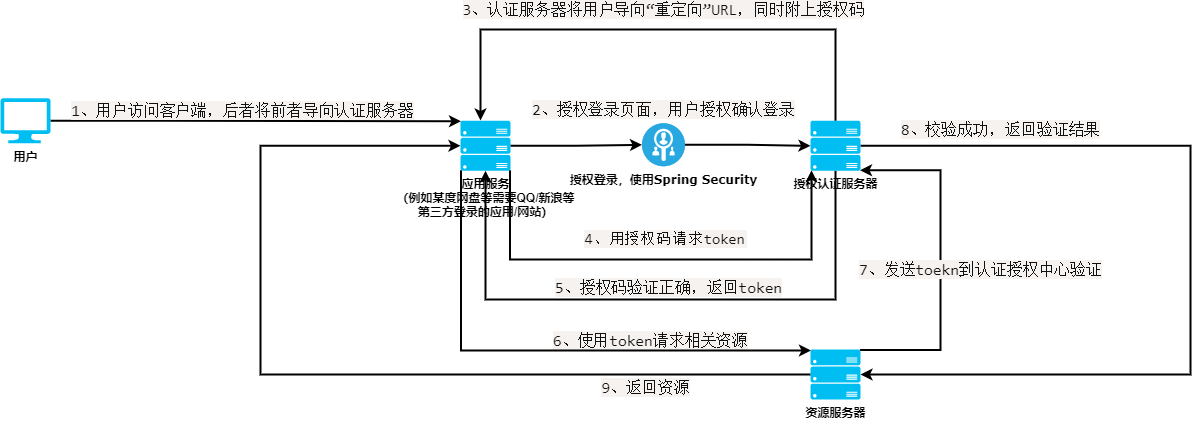
3、运行流程及源码讲解:
3.1、
根据以下代码进行自绘图:

@EnableResourceServer注解:
