
用于快速实现完美的碰撞检测,Mask 可以精确到 1 个像素级别的判断
import pygame

pygame.init()
screen = pygame.display.set_mode((500, 400))
pygame.display.set_caption("遮罩")

tu = pygame.image.load('圆红.png').convert()
tu.set_colorkey((255,255,255))
m=pygame.mask.from_surface(tu)  #从指定 Surface 对象中返回一个 Mask
#返回值:<class 'pygame.mask.Mask'> <Mask(116x113)>
#透明的部分设置为0,不透明部分设置为 1
#说明:基于set_colorkey透明的省略参数2

tu1=pygame.image.load('圆蓝.png').convert_alpha()  #基于像素透明
m1=pygame.mask.from_surface(tu1,127)  #从指定 Surface对象中返回一个 Mask
#基于像素透明的可以设置参数2(threshold)
#参数2:检查每个像素的 alpha 值是否大于参数2指定的值。(alpha 通道使用 0 ~ 255 描述像素的透明度)【默认127】
#【alpha通道小于参数2的为透明,大于参数2的为不透明】

tu2=pygame.image.load('圆红.png').convert_alpha()

x=m.get_size()   #返回Mask 的大小。
# (116, 113)-> (width,height)

x=m.get_at((50,50))  #返回遮罩中指点坐标的值
#参数:坐标
#返回值:0表示透明,1表示不透明

m2=m
m2.set_at((50,50),0)  #给指定坐标设置值
#参数1:坐标
#参数2:值

print(type(x),x)
while True:
    for event in pygame.event.get():
        if event.type == pygame.QUIT:
            exit()
    screen.blit(tu, (0, 0))
    screen.blit(tu1, (300, 0))
    pygame.display.update()
import pygame
pygame.init()
red = (255,0,0)
blue = (0,0,255)
w,h = size = 480,360
screen = pygame.display.set_mode(size)
pygame.display.set_caption("遮罩")
clock = pygame.time.Clock()
i=0

# 创建大的圆环
radius1 = 50
width1,height1 = 2*radius1,2*radius1
hollow_circle = pygame.Surface((width1,height1),pygame.SRCALPHA)
pos = width1//2,height1//2
rect1 = hollow_circle.get_rect(center=(w//2,h//2))
pygame.draw.circle(hollow_circle,red,pos,radius1,10)
mask1 = pygame.mask.from_surface(hollow_circle) #获取圆环的Mask
# 创建小的实心圆
radius2 = 10
width2,height2 = 2 * radius2,2 * radius2
solid_circle = pygame.Surface((width2,height2),pygame.SRCALPHA)
pos = width2//2,height2//2
rect2 = solid_circle.get_rect(center=(w//2,h//2))
pygame.draw.circle(solid_circle,blue,pos,radius2)
mask2 = pygame.mask.from_surface(solid_circle)


while True:
    for event in pygame.event.get():
        if event.type == pygame.QUIT:
            exit()
    screen.fill((255,255,255))

    mpos = pygame.mouse.get_pos()
    rect2.center = mpos

    offset = rect2.x - rect1.x, rect2.y - rect1.y
    p = mask1.overlap(mask2, offset)  #检测两个Mask有没有碰撞
    #这种检测法图像的透明区域不在碰撞检测范围内
    #没有碰撞返回None,有碰撞返回碰撞的坐标(相对于mask1的坐标)
    #返回值:【mask1中碰撞区域左上角的坐标,而且这个坐标是相对于mask1图像左上角的】
    screen.blit(hollow_circle, rect1)
    screen.blit(solid_circle, rect2)
    print(i,p)
    i+=1
    clock.tick(2)
    pygame.display.update()
import pygame
pygame.init()
red = (255,0,0)
blue = (0,0,255)
screen = pygame.display.set_mode((480,360))
pygame.display.set_caption("mask")
clock = pygame.time.Clock()
i=0

小红块 = pygame.image.load("小红块.png").convert_alpha()
小红块rect = 小红块.get_rect()
测试图 = pygame.image.load("测试图.png").convert_alpha()
测试图.set_colorkey((0,0,0))
#设置透明色,透明区域不在mask碰撞检测范围内
测试图rect = 测试图.get_rect()

测试图rect.x=100
测试图rect.y=100
小红块mask = pygame.mask.from_surface(小红块,127)
测试图mask = pygame.mask.from_surface(测试图,127)
#透明区域的mask值为0


while True:
    for event in pygame.event.get():
        if event.type == pygame.QUIT:
            exit()
        if event.type == pygame.KEYDOWN:
            if event.key == pygame.K_RIGHT:
                小红块rect.x = 小红块rect.x + 10
            if event.key == pygame.K_LEFT:
                小红块rect.x = 小红块rect.x - 10
            if event.key == pygame.K_UP:
                小红块rect.top = 小红块rect.top - 10
            if event.key == pygame.K_DOWN:
                小红块rect.move_ip(0, 10)
    screen.fill((255,255,255))
    offsetX = 小红块rect.x - 测试图rect.x
    offsetY = 小红块rect.y - 测试图rect.y

    point = 测试图mask.overlap(小红块mask, (offsetX, offsetY))
    someArea = 测试图mask.overlap_area(小红块mask, (offsetX, offsetY))  #返回两个 Mask 重叠的像素数量

    if point:
        px, py = point
        # 借助返回的点,获取返回点的颜色
        pixel1 = 测试图.get_at((px,py))

        sx=测试图rect.x+px
        sy = 测试图rect.y + py
        #相对于screen的坐标

        cx=sx-小红块rect.x
        cy = sy - 小红块rect.y

        pixel2 = 小红块.get_at((cx, cy))


    else:
        pixel1=1000
        pixel2=2000

    print(i,point,someArea,pixel1,pixel2)
    screen.blit(测试图,测试图rect )
    screen.blit(小红块, 小红块rect)

    i+=1
    clock.tick(2)
    pygame.display.update()
测试图:

小红块:

mask1.fill() #将所有的位设置为 1
mask1.clear() #将所有的位设置为0
mask1.invert() #翻转 Mask 中所有的位(0 变 1,1 变 0)
mask2=mask1.scale((50,50))   #缩放 Mask 的尺寸
#Mask 根据指定尺寸缩放后返回一个新的 Mask
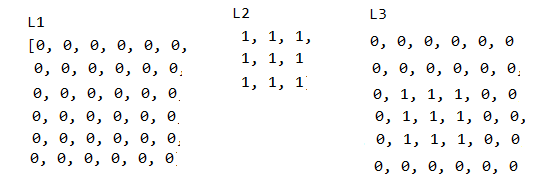
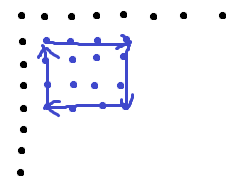
import pygame
pygame.init()

w,h = size = 480,360
screen = pygame.display.set_mode(size)
pygame.display.set_caption("遮罩")
clock = pygame.time.Clock()

tu1 = pygame.Surface((6,6),pygame.SRCALPHA)
mask1 = pygame.mask.from_surface(tu1)
#创建一个全部为0的mask

tu2=pygame.Surface((3,3),pygame.SRCALPHA)
pygame.draw.rect(tu2, (0,0,255), (0,0,3,3))
mask2 = pygame.mask.from_surface(tu2)

L1=[]
for i in range(6):
    for j in range(6):
        p = mask1.get_at((i, j))
        L1.append(p)
L2=[]
for i in range(3):
    for j in range(3):
        p = mask2.get_at((i, j))
        L2.append(p)
mask1.draw(mask2, (2,1))   #将mask2绘制到mask1上边,执行的是按位 or 操作
#参数2-偏移量:2表示mask2对应于mask1的位置往下走2行(mask1的第3行与mask2的首行对齐)
#             1表示mask2对应于mask1的位置往右走2列(mask1的第2列与mask2的首列对齐)
#偏移量的意思:【(mask2的行偏移量,列偏移量)】

L3=[]
for i in range(6):
    for j in range(6):
        p = mask1.get_at((i, j))
        L3.append(p)
print('L1')
print(L1)
print('L2')
print(L2)
print('L3')
print(L3)


while True:
    for event in pygame.event.get():
        if event.type == pygame.QUIT:
            exit()
    screen.fill((255,255,255))

    clock.tick(2)
    pygame.display.update()
意思理解图:
n=mask1.count()  #返回 Mask 被设置(为 1)的像素的数量
p=mask1.centroid()  #找到 Mask 的重心点。如果 Mask 是空的,那么返回值是 (0, 0)
#找到mask中所有设置为1的中心点,如果mask所有值都是0,那就返回(0,0)
import pygame
pygame.init()

w,h = size = 200,100
screen = pygame.display.set_mode(size)
pygame.display.set_caption("遮罩")
clock = pygame.time.Clock()

tu1 = pygame.Surface((8,8),pygame.SRCALPHA)
pygame.draw.rect(tu1, (0,0,255), (1,1,4,4))
mask1 = pygame.mask.from_surface(tu1)

f=mask1.outline()  #用列表的形式返回组成对象轮廓的点
#[(1, 1), (2, 1), (3, 1), (4, 1), (4, 2), (4, 3), (4, 4), (3, 4), (2, 4), (1, 4), (1, 3), (1, 2), (1, 1)]

print(f)

while True:
    for event in pygame.event.get():
        if event.type == pygame.QUIT:
            exit()
    screen.fill((255,255,255))

    clock.tick(2)
    pygame.display.update()
理解图:
import pygame
pygame.init()

w,h = size = 400,400
screen = pygame.display.set_mode(size)
pygame.display.set_caption("遮罩")
clock = pygame.time.Clock()

tu1 = pygame.Surface((200,200),pygame.SRCALPHA)
pygame.draw.circle(tu1, (0,0,255), (4,4),3,1)
pygame.draw.ellipse(tu1, (0,0,255), (20,20,20,10),1)
mask1 = pygame.mask.from_surface(tu1)

f=mask1.get_bounding_rects()  #返回具有连续1区域矩形列表
#每个1连续区域形成就形成一个矩形
#返回值:列表
#[<rect(1, 1, 7, 6)>, <rect(20, 20, 20, 10)>]


print(f)

while True:
    for event in pygame.event.get():
        if event.type == pygame.QUIT:
            exit()
    screen.fill((255,255,255))

    clock.tick(2)
    pygame.display.update()
