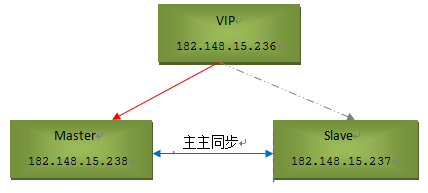
我们通常说的双机热备是指两台机器都在运行,但并不是两台机器都同时在提供服务。当提供服务的一台出现故障的时候,另外一台会马上自动接管并且提供服务,而且切换的时间非常短。MySQL双主复制,即互为Master-Slave(只有一个Master提供写操作),可以实现数据库服务器的热备,但是一个Master宕机后不能实现动态切换。使用Keepalived,可以通过虚拟IP,实现双主对外的统一接口以及自动检查、失败切换机制,从而实现MySQL数据库的高可用方案。之前梳理了Mysql主从/主主同步,下面说下Mysql+keeoalived双主热备高可用方案的实施。
|
1
2
3
4
5
6
|
Keepalived看名字就知道,保持存活,在网络里面就是保持在线了,也就是所谓的高可用或热备,用来防止单点故障(单点故障是指一旦某一点出现故障就会导整个系统架构的不可用)的发生,那说到keepalived不得不说的一个协议不是VRRP协议,可以说这个协议就是keepalived实现的基础。1)Keepalived的工作原理是VRRP(Virtual Router Redundancy Protocol)虚拟路由冗余协议。在VRRP中有两组重要的概念:VRRP路由器和虚拟路由器,主控路由器和备份路由器。2)VRRP路由器是指运行VRRP的路由器,是物理实体,虚拟路由器是指VRRP协议创建的,是逻辑概念。一组VRRP路由器协同工作,共同构成一台虚拟路由器。Vrrp中存在着一种选举机制,用以选出提供服务的路由即主控路由,其他的则成了备份路由。当主控路由失效后,备份路由中会重新选举出一个主控路由,来继续工作,来保障不间断服务。 |
过多内容在这里就不做详细介绍了,下面详细记录下Mysql+Keepalived双主热备的高可用方案的操作记录
1)先实施Master->Slave的主主同步。主主是数据双向同步,主从是数据单向同步。一般情况下,主库宕机后,需要手动将连接切换到从库上。(但是用keepalived就可以自动切换)
2)再结合Keepalived的使用,通过VIP实现Mysql双主对外连接的统一接口。即客户端通过Vip连接数据库;当其中一台宕机后,VIP会漂移到另一台上,这个过程对于客户端的数据连接来说几乎无感觉,从而实现高可用。
|
1
2
3
4
5
6
7
8
9
10
11
12
13
14
|
环境描述:mysql的安装可以参考:http://www.cnblogs.com/kevingrace/p/6109679.htmlCentos6.8版本Master1:182.148.15.238 安装mysql和keepalivedMaster2: 182.148.15.237 安装mysql和keepalivedVIP:182.148.15.236 要实现主主同步,可以先实现主从同步,即master1->master2的主从同步,然后master2->master1的主从同步.这样,双方就完成了主主同步。注意下面几点:1)要保证同步服务期间之间的网络联通。即能相互ping通,能使用对方授权信息连接到对方数据库(防火墙开放3306端口)。2)关闭selinux。3)同步前,双方数据库中需要同步的数据要保持一致。这样,同步环境实现后,再次更新的数据就会如期同步了。 |
可能出现的问题
|
1
2
3
4
5
6
7
|
报错:Last_IO_Error: Fatal error: The slave I/O thread stops because master and slave have equal MySQL server ids; these ids must be different for replication to work (or the --replicate-same-server-id option must be used on slave but this does not always make sense; please check the manual before using it). 解决办法:删除mysql数据目录下的auto.cnf文件,重启mysql服务即可!另:Keepalived必须使用root账号启动!! |
一、Mysql主主同步环境部署
|
1
2
3
4
5
6
7
8
9
10
11
12
13
14
15
16
17
18
19
20
21
22
23
24
25
26
27
28
29
30
31
32
33
34
35
36
37
38
39
40
41
42
43
44
45
46
47
48
49
50
51
52
53
54
55
56
57
58
59
60
61
62
63
64
65
66
67
68
69
70
71
72
73
74
75
76
77
78
79
80
81
82
83
84
85
86
87
88
89
90
91
92
93
94
95
96
97
98
99
100
101
102
103
104
105
106
107
108
109
110
111
112
113
114
115
116
117
118
119
120
121
122
123
124
125
126
127
128
129
130
131
132
133
134
135
136
137
138
139
140
141
142
143
144
145
146
147
148
149
150
151
152
153
154
155
156
157
158
159
160
161
162
163
164
165
166
167
168
169
170
171
172
173
174
175
176
177
178
179
180
181
182
183
184
185
186
187
188
189
190
191
192
193
194
195
196
197
198
199
200
201
202
203
204
205
206
207
208
209
210
211
212
213
214
215
216
217
218
219
220
221
222
223
224
225
226
227
228
229
230
231
232
|
---------------master1服务器操作记录---------------在my.cnf文件的[mysqld]配置区域添加下面内容:[root@master1 ~]# vim /usr/local/mysql/my.cnfserver-id = 1 log-bin = mysql-bin sync_binlog = 1binlog_checksum = nonebinlog_format = mixedauto-increment-increment = 2 auto-increment-offset = 1 slave-skip-errors = all [root@master1 ~]# /etc/init.d/mysql restartShutting down MySQL. SUCCESS!Starting MySQL.. SUCCESS! 数据同步授权(iptables防火墙开启3306端口)这样I/O线程就可以以这个用户的身份连接到主服务器,并且读取它的二进制日志。mysql> grant replication slave,replication client on *.* to wang@'182.148.15.%' identified by "wang@123";Query OK, 0 rows affected (0.00 sec) mysql> flush privileges;Query OK, 0 rows affected (0.00 sec) 最好将库锁住,仅仅允许读,以保证数据一致性;待主主同步环境部署后再解锁;锁住后,就不能往表里写数据,但是重启mysql服务后就会自动解锁!mysql> flush tables with read lock; //注意该参数设置后,如果自己同步对方数据,同步前一定要记得先解锁!Query OK, 0 rows affected (0.00 sec) 查看下log bin日志和pos值位置mysql> show master status;+------------------+----------+--------------+--------------------------+-------------------+| File | Position | Binlog_Do_DB | Binlog_Ignore_DB | Executed_Gtid_Set |+------------------+----------+--------------+--------------------------+-------------------+| mysql-bin.000004 | 430 | | mysql,information_schema | |+------------------+----------+--------------+--------------------------+-------------------+1 row in set (0.00 sec) ---------------master2服务器操作记录---------------在my.cnf文件的[mysqld]配置区域添加下面内容:[root@master2 ~]# vim /usr/local/mysql/my.cnfserver-id = 2 log-bin = mysql-bin sync_binlog = 1binlog_checksum = nonebinlog_format = mixedauto-increment-increment = 2 auto-increment-offset = 2 slave-skip-errors = all [root@master2 ~]# /etc/init.d/mysql restartShutting down MySQL.. SUCCESS!Starting MySQL.. SUCCESS! mysql> grant replication slave,replication client on *.* to wang@'182.148.15.%' identified by "wang@123";Query OK, 0 rows affected (0.00 sec) mysql> flush privileges;Query OK, 0 rows affected (0.00 sec) mysql> flush tables with read lock;Query OK, 0 rows affected (0.00 sec) mysql> show master status;+------------------+----------+--------------+--------------------------+-------------------+| File | Position | Binlog_Do_DB | Binlog_Ignore_DB | Executed_Gtid_Set |+------------------+----------+--------------+--------------------------+-------------------+| mysql-bin.000003 | 430 | | mysql,information_schema | |+------------------+----------+--------------+--------------------------+-------------------+1 row in set (0.00 sec) ---------------master1服务器做同步操作---------------mysql> unlock tables; //先解锁,将对方数据同步到自己的数据库中mysql> slave stop;mysql> change master to master_host='182.148.15.237',master_user='wang',master_password='wang@123',master_log_file='mysql-bin.000003',master_log_pos=430; Query OK, 0 rows affected, 2 warnings (0.01 sec) mysql> start slave;Query OK, 0 rows affected (0.01 sec) 查看同步状态,如下出现两个“Yes”,表明同步成功!mysql> show slave status G;*************************** 1. row *************************** Slave_IO_State: Waiting for master to send event Master_Host: 182.148.15.237 Master_User: wang Master_Port: 3306 Connect_Retry: 60 Master_Log_File: mysql-bin.000003 Read_Master_Log_Pos: 430 Relay_Log_File: mysql-relay-bin.000002 Relay_Log_Pos: 279 Relay_Master_Log_File: mysql-bin.000003 Slave_IO_Running: Yes Slave_SQL_Running: Yes ......................... Seconds_Behind_Master: 0 .........................这样,master1就和master2实现了主从同步,即master1同步master2的数据。 ---------------master2服务器做同步操作---------------mysql> unlock tables; //先解锁,将对方数据同步到自己的数据库中mysql> slave stop;mysql> change master to master_host='182.148.15.238',master_user='wang',master_password='wang@123',master_log_file='mysql-bin.000004',master_log_pos=430; Query OK, 0 rows affected, 2 warnings (0.06 sec) mysql> start slave;Query OK, 0 rows affected (0.01 sec) mysql> show slave status G;*************************** 1. row *************************** Slave_IO_State: Waiting for master to send event Master_Host: 182.148.15.238 Master_User: wang Master_Port: 3306 Connect_Retry: 60 Master_Log_File: mysql-bin.000004 Read_Master_Log_Pos: 430 Relay_Log_File: mysql-relay-bin.000002 Relay_Log_Pos: 279 Relay_Master_Log_File: mysql-bin.000004 Slave_IO_Running: Yes Slave_SQL_Running: Yes ........................ Seconds_Behind_Master: 0 ........................ 这样,master2就和master1实现了主从同步,即master2也同步master1的数据。 以上表明双方已经实现了mysql主主同步。当运行一段时间后,要是发现同步有问题,比如只能单向同步,双向同步失效。可以重新执行下上面的change master同步操作,只不过这样同步后,只能同步在此之后的更新数据。下面开始进行数据验证: -----------------主主同步效果验证---------------------1)在master1数据库上写入新数据mysql> unlock tables;Query OK, 0 rows affected (0.00 sec) mysql> create database huanqiu;Query OK, 1 row affected (0.01 sec) mysql> use huanqiu;Database changed mysql> create table if not exists haha ( -> id int(10) PRIMARY KEY AUTO_INCREMENT, -> name varchar(50) NOT NULL);Query OK, 0 rows affected (0.04 sec) mysql> insert into haha values(1,"王士博");Query OK, 1 row affected (0.00 sec) mysql> insert into haha values(2,"郭慧慧");Query OK, 1 row affected (0.00 sec) mysql> select * from haha;+----+-----------+| id | name |+----+-----------+| 1 | 王士博 || 2 | 郭慧慧 |+----+-----------+2 rows in set (0.00 sec) 然后在master2数据库上查看,发现数据已经同步过来了!mysql> show databases;+--------------------+| Database |+--------------------+| information_schema || huanqiu || mysql || performance_schema || test |+--------------------+5 rows in set (0.00 sec) mysql> use huanqiu;Reading table information for completion of table and column namesYou can turn off this feature to get a quicker startup with -A Database changedmysql> show tables;+-------------------+| Tables_in_huanqiu |+-------------------+| haha |+-------------------+1 row in set (0.00 sec) mysql> select * from haha;+----+-----------+| id | name |+----+-----------+| 1 | 王士博 || 2 | 郭慧慧 |+----+-----------+2 rows in set (0.00 sec) 2)在master2数据库上写入新数据mysql> create database hehe;Query OK, 1 row affected (0.00 sec) mysql> insert into huanqiu.haha values(3,"周正"),(4,"李敏");Query OK, 2 rows affected (0.00 sec)Records: 2 Duplicates: 0 Warnings: 0 然后在master1数据库上查看,发现数据也已经同步过来了!mysql> show databases;+--------------------+| Database |+--------------------+| information_schema || hehe || huanqiu || mysql || performance_schema || test |+--------------------+6 rows in set (0.00 sec) mysql> select * from huanqiu.haha;+----+-----------+| id | name |+----+-----------+| 1 | 王士博 || 2 | 郭慧慧 || 3 | 周正 || 4 | 李敏 |+----+-----------+4 rows in set (0.00 sec) 至此,Mysql主主同步环境已经实现。 |
二、配置Mysql+Keepalived故障转移的高可用环境
|
1
2
3
4
5
6
7
8
9
10
11
12
13
14
15
16
17
18
19
20
21
22
23
24
25
26
27
28
29
30
31
32
33
34
35
36
37
38
39
40
41
42
43
44
45
46
47
48
49
50
51
52
53
54
55
56
57
58
59
60
61
62
63
64
65
66
67
68
69
70
71
72
73
74
75
76
77
78
79
80
81
82
83
84
85
86
87
88
89
90
91
92
93
94
95
96
97
98
99
100
101
102
103
104
105
106
107
108
109
110
111
112
113
114
115
116
117
118
119
120
121
122
123
124
125
126
127
128
129
130
131
132
133
134
135
136
137
138
139
140
141
142
143
144
145
146
147
148
149
150
151
|
1)安装keepalived并将其配置成系统服务。master1和master2两台机器上同样进行如下操作:[root@master1 ~]# yum install -y openssl-devel[root@master1 ~]# cd /usr/local/src/[root@master1 src]# wget http://www.keepalived.org/software/keepalived-1.3.5.tar.gz[root@master1 src]# tar -zvxf keepalived-1.3.5.tar.gz[root@master1 src]# cd keepalived-1.3.5[root@master1 keepalived-1.3.5]# ./configure --prefix=/usr/local/keepalived[root@master1 keepalived-1.3.5]# make && make install [root@master1 keepalived-1.3.5]# cp /usr/local/src/keepalived-1.3.5/keepalived/etc/init.d/keepalived /etc/rc.d/init.d/[root@master1 keepalived-1.3.5]# cp /usr/local/keepalived/etc/sysconfig/keepalived /etc/sysconfig/[root@master1 keepalived-1.3.5]# mkdir /etc/keepalived/[root@master1 keepalived-1.3.5]# cp /usr/local/keepalived/etc/keepalived/keepalived.conf /etc/keepalived/[root@master1 keepalived-1.3.5]# cp /usr/local/keepalived/sbin/keepalived /usr/sbin/[root@master1 keepalived-1.3.5]# echo "/etc/init.d/keepalived start" >> /etc/rc.local 2)master1机器上的keepalived.conf配置。(下面配置中没有使用lvs的负载均衡功能,所以不需要配置虚拟服务器virtual server)[root@master1 ~]# cp /etc/keepalived/keepalived.conf /etc/keepalived/keepalived.conf.bak[root@master1 ~]# vim /etc/keepalived/keepalived.conf #清空默认内容,直接采用下面配置:! Configuration File for keepalived global_defs {notification_email {ops@wangshibo.cntech@wangshibo.cn} notification_email_from ops@wangshibo.cnsmtp_server 127.0.0.1 smtp_connect_timeout 30router_id MASTER-HA} vrrp_script chk_mysql_port { #检测mysql服务是否在运行。有很多方式,比如进程,用脚本检测等等 script "/opt/chk_mysql.sh" #这里通过脚本监测 interval 2 #脚本执行间隔,每2s检测一次 weight -5 #脚本结果导致的优先级变更,检测失败(脚本返回非0)则优先级 -5 fall 2 #检测连续2次失败才算确定是真失败。会用weight减少优先级(1-255之间) rise 1 #检测1次成功就算成功。但不修改优先级} vrrp_instance VI_1 { state MASTER interface eth0 #指定虚拟ip的网卡接口 mcast_src_ip 182.148.15.238 virtual_router_id 51 #路由器标识,MASTER和BACKUP必须是一致的 priority 101 #定义优先级,数字越大,优先级越高,在同一个vrrp_instance下,MASTER的优先级必须大于BACKUP的优先级。这样MASTER故障恢复后,就可以将VIP资源再次抢回来 advert_int 1 authentication { auth_type PASS auth_pass 1111 } virtual_ipaddress { 182.148.15.236 } track_script { chk_mysql_port }} 编写切换脚本。KeepAlived做心跳检测,如果Master的MySQL服务挂了(3306端口挂了),那么它就会选择自杀。Slave的KeepAlived通过心跳检测发现这个情况,就会将VIP的请求接管[root@master1 ~]# vim /opt/chk_mysql.sh#!/bin/bashcounter=$(netstat -na|grep "LISTEN"|grep "3306"|wc -l)if [ "${counter}" -eq 0 ]; then /etc/init.d/keepalived stopfi[root@master1 ~]# chmod 755 /opt/chk_mysql.sh 启动keepalived服务[root@master1 ~]# /etc/init.d/keepalived start正在启动 keepalived: [确定] 4)master2机器上的keepalived配置。master2机器上的keepalived.conf文件只修改priority为90、nopreempt不设置、real_server设置本地IP。[root@master2 ~]# cp /etc/keepalived/keepalived.conf /etc/keepalived/keepalived.conf.bak[root@master2 ~]# >/etc/keepalived/keepalived.conf[root@master2 ~]# vim /etc/keepalived/keepalived.conf! Configuration File for keepalived global_defs {notification_email {ops@wangshibo.cntech@wangshibo.cn} notification_email_from ops@wangshibo.cnsmtp_server 127.0.0.1 smtp_connect_timeout 30router_id MASTER-HA} vrrp_script chk_mysql_port { script "/opt/chk_mysql.sh" interval 2 weight -5 fall 2 rise 1 } vrrp_instance VI_1 { state BACKUP interface eth0 mcast_src_ip 182.148.15.237 virtual_router_id 51 priority 99 advert_int 1 authentication { auth_type PASS auth_pass 1111 } virtual_ipaddress { 182.148.15.236 } track_script { chk_mysql_port }} [root@master2 ~]# cat /opt/chk_mysql.sh#!/bin/bashcounter=$(netstat -na|grep "LISTEN"|grep "3306"|wc -l)if [ "${counter}" -eq 0 ]; then /etc/init.d/keepalived stopfi[root@master2 ~]# chmod 755 /opt/chk_mysql.sh [root@master2 ~]# /etc/init.d/keepalived start正在启动 keepalived: [确定] 5)master1和master2两台服务器都要授权允许root用户远程登录,用于在客户端登陆测试!mysql> grant all on *.* to root@'%' identified by "1234567";Query OK, 0 rows affected (0.00 sec) mysql> flush privileges;Query OK, 0 rows affected (0.01 sec) 6)在master1和master2两台机器上设置iptables防火墙规则,如下:[root@master1 ~]# cat /etc/sysconfig/iptables........-A INPUT -s 182.148.15.0/24 -d 224.0.0.18 -j ACCEPT #允许组播地址通信-A INPUT -s 182.148.15.0/24 -p vrrp -j ACCEPT #允许VRRP(虚拟路由器冗余协)通信-A INPUT -m state --state NEW -m tcp -p tcp --dport 3306 -j ACCEPT #开放mysql的3306端口 [root@master1 ~]# /etc/init.d/iptables restart |
三、Mysql+keepalived故障转移的高可用测试
|
1
2
3
4
5
6
7
8
9
10
11
12
13
14
15
16
17
18
19
20
21
22
23
24
25
26
27
28
29
30
31
32
33
34
35
36
37
38
39
40
41
42
43
44
45
46
47
48
49
50
51
52
53
54
55
56
57
58
59
60
61
62
63
64
65
66
67
68
69
70
71
72
73
74
75
76
77
78
79
80
81
82
83
84
85
86
87
88
89
90
91
92
93
94
95
96
97
98
99
100
101
102
103
104
105
106
107
108
109
110
111
112
113
114
115
116
117
118
119
120
121
122
123
124
125
126
127
128
129
130
131
132
133
134
135
136
137
138
139
140
141
142
143
144
145
146
147
148
149
150
151
152
153
154
155
156
157
158
159
160
161
162
163
164
165
166
167
168
169
170
171
172
173
174
175
176
177
178
179
180
181
182
183
184
185
186
187
188
189
190
191
192
193
194
195
196
197
198
199
200
201
202
203
204
205
206
207
208
209
210
211
212
213
214
215
216
217
218
219
220
221
222
223
224
|
1)通过Mysql客户端通过VIP连接,看是否连接成功。比如,在远程一台测试机上连接,通过vip地址可以正常连接(下面的连接权限要是在服务端提前授权的)[root@dev-new-test ~]# mysql -h182.148.15.236 -uroot -p123456Welcome to the MySQL monitor. Commands end with ; or g.Your MySQL connection id is 60Server version: 5.6.35-log Source distributionCopyright (c) 2000, 2013, Oracle and/or its affiliates. All rights reserved.Oracle is a registered trademark of Oracle Corporation and/or itsaffiliates. Other names may be trademarks of their respectiveowners.Type 'help;' or 'h' for help. Type 'c' to clear the current input statement.mysql> select * from huanqiu.haha;+----+-----------+| id | name |+----+-----------+| 1 | 王士博 || 2 | 郭慧慧 || 3 | 周正 || 4 | 李敏 |+----+-----------+4 rows in set (0.00 sec)2)默认情况下,vip是在master1上的。使用"ip addr"命令查看vip切换情况 [root@master1 ~]# ip addr1: lo: <LOOPBACK,UP,LOWER_UP> mtu 65536 qdisc noqueue state UNKNOWN link/loopback 00:00:00:00:00:00 brd 00:00:00:00:00:00 inet 127.0.0.1/8 scope host lo inet6 ::1/128 scope host valid_lft forever preferred_lft forever2: eth0: <BROADCAST,MULTICAST,UP,LOWER_UP> mtu 1500 qdisc pfifo_fast state UP qlen 1000 link/ether 52:54:00:3c:25:42 brd ff:ff:ff:ff:ff:ff inet 182.148.15.238/27 brd 182.148.15.255 scope global eth0 inet 182.148.15.236/32 scope global eth0 //这个32位子网掩码的vip地址表示该资源目前还在master1机器上 inet 182.148.15.236/27 brd 82.48.115.255 scope global secondary eth0:0 inet6 fe80::5054:ff:fe3c:2542/64 scope link valid_lft forever preferred_lft forever停止master1机器上的mysql服务,根据配置中的脚本,mysql服务停了,keepalived也会停,从而vip资源将会切换到master2机器上。(mysql服务没有起来的时候,keepalived服务也无法顺利启动!)[root@master1 ~]# /etc/init.d/mysql stopShutting down MySQL.. SUCCESS![root@master1 ~]# ps -ef|grep mysqlroot 25812 21588 0 17:30 pts/0 00:00:00 grep mysql[root@master1 ~]# ps -ef|grep keepalivedroot 25814 21588 0 17:30 pts/0 00:00:00 grep keepalived[root@master1 ~]# ip addr 1: lo: <LOOPBACK,UP,LOWER_UP> mtu 65536 qdisc noqueue state UNKNOWN link/loopback 00:00:00:00:00:00 brd 00:00:00:00:00:00 inet 127.0.0.1/8 scope host lo inet6 ::1/128 scope host valid_lft forever preferred_lft forever2: eth0: <BROADCAST,MULTICAST,UP,LOWER_UP> mtu 1500 qdisc pfifo_fast state UP qlen 1000 link/ether 52:54:00:3c:25:42 brd ff:ff:ff:ff:ff:ff inet 182.148.15.238/27 brd 182.148.15.255 scope global eth0 inet 182.148.15.236/27 brd 82.48.115.255 scope global secondary eth0:0 inet6 fe80::5054:ff:fe3c:2542/64 scope link valid_lft forever preferred_lft forever如上结果,发现32位子网掩码的vip没有了,说明此时vip资源已不在master1机器上了查看下master1的系统日志,如下,会发现vip资源已经切换走了[root@master1 ~]# tail -f /var/log/messagesApr 15 17:17:43 localhost Keepalived_vrrp[23037]: Sending gratuitous ARP on eth0 for 182.148.15.236Apr 15 17:17:48 localhost Keepalived_vrrp[23037]: Sending gratuitous ARP on eth0 for 182.148.15.236Apr 15 17:17:48 localhost Keepalived_vrrp[23037]: VRRP_Instance(VI_1) Sending/queueing gratuitous ARPs on eth0 for 182.148.15.236Apr 15 17:17:48 localhost Keepalived_vrrp[23037]: Sending gratuitous ARP on eth0 for 182.148.15.236Apr 15 17:17:48 localhost Keepalived_vrrp[23037]: Sending gratuitous ARP on eth0 for 182.148.15.236Apr 15 17:17:48 localhost Keepalived_vrrp[23037]: Sending gratuitous ARP on eth0 for 182.148.15.236Apr 15 17:17:48 localhost Keepalived_vrrp[23037]: Sending gratuitous ARP on eth0 for 182.148.15.236Apr 15 17:30:39 localhost Keepalived_healthcheckers[23036]: StoppedApr 15 17:30:39 localhost Keepalived_vrrp[23037]: VRRP_Instance(VI_1) sent 0 priorityApr 15 17:30:39 localhost Keepalived_vrrp[23037]: VRRP_Instance(VI_1) removing protocol VIPs.再到master2机器上,发现vip资源的确切换过来了[root@master2 ~]# ip addr1: lo: <LOOPBACK,UP,LOWER_UP> mtu 65536 qdisc noqueue state UNKNOWN link/loopback 00:00:00:00:00:00 brd 00:00:00:00:00:00 inet 127.0.0.1/8 scope host lo inet6 ::1/128 scope host valid_lft forever preferred_lft forever2: eth0: <BROADCAST,MULTICAST,UP,LOWER_UP> mtu 1500 qdisc pfifo_fast state UP qlen 1000 link/ether 52:54:00:95:1f:6d brd ff:ff:ff:ff:ff:ff inet 182.148.15.237/27 brd 182.148.15.255 scope global eth0 inet 182.148.15.236/32 scope global eth0 inet6 fe80::5054:ff:fe95:1f6d/64 scope link valid_lft forever preferred_lft forever查看master2的系统日志[root@master2 ~]# tail -f /var/log/messagesApr 15 17:30:41 localhost Keepalived_vrrp[8731]: Sending gratuitous ARP on eth0 for 182.148.15.236Apr 15 17:30:41 localhost Keepalived_vrrp[8731]: Sending gratuitous ARP on eth0 for 182.148.15.236Apr 15 17:30:41 localhost Keepalived_vrrp[8731]: Sending gratuitous ARP on eth0 for 182.148.15.236Apr 15 17:30:41 localhost Keepalived_vrrp[8731]: Sending gratuitous ARP on eth0 for 182.148.15.236Apr 15 17:30:46 localhost Keepalived_vrrp[8731]: Sending gratuitous ARP on eth0 for 182.148.15.236Apr 15 17:30:46 localhost Keepalived_vrrp[8731]: VRRP_Instance(VI_1) Sending/queueing gratuitous ARPs on eth0 for 182.148.15.236Apr 15 17:30:46 localhost Keepalived_vrrp[8731]: Sending gratuitous ARP on eth0 for 182.148.15.236Apr 15 17:30:46 localhost Keepalived_vrrp[8731]: Sending gratuitous ARP on eth0 for 182.148.15.236Apr 15 17:30:46 localhost Keepalived_vrrp[8731]: Sending gratuitous ARP on eth0 for 182.148.15.236Apr 15 17:30:46 localhost Keepalived_vrrp[8731]: Sending gratuitous ARP on eth0 for 182.148.15.2363)再次启动master1的mysql和keepalived服务。(注意:如果restart重启mysql,那么还要启动下keepalived,因为mysql重启,根据脚本会造成keepalived关闭)注意:一定要先启动mysql服务,然后再启动keepalived服务。如果先启动keepalived服务,按照上面的配置,mysql没有起来,就会自动关闭keepalived。[root@master1 ~]# /etc/init.d/mysql startStarting MySQL.. SUCCESS![root@master1 ~]# /etc/init.d/keepalived start正在启动 keepalived: [确定]启动这两个服务器后,稍微等过一会儿,注意观察会发现vip资源再次从master2机器上切换回来了。[root@master1 ~]# ip addr1: lo: <LOOPBACK,UP,LOWER_UP> mtu 65536 qdisc noqueue state UNKNOWN link/loopback 00:00:00:00:00:00 brd 00:00:00:00:00:00 inet 127.0.0.1/8 scope host lo inet6 ::1/128 scope host valid_lft forever preferred_lft forever2: eth0: <BROADCAST,MULTICAST,UP,LOWER_UP> mtu 1500 qdisc pfifo_fast state UP qlen 1000 link/ether 52:54:00:3c:25:42 brd ff:ff:ff:ff:ff:ff inet 182.148.15.238/27 brd 182.148.15.255 scope global eth0 inet 182.148.15.236/32 scope global eth0 inet 182.148.15.236/27 brd 82.48.115.255 scope global secondary eth0:0 inet6 fe80::5054:ff:fe3c:2542/64 scope link valid_lft forever preferred_lft forever[root@master1 ~]# tail -f /var/log/messagesApr 15 17:40:41 localhost Keepalived_vrrp[27002]: Sending gratuitous ARP on eth0 for 182.148.15.236Apr 15 17:40:41 localhost Keepalived_vrrp[27002]: Sending gratuitous ARP on eth0 for 182.148.15.236Apr 15 17:40:41 localhost Keepalived_vrrp[27002]: Sending gratuitous ARP on eth0 for 182.148.15.236Apr 15 17:40:41 localhost Keepalived_vrrp[27002]: Sending gratuitous ARP on eth0 for 182.148.15.236Apr 15 17:40:46 localhost Keepalived_vrrp[27002]: Sending gratuitous ARP on eth0 for 182.148.15.236Apr 15 17:40:46 localhost Keepalived_vrrp[27002]: VRRP_Instance(VI_1) Sending/queueing gratuitous ARPs on eth0 for 182.148.15.236Apr 15 17:40:46 localhost Keepalived_vrrp[27002]: Sending gratuitous ARP on eth0 for 182.148.15.236Apr 15 17:40:46 localhost Keepalived_vrrp[27002]: Sending gratuitous ARP on eth0 for 182.148.15.236Apr 15 17:40:46 localhost Keepalived_vrrp[27002]: Sending gratuitous ARP on eth0 for 182.148.15.236Apr 15 17:40:46 localhost Keepalived_vrrp[27002]: Sending gratuitous ARP on eth0 for 182.148.15.236再看看master2机器,发现vip资源又被恢复后的master1抢过去了[root@master2 ~]# ip addr1: lo: <LOOPBACK,UP,LOWER_UP> mtu 65536 qdisc noqueue state UNKNOWN link/loopback 00:00:00:00:00:00 brd 00:00:00:00:00:00 inet 127.0.0.1/8 scope host lo inet6 ::1/128 scope host valid_lft forever preferred_lft forever2: eth0: <BROADCAST,MULTICAST,UP,LOWER_UP> mtu 1500 qdisc pfifo_fast state UP qlen 1000 link/ether 52:54:00:95:1f:6d brd ff:ff:ff:ff:ff:ff inet 182.148.15.237/27 brd 182.148.15.255 scope global eth0 inet6 fe80::5054:ff:fe95:1f6d/64 scope link valid_lft forever preferred_lft forever[root@master2 ~]# tail -f /var/log/messagesApr 15 17:30:41 localhost Keepalived_vrrp[8731]: Sending gratuitous ARP on eth0 for 182.148.15.236Apr 15 17:30:46 localhost Keepalived_vrrp[8731]: Sending gratuitous ARP on eth0 for 182.148.15.236Apr 15 17:30:46 localhost Keepalived_vrrp[8731]: VRRP_Instance(VI_1) Sending/queueing gratuitous ARPs on eth0 for 182.148.15.236Apr 15 17:30:46 localhost Keepalived_vrrp[8731]: Sending gratuitous ARP on eth0 for 182.148.15.236Apr 15 17:30:46 localhost Keepalived_vrrp[8731]: Sending gratuitous ARP on eth0 for 182.148.15.236Apr 15 17:30:46 localhost Keepalived_vrrp[8731]: Sending gratuitous ARP on eth0 for 182.148.15.236Apr 15 17:30:46 localhost Keepalived_vrrp[8731]: Sending gratuitous ARP on eth0 for 182.148.15.236Apr 15 17:40:41 localhost Keepalived_vrrp[8731]: VRRP_Instance(VI_1) Received advert with higher priority 101, ours 99Apr 15 17:40:41 localhost Keepalived_vrrp[8731]: VRRP_Instance(VI_1) Entering BACKUP STATEApr 15 17:40:41 localhost Keepalived_vrrp[8731]: VRRP_Instance(VI_1) removing protocol VIPs.4)同样,关闭master1机器的keepalived服务,vip资源会自动切换到master2机器上。当master1的keepalived服务恢复后,会将vip资源再次切回来。[root@master1 ~]# /etc/init.d/keepalived stop停止 keepalived: [确定][root@master1 ~]# ip addr1: lo: <LOOPBACK,UP,LOWER_UP> mtu 65536 qdisc noqueue state UNKNOWN link/loopback 00:00:00:00:00:00 brd 00:00:00:00:00:00 inet 127.0.0.1/8 scope host lo inet6 ::1/128 scope host valid_lft forever preferred_lft forever2: eth0: <BROADCAST,MULTICAST,UP,LOWER_UP> mtu 1500 qdisc pfifo_fast state UP qlen 1000 link/ether 52:54:00:3c:25:42 brd ff:ff:ff:ff:ff:ff inet 182.148.15.238/27 brd 182.148.15.255 scope global eth0 inet 182.148.15.236/27 brd 82.48.115.255 scope global secondary eth0:0 inet6 fe80::5054:ff:fe3c:2542/64 scope link valid_lft forever preferred_lft forever查看master2,发现vip切过来了[root@master2 ~]# ip addr1: lo: <LOOPBACK,UP,LOWER_UP> mtu 65536 qdisc noqueue state UNKNOWN link/loopback 00:00:00:00:00:00 brd 00:00:00:00:00:00 inet 127.0.0.1/8 scope host lo inet6 ::1/128 scope host valid_lft forever preferred_lft forever2: eth0: <BROADCAST,MULTICAST,UP,LOWER_UP> mtu 1500 qdisc pfifo_fast state UP qlen 1000 link/ether 52:54:00:95:1f:6d brd ff:ff:ff:ff:ff:ff inet 182.148.15.237/27 brd 182.148.15.255 scope global eth0 inet 182.148.15.236/32 scope global eth0 inet6 fe80::5054:ff:fe95:1f6d/64 scope link valid_lft forever preferred_lft forever再次恢复master1的keepalived服务,发现vip资源很快油切回来了。[root@master1 ~]# /etc/init.d/keepalived start正在启动 keepalived: [确定][root@master1 ~]# ip addr1: lo: <LOOPBACK,UP,LOWER_UP> mtu 65536 qdisc noqueue state UNKNOWN link/loopback 00:00:00:00:00:00 brd 00:00:00:00:00:00 inet 127.0.0.1/8 scope host lo inet6 ::1/128 scope host valid_lft forever preferred_lft forever2: eth0: <BROADCAST,MULTICAST,UP,LOWER_UP> mtu 1500 qdisc pfifo_fast state UP qlen 1000 link/ether 52:54:00:3c:25:42 brd ff:ff:ff:ff:ff:ff inet 182.148.15.238/27 brd 182.148.15.255 scope global eth0 inet 182.148.15.236/32 scope global eth0 inet 182.148.15.236/27 brd 82.48.115.255 scope global secondary eth0:0 inet6 fe80::5054:ff:fe3c:2542/64 scope link valid_lft forever preferred_lft forever在此查看master2,发现vip资源被切走了[root@master2 ~]# ip addr1: lo: <LOOPBACK,UP,LOWER_UP> mtu 65536 qdisc noqueue state UNKNOWN link/loopback 00:00:00:00:00:00 brd 00:00:00:00:00:00 inet 127.0.0.1/8 scope host lo inet6 ::1/128 scope host valid_lft forever preferred_lft forever2: eth0: <BROADCAST,MULTICAST,UP,LOWER_UP> mtu 1500 qdisc pfifo_fast state UP qlen 1000 link/ether 52:54:00:95:1f:6d brd ff:ff:ff:ff:ff:ff inet 182.148.15.237/27 brd 182.148.15.255 scope global eth0 inet6 fe80::5054:ff:fe95:1f6d/64 scope link valid_lft forever preferred_lft forever以上在vip资源切换过程中,对于客户端连接mysql(使用vip连接)来说几乎是没有任何影响的。 |
------------------------------------温馨提示(Keepalived的抢占和非抢占模式)---------------------------------------
|
1
2
3
4
5
6
7
8
9
10
11
12
13
14
15
16
17
18
19
20
21
22
23
24
|
keepalive是基于vrrp协议在linux主机上以守护进程方式,根据配置文件实现健康检查。VRRP是一种选择协议,它可以把一个虚拟路由器的责任动态分配到局域网上的VRRP路由器中的一台。控制虚拟路由器IP地址的VRRP路由器称为主路由器,它负责转发数据包到这些虚拟IP地址。一旦主路由器不可用,这种选择过程就提供了动态的故障转移机制,这就允许虚拟路由器的IP地址可以作为终端主机的默认第一跳路由器。keepalive通过组播,单播等方式(自定义),实现keepalive主备推选。工作模式分为抢占和非抢占(通过参数nopreempt来控制)。1)抢占模式:主服务正常工作时,虚拟IP会在主上,备不提供服务,当主服务优先级低于备的时候,备会自动抢占虚拟IP,这时,主不提供服务,备提供服务。也就是说,工作在抢占模式下,不分主备,只管优先级。如上配置,不管keepalived.conf里的state配置成master还是backup,只看谁的priority优先级高(一般而言,state为MASTER的优先级要高于BACKUP)。priority优先级高的那一个在故障恢复后,会自动将VIP资源再次抢占回来!!2)非抢占模式:这种方式通过参数nopreempt(一般设置在advert_int的那一行下面)来控制。不管priority优先级,只要MASTER机器发生故障,VIP资源就会被切换到BACKUP上。并且当MASTER机器恢复后,也不会去将VIP资源抢占回来,直至BACKUP机器发生故障时,才能自动切换回来。千万注意:nopreempt这个参数只能用于state为backup的情况,所以在配置的时候要把master和backup的state都设置成backup,这样才会实现keepalived的非抢占模式!也就是说:a)当state状态一个为master,一个为backup的时候,加不加nopreempt这个参数都是一样的效果。即都是根据priority优先级来决定谁抢占vip资源的,是抢占模式!b)当state状态都设置成backup,如果不配置nopreempt参数,那么也是看priority优先级决定谁抢占vip资源,即也是抢占模式。c)当state状态都设置成backup,如果配置nopreempt参数,那么就不会去考虑priority优先级了,是非抢占模式!即只有vip当前所在机器发生故障,另一台机器才能接管vip。即使优先级高的那一台机器恢复 后也不会主动抢回vip,只能等到对方发生故障,才会将vip切回来。 |
---------------------------------mysql状态检测脚本优化---------------------------------
|
1
2
3
4
5
6
7
8
9
10
11
12
13
14
15
16
17
18
19
20
21
22
23
24
25
26
27
28
29
30
31
32
33
34
35
36
37
38
39
40
41
|
上面的mysql监测脚本有点过于简单且粗暴,即脚本一旦监测到Master的mysql服务关闭,就立刻把keepalived服务关闭,从而实现vip转移!下面对该脚本进行优化,优化后,当监测到Master的mysql服务关闭后,就会将vip切换到Backup上(但此时Master的keepalived服务不会被暴力kill)当Master的mysql服务恢复后,就会再次将VIP资源切回来![root@master ~]# cat /opt/chk_mysql.sh#!/bin/bashMYSQL=/usr/local/mysql/bin/mysqlMYSQL_HOST=localhostMYSQL_USER=rootMYSQL_PASSWORD=123456CHECK_TIME=3 #mysql is working MYSQL_OK is 1 , mysql down MYSQL_OK is 0 MYSQL_OK=1 function check_mysql_helth (){ $MYSQL -h $MYSQL_HOST -u $MYSQL_USER -p${MYSQL_PASSWORD} -e "show status;" >/dev/null 2>&1 if [ $? = 0 ] ;then MYSQL_OK=1 else MYSQL_OK=0 fi return $MYSQL_OK}while [ $CHECK_TIME -ne 0 ]do let "CHECK_TIME -= 1" check_mysql_helthif [ $MYSQL_OK = 1 ] ; then CHECK_TIME=0 exit 0fiif [ $MYSQL_OK -eq 0 ] && [ $CHECK_TIME -eq 0 ]then pkill keepalived exit 1fisleep 1done |