Redis是构建高性能、可持久化数据存储的解决方案,他的使用者有Twitter、github、Blizzard、微博等。
Redis的优点
1.支持更多的数据类型
2.支持数据持久化
3.内置replication和cluster
4.支持原地更新操作
Memcached的优点
1.多线程
2.更少的内存消耗
3.更少的内存碎片
安装
yum install redis -y
查看版本
redis-cli --version
redis-cli 3.2.10
配置文件解析
vim /etc/redis.conf

port 6379 #监听的端口

bind 192.168.1.100 10.0.0.1 #绑定ip,多个ip时空格隔开

databases 16 #指定数据集合数量,默认都存储在0号数据集合

#数据持久化之设置快照
save 900 1
save 300 10
save 60 10000
#   after 900 sec (15 min) if at least 1 key changed
#   after 300 sec (5 min) if at least 10 keys changed
#   after 60 sec if at least 10000 keys changed
启动服务器
service redis start
ss -tnlp

LISTEN      0      128                                                          127.0.0.1:6379                                                                *:*      users:(("redis-server",6527,4))
使用命令行工具连入
redis-cli #默认127.0.0.1
127.0.0.1:6379>
关闭服务器
redis-cli shutdown
Celery中使用redis
Celery是Python开发的分布式任务调度模块。

安装
pip install Celery
编写tasks程序
# -*- coding: utf-8 -*-

import time

from celery import Celery

celery = Celery("tasks",broker="redis://localhost:6379/0")

@celery.task
def sendmail(mail):
	print("sending mail to %s..." % mail['to'])
	time.sleep(3.0)
	print("mail sent.")
安装redis模块
pip install redis
启动程序
celery -A tasks worker --loglevel=info
User information: uid=0 euid=0 gid=0 egid=0

  uid=uid, euid=euid, gid=gid, egid=egid,

 -------------- celery@test v4.1.0 (latentcall)
---- **** -----
--- * ***  * -- Linux-2.6.32-642.13.1.el6.x86_64-x86_64-with-centos-6.8-Final 2017-09-08 13:46:11
-- * - **** ---
- ** ---------- [config]
- ** ---------- .> app:         tasks:0x7f8382775048
- ** ---------- .> transport:   redis://localhost:6379/0
- ** ---------- .> results:     disabled://
- *** --- * --- .> concurrency: 4 (prefork)
-- ******* ---- .> task events: OFF (enable -E to monitor tasks in this worker)
--- ***** -----
 -------------- [queues]
                .> celery           exchange=celery(direct) key=celery


[tasks]
  . tasks.sendmail

[2017-09-08 13:46:11,582: INFO/MainProcess] Connected to redis://localhost:6379/0
[2017-09-08 13:46:11,592: INFO/MainProcess] mingle: searching for neighbors
[2017-09-08 13:46:12,616: INFO/MainProcess] mingle: all alone
[2017-09-08 13:46:12,629: INFO/MainProcess] celery@test ready.
发送任务
>>> from tasks import sendmail
>>> sendmail.delay(dict(to="xxx@qq.com"))
<AsyncResult: d27a5aca-410e-4b27-b2a6-e3f695ad05c4>
日志记录
[2017-09-08 13:54:25,638: INFO/MainProcess] Received task: tasks.sendmail[d27a5aca-410e-4b27-b2a6-e3f695ad05c4]
[2017-09-08 13:54:25,640: WARNING/ForkPoolWorker-1] sending mail to xxx@qq.com...
[2017-09-08 13:54:28,644: WARNING/ForkPoolWorker-1] mail sent.
[2017-09-08 13:54:28,644: INFO/ForkPoolWorker-1] Task tasks.sendmail[d27a5aca-410e-4b27-b2a6-e3f695ad05c4] succeeded in 3.0045828549191356s: None
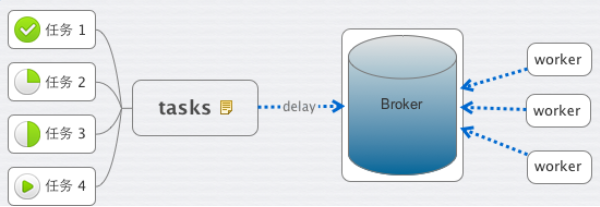
Celery默认设置就能满足基本要求。Worker以Pool模式启动,默认大小为CPU核心数量,缺省序列化机制是pickle,但可以指定为json。