概念
多线程的用途:多线程一般用来处理高并发
什么叫高并发:通过设计保证系统能够并行处理很多请求
高并发关注的指标:
响应时间:用户能够快速拿到响应结果
吞吐量:单位时间内处理多少个请求
每秒查询率
并发用户数
什么是线程:运行程序会创建一个进程。进程里面包含多个线程,操作系统(OS)调度的最小单元是线程(轻量级进程)。
运行一个普通的java程序包含的线程:
 1 package com.lgstudy;
 2
 3 import java.lang.management.ManagementFactory;
 4 import java.lang.management.ThreadInfo;
 5 import java.lang.management.ThreadMXBean;
 6
 7 /**
 8  * lgs
 9  *
10  *
11  * 一个java程序包含的线程
12  */
13 public class ShowMainThread {
14
15     public static void main(String[] args) {
16         //java虚拟机的线程管理接口
17         ThreadMXBean threadMXBean = ManagementFactory.getThreadMXBean();
18         //获取线程信息的方法
19         ThreadInfo[] threadInfos =
20                 threadMXBean.dumpAllThreads(false,false);
21         for(ThreadInfo threadInfo:threadInfos){
22             System.out.println(threadInfo.getThreadId()+":"+threadInfo.getThreadName());
23         }
24     }
25
26 }
输出:
5:Attach Listener //获取内存dump,线程dump
4:Signal Dispatcher //将信号分发给jvm的线程
3:Finalizer //调用对象的finalizer 方法 进行垃圾回收 这个方法不可靠一般不用用finally最好
2:Reference Handler //清除Reference
1:main //程序的主入口
为什么要用线程?
1、 充分利用CPU多处理核心;
2、 更快的响应时间(用户订单的场景,发送邮件等部分与订单业务无关和没有要求数据一致性的功能可由其他线程执行,从而提高订单业务的响应时间)
启动线程和退出线程
创建线程的方法
extends Thread
implements Runnable
启动线程:threadl类的start()
线程完成:1、run()方法执行完成;2、抛出一个未处理的异常导致线程的提前结束
 1 package com.lgs;
 2
 3 // 怎样创建线程/启动线程/退出线程
 4 public class HowCreatThread {
 5
 6     // 1. 创建线程:继承Thread类和实现Runnable接口
 7     // 1.1 继承Thread类
 8     public static class MyThread extends Thread{
 9
10         @Override
11         public void run() {
12             System.out.println("Mythread");
13         }
14
15     }
16
17     // 1.2 实现Runnable接口
18     public static class MyRunnable implements Runnable{
19
20         @Override
21         public void run() {
22             System.out.println("MyRunnable");
23
24         }
25
26     }
27
28     public static void main(String[] args) {
29         // 创建线程
30         // 直接new线程Thread的实现类
31         Thread t1 = new MyThread();
32         // 把实现的Runnable类放到Thread类的构造函数里面去
33         Thread t2 = new Thread(new MyRunnable());
34
35         // 启动线程 调用线程的start()方法
36         t1.start();
37         t2.start();
38     }
39
40 }
取消和中断
不安全的取消:
单独使用一个取消标志位.
 1 package com.lgs.interrupt;
 2
 3 //不安全的取消 自己定义一个取消标志位
 4 public class FlagCacelThread {
 5
 6     public static class MyRunnable implements Runnable{
 7
 8         //定义取消标志位
 9         private volatile boolean on = true;
10         int i = 0;
11
12         @Override
13         public void run() {
14             while(on) {
15                 i++;
16                 //遇到阻塞方法(wait,sleep,blockingqueue(put,take),stop(),suspend,resume等)时
17                 //线程会一直阻塞 不能把on置为false
18                 try {
19                     Thread.sleep(20000);
20                 } catch (InterruptedException e) {
21                     e.printStackTrace();
22                 }
23             }
24             System.out.println("MyRunable" + i);
25         }
26
27         //中断线程
28         public void cancel() {
29             on = false;
30         }
31
32     }
33
34 }
Stop(),suspend(),resume()是过期的api,很大的副作用,容易导致死锁(suspend():将线程挂起不会释放锁)或者数据不一致(Stop():线程在未处理完数据时就停止)
如何安全的终止线程
使用线程的中断 :
interrupt() 中断线程,本质是将线程的中断标志位设为true,其他线程向需要中断的线程打个招呼。是否真正进行中断由线程自己决定。
isInterrupted() 线程检查自己的中断标志位
静态方法Thread.interrupted() 将中断标志位复位为false
由上面的中断机制可知Java里是没有抢占式任务,只有协作式任务。要中断线程就是通过协作来完成的
为何要用中断,线程处于阻塞(如调用了java的sleep,wait等等方法时)的时候,是不会理会我们自己设置的取消标志位的,但是这些阻塞方法都会检查线程的中断标志位。
package com.lgs.interrupt;

// 安全的中断线程:使用线程的中断 interrupt(),isInterrupted()配合中断线程
public class SafeInterrupt implements Runnable {

    //定义取消标志位
    private volatile boolean on = true;
    int i = 0;

    @Override
    public void run() {
        // 要取消的线程检查自己的中断标志位
        while(on && !Thread.currentThread().isInterrupted()) {
            i++;
            //遇到阻塞方法(sleep(),stop(),suspend,resume等)时 虽然不能把on置为false
            // 但是当前线程会检查自己的中断标志位可以中断线程
        }
        System.out.println("MyRunable" + i);
    }

    //中断线程
    //注意:用取消标志位+线程的interrupt来中断线程更好,
    //原因是在线程很忙的时候线程是不会理会interrupt()的
    public void cancel() {
        on = false;
        //使用当前线程的中断 像要中断的线程打个招呼要中断线程了
        Thread.currentThread().interrupt();
    }
}
处理不可中断的阻塞
IO通信 inputstream的read/write等阻塞方法,不会理会中断,而关闭底层的套接字socket.close()会抛出socketException 可以在抛出异常这里面做一些操作
NIO: selector.select()会阻塞,调用selector的wakeup不会理会中断,wakeup和close方法会抛出ClosedSelectorException
死锁状态不响应中断的请求,这个必须重启程序,检查程序找到死锁的位置修改错误。
package com.lgs.interrupt;

//遇到阻塞中断的处理方法
public class BlockInterrupt {

    private volatile boolean on = true;

    private class WhenBlock implements Runnable{

        @Override
        public void run() {
            while(on && !Thread.currentThread().isInterrupted()) {
                try {
                    //阻塞方法(sleep()/wait()/stop()/suspend()等)会抛出中断异常,抛出中断异常后会把线程的中断标志位置为false
                    Thread.sleep(20000);
                } catch (InterruptedException e) {
                    // 所以需要在异常里面重新设置一下中断标志位
                    Thread.currentThread().interrupt();
                }
                // 业务处理
            }
            // 清理工作

        }

        //中断线程
        //注意:用取消标志位+线程的interrupt来中断线程更好,
        //原因是在线程很忙的时候线程是不会理会interrupt()的
        public void cancel() {
            on = false;
            //使用当前线程的中断 像要中断的线程打个招呼要中断线程了
            Thread.currentThread().interrupt();
        }

    }

}
如何让我们的代码既可以响应普通的中断,又可以关闭底层的套接字呢?
覆盖线程的interrupt方法,在处理套接字异常时,再用super.interrupt()自行中断线程
package com.lgs.interrupt;

import java.io.IOException;
import java.io.InputStream;
import java.net.Socket;

//处理不可中断的阻塞:覆写线程的interrupt()方法,在interrupt()里面处理套接字异常时
//在finally里面调用线程的interrupt()方法
public class OverrideInterrupt extends Thread{

    private final Socket socket;

    private final InputStream in;

    public OverrideInterrupt(Socket socket, InputStream in) {
        this.socket = socket;
        this.in = in;
    }

    public void read() {
        try {
            // 会一直阻塞在这里等到有输入才会继续往下走 所以是不可中断的阻塞
            in.read();
        } catch (IOException e) {
            e.printStackTrace();
        }
    }

    @Override
    public void interrupt() {
        // 关闭底层套接字
        try {
            socket.close();
        } catch (IOException e) {
            e.printStackTrace();
        }finally {
            // 同时中断线程 像要中断的线程打招呼
            super.interrupt();
        }
    }
}
线程的状态
新创建 线程被创建,但是没有调用start方法
可运行(RUNNABLE) 运行状态,由cpu决定是不是正在运行
被阻塞(BLOCKING) 阻塞,线程被阻塞于锁
等待/计时等待(WAITING) 等待某些条件成熟
被终止 线程执行完毕
线程的优先级
成员变量priority控制优先级,范围1-10之间,数字越高优先级越高,缺省为5,创建线程时setPriotity()可以设置优先级,不要指望他发挥作用,因为线程优先级是由操作系统决定的,有的操作系统甚至会忽略jvm的线程优先级。
Daemon线程
守护型线程(如GC线程),做调度用,程序里没有非Daemon线程时,java程序就会退出。一般用不上,也不建议我们平时开发时使用,因为Daemon线程的Try/Finally里的代码不一定执行的。
 1 package com.lgstudy;
 2
 3 import com.lgstudy.threadstate.SleepUtils;
 4
 5 /**
 6  * lgs
 7  *
 8  * 守护线程
 9  */
10 public class Daemon {
11     public static void main(String[] args) {
12         Thread thread = new Thread(new DaemonRunner());
13         //将线程置为守护线程
14         thread.setDaemon(true);
15         thread.start();
16     }
17
18     static class DaemonRunner implements Runnable {
19         @Override
20         public void run() {
21             try {
22                 SleepUtils.second(100);
23             } finally {
24                 System.out.println("DaemonThread finally run.");
25             }
26         }
27     }
28 }
常用方法深入理解
run()和start()
run就是一个普通的方法,跟其他类的实例方法没有任何区别,他之所以能在线程里面运行时因为调用了start()方法。
package com.lgs;

// run方法和start方法 run就是一个普通的java方法 能运行是因为调用了线程的start方法
public class RunAndStart {

    public static class MyThread extends Thread {
        private String threadName;

        public void setThreadName(String threadName) {
            this.threadName = threadName;
        }

        @Override
        public void run() {
            int i = 1;
            while (i > 0) {
                try {
                    Thread.sleep(1000);
                } catch (InterruptedException e) {
                    e.printStackTrace();
                }
                System.out.println("I am " + this.threadName + " " + i);
                i++;
            }
        }
    }

    public static void main(String[] args) {
        // Thread t = new MyThread();
        // ((MyThread) t).setThreadName("MyThread");
        // t.run();
        Thread t = new MyThread();
        ((MyThread) t).setThreadName("MyThread2");
        t.start();
    }

}
Sleep
不会释放锁,当前线程变成了休眠状态,所以我们在用sleep时,要把sleep放在同步代码块的外面。
package com.lgs;

// sleep方法不会释放锁
public class SleepTest {
    //锁
    private Object lock = new Object();

    public static void main(String[] args) {
        SleepTest sleepTest = new SleepTest();
        Thread threadA = sleepTest.new ThreadSleep();
        threadA.setName("ThreadSleep");
        Thread threadB = sleepTest.new ThreadNotSleep();
        threadB.setName("ThreadNotSleep");
        // 先启动会休眠的线程
        threadA.start();
        try {
            // 主线程休眠一秒钟
            Thread.sleep(1000);
            System.out.println(" RunTest slept!");
        } catch (InterruptedException e) {
            e.printStackTrace();
        }
        // 启动不会休眠的线程
        threadB.start();
    }

    // 定义一个会休眠的线程
    private class ThreadSleep extends Thread{

        @Override
        public void run() {
            String threadName = Thread.currentThread().getName();
            System.out.println(threadName+" will take the lock");
            try {

                //拿到锁以后,休眠
                synchronized(lock) {
                    System.out.println(threadName+" taking the lock");
                    // Thread.sleep(5000); //拿到同步代码块外面去 否则不会释放锁
                    System.out.println("Finish the work: "+threadName);
                }
                // 在同步代码块外面使用sleep才会释放锁
                Thread.sleep(5000);
            } catch (InterruptedException e) {
                //e.printStackTrace();
            }
        }
    }

    // 定义一个不会休眠的线程
    private class ThreadNotSleep extends Thread{

        @Override
        public void run() {
            String threadName = Thread.currentThread().getName();
            System.out.println(threadName+" will take the lock time="+System.currentTimeMillis());
            //拿到锁以后不休眠
            synchronized(lock) {
                System.out.println(threadName+" taking the lock time="+System.currentTimeMillis());
                System.out.println("Finish the work: "+threadName);
            }
        }
    }
}
yield()
不会释放锁,当前线程出让cpu占有权,当前线程变成了可运行状态,下一时刻仍然可能被cpu选中运行。
wait()和 notify()/notiyfAll()
等待通知机制,调用以前,当前线程必须要持有锁,调用了wait() notify()/notiyfAll()后会释放锁。
等待通知机制:
线程 A调用了对象O的wait方法进入等待状态,线程 B调用了对象O的notify/notiyfAll方法进行唤醒,唤醒的是在对象O上wait的线程(比如线程A)
notify() 唤醒一个线程,唤醒哪一个完全看cpu的心情(谨慎使用)
notiyfAll() 所有在对象O上wait的线程全部唤醒(平时推荐用notiyfAll())
package com.lgs.waitnotify;

public class User {

    public static final  String CITY = "NewYork";
    private int age;

    private String city;

    public User(int age, String city) {
        this.age = age;
        this.city = city;
    }

    public User() {

    }

    public synchronized void changeCity() {
        this.city = "london";
        notifyAll();
    }

    public synchronized void changeAge() {
        this.age = 31;
        notifyAll();
    }

    public synchronized void waitAge() {
        while(age <= 30) {
            try {
                // 年龄小于等于30的时候一直等待
                wait();
                // 被唤醒
                System.out.println("wait age [" + Thread.currentThread().getId()
                        +"] is notified");
            } catch (InterruptedException e) {
                e.printStackTrace();
            }
        }
        // 业务逻辑 被唤醒以后打印年龄
        System.out.println("the age is " + this.age);
    }

    public synchronized void waitCity() {
        while(this.city.equals(CITY)) {
            try {
                // 城市是NewYork的时候一直等待
                wait();
                // 被唤醒
                System.out.println("wait city [" + Thread.currentThread().getId()
                        +"] is notified");
            } catch (InterruptedException e) {
                e.printStackTrace();
            }
        }
        // 业务逻辑 被唤醒以后打印城市
        System.out.println("the city is " + this.city);
    }

}
package com.lgs.waitnotify;

public class TestUser {

    private static User user = new User(30, User.CITY);

    private static class CheckAge extends Thread{
        @Override
        public void run() {
            // 检查用户年龄是否发生变化的线程
            user.waitAge();
        }
    }

    private static class CheckCity extends Thread{
        @Override
        public void run() {
            // 检查用户城市是否发生变化的线程
            user.waitCity();
        }
    }

    public static void main(String[] args) throws InterruptedException {
        // 启动3个检查用户年龄的线程
        for(int i = 0; i<3; i++) {
            new CheckAge().start();
        }

        // 启动3个检查用户城市的线程
        for(int i = 0; i<3; i++) {
            new CheckCity().start();
        }

        // 让主线程休眠一秒钟
        Thread.sleep(1000);
        // 更改城市 把城市变化为London
        user.changeCity();
    }
}
线程间协作和通信
每个线程有自己栈空间,孤立运行,对我们没有价值。如果多个线程能够相互配合完成工作,这将会带来巨大的价值。
volatile和synchronized
多个线程同时访问一个共享的变量的时候,每个线程的工作内存有这个变量的一个拷贝,变量本身还是保存在共享内存中。
volatile修饰字段,对这个变量的访问必须要从共享内存刷新一次。最新的修改写回共享内存。可以保证字段的可见性。绝对不是线程安全的,没有操作的原子性。
适用场景:1、一个线程写,多个线程读;2、volatile变量的变化很固定即变化以后都是一个固定的值
package com.lgs.volatiletest;

// volatile只能保证多个线程同时对变量的修改是可见的
// 不能保证线程安全 要保证线程安全 需要对代码加同步
public class VolatileThread implements Runnable {

    private volatile int a = 0;
    @Override
    public void run() {
        synchronized (this) {// 要保证对变量a的修改是线程安全的要加同步 否则只是修改可见
            a = a + 1;
            System.out.println(Thread.currentThread().getName() + "---" + a);
            try {
                Thread.sleep(100);
            } catch (InterruptedException e) {
                e.printStackTrace();
            }
            a = a + 1;
            System.out.println(Thread.currentThread().getName() + "---" + a);
        }
    }

}
package com.lgs.volatiletest;

public class VolatileTest {

    public static void main(String[] args) {
        VolatileThread  v = new VolatileThread();
        Thread t1 = new Thread(v);
        Thread t2 = new Thread(v);
        Thread t3 = new Thread(v);
        Thread t4 = new Thread(v);

        t1.start();
        t2.start();
        t3.start();
        t4.start();
    }
}
输出:
Thread-0----1
Thread-0----2
Thread-3----3
Thread-3----4
Thread-2----5
Thread-2----6
Thread-1----7
Thread-1----8
面试:volatile是不是线程安全的?
答案:不是 原因是volatile只保证了对变量的读取都要从共享内存读(可见性) 但是没有对变量的写进行控制
关键字synchronized可以修饰方法或者以同步块的形式来进行使用,它主要确保多个线程在同一个时刻,只能有一个线程处于方法或者同步块中,它保证了线程对变量访问的可见性和排他性,又称为内置锁机制。
synchronized底层实现原理:
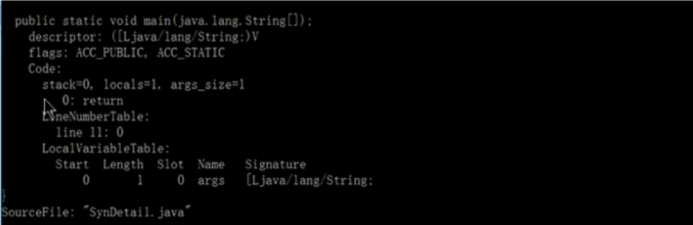
写一个类里面只有一个空的main方法
package com.lgs.sync;

public class SynDetail {

    public static void main(String[] args) {

    }

}
编译好后 cmd进入class所在的目录 使用如下命令:
javap -v SynDetail.class

在类的main方法里面加上synchronized关键字 再用上面的命令查看
package com.lgs.sync;

public class SynDetail {

    public static void main(String[] args) {
        synchronized (SynDetail.class){

        }

    }

}
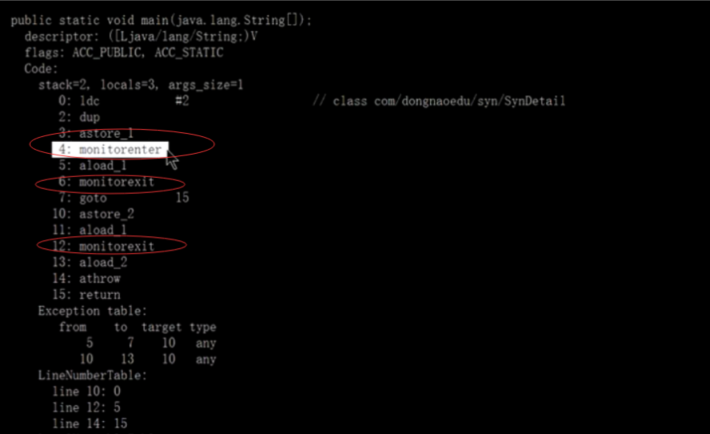
Synchronized的类锁和对象锁,本质上是两把锁,类锁实际锁的是每一个类的class对象。对象锁锁的是当前对象实例。
 1 package com.lgstudy.syn;
 2
 3 import com.lgstudy.threadstate.SleepUtils;
 4
 5 /**
 6  * 类锁和实例锁
 7  */
 8 public class InstanceAndClass {
 9
10     //测试类锁
11     private static class TestClassSyn extends Thread{
12         @Override
13         public void run() {
14             System.out.println("TestClass is going...");
15             synClass();
16         }
17     }
18
19     //测试对象锁
20     private static class TestInstanceSyn extends Thread{
21         private InstanceAndClass instanceAndClass;
22
23         public TestInstanceSyn(InstanceAndClass instanceAndClass) {
24             this.instanceAndClass = instanceAndClass;
25         }
26
27         @Override
28         public void run() {
29             System.out.println("TestInstance is going..."+instanceAndClass);
30             instanceAndClass.synInstance();
31         }
32
33     }
34
35     //测试对象锁
36     private static class TestInstance2Syn implements Runnable{
37         private InstanceAndClass instanceAndClass;
38
39         public TestInstance2Syn(InstanceAndClass instanceAndClass) {
40             this.instanceAndClass = instanceAndClass;
41         }
42         @Override
43         public void run() {
44             System.out.println("TestInstance2 is going..."+instanceAndClass);
45             instanceAndClass.synInstance2();
46         }
47     }
48
49     //锁对象的方法
50     private synchronized void synInstance(){
51         SleepUtils.second(3);
52         System.out.println("synInstance is going...");
53         SleepUtils.second(3);
54         System.out.println("synInstance ended");
55     }
56
57     //锁对象的方法
58     private synchronized void synInstance2(){
59         SleepUtils.second(3);
60         System.out.println("synInstance2 going...");
61         SleepUtils.second(3);
62         System.out.println("synInstance2 ended");
63     }
64
65     //锁类的方法
66     private static synchronized void synClass(){
67         SleepUtils.second(1);
68         System.out.println("synClass going...");
69         SleepUtils.second(1);
70     }
71
72     public static void main(String[] args) {
73         InstanceAndClass instanceAndClass = new InstanceAndClass();
74         Thread t1 = new TestClassSyn();
75         Thread t2 = new Thread(new TestInstanceSyn(instanceAndClass));
76         Thread t3 = new Thread(new TestInstance2Syn(instanceAndClass));
77         t2.start();
78         t3.start();
79         SleepUtils.second(1);
80         t1.start();
81     }
82
83 }
等待和通知机制
一个线程修改了另外一个对象的值 想让另外一个线程知道这个修改 这种情况就可以用等待通知机制
等待方原则:
1、获取对象锁
2、如果条件不满足,调用对象的wait方法,被通知后依然要检查条件是否满足
3、条件满足以后,才能执行相关的业务逻辑
等待范式:
Synchronized(对象){
While(条件不满足){
对象.wait()
}
业务逻辑处理
}
通知方原则:
1、 获取对象的锁;
2、 改变条件;
3、 通知所有等待在对象的线程
通知范式:
Synchronized(对象){
业务逻辑处理,改变条件
对象.notify/notifyAll
}
等待通知机制实现有界阻塞队列:
package com.lgs.waitnotify.bg;

import java.util.LinkedList;
import java.util.List;

// 等待通知机制实现有界阻塞队列
public class BlockingQueueWN<T> {

    // 定义一个list存放队列数据
    private List queue = new LinkedList<>();

    // 定义队列的容量
    private final int limit;

    // 定义构造函数来初始化队列容量
    public BlockingQueueWN(int limit) {
        this.limit = limit;
    }

    // 入队
    public synchronized void enqueue(T item) throws InterruptedException {
        // 当队列已经满了的时候就需要等待
        while(this.queue.size() == this.limit) {
            wait();
        }
        // 数据即将入队时就通知出队可以取数据了 因为可以肯定有出队的线程正在等待
        if(this.queue.size() == 0) {
            notifyAll();
        }
        // 数据入队
        this.queue.add(item);
    }

    // 出队
    public synchronized T dequeue() throws InterruptedException {
        // 如果队列没有数据时就等待
        if(this.queue.size() == 0) {
            wait();
        }
        // 数据即将出队就通知入队可以插入数据了 因为可以肯定有入队的线程正在等待
        if(this.queue.size() == this.limit) {
            notifyAll();
        }
        // 数据出队
        return (T)this.queue.remove(0);
    }

}
package com.lgs.waitnotify.bg;

// 测试等待通知机制实现的有界阻塞队列
public class BqTest {
    // 定义一个推数据入队列的线程
    private static class PushThread extends Thread{
        // 持有BlockingQueueWN
        BlockingQueueWN<Integer> bq;

        public PushThread(BlockingQueueWN<Integer> bq) {
             this.bq = bq;
        }

        public void run() {
            int i = 20;
            while(i > 0) {
                System.out.println(" i=" + i +" will push");
                try {
                    Thread.sleep(2000);
                    bq.enqueue(i);
                } catch (InterruptedException e) {
                    // TODO Auto-generated catch block
                    e.printStackTrace();
                }
                i--;
            }
        }
    }

     //取数据出队列
    private static class PopThread extends Thread{
        BlockingQueueWN<Integer> bq;

        public PopThread(BlockingQueueWN<Integer> bq) {
            this.bq = bq;
        }
        @Override
        public void run() {
            while(true){
                try {
                    System.out.println(Thread.currentThread().getName()
                            +" will pop.....");
                    Integer i = bq.dequeue();
                    System.out.println(" i="+i.intValue()+" alread pop");
                } catch (InterruptedException e) {
                    //e.printStackTrace();
                }
            }

        }
    }

    public static void main(String[] args) {
        // 创建一个有界阻塞队列的实例
        BlockingQueueWN bq = new BlockingQueueWN(10);

        // 创建入队线程
        Thread t1 = new PushThread(bq);
        t1.setName("push");

        // 创建出队列线程
        Thread t2 = new PopThread(bq);
        t2.setName("pop");

        // 启动线程
        t1.start();
        t2.start();
    }
}
输出;
i=20 will push
pop will pop.....
i=19 will push
i=20 alread pop
pop will pop.....
i=18 will push
i=19 alread pop
pop will pop.....
i=17 will push
i=18 alread pop
pop will pop.....
i=16 will push
i=17 alread pop
pop will pop.....
i=15 will push
i=16 alread pop
pop will pop.....
i=14 will push
i=15 alread pop
pop will pop.....
i=13 will push
i=14 alread pop
pop will pop.....
i=13 alread pop
i=12 will push
pop will pop.....
i=12 alread pop
pop will pop.....
i=11 will push
i=11 alread pop
pop will pop.....
i=10 will push
i=9 will push
i=10 alread pop
pop will pop.....
i=8 will push
i=9 alread pop
pop will pop.....
i=7 will push
i=8 alread pop
pop will pop.....
i=6 will push
i=7 alread pop
pop will pop.....
i=5 will push
i=6 alread pop
pop will pop.....
i=4 will push
i=5 alread pop
pop will pop.....
i=3 will push
i=4 alread pop
pop will pop.....
i=2 will push
i=3 alread pop
pop will pop.....
i=1 will push
i=2 alread pop
pop will pop.....
i=1 alread pop
pop will pop.....
管道输入输出流 (使用较少 了解即可)
管道输入输出流用于线程中间的数据传递,传输媒介是内存
PpedOutputStream/PpedInputStream 面向的字节
PipedReader/PipedWriter 面向的是字符
只适合线程间一对一的通信,适用范围较狭窄。
package com.lgs;

import java.io.IOException;
import java.io.PipedReader;
import java.io.PipedWriter;

// 管道输入输出流
public class PipeTransfer {

    private static class Print implements Runnable{
        private PipedReader in;

        public Print(PipedReader in) {
            this.in = in;
        }

        @Override
        public void run() {
           int receive =0;
            try {
                while((receive=in.read())!=-1){
                    System.out.println((char) receive);
                }
            } catch (IOException e) {
                e.printStackTrace();
            }
        }
    }

    public static void main(String[] args) throws Exception {
        PipedWriter out = new PipedWriter();
        PipedReader in = new PipedReader();
        //必须进行连接
        out.connect(in);

        Thread t1 = new Thread(new Print(in),"PrintThread");
        t1.start();
        int receive =0;
        try {
            while((receive=System.in.read())!=-1){
                out.write(receive);
            }
        } catch (IOException e) {
            e.printStackTrace();
        }finally {
            out.close();
        }
    }

}
join方法
线程A执行了线程B的join()方法后,线程A需要等待线程B线程执行完了以后,线程A在join后面的代码才会继续执行
package com.lgs;

// 测试线程的join方法
public class JoinTest {

    private static class CutInLine implements Runnable{

        private Thread t;

        public CutInLine(Thread t) {
            this.t = t;
        }
        @Override
        public void run() {
            try {
                t.join();
            } catch (InterruptedException e) {
                e.printStackTrace();
            }
            System.out.println(Thread.currentThread().getName() + " will work");
        }

    }

    public static void main(String[] args) {
        Thread pre = Thread.currentThread();
        for(int i = 0; i < 3; i++) {
            Thread t = new Thread(new CutInLine(pre),String.valueOf(i));
            System.out.println(pre.getId() + " cut in the thread:" + t.getName());
            t.start();
            pre = t;
        }
    }
}
输出:
1 cut in the thread:0
10 cut in the thread:1
11 cut in the thread:2
0 will work
1 will work
2 will work
ThreadLocal
本质是个map,map的键就是每个线程对象,值就是每个线程所拥有的值
常用方法:
initialValue() 给局部变量设置初始值
get() 从ThreadLocal里面取出线程的设置
set(value) 给ThreadLocal设置值
remove():将当前线程局部变量的值删除,这个方法是JDK 5.0新增的方法。当线程结束后,对应该线程的局部变量将自动被垃圾回收,所以显式调用该方法清除线程的局部变量并不是必须的操作,但它可以加快内存回收的速度。
ThreadLocal拥有的这个变量,在线程之间很独立的,相互之间没有联系。内存占用相对来说比较大。
package com.lgs.threadlocaltest;

// ThreadLocal测试
public class ThreadLocalTest {

    private static ThreadLocal<String> tl = new ThreadLocal<String>() {
        protected String initialValue() {
            return "init";
        }
    };

    public void test() {
        Thread[] runs = new Thread[3];
        for(int i = 0; i < runs.length; i++) {
            runs[i] = new Thread(new T1(i));
        }
        for(int i = 0; i < runs.length; i++) {
            runs[i].start();
        }
    }

    private static class T1 implements Runnable{

        private int id;

        public T1(int id) {
            this.id = id;
        }
        @Override
        public void run() {

            System.out.println(Thread.currentThread().getId() + " start");
            String s = tl.get();
            s = s + "_" + id;
            tl.set(s);
            System.out.println(Thread.currentThread().getId() + ":" + s);
        }

    }

    public static void main(String[] args) {
        ThreadLocalTest test = new ThreadLocalTest();
        test.test();
    }
}
输出:
10 start
11 start
11:init_1
12 start
12:init_2
10:init_0
性能问题
串行化、无锁化、异步化编程是趋势之一,比如node.js,Vert.x。
黄金原则:编码时候不要考虑性能优化的事情,先正确实现业务,发现性能不行,这个时候再来考虑性能优化。
等待超时模式
适用场景:调用一个方法时等待一段时间(一般来说是给定一个时间段),如果该方法能够在给定的时间段之内得到结果,那么将结果立刻返回,反之,超时返回默认结果。
假设等待时间段是T,那么可以推断出在当前时间now+T之后就会超时
等待持续时间:REMAINING=T。
超时时间:FUTURE=now+T。
// 对当前对象加锁
public synchronized Object get(long mills) throws InterruptedException {
   // 超时的时刻
long future = System.currentTimeMillis() + mills;
// 还需要等待的时间段remaining
long remaining = mills;
//没有返回值并且还需要等待的时间段remaining大于0时持续等待
while ((result == null) && remaining > 0) {
// 等待remaining时间
wait(remaining);
// 超时的时刻不断减去当前时间等于还需要等待的时间
remaining = future - System.currentTimeMillis();
}
return result;
}