水了几篇博客真开心.其实不是真的水,也配图啥的吧 .... 好了, 我要开始认真了哈 跟着我 好好学,明年哥给你取个嫂子!
基本组件
<view>这就类似于我们的 div 很简单吧!</view>
<text>简单的文本</text>
<image>参数有 src mode(图片的裁剪)</image>
简单的水一下就行了 还有两个viedo(视频) 和 swiper(微信内置的轮播图组件) 都在这个链接里了 点击 ==点我==
事件(捕获,冒泡)
事件我也不知道怎么写呀 点击 ==点我== 也都放在这里了
简单的介绍一个 事件的 捕获 事件的 冒泡
什么是事件的捕获: 从外到内的
什么是事件的冒泡: 从内到外的
<view class="outer" capture-bind:tap="outer">
最外面
  <view class="meddle" capture-bind:tap="meddle">
  中间的
    <view class="inner" capture-bind:tap="inner">
    最里面
    </view>
  </view>
</view>
.outer{
  height: 500rpx;
  background-color:red;
    text-align: center
}

.meddle{
  margin: 20px;
  height: 150px;
  width: 100px;
  background-color:blue;
  text-align: center
}


.inner{
  height: 100px;
  width: 50px;
  background-color:yellow;
    text-align: center;
    margin: 20px
}
  },
  inner:function(){
    console.log('innder')
  },
  meddle:function(){
    console.log('meddle')
  },
  outer:function(){
    console.log('outer')
  }

事件捕获使用 capture-bind:tap='click' 进行捕获
使用catch来阻止事件的捕获
只需要把 capture-bind:tap 中的 bind改为 catch就行了 假如我们把meddle的事件catch了就只会打印outer 和 meddle了
<view class="outer" capture-bind:tap="outer">
最外面
  <view class="meddle" capture-catch:tap="meddle">
  中间的
    <view class="inner" capture-bind:tap="inner">
    最里面
    </view>
  </view>
</view>
事件的冒泡
事件的冒泡的执行, 必须是捕获到改事件才能冒泡
继续添加 绑定事件
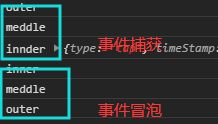
  click_outer:function(){
    console.log('outer')
  },
  click_inner: function () {
    console.log('inner')
  },
  click_meddle: function () {
    console.log('meddle')
  }
<view class="outer" capture-bind:tap="outer" bindtap='click_outer'>
最外面
  <view class="meddle" capture-bind:tap="meddle" bindtap="click_meddle">
  中间的
    <view class="inner" capture-bind:tap="inner" bindtap="click_inner">
    最里面
    </view>
  </view>
</view>
自定义组件
好不容易熬到现在 开始写自定义组件了 你不要懵了哈 还有一个案例! 记得交作业.
先来一个官方文档 ==点击==
创建自定义组件
1 声明组件 首先需要在json文件中进行自定义组价声明
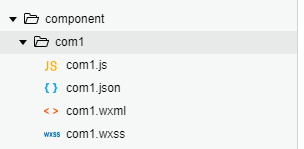
右键创建component文件 后在json文件中设置component:true 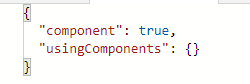
然后字在你需要导入 这个 自定义组件的 json文件中 中 设置 usingComponents:{} 字典内填写 自定义组件名 和 组件路径
{
  "usingComponents": {
    "tes":"/component/test/test"
  }
}
然后就可以在你的 wxml中 使用 tes调用了
<tes></tes>
property用法 在js文件中 property是用来动态渲染的 通过page传值到我们的自定义组件
<view>这个是page传来的值{{name}}</view>

  properties: {
    name: {
      type: 'String',
      value: 'xxxx'
      }
  },
单我们page页面需要传值得时候只需要直接 name='' 就可以了
<tes name="我是page传来的"></tes>
也就是说 property中的value传了的话就是默认值 page传来就改变 也可以直接使用 data中直接定义 其中 自定义组件 的方法是method
❥给你布置回家作业了!!!!!! page中的组件 来启动自己的 click方法 从而达到 改变 num 每次点击+1
注意点 使用setData 来实时刷新页面
答案:
1 首先需要自定义一个点击事件 为 icre 其目的是为了靠组件返回的消息改变值
<tes bind:icre="click"></tes>
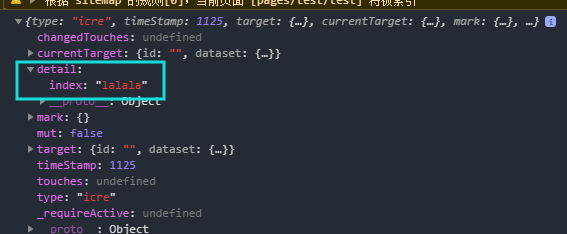
2 然后在组件内填写 按钮 触发后 执行 this.triggerEvent('icre', {'index':123},{}) 其中 icre 就是告诉页面我被点击了 你可以执行了
index 是参数 他 不会存在 currentTarge里面 存在detail里面
    click:function(){
      this.triggerEvent('icre', {'index':'lalala'},{})
    }
我在页面的click中打印了 e 可以看到 index 在 detail中