1 前言
欢迎访问南瓜慢说 www.pkslow.com获取更多精彩文章!
Kubernetes有专门的ConfigMap和Secret来管理配置,但它也有一些局限性,所以还是希望通过Spring Cloud Config来管理。在Kubernetes上面的微服务系统会有所不同,我们来探索一下如何整合Spring Cloud Kubernetes来做配置管理。
整体方案与《使用Spring Cloud Config统一管理配置,别再到处放配置文件了》差不多,只是引入Spring Cloud Kubernetes来使用Kubernetes的服务发现,而不使用Eureka等。
2 服务端
引入依赖:
<dependency>
  <groupId>org.springframework.cloud</groupId>
  <artifactId>spring-cloud-config-server</artifactId>
  <version>2.2.0.RELEASE</version>
</dependency>
<dependency>
  <groupId>org.springframework.cloud</groupId>
  <artifactId>spring-cloud-starter-kubernetes</artifactId>
</dependency>
服务端启动类如下:
package com.pkslow.config;

import org.springframework.boot.SpringApplication;
import org.springframework.boot.autoconfigure.SpringBootApplication;
import org.springframework.cloud.client.discovery.EnableDiscoveryClient;
import org.springframework.cloud.config.server.EnableConfigServer;

@SpringBootApplication
@EnableConfigServer
@EnableDiscoveryClient
public class ConfigServerK8s {
    public static void main(String[] args) {
        SpringApplication.run(ConfigServerK8s.class, args);
    }
}
服务端的application.properties配置如下:
server.port=8888
spring.application.name=config-server-k8s
spring.cloud.config.server.git.uri=https://github.com/pkslow/pkslow-config
spring.cloud.config.server.git.username=admin@pkslow.com
spring.cloud.config.server.git.password=***
spring.cloud.config.server.git.default-label=master
spring.cloud.config.server.git.search-paths=demo
这里的应用名字为config-server-k8s,后续部署到k8s也是用这个名字。
k8s的资源定义文件如下:
apiVersion: apps/v1
kind: Deployment
metadata:
  name: config-server-k8s-deployment
spec:
  selector:
    matchLabels:
      app: config-server-k8s
  replicas: 1
  template:
    metadata:
      labels:
        app: config-server-k8s
    spec:
      containers:
        - name: config-server-k8s
          image: pkslow/config-server-k8s:1.0-SNAPSHOT
          ports:
            - containerPort: 8888

---
apiVersion: v1
kind: Service
metadata:
  labels:
    app: config-server-k8s
  name: config-server-k8s
spec:
  ports:
    - port: 8888
      name: config-server-k8s
      protocol: TCP
      targetPort: 8888
  selector:
    app: config-server-k8s
  type: ClusterIP
---
apiVersion: extensions/v1beta1
kind: Ingress
metadata:
  name: config-server-k8s
  annotations:
    kubernetes.io/ingress.class: nginx
spec:
  rules:
    - http:
        paths:
          - path: /
            backend:
              serviceName: config-server-k8s
              servicePort: 8888
      host: config-server-k8s.localhost
保持Service名字统一为config-server-k8s。
3 客户端
引入依赖:
<dependency>
  <groupId>org.springframework.boot</groupId>
  <artifactId>spring-boot-starter-web</artifactId>
</dependency>
<dependency>
  <groupId>org.springframework.cloud</groupId>
  <artifactId>spring-cloud-starter-kubernetes</artifactId>
</dependency>
<dependency>
  <groupId>org.springframework.cloud</groupId>
  <artifactId>spring-cloud-starter-config</artifactId>
</dependency>
<dependency>
  <groupId>org.springframework.boot</groupId>
  <artifactId>spring-boot-starter-actuator</artifactId>
</dependency>
spring-cloud-starter-kubernetes为服务发现;
spring-cloud-starter-config作为配置客户端;
spring-boot-starter-actuator提供EndPoint来刷新配置。
启动类为:
package com.pkslow.config;

import org.springframework.boot.SpringApplication;
import org.springframework.boot.autoconfigure.SpringBootApplication;
import org.springframework.cloud.client.discovery.EnableDiscoveryClient;

@SpringBootApplication
@EnableDiscoveryClient
public class ConfigClientK8s {
    public static void main(String[] args) {
        SpringApplication.run(ConfigClientK8s.class, args);
    }
}
配置文件bootstrap.properties如下:
server.port=8080

# 服务名
spring.application.name=config-client-k8s

# 读取配置时的profile
spring.profiles.active=dev
# 读取配置时的代码分支
spring.cloud.config.label=release

# 开放刷新接口
management.endpoints.web.exposure.include=*
management.endpoint.health.show-details=always

# 通过服务名找到配置服务器
spring.cloud.config.discovery.enabled=true
spring.cloud.config.discovery.service-id=config-server-k8s
展示配置结果的Web服务:
package com.pkslow.config;

import org.springframework.beans.factory.annotation.Value;
import org.springframework.cloud.context.config.annotation.RefreshScope;
import org.springframework.web.bind.annotation.GetMapping;
import org.springframework.web.bind.annotation.RestController;

import java.util.HashMap;
import java.util.Map;

@RefreshScope
@RestController
public class PkslowController {
    @Value("${pkslow.age:0}")
    private Integer age;

    @Value("${pkslow.email:null}")
    private String email;

    @Value("${pkslow.webSite:null}")
    private String webSite;

    @GetMapping("/pkslow")
    public Map<String, String> getConfig() {
        Map<String, String> map = new HashMap<>();
        map.put("age", age.toString());
        map.put("email", email);
        map.put("webSite", webSite);
        return map;
    }
}
客户端的k8s文件:
apiVersion: apps/v1
kind: Deployment
metadata:
  name: config-client-k8s-deployment
spec:
  selector:
    matchLabels:
      app: config-client-k8s
  replicas: 1
  template:
    metadata:
      labels:
        app: config-client-k8s
    spec:
      containers:
        - name: config-client-k8s
          image: pkslow/config-client-k8s:1.0-SNAPSHOT
          ports:
            - containerPort: 8080

---
apiVersion: v1
kind: Service
metadata:
  labels:
    app: config-client-k8s
  name: config-client-k8s
spec:
  ports:
    - port: 8080
      name: config-client-k8s
      protocol: TCP
      targetPort: 8080
  selector:
    app: config-client-k8s
  type: ClusterIP
---
apiVersion: extensions/v1beta1
kind: Ingress
metadata:
  name: config-client-k8s
  annotations:
    kubernetes.io/ingress.class: nginx
spec:
  rules:
    - http:
        paths:
          - path: /
            backend:
              serviceName: config-client-k8s
              servicePort: 8080
      host: config-client-k8s.localhost
注意Service名字为config-client-k8s。
4 部署与测试
总结一下,服务端主要做了两件事:
(1)提供配置服务,从Github中读取配置;
(2)把自己注册到Kubernetes中去,以让客户端发现并读取配置。
客户端主要做了件事:
(1)作为配置客户端,从服务端读配置;
(2)把自己注册到Kubernetes中去,让服务端可以访问;
(3)提供刷新配置的功能给外界调用。
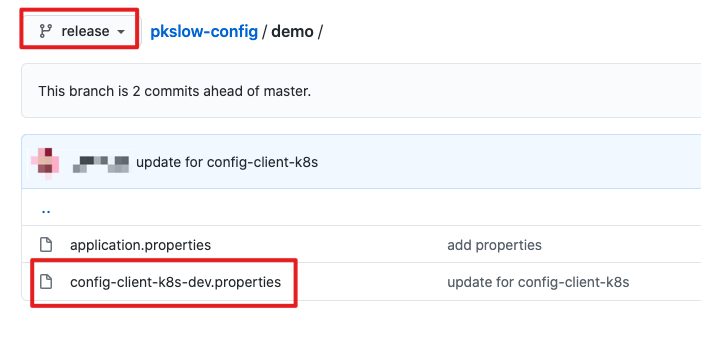
根据客户端的名字、配置的label和profile,客户端便会读取release分支的配置文件config-client-k8s-dev.properties的内部。
访问http://config-client-k8s.localhost/pkslow结果如下:

如果修改了配置信息,客户端不能及时生效,需要通过发送POST请求到http://config-client-k8s.localhost/actuator/refresh,这点不再赘述。
5 服务端统一刷新
如果改了大量配置,或者基础配置,想让所有客户端生效怎么办?总不能一个个去刷新?而且在客户端有多个Pod需要LoadBalance的情况下,无法确保每个Java应用都能刷新到。
所以让服务去读取所有相关的客户端,并刷新。实现很简单,直接新增一个RefreshController就可以了:
package com.pkslow.config;

import org.springframework.beans.factory.annotation.Autowired;
import org.springframework.cloud.client.ServiceInstance;
import org.springframework.cloud.client.discovery.DiscoveryClient;
import org.springframework.http.HttpEntity;
import org.springframework.http.HttpHeaders;
import org.springframework.http.MediaType;
import org.springframework.http.ResponseEntity;
import org.springframework.web.bind.annotation.GetMapping;
import org.springframework.web.bind.annotation.RestController;
import org.springframework.web.client.RestTemplate;

import java.util.HashMap;
import java.util.List;
import java.util.Map;

@RestController
public class RefreshController {
    @Autowired
    private DiscoveryClient discoveryClient;

    private RestTemplate rest = new RestTemplate();

    @GetMapping("/refresh")
    public Map<String, String> refresh() {

        Map<String, String> result = new HashMap<>();
        List<String> services = discoveryClient.getServices();
        result.put("Basic Info", "Total services in k8s:" + services.size());

        services.stream()
                .filter(s -> (!"config-server-k8s".equals(s)) && s.startsWith("config-client"))
                .forEach(service -> {
                    List<ServiceInstance> instances = discoveryClient.getInstances(service);

                    instances.forEach(instance -> {
                        String url = "http://" + instance.getHost() + ":" + instance.getPort() + "/actuator/refresh";

                        try {
                            HttpHeaders headers = new HttpHeaders();
                            headers.setContentType(MediaType.APPLICATION_JSON);
                            HttpEntity<String> entity = new HttpEntity<>(null, headers);
                            ResponseEntity<String> response = rest.postForEntity(url, entity, String.class);
                            result.put(service + " " + url, response.getStatusCode().getReasonPhrase());
                        } catch (Exception e) {
                            result.put(service + " " + url, e.getMessage());
                        }
                    });
                });

        return result;
    }
}
注意上面的过滤逻辑,因为不是所有Service都可以、都需要refresh,具体逻辑看业务。
请求http://config-server-k8s.localhost/refresh结果如下(把客户端的replicas设置成了3):
{
  "config-client-k8s http://10.1.0.126:8080/actuator/refresh": "OK",
  "config-client-k8s http://10.1.0.125:8080/actuator/refresh": "OK",
  "Basic Info": "Total services in k8s:7",
  "config-client-k8s http://10.1.0.122:8080/actuator/refresh": "OK"
}
注:可能会遇到权限不足的问题,创建一个对应的Kubernetes ServiceAccount即可,不清楚可以参考:把Spring Cloud Data Flow部署在Kubernetes上,再跑个任务试试
客户端其实不一定需要引入
DiscoveryService,如果不通过Server的ServiceId来寻找地址,而是直接配置服务端地址spring.cloud.config.uri。但服务端是需要的,因为要获取客户端的信息来实现统一reload。
6 总结
配置管理其实是一门大学问,把Spring Cloud Config放在Kubernetes上用只是其中一种场景。
关于配置的一些文章:
Spring Cloud Config在Spring Cloud Task中的应用,比Web应用更简单
Spring Cloud Config整合Spring Cloud Kubernetes,在k8s上管理配置
使用Spring Cloud Config统一管理配置,别再到处放配置文件了
Java怎么从这四个位置读取配置文件Properties(普通文件系统-classpath-jar-URL)
注解@ConfigurationProperties让配置整齐而简单
Springboot整合Jasypt,让配置信息安全最优雅方便的方式
欢迎关注微信公众号<南瓜慢说>,将持续为你更新...

多读书,多分享;多写作,多整理。