版权声明:本文为博主原创文章,遵循 CC 4.0 BY-SA 版权协议,转载请附上原文出处链接和本声明。
本文链接:https://blog.csdn.net/u013517797/article/details/79942172
接上一篇:https://blog.csdn.net/acmman/article/details/79778241
为了方便大家学习,我将博客中编写的仓储系统和销售系统的最终源码分享出来,希望能帮助到大家学习:
仓储系统下载地址:https://download.csdn.net/download/u013517797/10349085
销售系统下载地址:https://download.csdn.net/download/u013517797/10349095
-----------------------------------华丽的分割线(#^.^#)----------------------------------------------
上次我们编写了RabbitMQ结合SSM框架的数据提供方“仓储系统”的工程,下面我们来编写要从MQ获取信息的“销售系统”,并且实现“仓储系统”与“销售系统”的信息交互。
我们回顾一下之前的最终的信息交互模式图:
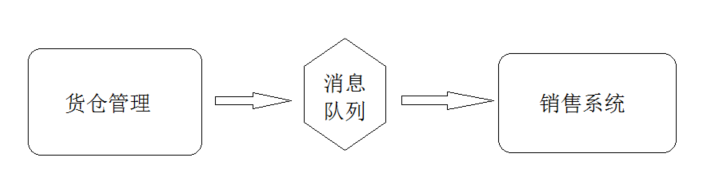
其中“仓储系统”用于货物的入库和管理,当货物更新时,将货物信息推送至消息队列。而“销售系统”主要负责货物的销售,货物信息从消息队列中同步过来。
一、编写“销售系统”
对于“销售系统”,其整体架构与“仓储系统”几乎一致,创建工程和搭建工程参考上一篇搭建“仓储系统”的代码,这里仅阐述一下“销售系统”的业务模块。
按照“仓储系统”的工程架构,将“销售系统”搭建起来:
更改其中的数据库篇配置文件,让其连接销售系统的数据库:
jdbc.driver=com.mysql.jdbc.Driver
jdbc.url=jdbc:mysql://localhost:3306/sale_system
jdbc.username=root
jdbc.password=1234
c3p0.pool.maxPoolSize=400
c3p0.pool.minPoolSize=50
c3p0.pool.initialPoolSize=50
c3p0.pool.acquireIncrement=100
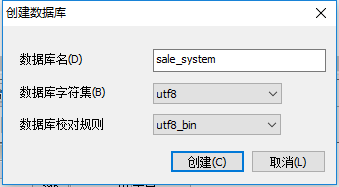
然后使用sqlyog工具,在数据库中创建一个名为“sale_system”的数据库:
其中创建一个名为commodity的商品表:
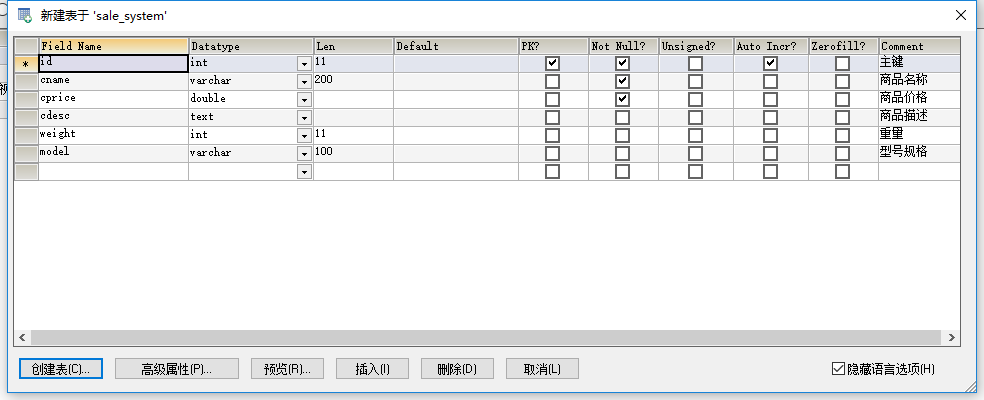
建表语句:
CREATE TABLE `commodity` (
`id` int(11) NOT NULL AUTO_INCREMENT COMMENT '主键',
`cname` varchar(200) COLLATE utf8_bin NOT NULL COMMENT '商品名称',
`cprice` double NOT NULL COMMENT '商品价格',
`cdesc` text COLLATE utf8_bin COMMENT '商品描述',
`weight` int(11) DEFAULT NULL COMMENT '重量',
`model` varchar(100) COLLATE utf8_bin DEFAULT NULL COMMENT '型号规格',
PRIMARY KEY (`id`)
) ENGINE=InnoDB DEFAULT CHARSET=utf8 COLLATE=utf8_bin
然后创建Mapper配置文件“CommodityMapper.xml”:
<?xml version="1.0" encoding="UTF-8"?>
<!DOCTYPE mapper
PUBLIC "-//mybatis.org//DTD Mapper 3.0//EN"
"http://mybatis.org/dtd/mybatis-3-mapper.dtd">
<mapper namespace="com.sale_system.mapper.CommodityMapper">
<!-- resultMap映射 -->
<resultMap type="com.sale_system.po.Commodity" id="commodityRM">
<!-- 主键 -->
<id property="id" column="id" jdbcType="INTEGER" />
<!-- 一般属性 -->
<result property="name" column="cname" jdbcType="VARCHAR"/>
<result property="price" column="cprice" jdbcType="DOUBLE"/>
<result property="desc" column="cdesc"/>
<result property="weight" column="weight" jdbcType="INTEGER"/>
<result property="model" column="model" jdbcType="VARCHAR"/>
</resultMap>
<!-- 查询一个 -->
<select id="selectById" parameterType="int" resultMap="commodityRM">
select * from commodity
where id=#{id}
</select>
<!-- 查询 -->
<select id="selectAll" resultMap="commodityRM">
select * from commodity
</select>
<insert id="insert" parameterType="com.sale_system.po.Commodity">
insert into commodity
(<if test="id !=null">ID,</if>CNAME,CPRICE,CDESC,WEIGHT,MODEL)
values
(
<if test="id !=null">
#{id,jdbcType=INTEGER},
</if>
#{name,jdbcType=VARCHAR},
#{price,jdbcType=DOUBLE},
#{desc},
#{weight,jdbcType=INTEGER},
#{model,jdbcType=VARCHAR}
)
</insert>
<!-- 修改语句 -->
<update id="update" parameterType="com.sale_system.po.Commodity">
update commodity
<set>
<if test="name != null">cname=#{name},</if>
<if test="price != null">cprice=#{price},</if>
<if test="desc != null">cdesc = #{desc},</if>
<if test="weight != null">weight=#{weight},</if>
<if test="model != null">model=#{model}</if>
</set>
where id=#{id}
</update>
<!-- 删除一条 -->
<delete id="deleteById" parameterType="int">
delete from commodity
where id=#{id}
</delete>
</mapper>
要注意的是,insert配置中本不应该插入id的,因为id是自增的,无需插入,但是这里我们的数据在同步的时候是需要同步相关ID的,所以当ID存在的时候,需要插入。
然后在“com.sale_system.po”包下创建商品bean对象“Commodity”:
package com.sale_system.po;
public class Commodity {
private int id;
private String name;
private Double price;
private String desc;
private Integer weight;
private String model;
public int getId() {
return id;
}
public void setId(int id) {
this.id = id;
}
public String getName() {
return name;
}
public void setName(String name) {
this.name = name;
}
public Double getPrice() {
return price;
}
public void setPrice(Double price) {
this.price = price;
}
public String getDesc() {
return desc;
}
public void setDesc(String desc) {
this.desc = desc;
}
public Integer getWeight() {
return weight;
}
public void setWeight(Integer weight) {
this.weight = weight;
}
public String getModel() {
return model;
}
public void setModel(String model) {
this.model = model;
}
}
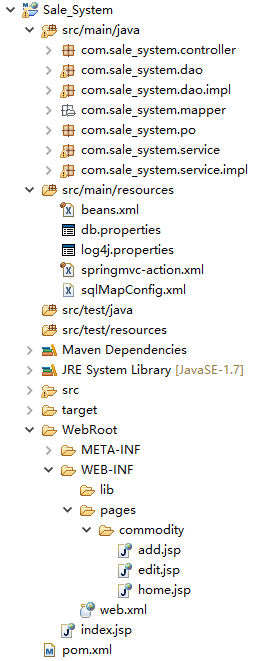
然后Servie与Dao层与“仓储系统”结构类似,分别是商品的增删改查。编写完毕后的java代码层结构如下:
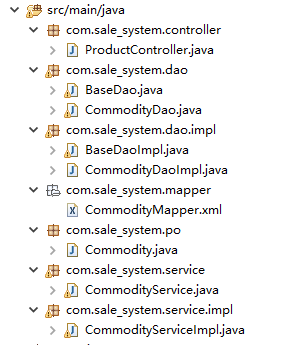
请求响应层Controller类:
package com.sale_system.controller;
import java.util.List;
import org.apache.commons.logging.Log;
import org.apache.commons.logging.LogFactory;
import org.springframework.beans.factory.annotation.Autowired;
import org.springframework.stereotype.Controller;
import org.springframework.ui.Model;
import org.springframework.web.bind.annotation.RequestMapping;
import com.sale_system.po.Commodity;
import com.sale_system.service.CommodityService;
@Controller
public class CommdityController {
@Autowired
private CommodityService commodityService;
Log log = LogFactory.getLog(this.getClass());
@RequestMapping("/commodity/home.action")
public String list(Model model){
List<Commodity> commodityList = commodityService.selectAll(null);
model.addAttribute("commodityList",commodityList);
return "/commodity/home.jsp";
}
@RequestMapping("/commodity/toAdd.action")
public String toAdd(Model model){
return "/commodity/add.jsp";
}
@RequestMapping("/commodity/add.action")
public String add(Model model,Commodity commodity){
commodityService.insert(commodity);
return list(model);
}
@RequestMapping("/commodity/toEdit.action")
public String toEdit(Model model,Integer id){
if(id!=null){
model.addAttribute("commodity", commodityService.selectById(id));
}
return "/commodity/edit.jsp";
}
@RequestMapping("/commodity/edit.action")
public String edit(Model model,Commodity commodity){
commodityService.update(commodity);
return list(model);
}
@RequestMapping("/commodity/delete.action")
public String delete(Model model,Integer id){
commodityService.deleteById(id);
return list(model);
}
}
然后主页home.jsp:
<%@ page language="java" import="java.util.*" pageEncoding="UTF-8"%>
<%@ taglib uri="http://java.sun.com/jsp/jstl/core" prefix="c" %>
<!DOCTYPE HTML PUBLIC "-//W3C//DTD HTML 4.01 Transitional//EN">
<html>
<head>
<title>商品销售系统首页</title>
</head>
<body>
<h1>商品销售系统</h1>
<hr/>
<a href="toAdd.action">
<button style="background-color:#173e65;color:#ffffff;70px;">添加</button>
</a>
<c:if test="${commodityList!=null}">
<table style="margin-top: 10px;700px;text-align:center;" border=1>
<tr>
<td>序号</td><td>商品名称</td><td>价格</td><td>商品描述</td>
<td>重量</td><td>型号规格</td>
</tr>
<c:forEach items="${commodityList}" var="item" varStatus="status">
<tr>
<td>${status.index+1}</td><td>${item.name }</td>
<td>${item.price}</td><td>${item.desc }</td>
<td>${item.weight}</td><td>${item.model}</td>
</tr>
</c:forEach>
</table>
</c:if>
<c:if test="${commodityList==null}">
<b>搜索结果为空!</b>
</c:if>
</body>
</html>
默认页面index.jsp的跳转路径为"commodity/home.action":
<%@ page language="java" import="java.util.*" pageEncoding="utf-8"%>
<!DOCTYPE HTML PUBLIC "-//W3C//DTD HTML 4.01 Transitional//EN">
<html>
<head>
<title>index</title>
</head>
<body>
<script language="JavaScript">
window.location.href = "commodity/home.action";
</script>
</body>
</html>
添加和编辑页面我们这里暂时不使用,所以无需编写。
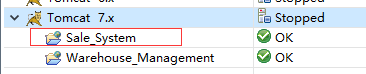
将工程部署至tomcat:
启动tomcat,在浏览器中分别打开仓储系统和销售系统:
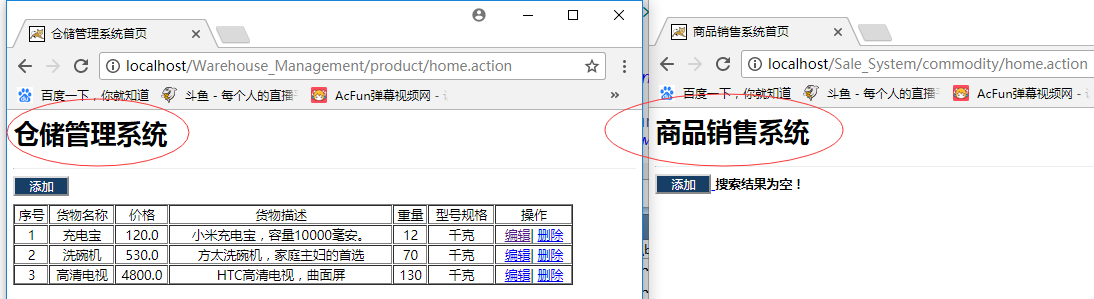
目前它们的数据是相互隔离开来的,我们下面使用RabbitMQ来让两者进行数据交互,使得销售系统可以同步仓储系统的货物数据。
二、搭建RabbitMQ连接环境
下面分别在仓储系统和销售系统中添加RabbitMQ的连接环境,由于配置类似,这里以“生产者”和“消费者”来区分两工程的不同配置。
首先我们在pom.xml添加RabbitMQ的相关依赖:
<!-- RabbitMQ相关依赖 -->
<dependency>
<groupId>org.springframework.amqp</groupId>
<artifactId>spring-rabbit</artifactId>
<version>1.4.0.RELEASE</version>
</dependency>
保存后可以看到相关依赖被引入:
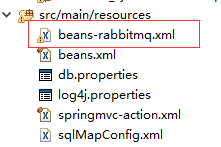
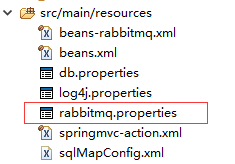
然后在src/main/resource下创建一个名为“beans-rabbitmq.xml”的配置文件,为rabbitmq的配置文件:
编写该文件:
<beans xmlns="http://www.springframework.org/schema/beans"
xmlns:xsi="http://www.w3.org/2001/XMLSchema-instance"
xmlns:context="http://www.springframework.org/schema/context"
xmlns:rabbit="http://www.springframework.org/schema/rabbit"
xsi:schemaLocation="http://www.springframework.org/schema/beans
http://www.springframework.org/schema/beans/spring-beans-4.1.xsd
http://www.springframework.org/schema/context
http://www.springframework.org/schema/context/spring-context-3.0.xsd
http://www.springframework.org/schema/rabbit
http://www.springframework.org/schema/rabbit/spring-rabbit-1.4.xsd">
</beans>
上面除了spring的bean的schema声明,还要加入rabbit的schema声明。
然后编写该配置文件:
(1)首先添加RabbitMQ的连接工厂(生产者和消费者都配置)
<!-- 定义RabbitMQ的连接工厂 -->
<rabbit:connection-factory id="connectionFactory"
host="${rabbitmq.host}" port="${rabbitmq.port}" username="${rabbitmq.username}" password="${rabbitmq.password}"
virtual-host="${rabbitmq.vhost}" />
这里动态引入了参数配置文件的信息,所以这里需要创建一个properties文件,用于配置RabbitMQ的连接信息。所以在src/main/resource下创建一个名为“rabbitmq.properties”的配置文件,放置连接信息:
内容:
rabbitmq.host=127.0.0.1
rabbitmq.port=5672
rabbitmq.username=jack
rabbitmq.password=jack
rabbitmq.vhost=/jack
然后在spring配置文件beans.xml的数据库配置文件引入后面,引入该properties配置:
<!-- 1.加载数据库配置的属性文件 -->
<context:property-placeholder location="classpath:db.properties,classpath:rabbitmq.properties"/>
然后回到beans-rabbitmq.xml中,在rabbit:connection-factory下添加RabbitMQ的中心管理模块:
<!-- MQ的管理,包括队列、交换器等 -->
<rabbit:admin connection-factory="connectionFactory" />
(2)定义交换机(仅生产者配置)
这里我们定义一个“通配符”类型的交换机:
<!-- 定义交换机,auto-declare为自动声明, durable为持久化队列-->
<rabbit:topic-exchange name="JACK-ITEM-EXCHANGE" auto-declare="true" durable="true"/>
(3)定义模板(仅生产者配置)
下面定义Rabbit模板,该模板会加载获取与rabbit交互的连接工厂和相关的交换机,在Java应用层可以注入该类进行与RabbitMQ的各种数据交互,十分重要:
<!-- 定义Rabbit模板,指定连接工厂以及定义exchange -->
<rabbit:template id="rabbitTemplate" connection-factory="connectionFactory" exchange="JACK-ITEM-EXCHANGE" />
(4)定义队列和监听(仅消费者配置)
这里需要为消费者的配置文件中配置接收信息的队列配置:
<!-- 定义队列,auto-declare为自动声明, durable为持久化队列 -->
<rabbit:queue name="JACK-WEB-ITEM-QUEUE" auto-declare="true" durable="true"/>
然后是监听对象和监听对象配置:
<!-- 消费者对象 -->
<bean id="itemMQHandler" class="com.sale_system.mq.handle.ItemMQHandler"/>
<!-- 监听对象 -->
<rabbit:listener-container connection-factory="connectionFactory">
<!-- ref为监听对象、method为有消息之后通知的方法名 -->
<rabbit:listener ref="itemMQHandler" method="execute" queue-names="JACK-WEB-ITEM-QUEUE"/>
</rabbit:listener-container>
当消息推送到JACK-WEB-ITEM-QUEUE队列后,listener-container会通知listener对象itemMQHandler接收信息,接收方法为“execute”,接收队列名为“JACK-WEB-ITEM-QUEUE”的信息。
生产者完整的配置如下:
<?xml version="1.0" encoding="UTF-8"?>
<beans xmlns="http://www.springframework.org/schema/beans"
xmlns:xsi="http://www.w3.org/2001/XMLSchema-instance"
xmlns:context="http://www.springframework.org/schema/context"
xmlns:rabbit="http://www.springframework.org/schema/rabbit"
xsi:schemaLocation="http://www.springframework.org/schema/beans
http://www.springframework.org/schema/beans/spring-beans-4.1.xsd
http://www.springframework.org/schema/context
http://www.springframework.org/schema/context/spring-context-3.0.xsd
http://www.springframework.org/schema/rabbit
http://www.springframework.org/schema/rabbit/spring-rabbit-1.4.xsd">
<!-- 定义RabbitMQ的连接工厂 -->
<rabbit:connection-factory id="connectionFactory"
host="${rabbitmq.host}" port="${rabbitmq.port}" username="${rabbitmq.username}" password="${rabbitmq.password}"
virtual-host="${rabbitmq.vhost}" />
<!-- MQ的管理,包括队列、交换器等 -->
<rabbit:admin connection-factory="connectionFactory" />
<!-- 定义交换机,auto-declare为自动声明, durable为持久化队列-->
<rabbit:topic-exchange name="JACK-ITEM-EXCHANGE" auto-declare="true" durable="true"/>
<!-- 定义Rabbit模板,指定连接工厂以及定义exchange -->
<rabbit:template id="rabbitTemplate" connection-factory="connectionFactory" exchange="JACK-ITEM-EXCHANGE" />
</beans>
消费者的配置如下:
<?xml version="1.0" encoding="UTF-8"?>
<beans xmlns="http://www.springframework.org/schema/beans"
xmlns:xsi="http://www.w3.org/2001/XMLSchema-instance"
xmlns:context="http://www.springframework.org/schema/context"
xmlns:rabbit="http://www.springframework.org/schema/rabbit"
xsi:schemaLocation="http://www.springframework.org/schema/beans
http://www.springframework.org/schema/beans/spring-beans-4.1.xsd
http://www.springframework.org/schema/context
http://www.springframework.org/schema/context/spring-context-3.0.xsd
http://www.springframework.org/schema/rabbit
http://www.springframework.org/schema/rabbit/spring-rabbit-1.4.xsd">
<!-- 定义RabbitMQ的连接工厂 -->
<rabbit:connection-factory id="connectionFactory"
host="${rabbitmq.host}" port="${rabbitmq.port}" username="${rabbitmq.username}" password="${rabbitmq.password}"
virtual-host="${rabbitmq.vhost}" />
<!-- MQ的管理,包括队列、交换器等 -->
<rabbit:admin connection-factory="connectionFactory" />
<!-- 定义队列,auto-declare为自动声明, durable为持久化队列 -->
<rabbit:queue name="JACK-WEB-ITEM-QUEUE" auto-declare="true" durable="true"/>
<!-- 消费者对象 -->
<bean id="itemMQHandler" class="com.sale_system.mq.handle.ItemMQHandler"/>
<!-- 监听对象 -->
<rabbit:listener-container connection-factory="connectionFactory">
<!-- ref为监听对象、method为有消息之后通知的方法名 -->
<rabbit:listener ref="itemMQHandler" method="execute" queue-names="JACK-WEB-ITEM-QUEUE"/>
</rabbit:listener-container>
</beans>
其中的消费者对象和监听对象,在下面进行监听逻辑编写时会详细讲到,这里可以先注释。
最后,在spring的配置文件beans.xml的最下面引入该xml:
<!-- 引入RabbitMQ配置 -->
<import resource="classpath*:beans-rabbitmq.xml" />
至此RabbitMQ的基本环境搭建完毕。
这里细心的朋友可能会注意到,我们并没有在生产者的配置文件中声明队列并且绑定交换机,其实这一步操作不应该在这里做,因为后台一旦进行了配置,则会耦合度比较高,当绑定关系发生变化时,需要重启项目,十分的不友好。所以,绑定关系最好是手动在RabbitMQ的管理工具里指定。
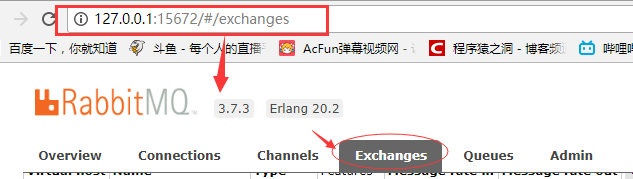
登录RabbitMQ的管理工具,打开Exchanges模块:
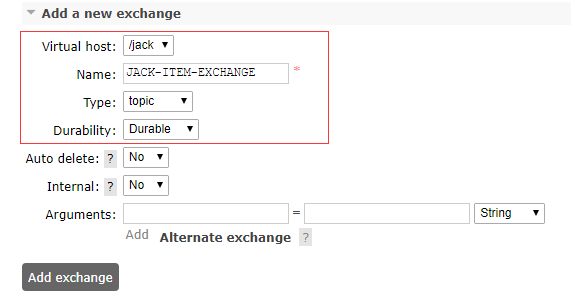
创建一个名为“JACK-ITEM-EXCHANGE”的交换机:
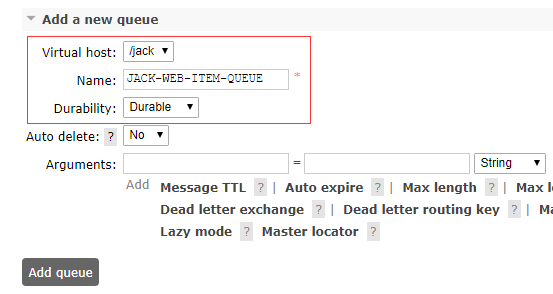
然后打开Queues,创建一个名为“JACK-WEB-ITEM-QUEUE”的队列:
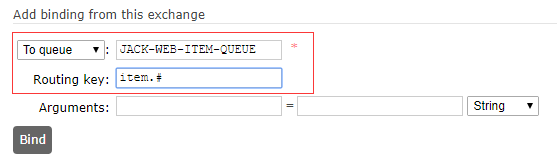
然后回到Exchanges模块,将队列绑定在交换机上:
大功告成!
三、仓储系统对外发布消息
在之前的业务涉及中,我们要求仓储系统在新增、删除以及编辑的时候需要将信息传输至消息队列,所以我们在相关方法中添加与rabbit交互的代码。
首先在Controller类中注入rabbitTemplate:
//注入RabbitMQ的模板类,用于与RabbitMQ交互
@Autowired
private RabbitTemplate rabbitTemplate;
然后修改货物新增的Controller方法,在insert之后,我们要与RabbitMQ交互,将新增的信息推送到交换机:
@RequestMapping("/product/add.action")
public String add(Model model,Product product){
productService.insert(product);
try {
//将信息信息发送至rabbitMQ的交换机,通知其它系统新增了商品
Map<String,Object> msg = new HashMap<String,Object>();
msg.put("itemObject",product);
msg.put("type", "insert");
msg.put("date", System.currentTimeMillis());//时间戳
//使用fastJson将新增的商品信息转换为json字符串,方便接收方解析
this.rabbitTemplate.convertAndSend("item.insert", JSON.toJSON(msg).toString());//消息的key,与内容
} catch (AmqpException e) {
e.printStackTrace();
}
//重新刷新至分页列表页首页
return list(model);
}
可以看到我们组装了一个Map,将变更的货物信息、操作类型、时间戳封装在Map中,然后转换为json传输到交换机。
这里要做两个操作,由于之前编写MyBatis的时候没有指定自动返回主键ID,这里需要在Mapper配置文件中的insert配置中添加useGeneratedKeys、keyProperty、keyColumn三个参数:
<insert id="insert" parameterType="com.warehouse_management.po.Product" useGeneratedKeys="true" keyProperty="id" keyColumn="id">
insert into product
(PNAME,PRICE,PDESC,WEIGHT,MODEL)
values
(
#{name,jdbcType=VARCHAR},
#{price,jdbcType=DOUBLE},
#{desc},
#{weight,jdbcType=INTEGER},
#{model,jdbcType=VARCHAR}
)
</insert>
这样进行新增操作后,product类中就会拿到新增到数据库里该条数据的id主键。
然后由于我们要封装和解析json,在两个工程的POM文件中都新增fastJson的依赖:
<dependency>
<groupId>com.alibaba</groupId>
<artifactId>fastjson</artifactId>
<version>1.2.15</version>
</dependency>
之后在仓储系统的编辑与删除Controller想赢方法中同样添加消息通知的代码:
@RequestMapping("/product/edit.action")
public String edit(Model model,Product product){
productService.update(product);
try {
//将信息信息发送至rabbitMQ的交换机,通知其它系统修改了商品
Map<String,Object> msg = new HashMap<String,Object>();
msg.put("itemObject",product);
msg.put("type", "update");
msg.put("date", System.currentTimeMillis());//时间戳
//使用fastJson将新增的商品信息转换为json字符串,方便接收方解析
this.rabbitTemplate.convertAndSend("item.update", JSON.toJSON(msg).toString());//消息的key,与内容
} catch (AmqpException e) {
e.printStackTrace();
}
//重新刷新至分页列表页首页
return list(model);
}
@RequestMapping("/product/delete.action")
public String delete(Model model,Integer id){
productService.deleteById(id);
try {
//将信息信息发送至rabbitMQ的交换机,通知其它系统删除了商品
Product product = new Product();
product.setId(id);//封装删除的ID信息
Map<String,Object> msg = new HashMap<String,Object>();
msg.put("itemObject",product);
msg.put("type", "update");
msg.put("date", System.currentTimeMillis());//时间戳
//使用fastJson将新增的商品信息转换为json字符串,方便接收方解析
this.rabbitTemplate.convertAndSend("item.update", JSON.toJSON(msg).toString());//消息的key,与内容
} catch (AmqpException e) {
e.printStackTrace();
}
//重新刷新至分页列表页首页
return list(model);
}
其实发现代码有重复性,我们可以将它单独封装为一个方法。封装后最终的代码为:
@RequestMapping("/product/add.action")
public String add(Model model,Product product){
productService.insert(product);
//将信息信息发送至rabbitMQ,通知其它系统新增了商品
sengMsgToMQ(product,"insert");
//重新刷新至分页列表页首页
return list(model);
}
@RequestMapping("/product/edit.action")
public String edit(Model model,Product product){
productService.update(product);
//将信息信息发送至rabbitMQ,通知其它系统编辑了商品
sengMsgToMQ(product,"update");
//重新刷新至分页列表页首页
return list(model);
}
@RequestMapping("/product/delete.action")
public String delete(Model model,Integer id){
productService.deleteById(id);
//将信息信息发送至rabbitMQ,通知其它系统删除了商品
Product product = new Product();
product.setId(id);//封装删除的ID信息
sengMsgToMQ(product,"delete");
//重新刷新至分页列表页首页
return list(model);
}
private void sengMsgToMQ(Product product,String Type) {
try {
Map<String,Object> msg = new HashMap<String,Object>();
msg.put("itemObject",JSON.toJSON(product).toString());
msg.put("type", Type);
msg.put("date", System.currentTimeMillis());//时间戳
//使用fastJson将新增的商品信息转换为json字符串,方便接收方解析
this.rabbitTemplate.convertAndSend("item."+Type, JSON.toJSON(msg).toString());//消息的key,与内容
} catch (AmqpException e) {
e.printStackTrace();
}
}
至此,仓储系统的交互逻辑完成。
下面要编写销售系统与RabbitMQ的交互,用于获取仓储系统同步的数据。
四、销售系统同步消息队列商品信息
在销售系统中要时刻保持与仓储系统中的货物信息一致,所以这里需要编写一个消费者,用于从RabbitMQ中实时监听数据变更信息。
首先创建一个“com.sale_system.mq.handle”包,用于放置与MQ相关的控制器类。然后创建一个名为“ItemMQHandler”的类,用于实现信息监听:
package com.sale_system.mq.handle;
public class ItemMQHandlerr {
public void execute(String msg){
}
}
然后在销售系统的mq的xml配置文件中添加该bean:
<!-- 消费者对象 -->
<bean id="itemMQHandler" class="com.sale_system.mq.handle.ItemMQHandler"/>
然后定义一个监听器,用来监听RabbitMQ中指定的队列:
<!-- 监听对象 -->
<rabbit:listener-container connection-factory="connectionFactory">
<rabbit:listener ref="itemMQHandler" method="execute" queue-names="JACK-WEB-ITEM-QUEUE"/><!-- 监听对象和有消息之后通知的方法名 -->
</rabbit:listener-container>
注:上面其实已经添加了,这里再次讲解一下,加深印象。
队列与交换机已经人工在管理界面中绑定了,这里不再赘述。
然后我们回到ItemMQHandler类中进行信息的具体处理:
package com.sale_system.mq.handle;
import java.util.Map;
import org.springframework.beans.factory.annotation.Autowired;
import com.alibaba.fastjson.JSON;
import com.alibaba.fastjson.JSONObject;
import com.mysql.jdbc.StringUtils;
import com.sale_system.po.Commodity;
import com.sale_system.service.CommodityService;
public class ItemMQHandler {
@Autowired
private CommodityService commodityService;
/**
* 更新数据库中的商品数据,完成数据同步
* */
public void execute(String msg){
if(!StringUtils.isNullOrEmpty(msg)){
Map<String,Object> msgMap = (Map<String, Object>) JSON.parse(msg);
//获取商品同步信息
String jsonStr = (String) msgMap.get("itemObject");
JSONObject jsonObject = JSON.parseObject(jsonStr);
Commodity commodity = convertMapToCommodity(jsonObject);
//获取同步类型
String type = (String) msgMap.get("type");
if(type.equals("insert")){
commodityService.insert(commodity);
}else if(type.equals("update")){
if(commodityService.selectById(commodity.getId())!=null){
//如果ID存在,进行编辑
commodityService.update(commodity);
}else{
//如果ID不存在,执行插入操作
commodityService.insert(commodity);
}
}else if(type.equals("delete")){
if(commodityService.selectById(commodity.getId())!=null){
//如果ID存在,进行删除
commodityService.deleteById(commodity.getId());
}
}
}
}
private Commodity convertMapToCommodity(JSONObject jsonObject) {
Commodity commodity = new Commodity();
if(jsonObject!=null){
if(jsonObject.get("id")!=null){
commodity.setId(Integer.parseInt(jsonObject.get("id").toString()));
}
if(jsonObject.get("name")!=null){
commodity.setName(jsonObject.get("name").toString());
}
if(jsonObject.get("price")!=null){
commodity.setPrice(Double.parseDouble(jsonObject.get("price").toString()));
}
if(jsonObject.get("desc")!=null){
commodity.setDesc(jsonObject.get("desc").toString());
}
if(jsonObject.get("weight")!=null&&!StringUtils.isNullOrEmpty(jsonObject.get("weight").toString())){
commodity.setWeight(Integer.parseInt(jsonObject.get("weight").toString()));
}
if(jsonObject.get("model")!=null){
commodity.setModel(jsonObject.get("model").toString());
}
}
return commodity;
}
}
接受到信息后,首先取出变更商品的实体信息,转换为商品类,然后根据type进行不同的操作来更新数据。
我们重启仓库系统和销售系统,登录后依然没有变化:

但是我们可以在控制台看到,销售系统正在实时监听消息队列:

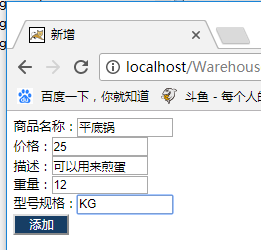
此时我们在仓储系统中插入一条新的数据:

刷新销售系统的页面,发现信息同步过来了:
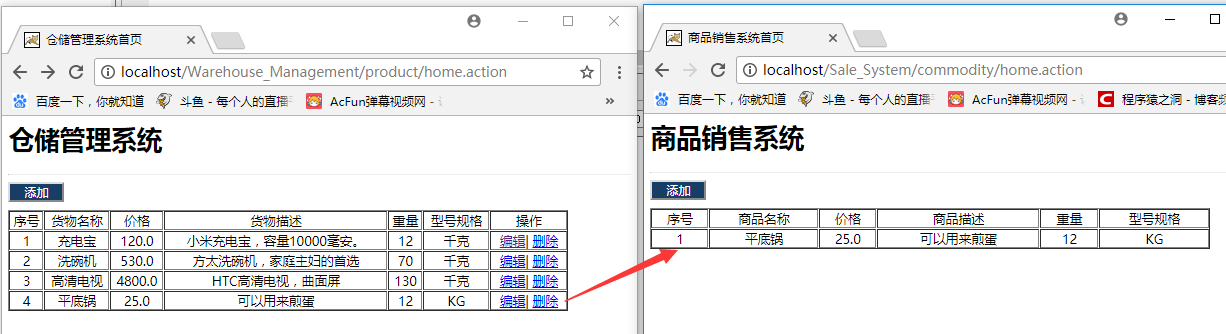
查看数据库,也进行了数据存储:

然后我们修改前三个数据:
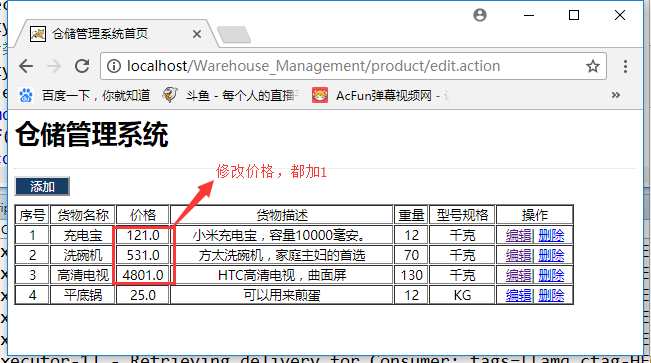
此时根据编辑空则更新的规则,发现销售系统也同步过来了:

至此,我们实现了两个系统之间的数据同步操作,同时RabbitMQ的基本知识也介绍完毕,有兴趣的同学可以继续深入研究。
转载请注明出处:https://blog.csdn.net/acmman/article/details/79942172
————————————————
版权声明:本文为CSDN博主「光仔December」的原创文章,遵循 CC 4.0 BY-SA 版权协议,转载请附上原文出处链接及本声明。
原文链接:https://blog.csdn.net/acmman/article/details/79942172