其实Getting Started当中有着详细的说明,https://docs.efproject.net/en/latest/platforms/aspnetcore/new-db.html。但是有网友问道,就说一下好了。
- 新建项目,Asp.net core,选择不适用身份验证。
- 添加项目引用。这里还是使用postgreSql。
在Nuget 控制台中输入命令:
Install-Package Npgsql.EntityFrameworkCore.PostgreSQL
Install-Package Microsoft.EntityFrameworkCore.Tools –Pre
添加这两个依赖
然后手动在Tools 节点中加上 "Microsoft.EntityFrameworkCore.Tools": "1.0.0-preview2-final",
这里发现Tools –Pre就可以正常使用nuget安装,昨天直接获取版本安装失败,看来还是nuget同步问题。
- 创建Model类 Blogs,Post和DBContext
using System;
using System.Collections.Generic;
using System.Linq;
using System.Threading.Tasks;
namespace PostgreSqlDemo2.Models
{
public class Blog
{
public int BlogId { get; set; }
public string Url { get; set; }
public List<Post> Posts { get; set; }
}
}
using System;
using System.Collections.Generic;
using System.Linq;
using System.Threading.Tasks;
namespace PostgreSqlDemo2.Models
{
public class Post
{
public int PostId { get; set; }
public string Title { get; set; }
public string Content { get; set; }
public int BlogId { get; set; }
public Blog Blog { get; set; }
}
}
using Microsoft.EntityFrameworkCore;
using System;
using System.Collections.Generic;
using System.Linq;
using System.Threading.Tasks;
namespace PostgreSqlDemo2.Models
{
public class BloggingContext : DbContext
{
public BloggingContext(DbContextOptions<BloggingContext> options)
: base(options)
{ }
public DbSet<Blog> Blogs { get; set; }
public DbSet<Post> Posts { get; set; }
}
}
- 在Startup.cs类中注册DBContext
public void ConfigureServices(IServiceCollection services)
{
// Add framework services.
services.AddApplicationInsightsTelemetry(Configuration);
services.AddDbContext<BloggingContext>(options =>
options.UseNpgsql(Configuration.GetConnectionString("DefaultConnection")));
services.AddMvc();
}
- Appsetting.json中增加连接字符串
"ConnectionStrings": {
"DefaultConnection": "User ID=test;Password=test;Host=192.168.1.6;Database=testdb;Pooling=true;"
},
- 创建Migration类
这里要说一下,Migration是ef框架设计的工具,能够用来生成一些框架类。在vs2015中,可以在Nuget控制台中使用Add-Migration,linux或者cmd中,可以使用dotnet ef migration命令,具体请自行学习。
言归正传,我们开始生成类,在Nuget控制台中输入命令:
Add-Migration MyFirstMigration
等待结束,笔者这里会报一个"无法识别的转义序列"的错误,但是不影响使用,笔者已经在apsnet上报了issue。
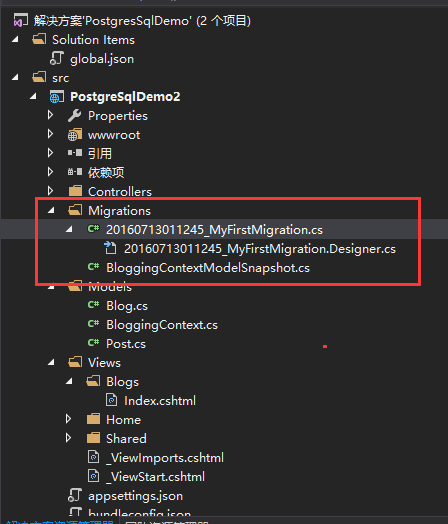
然后我们会看到,项目结构中增加了一个文件夹及几个文件如下:

查看代码:
using System;
using System.Collections.Generic;
using Microsoft.EntityFrameworkCore.Migrations;
namespace PostgreSqlDemo2.Migrations
{
public partial class MyFirstMigration : Migration
{
protected override void Up(MigrationBuilder migrationBuilder)
{
migrationBuilder.CreateTable(
name: "Blogs",
columns: table => new
{
BlogId = table.Column<int>(nullable: false)
.Annotation("Npgsql:ValueGeneratedOnAdd", true),
Url = table.Column<string>(nullable: true)
},
constraints: table =>
{
table.PrimaryKey("PK_Blogs", x => x.BlogId);
});
migrationBuilder.CreateTable(
name: "Posts",
columns: table => new
{
PostId = table.Column<int>(nullable: false)
.Annotation("Npgsql:ValueGeneratedOnAdd", true),
BlogId = table.Column<int>(nullable: false),
Content = table.Column<string>(nullable: true),
Title = table.Column<string>(nullable: true)
},
constraints: table =>
{
table.PrimaryKey("PK_Posts", x => x.PostId);
table.ForeignKey(
name: "FK_Posts_Blogs_BlogId",
column: x => x.BlogId,
principalTable: "Blogs",
principalColumn: "BlogId",
onDelete: ReferentialAction.Cascade);
});
migrationBuilder.CreateIndex(
name: "IX_Posts_BlogId",
table: "Posts",
column: "BlogId");
}
protected override void Down(MigrationBuilder migrationBuilder)
{
migrationBuilder.DropTable(
name: "Posts");
migrationBuilder.DropTable(
name: "Blogs");
}
}
}
Design.cs
using System;
using Microsoft.EntityFrameworkCore;
using Microsoft.EntityFrameworkCore.Infrastructure;
using Microsoft.EntityFrameworkCore.Metadata;
using Microsoft.EntityFrameworkCore.Migrations;
using PostgreSqlDemo2.Models;
namespace PostgreSqlDemo2.Migrations
{
[DbContext(typeof(BloggingContext))]
[Migration("20160713011245_MyFirstMigration")]
partial class MyFirstMigration
{
protected override void BuildTargetModel(ModelBuilder modelBuilder)
{
modelBuilder
.HasAnnotation("ProductVersion", "1.0.0-rtm-21431");
modelBuilder.Entity("PostgreSqlDemo2.Models.Blog", b =>
{
b.Property<int>("BlogId")
.ValueGeneratedOnAdd();
b.Property<string>("Url");
b.HasKey("BlogId");
b.ToTable("Blogs");
});
modelBuilder.Entity("PostgreSqlDemo2.Models.Post", b =>
{
b.Property<int>("PostId")
.ValueGeneratedOnAdd();
b.Property<int>("BlogId");
b.Property<string>("Content");
b.Property<string>("Title");
b.HasKey("PostId");
b.HasIndex("BlogId");
b.ToTable("Posts");
});
modelBuilder.Entity("PostgreSqlDemo2.Models.Post", b =>
{
b.HasOne("PostgreSqlDemo2.Models.Blog", "Blog")
.WithMany("Posts")
.HasForeignKey("BlogId")
.OnDelete(DeleteBehavior.Cascade);
});
}
}
}
using System;
using Microsoft.EntityFrameworkCore;
using Microsoft.EntityFrameworkCore.Infrastructure;
using Microsoft.EntityFrameworkCore.Metadata;
using Microsoft.EntityFrameworkCore.Migrations;
using PostgreSqlDemo2.Models;
namespace PostgreSqlDemo2.Migrations
{
[DbContext(typeof(BloggingContext))]
partial class BloggingContextModelSnapshot : ModelSnapshot
{
protected override void BuildModel(ModelBuilder modelBuilder)
{
modelBuilder
.HasAnnotation("ProductVersion", "1.0.0-rtm-21431");
modelBuilder.Entity("PostgreSqlDemo2.Models.Blog", b =>
{
b.Property<int>("BlogId")
.ValueGeneratedOnAdd();
b.Property<string>("Url");
b.HasKey("BlogId");
b.ToTable("Blogs");
});
modelBuilder.Entity("PostgreSqlDemo2.Models.Post", b =>
{
b.Property<int>("PostId")
.ValueGeneratedOnAdd();
b.Property<int>("BlogId");
b.Property<string>("Content");
b.Property<string>("Title");
b.HasKey("PostId");
b.HasIndex("BlogId");
b.ToTable("Posts");
});
modelBuilder.Entity("PostgreSqlDemo2.Models.Post", b =>
{
b.HasOne("PostgreSqlDemo2.Models.Blog", "Blog")
.WithMany("Posts")
.HasForeignKey("BlogId")
.OnDelete(DeleteBehavior.Cascade);
});
}
}
}
上面代码都是自动生成的,生成依据就是你的Models中的实体类文件。
- 创建数据库
虽然上面生成了数据库架构的代码,但是还没有更新到数据库中去。需要执行:
Update-Database
如果显示Done.
则表示更新数据库成功。可以看看数据库中已经自动根据model实体创建了对应的数据表。
- 剩下的工作就和前文一样了,不在细说。
总结:
记住几个命令 "Add-Migration MyFirstMigration","Update-Database"。注意执行时要保证代码能够正常编译,并且已经完成数据库的配置。如果数据库结构改了,可以修改Models下对应的实体类,然后删除Migration文件夹下的文件,然后从新执行这两个命令。笔者这里使用PostgreSQL的时候,报错了,提示Blogs表已存在,应该是issue,只能自行更新了。